







This time we have with us ASUS’s latest X58 flagship motherboard, the highly anticipated Rampage III Extreme.
Product on Review: ASUS Rampage III Extreme
Manufacturer and Sponsor: ASUS
MSRP: Under £350
Street Price: £329.99
The Rampage is back and in better shape than ever! Since the introduction of the highly popular Rampage II Extreme, ASUS have been busy developing its successor. Apart from new motherboard releases including USB3 and SATA III support, the X58 platform has remained vastly unchanged. Most manufacturers have been bringing innovation to the more mainstream P55 platform instead. We have seen EVGA come out of nowhere to deliver unparalleled overclocking abilities but that was treading on ASUS’s territory. Not wanting to be beaten at their own game, ASUS have carefully designed the Rampage III Extreme to be a superior product. Not an easy feat considering that its predecessor is still the first port of call for most enthusiasts out there.
So what does this board actually bring to the table? For starters all the features we previously saw on the Maximus III Extreme have now made their way to this board. USB3 support is now available thanks to the ever popular NEC controller chip and the Marvell SATA 6Gb/s controller makes an appearance. In terms of overclocking, the TweakIt application is back with some additional features and the board itself has been designed with the best component to produce the highest and most stable overclock. The board caters for the hardcore overclockers with LN2 specific modifications and voltage monitoring abilities, as well as the average users with one touch overclocking profiles. If the ROG connect feature didn’t impress you last time on the Maximus III Extreme, we will be looking at another way in which it can be implemented.
A bit about ASUS:
ASUS comes from the last four letters of Pegasus, the winged horse in Greek mythology that represents the inspiration of art and learning. ASUS embodies the strength, creative spirit and purity symbolized by this regal and agile mythical creature, soaring to new heights of quality and innovation with each product it introduces to the market.
ASUS pursues technological and aesthetic perfection through continuous innovation. We place ourselves in our customers’ shoes to develop a deep understanding of, and genuine empathy for, their needs—enabling us to create user experiences that transcend the norm.
ASUS Design Philosophy
ASUS Design develops high-quality solutions our customers will enjoy.
Our design process is built on thorough research, early anticipation and well-planned execution.
We act with a global vision and a focus on local strengths, conditions and heritage.
ASUS comes from the last four letters of Pegasus, the winged horse in Greek mythology that represents the inspiration of art and learning. ASUS embodies the strength, creative spirit and purity symbolized by this regal and agile mythical creature, soaring to new heights of quality and innovation with each product it introduces to the market.
ASUS pursues technological and aesthetic perfection through continuous innovation. We place ourselves in our customers’ shoes to develop a deep understanding of, and genuine empathy for, their needs—enabling us to create user experiences that transcend the norm.
ASUS Design Philosophy
ASUS Design develops high-quality solutions our customers will enjoy.
Our design process is built on thorough research, early anticipation and well-planned execution.
We act with a global vision and a focus on local strengths, conditions and heritage.
Innovation has always been the key to ASUS’s success but couple it with their most high end chipset and some excellent components, we’re in for a treat with the Rampage III Extreme!
Demo version 002!
Specifications
| CPU -Intel® Socket 1366 Core™ i7 Processor/Core™ i7 Processor Extreme Edition -Supports Intel® Turbo Boost Technology *Note: This board does NOT support the i7 8xx series of CPU Chipset -Intel® X58/ICH10R System Bus Up to 6.4 GT/s with QuickPath Interconnection Memory – 6 x DIMM, Max. 24 GB, DDR3 2200(O.C.)/2133(O.C.)/2000(O.C.)/1800(O.C.)/1600/1333/1066 Non-ECC, Un-buffered Memory modules -Tri Channel memory architecture Expansion Slots – 4 x PCIe 2.0 x16 Supports x16; x16/x16; x16/x8/x8; x8/x8/x8/x8 configurations – 1 x PCIe x4 – 1 x PCI 2.2 Multi-GPU Support -Supports 3-Way NVIDIA® SLI™ Technology / ATI® CrossFireX™ Technology Storage Intel® ICH10R Southbridge -6 x SATA 3.0 Gb/s ports -Intel Matrix Storage Technology Support RAID 0,1,5,10 JMicron® 363 controllers: – 1 x SATA 3.0 Gb/s port (Black) – 1 x External SATA 3.0 Gb/s port (SATA On-the-Go) Marvell® PCIe SATA 6Gb/s controller – 2 x SATA 6.0 Gb/s ports (Red) LAN – Gigabit Intel® PHY Audio 8-channel High Definition Audio CODEC – Supports Blu-ray audio layer content protection IEEE 1394 2 x 1394a ports (1 port onboard, 1 port at back I/O) USB NEC® USB 3.0 controller – 2 x USB 3.0/2.0 ports (at back I/O) Intel® ICH10R Southbridge – 9 USB 2.0/1.1 ports (2 ports at mid-board, 6 ports at back I/O, 1 port at back I/O reserved for ROG Connect) Bluetooth Module Accessory Card -Bluetooth V2.0/V2.1+EDR -RC Bluetooth On/Off Switch Back Panel I/O Ports -1 x External SATA -1 x IEEE 1394a -1 x LAN(RJ45) port -8 -Channel Audio I/O -1 x Clr CMOS switch -1 x PS/2 Keyboard port (purple) -2 x USB 3.0/2.0 ports -7 x USB 2.0 ports (1 port also for ROG Connect) -1 x ROG Connect On/Off switch -S/PDIF Out (Optical) Software -Drivers and Applications -Futuremark 3DMark Vantage Advanced Edition -Kaspersky Anti-Virus -ASUS TurboV EVO Utility -ASUS PC Probe II -ASUS Update -ASUS AI Suite Other Special Features -CPU Level UP -MemOK! -Onboard switches: Power/Reset/ Clr CMOS -ASUS MyLogo3 -ASUS Fan Xpert -ASUS EZ Flash 2 -ASUS CrashFree BIOS 3 -Q-Fan Plus -ASUS Q-Connector -ASUS Q-Led (CPU, DRAM, VGA, Boot Device LED) -ASUS Q-Slot -ASUS Q-Dimm Form Factor extended ATX Form Factor: 12 inch x 10.6 inch ( 30.5 cm x 26.9 cm ) *The board is 1 inch wider than other ATX boards so check your case for compatibility |
Features
| iROG Intelligent multiple control at hand The iROG is a special IC which enables several ROG highlighted functions that gives users full disposal of the motherboard at any stage! This design allows advanced user control and management to be processed purely at a hardware level. iROG greatly increases fun during overclocking for PC enthusiasts and it offers system maintenance and management with more control and efficiency. USB BIOS Flashback No worry of BIOS crash anytime! USB BIOS Flashback must be the most convenient way to flash BIOS ever! It allows overclockers to try their BIOS with the simplest way one can imagine. No need to enter the BIOS or the operating system, just plug the thumb drive into the ROG Connect port & push the ROG Connect button for 2 seconds, BIOS would be automatically flashed under standby power. It´s no doubt that USB BIOS Flashback gives overclockers the ultimate convenience. Voltiminder LED Friendly reminder on Voltage Settings In the pursuit of extreme performance, overvoltage adjustment is critical but risky. Acting as the “red zone” of a tachometer, the Voltiminder LED displays the voltage status for CPU, PCH, and Memory in a intuitive colour-coded fashion. The voltiminder LED allows quick voltage monitoring for overclockers. Probelt Get all hands-on with hardware-based overclocking ProbeIt takes the guesswork out of locating the motherboard´s measurement points, identifying them clearly in the form of 5 sets of detection points so you´ll know exactly where to get quick yet accurate readings using a multimeter. Extreme Engine Digi+ The implementation of Extreme Engine Digi+ was designed to enable overclockers to push the new generation of CPUs to the limit. The next-generation dynamic multi-phase power management system equipped with high performance ML Caps that ensure a stable power supply during overvoltage by lowering ESR (Equivalent Series Resistance), which successfully delivers the advantage of both analog and digital VRM all in one go, keeping mission-critical components such as the processor, system memory and the Northbridge reliable while maintaining high power efficiency. – 8-phase CPU power – 3-phase QPI/DRAM p0wer – 3-phase NB power – 3-phase Memory power – ML caps on CPU, memory and QPI respectively EZPlug More power for the power hungry monsters The Rampage III Extreme comes with two sets of E-ATX 12V, and two sets of 4-pin Molex plugs, delivering enough power for power hungry monster rigs when conducting extreme overclocking. LN2 Mode Cold-boot bug is a barrier which overclockers often need to face when conducting subzero overclocking with LN2 (Liquid Nitrogen). When the cold-boot bug occurs, the CPU will no longer POST till it has been warmed up again. The LN2 Mode exclusively supported by Rampage III Extreme enables users to remedy this limitation, delivering non-stop smooth extreme overclocking capability, which makes Rampage III Extreme the perfect choice for all overclockers under LGA1366 platform. RC Bluetooth Overwhelm your acknowledgement with wireless overclocking experience! System Debug and keyboard-free overclocking have evolved a long way in the past years. However, regardless of any existing design, users still cannot gain the full control the system without either opening up the chassis, or simply getting back to the good old trusty keyboard. Thank to the Forth generation Asus TweakIt technology via the iROG processor, users can now gain the full control of the keyboard-free overclocking and debug tools wirelessly via their very own Bluetooth device anytime, anywhere. Q Reset ROG Connect Plug and Overclock – Tweak it the hardcore way! MemOK! Bios Flashback Two BIOS ROM. Two BIOS settings. Twice the overclocking flexibility. CPU Level Up A Simple click for instant upgrade Extreme Tweaker One stop performance tuning shop COP Ex Maximum OC with confidence with burn proof protection to chipsets and GPU! Loadline Calibration Optimal power boost for extreme CPU overclocking! Onboard Switch No more shorting pins or moving jumpers ASUS Q-Connector Make connections quick and accurate Q-Fan Plus Optimized quietness and cooling for more devices! |
The Rampage III Extreme sports numerous features unique to the Republic of Gamers line of motherboards and has specifications to match. This comprehensive list demonstrates ASUS’s attention to detail and each small touch they’ve added has big implications whether you’re using the board for normal application or pushing it to its limit. ASUS doesn’t limit the user to just one way of doing things, be it overclocking or simply turning on the board! But rest assured that all those features are very useful and not gimmicks as some may think.
The board is laden with everything users would ever want so on that basis alone, it looks promising and a suitable successor to the Rampage II Extreme. But let’s see how these features reflect on performance and overclockability.
Packaging and Content
The packaging
As with the Maximus III Extreme, ASUS package the Rampage in a very attractive and vibrant cardboard box. The ROG logo is depicted at the top to signify the exclusiveness of the board. The Republic Of Gamers nomenclature is an indication of this board’s heritage as a stellar overclocker. The box itself is thicker than the Maximus II Extreme box.
Front of the box
With the Rampage printed boldly across the front in a reflective format, the user know exactly what to expect from the product. At the bottom are a few insignias showing a few of the key features that this board supports such as Intel Core i7 LGA 1366 CPUs, Nvidia SLI and ATI CrossFireX. For convenience, the box comes with a handle so you can take to your friends and boast (Not that I did that…).
Back of the box
As with the back of most hardware boxes, ASUS do not disappoint in listing some of the board’s key features and specifications. We know already that the board sports a vast array of features, as listed over the last two pages, so ASUS have only included them partially. The unique aspects of the Rampage include ROG connectivity, the Extreme Engine Digi+ feature, 4 PCIe x16 slots and 3DMark Vantage bundled. The information is nicely laid out for easy reading and contains a few illustrations demonstrating those unique features.
Flipping open the box
The box makes use of a front flap, stuck down using Velcro, that teases us with the Rampage III Extreme board when opened. The colour theme is evident throughout, using the ever growing popular choice of red and black that oozes performance and professionalism. The flap is efficiently used to provide more information on the board (weird feeling of déjà vu here).
Features and bundle
Opening the flap, we see more features listed, this time with ASUS going more in-depth with their application and how they provide a better user experience. This time the flap is titled “Ultimate Overclocking Performance” and I have no reason to doubt that given the already impressive specifications and feature list. At the bottom, we can see that both 3DMark Vantage and Kaspersky Anti-Virus are bundled for new users to take advantage of.
Interior of the box
Inside the main box are two small packages, one retaining the Rampage III Extreme and the other holding the rest of the bundle. The motherboard box is covered by a tough plastic sheet shaped to fit it and protect the board during transit. It also does a good job showcasing the Rampage III Extreme.
Closer Look: The Bundle
Opening the interior box
The lower box reveals the neatly packaged bundle into several compartments. These hold the manual, I/O plate, the cables, a fan and an ROG sticker. The list of accessories is very rich so read on to find out more. The reason for the thicker box is quite evident here as we see the box in the top left compartment which houses the optional chipset heatsink and fan. Again, the bundle is very similar to that of the Maximus III Extreme so expect more of the same if you read the previous review.
The manual and driver CD
In the first lower compartment are:
1 x User’s Manual
1 x 12-in-1 ROG Cable Label
1 x I/O Shield
1 x ROG Connect Cable
The I/O plate continues ASUS’s trend of offering padding on both side of the metallic plate. Thankfully, the plate doesn’t have any protruding metal clips that we are accustomed to see with other manufacturers. The foam padding helps ease installation. The manual is a very in depth booklet that covers every aspect of the board, from its layout, installation and specifications, to a more comprehensive look at the software utilities and the BIOS features. The support disc includes ASUS PC Probe II, AI Suite, ASUS update, the TurboV EVO Utility, 3DMark Vantage Advanced Edition, Kaspersky Anti Virus and all the required chipset drivers. The ROG connect cable enables connectivity between the motherboard and other windows based devices for remote hardware monitoring and overclocking. More on that later!
SATA cables
Moving on to the next compartment, ASUS bundle:
1 x 2-in-1 SATA 6.0Gb/s Cables
3 x 2-in-1 SATA 3.0Gb/s Signal Cables
1 x E-SATA + 2 x USB 2.0 module
Unlike with the Maximus III Extreme, the SATA 6.0Gb/s cable is distinguishable by its white coloured end. Each pack contain 2 cables, one being straight ended and the other with a right angled connector at one end. This is enough to fill all the 6 Intel and 2 Marvel SATA ports on the motherboard. For additional USB ports, ASUS also include an E-SATA + USB 2.0 module which connect directly to the motherboard. The bracket can be removed to reveal just the cable modules, ideal outside a case environment.
SLI and CrossFireX cables
Here, we have:
1 x 2-in-1 ASUS Q-Connector Kit
1 x CrossFireX cable
1 x SLI Cable
1 x 3-way SLI Cable
1 x Thermal Sensor Cables Pack
2 x ROG Probelt cables
The thermal sensor cables can be plugged into 3 separate 2-pinned connectors on the motherboard to get an idea of temperatures across the board or anywhere inside the case it’s installed in. The Probelt cables are very handy when coupled with a multi meter. Instead of probing the motherboard with the multi meter probes, the cable can simply be attached to them on one end and then plugged into the appropriate sockets on the motherboard. This allows for safer voltage monitoring and more secure probing. Of course, this is one of several ways to monitor the voltages.
Optional chipset cooling fan
For extra cooling on the X58 chip, this small heatsink and fan can be installed with easy access to a small pin connector close by. The only issue with this is that it may conflict with CPU heatsinks. Using a Noctua NH-D14 meant that the small cooler could not be installed but temperatures remained acceptable throughout testing nonetheless.
The RC Bluetooth module
If you read the previous Maximus III Extreme review, then you’ll know exactly why this small module got me excited last time. Finally, the RC Bluetooth module has made its way to the Rampage III Extreme. The module allows the user to connect to the motherboard via Bluetooth using compatible devices, namely mobile phones (more on compatibility later on). Using the RC TweakIt application, the user is then able to overclock and monitor the motherboard parameters with their phone! Having used it myself, I can attest to it being a very useful tweaking kit to unlock every drop of performance from the motherboard. Everything is done in real time i.e. outside the traditional BIOS environment. The protruding part of the PCB holds the Bluetooth antenna.
Closer Look: The Motherboard
The Rampage III Extreme in all its glory
ASUS continue their latest trend of using red and black as the theme colours, which we saw previously with the Maximus III Extreme. Both boards represent ASUS’s latest line of boards in the Republic Of Gamers sector. As such, the board is very aesthetically pleasing and packs in every possible feature a user could want. It makes excellent use of space to not appear cluttered and every small detail is taken into consideration when it comes to ease of use and installation. So we have all the pin connectors at the bottom and the ROG specific features on the right next to the DIMM slots. One thing to realise is that it is 1 inch wider than the traditional ATX form factor so check your case for compatibility. It fits snugly in my own mid tower Lian Li B25 but the cable management holes are partly covered so installation wasn’t easy and required re-routing some of the cables. Installation should not be a problem in a bigger case or if you’re setting up your computer for the first time.
The I/O connectors
Going to the back of the motherboard, not surprisingly we see the rear panel connectors. ASUS have retained the legacy purple PS/2 keyboard port, which is convenient since no drivers are required for such keyboards. There are 9 USB ports at the back, 2 of which are USB 3.0 compliant (blue), and the last one reserved for the ROG connect cable (mounted perpendicular to the board next to the RC Bluetooth module. The ROG connect feature has two primary functions, one is to connect other devices for remote monitoring of the motherboard and the other is for flashing the BIOS. The switch to enable this functionality is adjacent to the port. To the left of the rear panel is a handy clear CMOS switch.
The RC Bluetooth module
Behind the ROG connect button is another connector where the user can plug in the RC Bluetooth module. With it installed, the user can enable the feature by depressing the onboard button. The rear panel plate has been made to accommodate the module so access to it is easy.
The rear motherboard panel
Once installed, the back panel is a spectacle of colours. Thankfully the lights are subtle to not appear distracting. The main switches are lit up for easier access, especially if you’re the type to place your computer in a dark corner of the room somewhere. All the ports are clearly labelled and the white cable is the ROG cable connect. Again, ASUS only delivers the best and we can see this by their attractive and very well thought out back panel.
The EZ-PLUG and NEC D720200F1 chip
In front of the I/O ports, the board sports the NEC D720200F1 chip that delivers USB 3.0 support to the board. It uses one lane of the PCIe 2.0 bus to provide sufficient bandwidth for the USB 3.0 controller and thus will not impact on graphics card performance. This chip is found in all current motherboards that provide the same functionality. Another nifty feature shown above is the EZ-PLUG, or Molex power connector to you and me. This feature was seen in the Maximus III Extreme and is also available on my own Biostar X58 motherboard. The plug allows more power to be delivered to the graphics cards. When seriously overclocking graphics cards, the 6 + 8 pin connectors may not provide enough power and that where’s the EZ-PLUGs come in handy.
Closer Look: The Motherboard (Continued)
CPU 12v Power connectors
Additionally, the board sports two sets of E-ATX 12v power connectors. Those familiar with recent overclocking oriented motherboard from EVGA will know that this features allows more power to be delivered to the CPU for more stable operation at high clocks during extreme overclocking. Of course, it isn’t necessary to use both but it is recommended if the board is to show its true potential. Again, make sure the power supply is compatible and has the appropriate cables before installation. Like on the Maximus III Extreme, the Q-Reset button makes a comeback as seen next to the I/O ports. The button is used in conjunction with the LN2 mode of the motherboard. Should the CPU completely stop functioning during extreme overclocking, the button temporarily stops power from the power supply thereby recovering the CPU from its frozen state.
The LGA 1366 socket
The X58 chipset supports Tri-channel so it’s no surprise to see the usual 6 DIMM slots present. Some of you may notice that cards installed in the top most PCIe slot may coincide with the RAM slot. To prevent any conflicts during installation, ASUS uses the Q-DIMM feature, meaning that the latch is only on one side of the slot. Another unique feature of the board is the superior VRM design of the board, dubbed Extreme Engine Digi+. Using a hybrid digital and analog VRM design, the board benefits from the advantages of both designs, less switching delay while offering better accuracy. The board delivers 8-phase digital VRM power for the CPU, 3-phase digital VRM power for the QPI/DRAM, 3-phase NB power, and 3-phase memory power.
Superior capacitors
Additionally, the board comes equipped with the next generation dynamic multi-phase power management system using superior high performance ML Cap (Multilayer Polymer Capacitor) for the CPU to deliver unparalleled stability during overvoltage. ASUS claim that the FET+ in metal packaging offers 1.3x faster heat dissipation, 40%+ better conductivity. To sum it up, better overclocking!
Motherboard choke
Surrounding the CPU socket are the chokes that help achieve better efficiency supporting higher rated current up to 40A. This is claimed to be 10A higher than ordinary designs. Unlike on the Maximus III Extreme, the chokes are passively cooled by the overhanging heatsink. Another feature to notice is the inclusion of both LGA1366 and LGA775 mounting holes. This means users can still make use of their older coolers. It is important to take into consideration that older heatsinks may have the same cooling potential as newer ones designed specifically for i7 chips. It has also been pointed out that the LGA775 mounting holes will allow extreme overclockers to retain their trusty LN2 pots. Again, these small features demonstrate ASUS’s keen attention to detail.
Motherboard cooling
One of the most striking features of the Rampage III Extreme is the chipset cooling. ASUS have opted for a single heat pipe design coupled with strikingly angular heatsinks. This approach and the fin arrangement help produce a larger surface area for efficient heat dissipation from the MOSFETs, X58 chip and the ICH10R Southbridge. The Southbridge heatsink is flat to prevent compatibility issues with PCIe devices. Similarly, the other two heatsinks are low enough to avoid conflicts with CPU coolers. As such, even the large Noctua NH-D14 can be installed. However, the additional fan provided may cause a problem if installed.
The PCIe and PCI slots
Unlike the Maximus III Extreme, the Rampage “only” has 4 physical PCIe 2.0 x16 slots but these are spaced adequately to support 4 dual slotted graphics cards. ASUS rely on the X58 chipset for the PCIe lanes rather than the NF200 chip. Nevertheless, the cards can be configured to run at x16/x16, x16/x8/x8 or x8/x8/x8/x8 for a quad card setup. To reduce the difficulty of removing large graphics cards, ASUS implemented the Q-Slot design which locks the graphics card when installed, but allows for easy unlocking. A PCI slot is thrown in for good measure, or in my case for an ASUS Xonar sound card. To run a dual card setup, it is recommended to use the first and third slot which both defaults to x16 electronically, thereby rendering the PCI slot useless. The second and fourth slot are limited to PCIe 2.0 x8 electronically. A final open ended PCIe x4 slot is included for additional devices.
Closer Look: The Motherboard (Continued)
The SATA ports
On the edge of the motherboard are 6 Intel ICH10R SATA II ports and 2 red Marvell SATA III 6Gb/s ports. To the left is a vertically mounted JMicron SATA II connector. Again, only one lane of the PCIe 2.0 bus is used for direct connection to the Marvell SATA 6Gb/s controller.
Two BIOS chips
Below/to the left of the large heatsink, there are two BIOS chip present. The dual BIOS system means that minimizes the chance of the board going wrong in case of incorrect bios flashes. Should one BIOS become corrupted, the other acts as a failsafe, during which time the first can be reflashed. The red BIOS-button in the corner lets the user switch between each one and LED lights below each chip indicate which one is being operated. Alternatively for hardcore overclockers, one BIOS chip could be used to save extreme overclocking profiles while the other stores more stable configurations. The iROG chips are unique to ASUS and acts as the hub for all ROG interactivity. Through this, real time overclocking and monitoring can be conducted outside of BIOS.
The pin connectors
At the bottom of the motherboard is a plethora of pin connectors. To the right are the system panel connectors and going to the left, passing the BIOS chips are the front panel USB and ASUS’s ROG OC Station connectors. 3 of the 8 fan connectors are situated at the bottom of the board. Each have 4 pins for PWM functionality but they are also compatible with regular 3 pin fan connectors. Also, it is crucial to have at least one fan connected to the CPU fan connector to avoid getting a warning each time on boot. Another EZ-PLUG can be found below the last PCIe slot and having it mounted to face the bottom ensures compatibility with devices in that last slot. Other pin connectors include the front audio panel connector and the IEEE 1394a port connector.
The VIA 1394 host controller
The large VIA chipset in the picture is the high speed 1394 host controller.
ASUS ROG features
Here we can see several ASUS ROG features around the 24 pin ATX motherboard connector. Firstly to the right, there is the Probelt feature which gives users easier access to get accurate voltage measurement. One of the demands of extreme overclockers is the ability to do so without having to probe the power supply or mod the board so ASUS have provided this. By simply probing the labelled connections (CPU, CPU PLL, QPI/DRAM, IOH, DRAM, etc) with a multi-meter, the user can monitor voltages in real time. Below the motherboard power connector are the Q-LEDs, giving user direct indication of component failure if the motherboard does not boot up. There are no LED debug screens but the Q-LEDs save you referring to the manual each time. This time, the Start/Reset buttons have been moved to the side of the board instead of placing them at the base. These facilitate turning on/off the motherboard outside the case. Another excellent feature is the PCIe x16 lane Switch. These 4 switches can be used to disable PCIe expansion cards in the corresponding slots. This makes it ideal to compare differences in performance under different configurations or should one card malfunction, it can simply be switched off to prevent conflicts. Lastly, the red Go button can be seen. When the system is off, holding the button on boot activates MemOK! which initiates self-memory patching if there are compatibility issues. Otherwise, it acts as a quick OC button based on the user’s profile as set in BIOS. Next to these is the LN2 jumper. Setting the jumper can help the CPU recover from a frozen condition caused by low temperatures.
The QPI jumper
Below the motherboard power connector is a small jumper labelled QPI_LL_SW. It allows loadline calibration to ensure a better OC.
Closer Look: The Motherboard (Continued)
ASUS Probelt
As previously mentioned, the Probelt allows users to plug in the multimeter and thanks to the Probelt cable and small onboard connectors, overclockers don’t have to manually probe the motherboard.
Multi-meter voltage monitoring
Here, the CPU voltage was being monitored in real time on a multi-meter.
Christmas came early
It may look like a Christmas tree but all those lights are useful indications that everything is operating correctly.
Size comparison
I mentioned earlier that the Rampage III Extreme is 1 inch wider than normal ATX motherboards and the above shows this clearly. The extra space accommodates ROG features.
Test Setup
Graphics card – Gainward Geforce GTX260 216 896MBPower Supply – Enermax Revolution 85+ 850W
Hard Drive – Samsung F1 320GB
Western Digital Caviar WD3200AAKS 320GB
Drivers – Nvidia Forceware 197.13
Cooler – Noctua NH-D14
CPU/Motherboard/RAM
CPU – Intel Core i7 920
RAM – 6GB (3x2GB) OCZ platinum DDR3 1333MHz
Motherboard – ASUS Rampage III Extreme
CPU – Intel Core i7 920
RAM – 6GB (3x2GB) OCZ platinum DDR3 1333MHz
Motherboard – Biostar T-Power x58
CPU – Intel Core i7 860
RAM – 4GB (2x2GB) OCZ platinum DDR3 1333MHz
Motherboard – ASUS Maximus III Extreme
Benchmark Suite
Core Temp 0.99.5
LinX stress Test
PC Wizard
3DMark Vantage
3DMark 06
Cinebench 11.5
x264 HD Benchmark
SiSoftware Sandra
Everest 5.01.1700
Far Cry 2
Street Fighter IV
Batman: Arkham Asylum
BIOS
First off, let’s have a look at what the Rampage III Extreme offers in its BIOS. Based on an AMI BIOS, ASUS users should be familiar with its layout. The BIOS provides a wealth of tweaking tools and customizations windows. Here, we’ll have a look at some of the main ones.
Quite conveniently, the first screen we are greeted with when entering the BIOS is the Extreme Tweaker one where users can configure system frequencies and voltages. The number of tweaking options is staggering but thankfully ASUS provide a simple tool named CPU Level Up. The feature allows users to choose from a list of pre-overclocked profiles giving a maximum speed of 3.20GHz on the i7 920. The Memory Level Up feature behaves similarly. Sync mode allows synchronization with other ROG devices so that changes made on one system will apply to the BIOS and be recorded on the ROG application in real time thanks to the iROG chips.
Going further down, a lot more options are revealed at the user’s disposal. Setting the AI Overclock Tuner to manual allows the user to adjust a range of frequencies including the BCLK, DRAM, QPI as well as other obscure settings. Voltages can also be adjusted here and ASUS makes sure to indicate whether they are safe on not. Up to 8 overclocking profiles can then be saved.
Going on to the main screen, we are presented with some basic system configurations, all of which can be accessed and configured as the user wishes. Here, the time/date and SATA controllers can be configured.
Moving on to the advanced window, a range of other chipset features can be configured. Onboard devices such as the HDA/1394/J-Micron controller can also be configured from here.
Selecting the CPU Configuration tab, a range of CPU settings can be enabled/disabled. Disabling unneeded settings such as the Virtualization Tech may improve overclocking headroom during extreme sessions.
The Power window allows the user to monitor hardware voltages, temperatures and fan speed.
The tools window presents the motherboard’s unique features, most notably the ability to flash the BIOS and configure the Go Button.
By being able to save a profile to the Go Button, simply pressing the button on the motherboard will load it when required.
Software Bundle
A range of chipset drivers are included in the drivers CD as we can expect. Apart from the browser utility, all the above are recommended to be installed. The ASUS TurboV EVO utility is a useful application that allows overclocking to be performed in windows and changes are applied on a BIOS level. For those who read the Maximus III Extreme review, these few pages will be very familiar.
The Utilities CD includes a number of applications. The PC Probe II and AI Suite provides software based overclocking while the ROG Connect and RC Bluetooth introduces the new concept of remote overclocking and system monitoring.
The AI Suite utility is common to most ASUS motherboards and helps monitor voltages and clock speed.
ASUS’s TurboV Evo is a unique overclocking software. It gives users a more comprehensive list of settings/voltages that can be configured, similar to that given in BIOS. Through this software, settings can be tweaked in real time when overclocking to improve stability or to push the CPU further. Changes made here are permanent but they can also be saved as profiles for future use. I ended up using this myself to gain a better insight as to what settings made high clock speeds unstable, without requiring to reboot every time to access BIOS. I recommend only making small changes using the utility since big changes will require a reboot or be unstable.
Alternatively, the easy option is to use the CPU Level Up feature, again as found in BIOS. The maximum frequency option is 3.2GHz but choosing this setting requires a reboot. Again changes are made on a BIOS level rather than software.
RG Connect
The RC TweakIt software is now in its fourth generation and it’s better than ever with unique innovations that are bound to revolutionize the way we overclock. The RC TweakIt feature was present on the old Rampage II Extreme but this iteration brings in remote overclocking and hardware monitoring through ASUS ROG Connect and RC Bluetooth.The former involves using any USB 2.0 enabled system running Windows XP or above operating systems which connects to the Rampage III Extreme motherboard via a male to male USB cable. This allows the other system to remotely manage the ASUS motherboard.
Alternatively, the RC Tweakit software can be installed on a compatible mobile phone, which through Bluetooth connection, can also control certain features of the Rampage III Extreme, namely clock frequencies and voltages. This method is more limited but highly useful. Last time, we had a detailed look at this on the Maximus III Extreme and this time we’ll explore how it can also be used on a remote laptop.
The RC Tweakit software was installed on my N97. Although it’s not officially supported on the touch screen phone, it can still be used with the onboard keyboard. On opening the application, it connects via Bluetooth and gives two options: Overclock and Monitor.
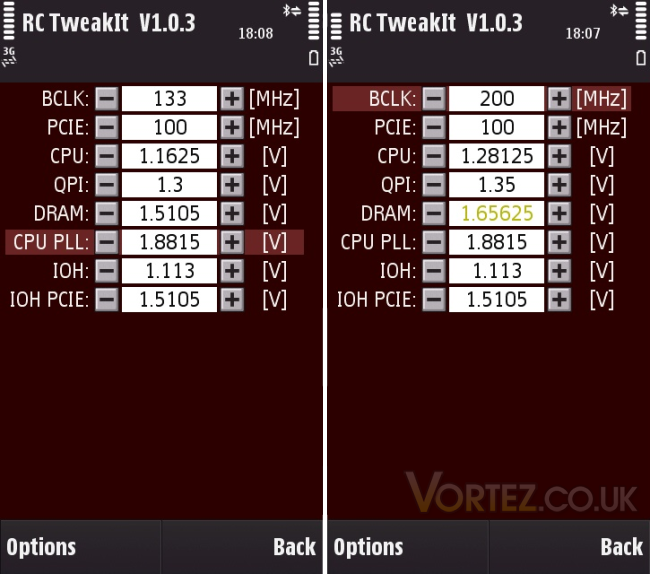
Each of the above configuration settings can be changed by simply adding or subtracting the values in increments. Each change happens in real time even when the motherboard is in full operation. This is a brilliant innovation that has plenty of interesting implications. It means that voltages can be altered on the fly to either increase stability or lowering them to reduce temperatures. Similarly, we can increase the BCLK to get the last drop of performance. All this happens on a BIOS level thanks to the iROG chip so changes made here will apply to the BIOS.
Furthermore the settings can be saved to profiles. In essence, the program behaves similarly to the TurboV Evo utility and making changes on each will consequently appear on the other utility, showing how the overclocking suite provided by ASUS is synchronized. The RC Tweakit utility also provides monitoring capability which refreshes to give you the most up to date readings.
RG Connect (Continued)
The monitoring utility gives on the fly temperatures and fan speeds. It’s ideal in showing you them remotely and accurately without having to run several applications on the computer, especially when looking to break world records!
The last window shows you the three frequencies in case the user wants to check if their settings have been applied. I would not recommend relying on this software solely when overclocking but it’s priceless when it comes to getting that last drop of performance on the fly without worrying about the computer needing a reboot every time.
Those who read the Maximus III Extreme or visit the forums will know that I love this feature. Being able to turn the computer on/off at your leisure with your phone has many practical implications. For the average user, it acts as a remote control allowing them to switch on the computer as they get up with the simple press of a button or turn off the computer after watching a film whilst tucked away in bed…The real application comes during overclocking. In case of computer lock ups, there’s no more need to reach down and hold the power button to restart because the RC TweakIt software allows the user to force a shutdown or clear the CMOS in the worst case scenario. This ensures that you can always boot up the motherboard afterwards.
Supported phones
-Windows Mobile 6.1/6.5 based phones: ASUS P835, Garmin-Asus M10, Samsung i8000, HTC HD2, Sony Ericsson Xperia X1
-Android V2.0 or later: Motorola Milestone
-Symbian V3: Nokia N96
*Fear not, iPhone support will come.
Let’s move on to using it on a laptop.
RG Connect (Continued)
If you don’t have a compatible phone , then this might be useful. The RC TweakIt application can also be used on another windows enable devices such as a laptop running Windows XP or later operating systems. This method is just as intuitive as the mobile phone application but does give a bit more freedom with the settings and monitoring capabilities. To enable the feature, all that is required is to plug the white bundled USB male to male connector into the motherboard on one end and to the laptop on the other. Following that, the ROG Connect switched has to be pressed.The software allows you to change a number of settings using the corresponding sliders. It’s very similar in style to the ASUS TurboV EVO application but can be run remotely. As with the mobile phone application, different profiles can be saved. Let me iterate that changes made here will also be applied to the BIOS! Everything is nicely laid out for ease of use with plenty of different options to manipulate.
Moving on from the voltage screen, there is the temperature monitoring screen . The optional temperature refers to the temperature sensors which can be plugged onto the Rampage III Extreme.
All 8 possible fans that can be plugged into the motherboard can be monitored using the RC TweakIt software. It is important that there is always one fan connected to the CPU fan connector to make sure that the motherboard does not detect an error on boot.
Finally, the individual clock speeds can be monitored.
Unlike the TurboV EVO or mobile phone application, a number of settings can be logged to watch for fluctuations during overclocking. This allows overclockers to go to the root of any possible problem or catch wild fluctuations that other applications may miss. The whole log can be viewed by simply going through each page/cycle.
Here there is a range of different settings that can be logged.
RG Connect (Continued)
Not surprisingly, the RC Remote makes its way to the laptop version of the RC TweakIt software. I personally used it countless times during overclocking when the computer locked up. Coupled with the phone, I could then increase the voltages so that on reboot, I didn’t have to go back to BIOS.
Another useful feature is the ability to flash the BIOS remotely and ASUS don’t stop there! Last time on the Maximus III Extreme, I mentioned that it was possible to flash by plugging in a USB drive containing the BIOS into the ROG connect port at the back. This method works just as easily and simply requires the user to choose which BIOS they want flashed and then directing the application to where the BIOS ROM is saved.
Wait a few seconds and flashing complete! ASUS ensure that if a BIOS gets corrupted, there are several failsafe ways to correct the problem or reflash.
Overclocking
With all these features geared towards overclocking, it would be a crime not to see what this board can do! So now we finally get to see what the fuss is all about. The vast array of features and tweaking tools makes the Rampage an overclockers dream but with such a name, you can’t expect less. There are several methods of overclocking. The first and best is the traditional BIOS option. In windows, the CPU Level Up automatically overclocks the CPU to pre-programmed settings. The TurboV Evo utility is another option but this is mostly for small tweaks rather than large overclocks. The RC Tweakit utility works in the same way. Lastly, there is the Go Button that is based on a specific profile created by the user in BIOS.
Personally I used BIOS along with the RC TweakIt software to achieve a stable 4.19GHz clock on my i7 920. Previously I had only managed 4GHz out of it using a Biostar T-Power X58 so on initial observations, the Rampage III Extreme managed to unlock its true potential compared to a board that is famed for its overclocking prowess. The various handpicked components used to build this board all contribute to deliver the most stable experience and reaching 4GHz was a walk in the park.
The first thing I noticed was that lower voltages were required to keep the core i7 920 at 4GHz compared to my Biostar motherboard. While the Biostar requires a CPU voltage of 1.316-1.328v for stable operation, the Rampage III Extreme kept the CPU stable at 1.29v. Already, it’s building up a larger headroom for the CPU.
222 BCLK
A more extreme way of reaching 4GHz was to increase the BCLK and using a lower multiplier. Unlike the 200 base clock I found myself limited to on the Biostar, the Rampage easily reached a stable BCLK of 222MHz with slight tweaks to the voltages and increasing the PCIe frequency to 104MHz. The impressive aspect was the 4GHz QPI link speed. I even managed to boot using a 230MHz base clock but it was not stable enough to run intensive applications.
Working from that, a stable clock of 4.19GHz was reached. Given a better CPU, I have no doubt that much higher clocks can be reached even on air cooling. I can only imagine what more exotic cooling can unlock with the help of the Rampage III Extreme. The motherboard also handled memory overclocking much better than the Biostar managing to get the OCZ 1333MHz 7-7-7-20 RAM to work at 1600MHz 8-8-8-22. On the whole, the Rampage III Extreme is a brilliant overclocker and the BCLK reached is an indication of its true performance since my chip was the limiting factor in this case.
Temperature
The temperature of the CPU will largely depend on the type of cooling you have. In my case, temperatures were reaching 90 degrees when stress testing on LinX at 4.19GHz while at 4GHz, they remained in the mid 70s.
The motherboard heatsink does a good job keeping the the chipset cool. The motherboard temperature remained at a cool 35 degrees throughout testing and the IOH/ICH temperature rose a maximum of 65 degrees centigrade.
Cinebench 11.5 & x264 HD Benchmark
Cinebench 11.5Based on the MAXON animation software CINEMA 4D, Cinebench is a test suite that uses the system’s processing power to render a photorealistic 3D scene. This makes it an excellent benchmark to measure CPU and motherboard performances.
At stock speed, we see a slight boost on the Rampage III Extreme compared to the Biostar. The i7 860 still has the advantage with the higher clock speed. At 4GHz, the Rampage yielded the smallest score, but overclocking further alleviates the problem.
x264 HD Benchmark
The x264 HD Benchmark from Tech ARP is a useful benchmark that demonstrates the encoding performance of systems by encoding a short HD quality video clip into a high quality x264 video file. The test uses multiple cores efficiently to give a good representation of real world performance.
The Rampage III Extreme gives consistently better results except at stock speed where the i7 860’s higher clock speed once again shines. The first pass is significantly faster on the ASUS motherboard.
SiSoftware Sandra
SiSoftware Sandra is a Windows system analyzer that includes benchmarking, testing and listing modules. It tries to go beyond other utilities to show you more of what is really going on under the hood so comparisons can be drawn. With an array of CPU and memory tests, it is ideal in comparing the P55 platform against the X58 chipset.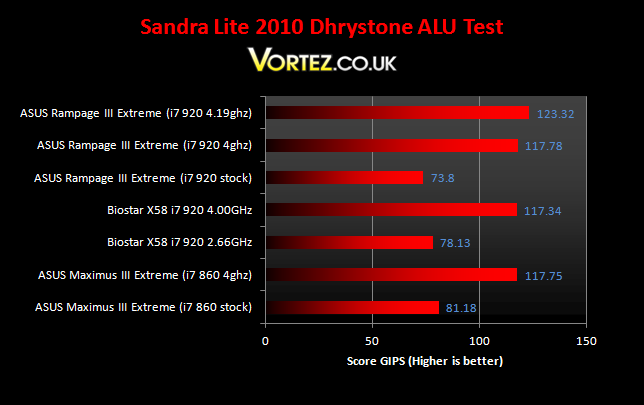
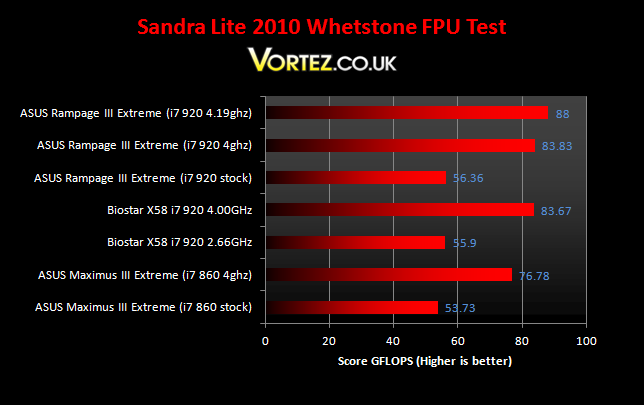
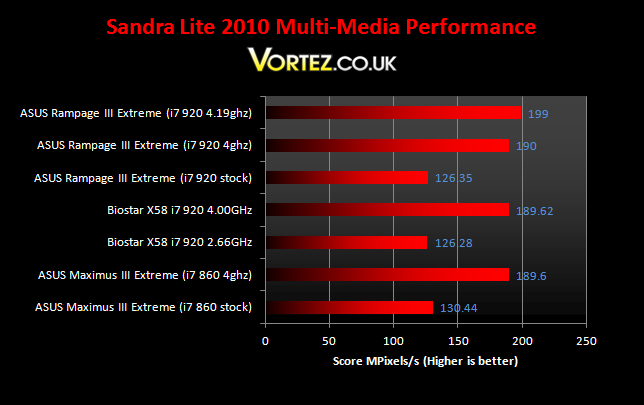
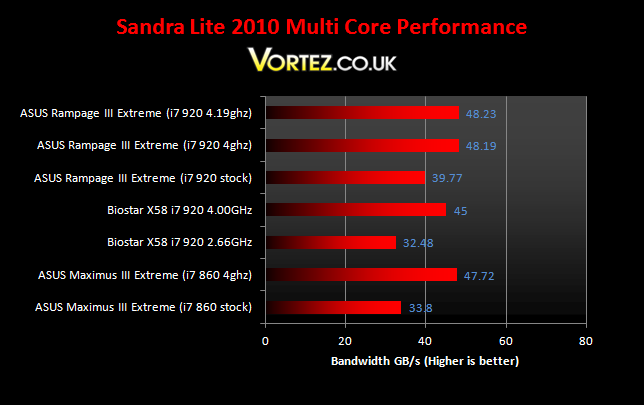
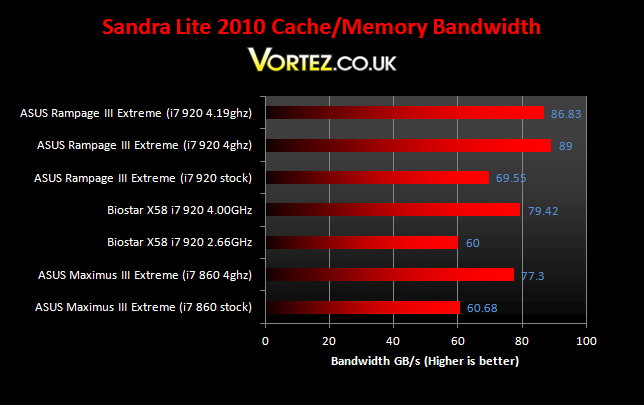
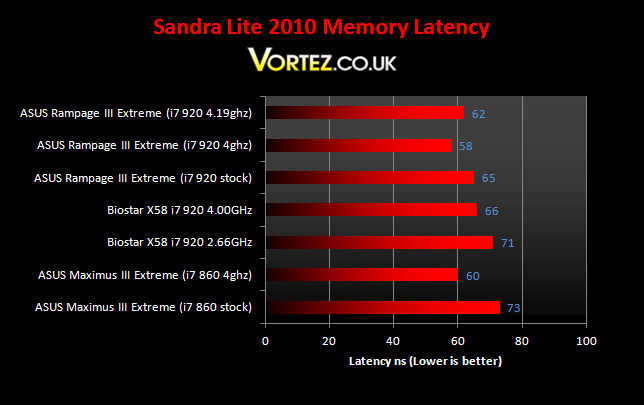
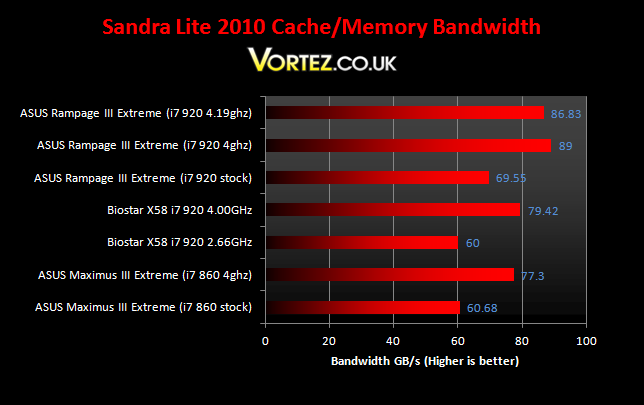
Again, the Rampage III Extreme’s superior memory handling and Tri-channel support gives it the advantage over the other two solutions. Memory bandwidth sees a significance increase on the Rampage but the CPU tests are vastly similar to the Biostar and the P55 platform.
Everest
Everest Ultimate is another useful computer diagnostic tool that provides the most up-to-date hardware information. It is home to a number of CPU and memory benchmarks, supporting all the latest motherboard chipsets and processors. Everest also provides accurate hardware monitoring capabilities that makes it a must have tool for system tweaking and maintenance.Cache & Memory benchmark
Stock speed
Biostar T-Power X58
Rampage III Extreme
With much better memory support, the Rampage III Extreme delivers higher memory bandwidth than the Biostar X58 and significantly lower latency thanks to the corresponding higher uncore clock that can be achieved.
Overclocked
Biostar T-Power X58 4ghZ
Rampage III Extreme 4GHz
Rampage III Extreme 4.19GHz
The Rampage III Extreme reigns supreme to the Biostar X58, especially on the L3 Cache. Overclocking further gives slightly better performance but higher memory and L3 cache latency. ASUS have done an excellent job to optimize the board for the best CPU and memory performance.
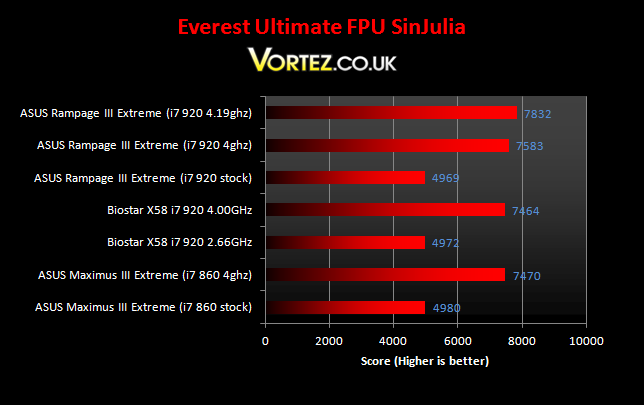
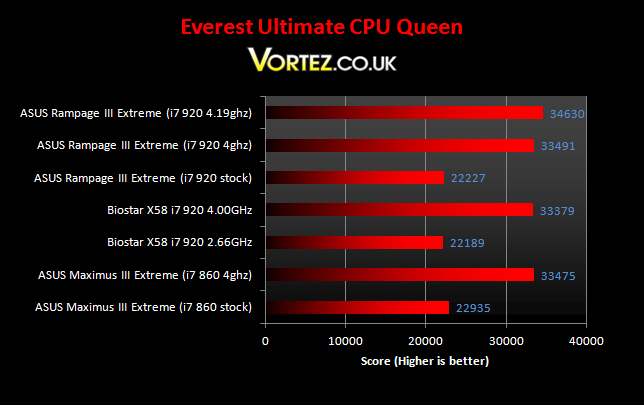
Performance in the two CPU oriented tests give similar results across all three setups.
Far Cry 2
One of the most hyped games of 2008, Far Cry 2 had some big shoes to fill. It was built to be the next best thing since well… Far Cry I suppose. Combining an open-world game play with highly detailed graphics, physics and AI, what more could we possibly want? The game puts us in the body of a malaria inflicted mercenary hunting down the “Jackal” in the heart of Africa, in a bid to stop an ongoing conflict between two rival factions. The storyline can be hard to follow sometimes but I’m no game reviewer, so let’s concentrate on the graphics and performance. After all, we all need to know if our hardware will be able to handle the scorching savannah burning at the hands of our flamethrowers.
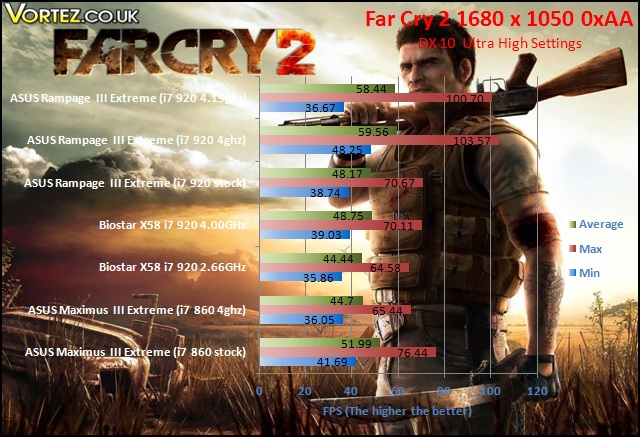
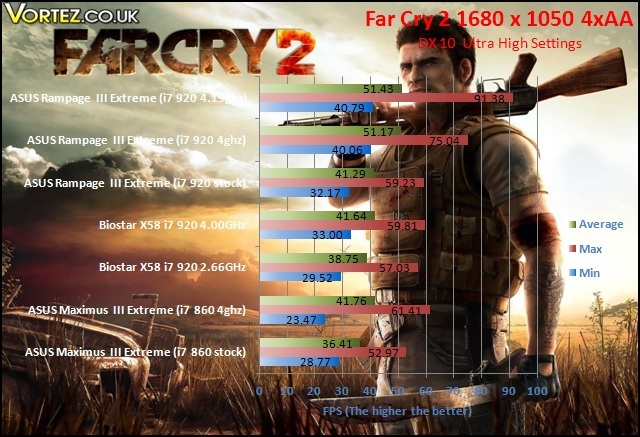
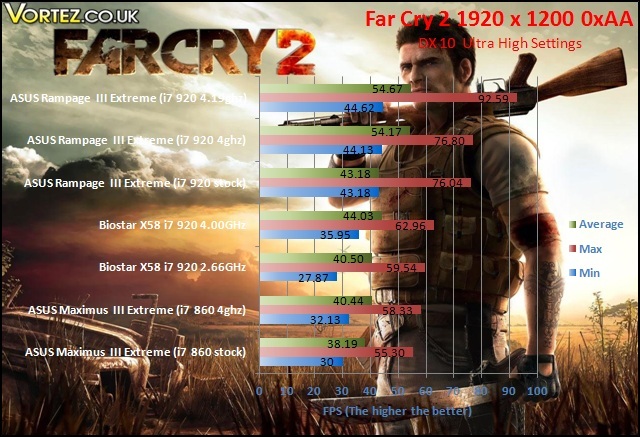
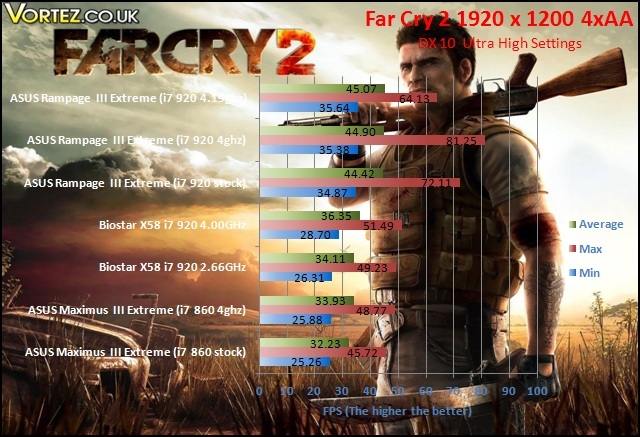
Strangely, we see some excellent gains in performance at both stock speed and when overclocked which I didn’t expect from the motherboard alone. The only other change between the tests were newer Nvidia drivers which leads me to believe that the latter is the culprit. However with FPS gains of up to 10FPS, representing a 20% boost in some cases, the Rampage III Extreme may provide some contributions to the results. If not, then I would thoroughly recommend the Forceware 197.13 or above drivers! In all cases apart the last, overclocking provides a welcoming boost in performance, more so than with the Maximus III Extreme or the Biostar T-Power X58 motherboards.
Street Fighter IV & Batman: Arkham Asylum
Street Fighter IV
Street Fighter is back in its 4th iteration and its bigger and better than ever. Combining fluid, fast based sparring with stunning artistic visuals, the game delivers tremendous game play. Be reacquainted with some of the most popular characters in video game history while you battle your way to the top, be it with Ryu or the mighty Bison. The game might be frustratingly hard in some cases but there’s nothing like the satisfaction of K.O’ing your opponent with a well stringed death bringing combo.


Again, we see a 25% gain in FPS in the two tests. I’m surprised Nvidia didn’t advertise these drivers as much…Overclocking does not have any benefits over stock clocks in this game.
Batman: Arkham Asylum
The Dark Knight takes on his greatest challenge yet when he becomes trapped with all of his most dangerous villains inside the insane asylum of Gotham City – Arkham Asylum. The game exposes you to a unique, dark and atmospheric adventure that takes you to the depths of Arkham Asylum, Gotham’s psychiatric hospital for the criminally insane.
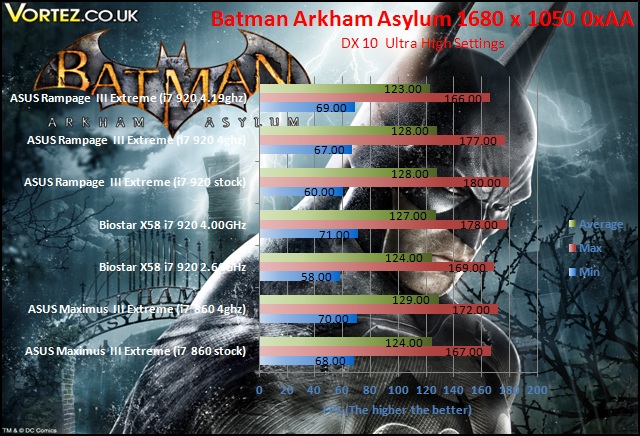
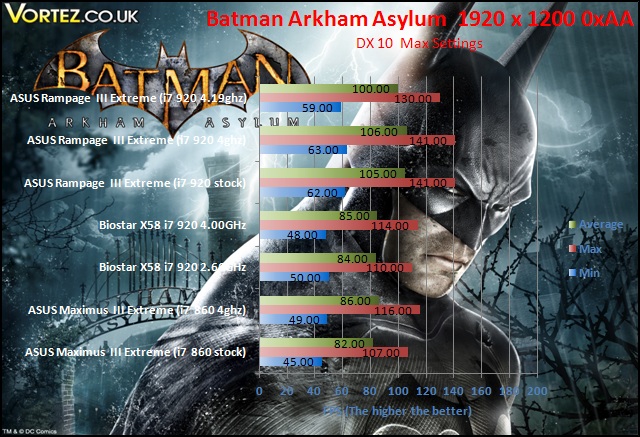
Surprisingly in this Nvidia sponsored game, there are no gains seen on the Rampage III Extreme at 1680×1050. Increasing the resolution, the story changes to favour the Rampage setup once again. The higher 4.19Ghz clock speed shows a reduction in performance.
3DMark 06 & Vantage
3DMark06
Futuremark has been the testing ground for enthusiasts ever since their first release in 1999! While 2006 is long gone, it’s still very popular amongst benchers.
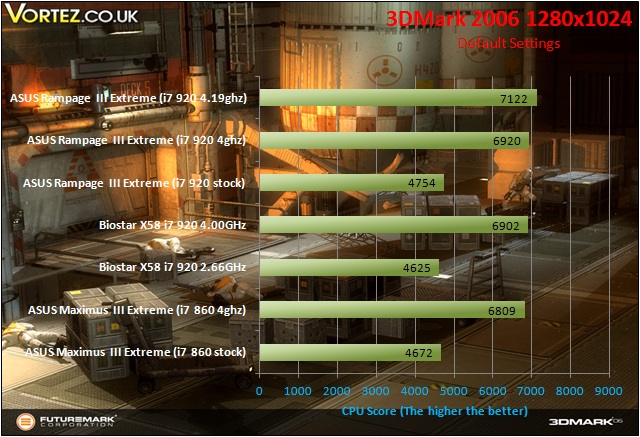
The Rampage III Extreme gives some excellent CPU scores and this no doubt will benefit benchmarkers out there on their quest for the highest scores.
3DMark Vantage
This latest benchmark suite from Futuremark introduces DX 10 PhysX support. Despite being on the verge of DX 11 games arriving, Vantage is still the chosen benchmark amongst enthusiasts these days.
We see a similar situation here on 3D Mark Vantage with the Rampage producing better results at a given clock speed.
PCIe 2.0 x16 vs x8
Some of you may be wondering whether using the PCIe 2.0 x8 slots will cause performance to deteriorate, especially when running more than 2 graphics cards. So I decided to test the single GTX260 in the second x8 slot. Just for clarification, the first and third slot are designed to operate at x16 while the second and fourth slot will always operate at x8 even with a single card setup. With two cards, it is recommended to use the first and third slot to get the optimal x16 bandwidth. Adding an additional card will mean that the slots run at x16/x8/x8, such that the third slot is now operating at x8 instead of x16. Four cards will cause all the slots to operate at x8.
Far Cry 2
Street Fighter IV
Batman: Arkham Asylum
The performance difference is minimal in all three games. There is a slight decrease in Far Cry 2 but nothing dramatic enough to stop you from considering the Rampage III Extreme.
Power Consumption
The Rampage III Extreme consumes more power than the other two boards. This is likely down to the sheer number of features and superior power circuitry on the board. The higher power consumption is reflected both at idle and under load. Strangely the difference in power consumption is reduced between the Rampage and the Biostar under load once the CPU is overclocked. The lower voltages used to achieve the same clock is the main factor contributing to the reduced delta. Overclocking to 4.19Ghz required a jump in the voltage applied and the increased power consumption for such a small OC is mirrored in the results.
Conclusion
The ASUS Rampage III Extreme is a fantastic board. It\’s exactly what enthusiasts have been looking forward to and ASUS haven\’t failed to deliver. From the initial presentation of the box to actually opening it and installing the board, you can\’t stop admiring the product. The sheer attention to every tiny detail that caters to everyone\’s needs such as the onboard switches to the comprehensive software suite and tweaking applications reflects on ASUS\’s ingenuity and their overclocking heritage. The whole Republic Of Gamers concept may seem like a childish marketing ruse but once you delve deeper into the innovations that the engineers deliver with the Rampage III Extreme, you get an idea of the professionalism behind it.
Overclocking is the main selling point of this motherboard. However, ASUS\’s aim has been to revolutionize it with new innovative features. On a hardware level, the Rampage III Extreme uses superior components across the board, sports extra power connectors and includes the Probelt feature. Furthermore, the iROG chip now implements a wide range of different ways to get the most of the board. The traditional BIOS will still be the main tool for overclocking but the RC TweakIt software goes one step ahead to facilitate the process.
Of course, SATA III 6Gb/s and USB 3.0 is finally here but it\’s the performance and stability of the board that should be highlighted here. It\’s good to see the X58 platform finally benefitting from innovations, that for a while has been limited to the mainstream P55 chipset.
The Rampage III Extreme is \”La crème de la crème\” of the motherboard world. While the price may reflect that on initial looks, it\’s worth every penny and users won\’t regret their choice! No other board will give what the Rampage III offers. After all we can\’t expect a premium board not to have a premium price.
Pros
[+]Loaded with features
[+]ROG functionality
[+]Unparalleled stability and overclocking
[+]Cool and efficient
[+]USB 3.0 and SATA III 6Gb/s
[+]Attractive finish
[+]Excellent packaging and bundle
[+]Excellent performance
Cons
[-]Size
This board doesn\’t deserve the Vortez Hardware Gold Award… It deserves better! Since we have no such award, the Rampage III Extreme will have to settle for the Gold Award.
I would like to thank ASUS for providing us with yet another brilliant sample and hope to see more from them in the future. Special thanks to Sniper Ash6 for helping in editing this aricle. To discuss this article, please visit our forums.
