Here we have ASUS’s latest Crosshair branded AM3 motherboard the Crosshair IV Formula.
Product on review: Crosshair IV Formula AM3 motherboard
Manufacturer: ASUS
Price: Around £165
The Crosshair range from ASUS has a very distinguished history. During its arrival it’s been one of THE premium boards for AMD AM2 and now AM3 users offering all the features and overclocking credentials demanded by enthusiasts. The previous Crosshair III model was held in particular high regard so the IV has a great deal to live up to…
Luckily ASUS have worked hard to make sure this board is at the cutting edge.
Yes, the USB3 and SATA 6.0Gb/s support is a very good start but the positives don’t end there. Looking closer we find onboard X-Fi SupremeFX audio, x16/x8/x8 PCI-E 2.0 slots for triple GPU installations, an 8+2 phase CPU power design, Turbo Key II overclocking, the very useful Core Unlocker feature and last but not least the ROG Connect overclock and monitoring control suite.
Extra overclocking specific features like the ProBelt voltage monitoring points and the thermal sensor headers for zone specific PWM controlled cooling are also incredibly valuable additions.
ASUS it seems have literally left nothing to chance – indeed the only thing they might have forgotten is the kitchen sink!
Asus are an incredibly well known and highly regarded company and are one of the major manufacturers in everything from motherboards and soundcards all the way to laptops and GPU’s.
Here’s a little more info about the company:
ASUS, a technology-oriented company blessed with one of the world’s top R& teams, is well known for high-quality and innovative technology. As a leading provider of 3C (computers, communications and consumer electronics) total solutions, ASUS offers a complete product portfolio to compete in the new millennium.
To succeed in this ultra-competitive industry, great products need to be complimented by speed-to-market, cost and service. That’s why all 100,000 over employees of ASUS strive for the “ASUS Way of Total Quality Management” to offer the best quality without compromising cost and time-to-market while providing maximum value to all customers through world-class services.
ASUS, a technology-oriented company blessed with one of the world’s top R&
teams, is well known for high-quality and innovative technology. As a leading provider of 3C (computers, communications and consumer electronics) total solutions, ASUS offers a complete product portfolio to compete in the new millennium.To succeed in this ultra-competitive industry, great products need to be complimented by speed-to-market, cost and service. That’s why all 100,000 over employees of ASUS strive for the “ASUS Way of Total Quality Management” to offer the best quality without compromising cost and time-to-market while providing maximum value to all customers through world-class services.
As I’ve said before focus these days seems to be on i5 and i7 based hardware. However, with AMD’s recently released hex-core Phenom II processors boards like these will find themselves back on the map.
Specification
CPU:
AMD® Socket AM3; Phenom™ II / Athlon™ II / Sempron™ 100 Series Processors.
AMD® 140W CPU support
Chipset:
AMD® 890FX / SB850
Memory:
4 x DIMM, Max. 16 GB, DDR3 1866(O.C.)/ DDR3 1800(O.C.)/ DDR3 1600(O.C.)/ 1333 / 1066 MHz ECC / non-ECC, un-buffered Memory
Dual channel memory architecture
Expansion Slots:
3 x PCIe 2.0 x16 slots, Supports ATI® Quad-GPU CrossFireX™ Technology (dual at x16 or triple at x16/x8/x8x mode)
1 x PCIe 2.0 x4 slot
2 x PCI 2.2 slots
STORAGE:
AMD SB850 chipset
– 6 x SATA 6.0 Gb/s ports with raid 0, 1, 5 and 10 support
JMicron JMB363 PATA and SATA controller
– 1x SATA 3.0 Gb/s port
– 1x eSATA 3.0 Gb/s port
LAN:
Marvell 8059 Gigabit LAN controller
Gamefirst
USB:
2x USB 3.0 ports (blue, at back panel)
12x USB 2.0 ports (5 ports at mid-board, 7 ports at back panel, 1 port at back is also for ROG connect)
ROG Exclusive Overclocking Features:
ROG Connect
GameFirst
Extreme Tweaker
Power Design
– 8+2 phase CPU power design
CPU Level up
MemOK!
iROG
Loadline Calibration
Intelligent Overclocking Tools
– ASUS TurboV EVO
– O.C Profile
Overclocking Protection
– COP EX (Component Overheat Protection – EX)
– Voltiminder LED
– ASUS C.P.R.(CPU Parameter Recall)
Back panel I/O Ports:
1 x PS/2 Keyboard (Purple)
1 x Optical S/PDIF Output
1 x External SATA
1 x IEEE 1394a
1 x LAN(RJ45) port
2 x USB 3.0/2.0 ports (blue)
7 x USB 2.0/1.1
8 -Channel Audio I/O
1 x Clr CMOS switch
1x ROG Connect On/Off switch
Internal I/O Connectors:
3 x USB connectors support additional 6 USB ports
6 x SATA 6.0 Gb/s connectors
1 x SATA 3.0 Gb/s connector
7 x Probelt measurement points
3 x Thermal sensor connectors
System Panel(Q-Connector)
1 x Power on switch
1 x Reset switch
1 x OC Station Header
1 x Go Button
1 x Turbo Key II switch
1 x Core Unlocker Switch
Support CD:
Drivers
ASUS Utilities
Kaspersky Anti-virus software (1 year license)
ASUS Update
Form Factor:
ATX Form Factor
12 inch x 9.6 inch ( 30.5 cm x 24.5 cm )
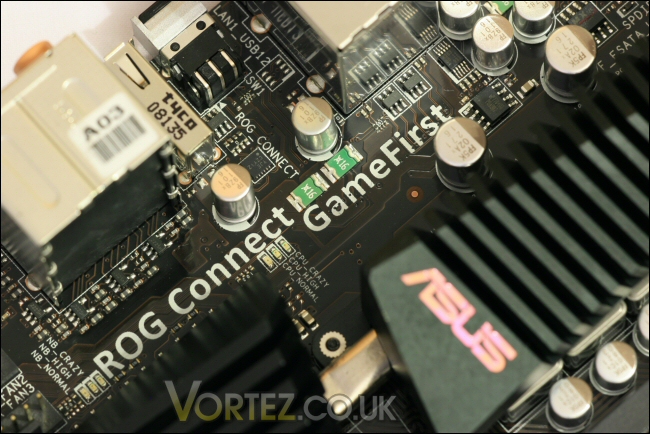
There is no doubting that this is a highly specified board. Besides the standard build quality and ROG features of ASUS boards like this I also like the USB 3.0, Sata III 6Gb/s and 140W CPU support. These features alone should make it quite future proof.
Packaging
We’re welcomed by typical ROG box art from ASUS with very little information on the front – just the name in big bold text – no mistaking what you’re getting here!
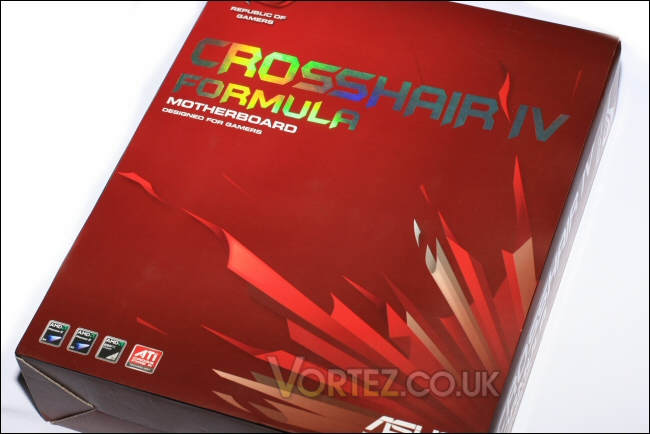
Box front – clear and to the point.
You have to lift a velcro secured flap to get to the information as well as a view of the board itself.

Additional information is hidden under the flap.
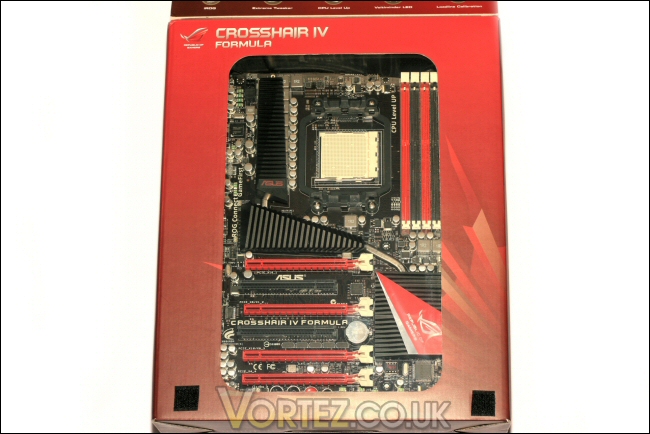
The Crosshair IV Formula within.
More specific details can be found on the rear, although for a full list of the board’s features the manual is required.
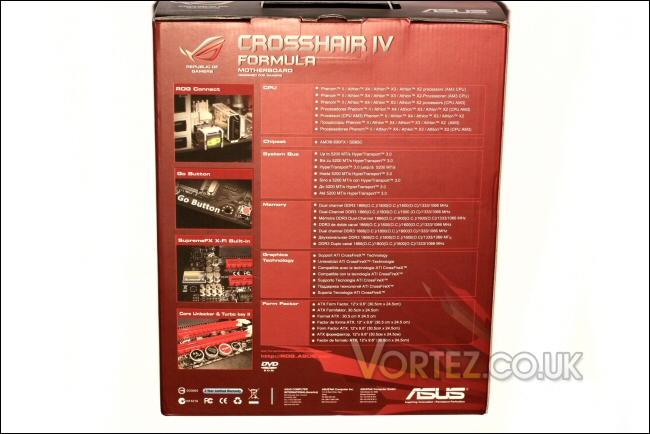
Box rear.
Contents and board
Upon opening the packaging fully we can see that there is quite a large selection of bundled extras.
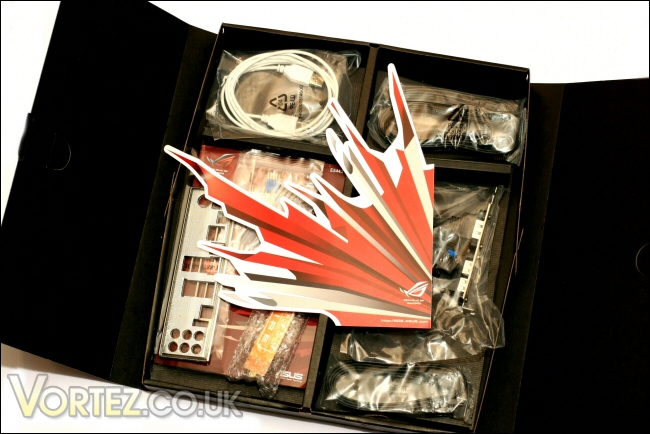
Bundled extras.
Here we find a selection of 6x SATA cables, I/O backplate, the ever present Q-connector for easy front panel connection, the ROG connect USB cable and SATA labels for optical and HDD identification. There’s also a single crossfire cable, a multi-functional module (2x port USB 2.0 and 1x eSATA), a large case sticker, the motherboard manual and the all important driver and utility DVD along with a matching ROG case sticker.
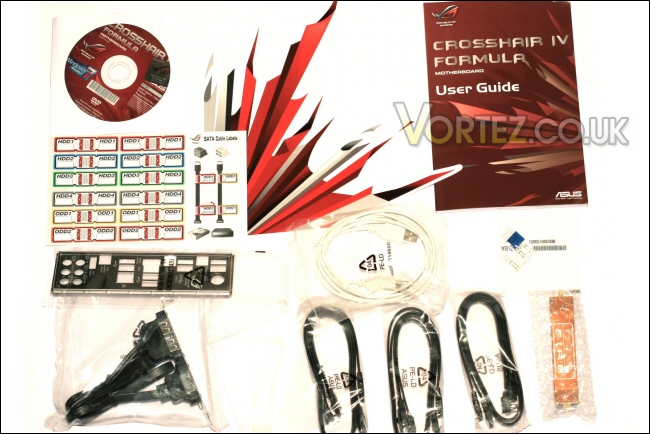
Quite a selection of goodies.
The board is safely packed within another box covered by a transparent plastic lid. All important for viewing the board with the boxes velcro cover opened!
Once extracted from its packaging you can see that the board itself is an impressive item with the components carrying the typical ROG red and black theme. Also of note is that this board represents yet another completely fanless design from ASUS which I always like.
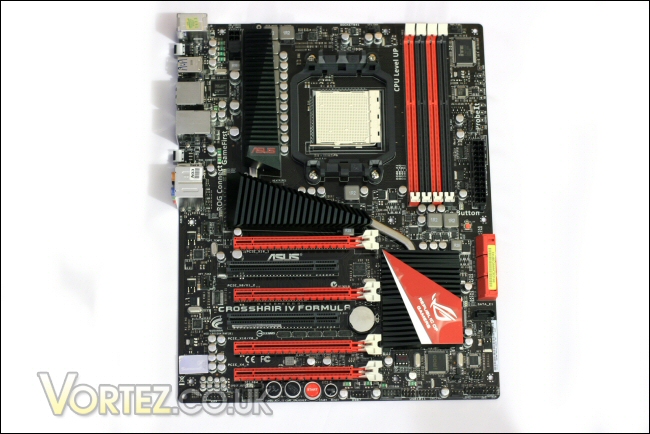
Board front.
The rear of the board is clutter free with only the CPU backplate as a point of interest.
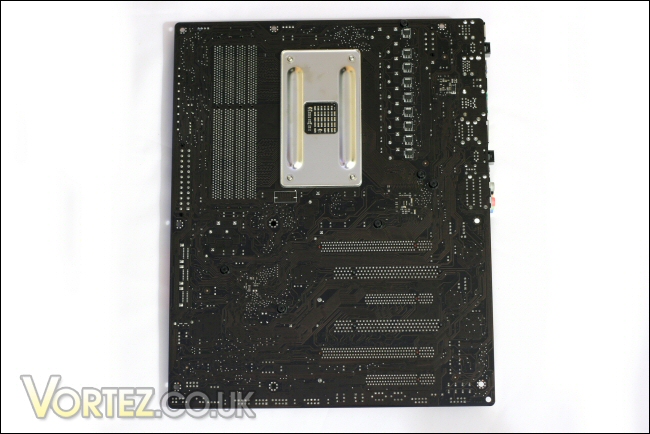
Board rear.
Motherboard features
Starting at the top of the board we see the four DDR3 DIMM slots. They are fairly tightly packed but I’d imagine only the largest DIMMs (think ‘Reaper’ style heatpipe models) might have issues during install. Nearby we see the 24 pin ATX power connector as well as the ‘Probe It’ voltage measurement points.
Many overclockers like to use multi-meters to assess exactly what voltages are running through their hardware. Although onboard voltage readings are useful they aren’t always 100% accurate so there’s nothing quite like taking that reading manually. ASUS have kindly added these contact points as easy to identify measurement points for all of the important ‘overclock required’ locations on the board.
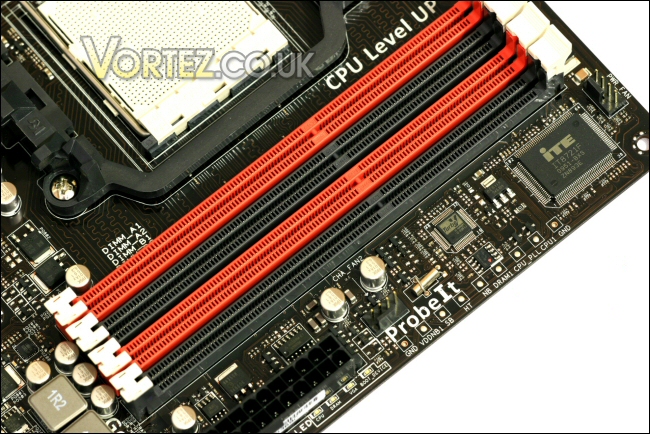
DDR3 and ‘Probe It’ voltage measurement points.
Below these we find the boards six SATA 6.0 Gb/s sockets. They are the right angled variety so should stop any interference with larger GPUs. Also present is a single black upright SATA 3 Gb/s socket and just above the red SATA sockets you might notice a small red button. This is the ‘Go Button’ and is part of the ‘MemOK!’ feature on this board.
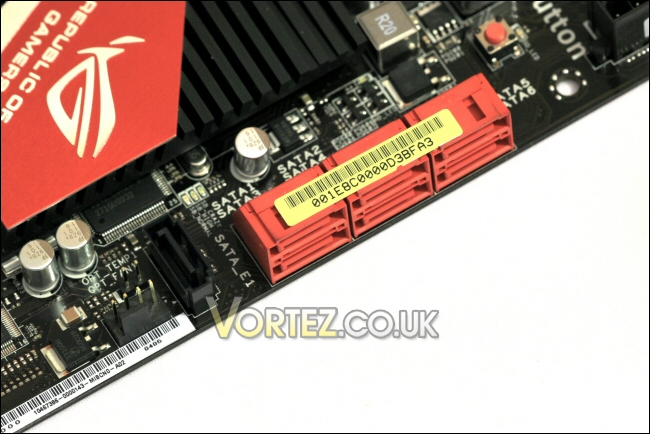
6.0Gb/s SATA.
Next to these are the board’s southbridge heatsink. This is a passive design that is linked to the northbridge via a heatpipe. It covers the SB850 chipset which provides the SATA 6.0Gb/s support including all raid support.
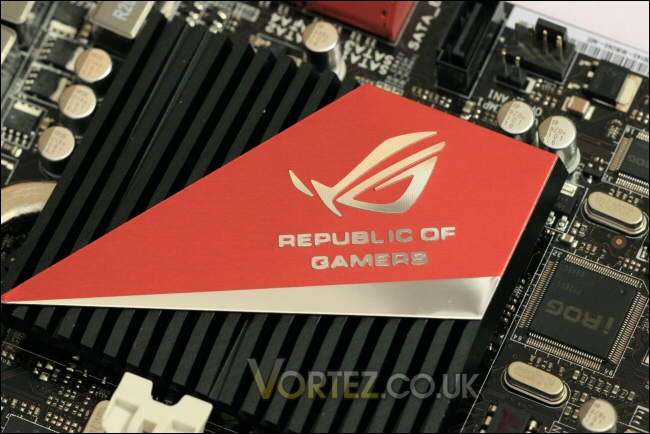
The passive southbridge.
Just below the southbridge we find the iROG chips – these provide advanced user control of several ROG features at hardware level and allow control of the board even when it’s being used.
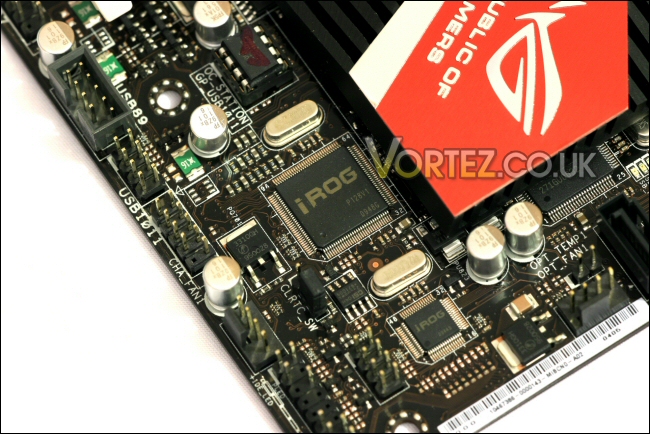
iROG chips for hardware level overclock control.
The very lowest portion of the board contains the typical ‘Start’ and ‘Reset’ buttons found on ROG designated boards. Also present are the ‘Core Unlocker’ and ‘Turbo Key II’ overclocking buttons. These allow one touch unlocking of dormant processor cores (if your CPU has them) and automatic overclocking all done onboard. The board is also not short on PCI-E connectivity with no less that 4 full size slots. Multi GPU gaming is definitely on the cards here!
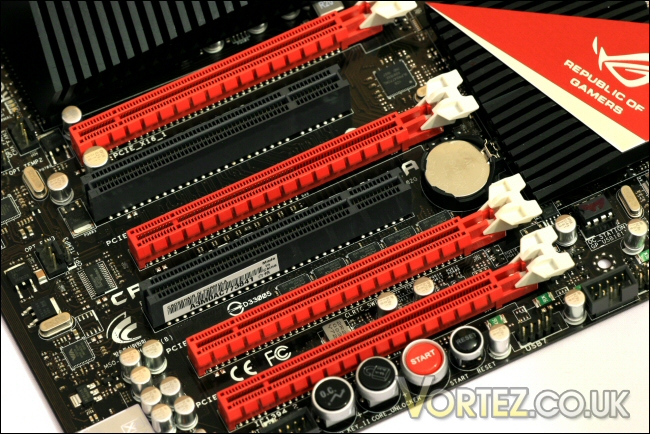
Start, Reset, Core Unlocker and Turbo Key II buttons.
Another interesting item at the base of the board is the X-Fi SupremeFX chip which utilises an 8 channel High Definition audio codec and provides EAX Advanced HD 4.0 audio.
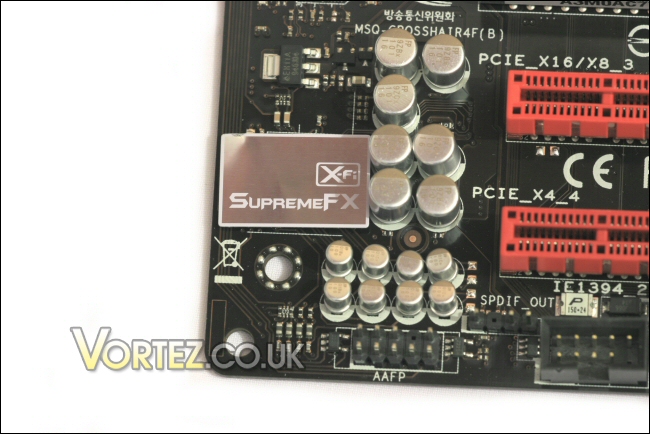
The SupremeFX chip.
Motherboard features continued
Moving back up the board we find the 890FX northbridge covered by its own fanless heatsink.
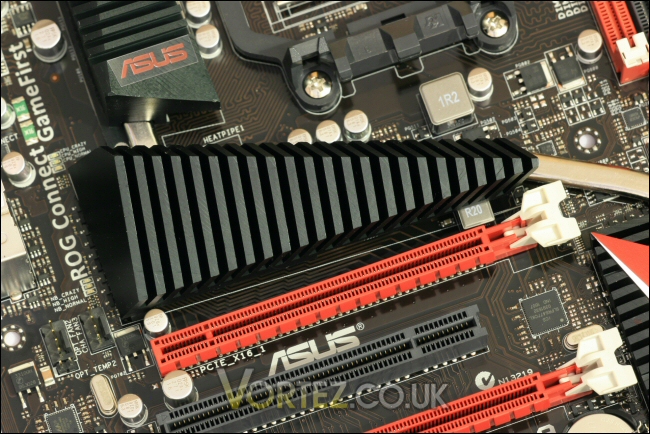
The Northbridge heatsink.
This ‘sink is connected on both sides by heatpipes running to both the southbridge and MOSFET heatsink next to the CPU socket. Hopefully this will provide sufficient cooling for the chipset when stressed in overclocked conditions.
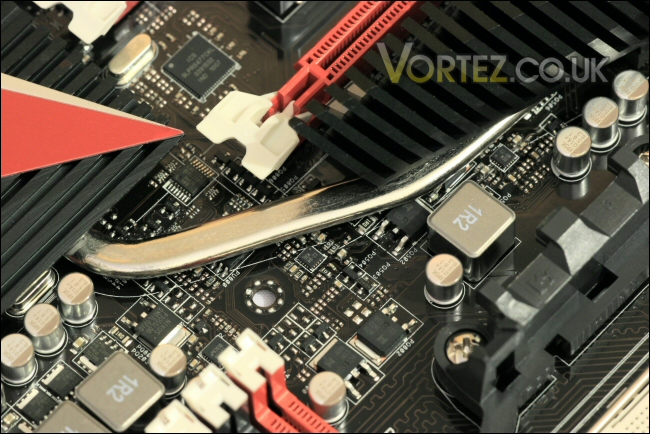
The heatpipe connects all three heatsinks.
The MOSFET cooling is virtually identical to the northbridge. It occupies a portion of the board between the CPU and I/O plate.
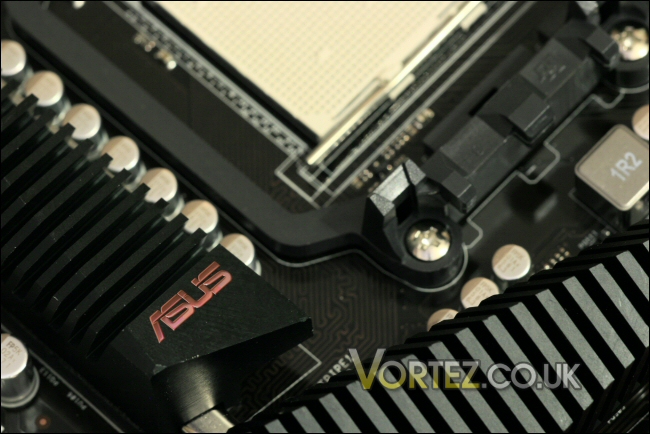
MOSFET cooling.
Above and to the left of the MOSFET heatsink we find the 8 pin 12V CPU connector. The low profile nature of the heatsink means that it shouldn’t interfere with the plug if it needed to be removed.
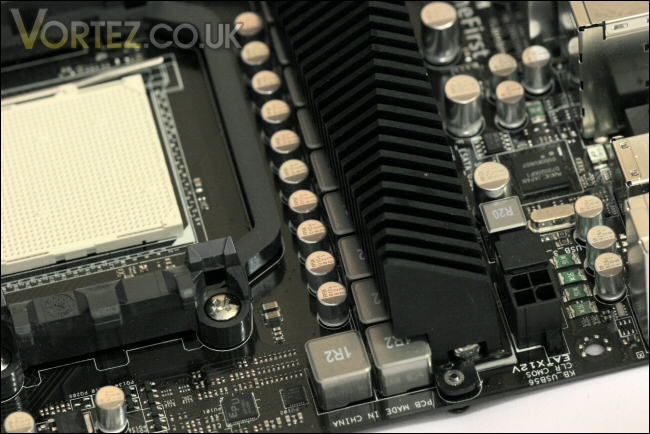
The 8 pin 12V connector.
The I/O plate is last. From the left we have the keyboard PS2 socket, two USB 2.0 ports, the clear CMOS switch (useful), two USB 3.0 ports and an optical digital port. Then there’s two USB 2.0 ports, a firewire and eSATA port, Gigabit lan, two USB 2.0 ports, the ROG connect switch along with ROG Connect USB port and a standard collection of 8 channel audio output sockets. Phew!!!
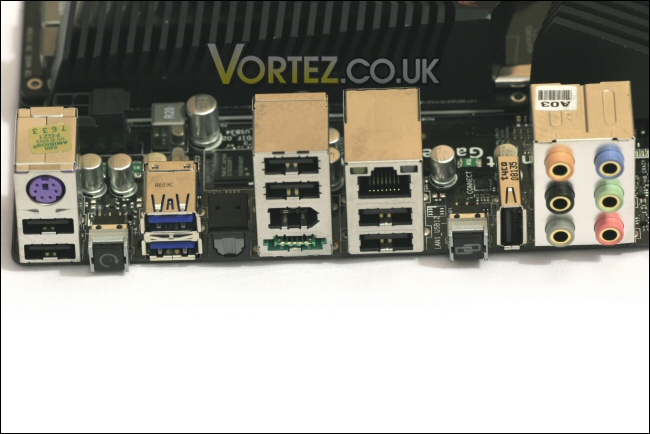
The I/O panel is crammed full!
Software page 1
The Crosshair IV Formula comes with a DVD containing the drivers required to use the board to its full potential. Also provided are a selection of programs to monitor, overclock, power save and protect your beloved PC.
First up we’ll take a look at the disc.
You’re greeted with a driver (and program) page which pretty much covers everything you’d need to get the PC up and running. As with the last ASUS board I tested of special note is the inclusion of a year long license for Kaspersky Antivirus.
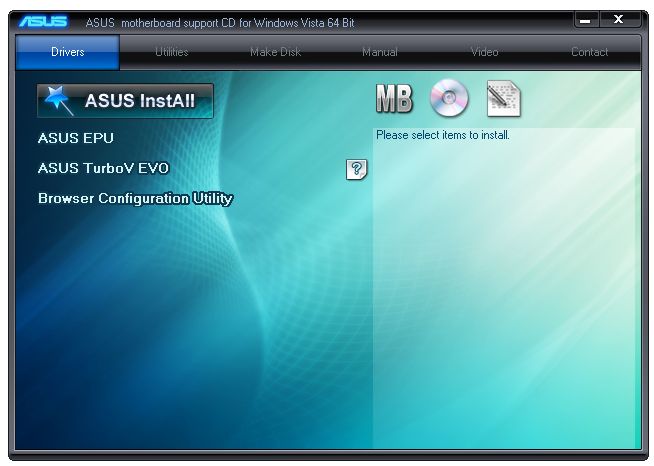
Full driver list for the motherboard.
The next tab includes various utilities which relate to monitoring, clocking and updating the board.
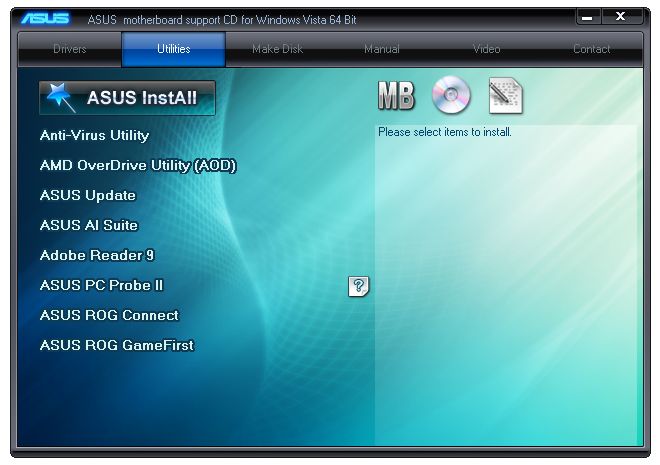
Utilities list.
The ‘Make Disk’ section allows you to do just that – RAID drivers normally need to be separated like this in order to be easily added during a windows install.
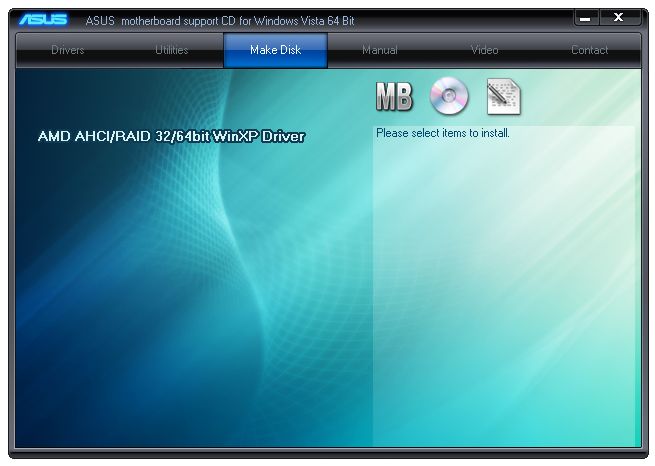
The ever important RAID disk.
There’s a manual section with various media covering motherboard installation, board features and RAID set-up.
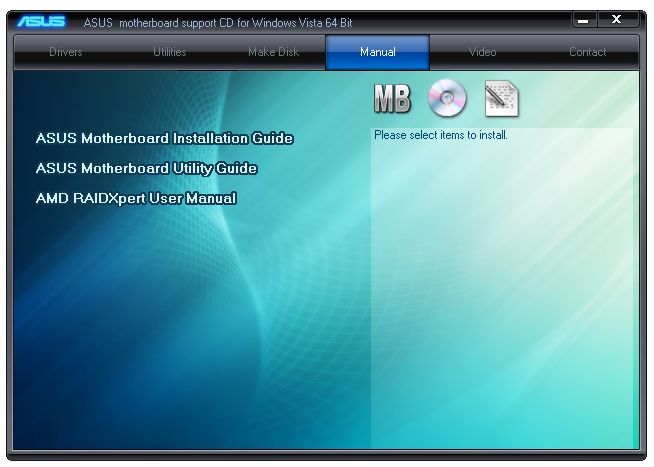
A selection of manuals.
There are also a couple of promotional video’s relating to ROG based boards and some of their features. Not massively useful but fun all the same!
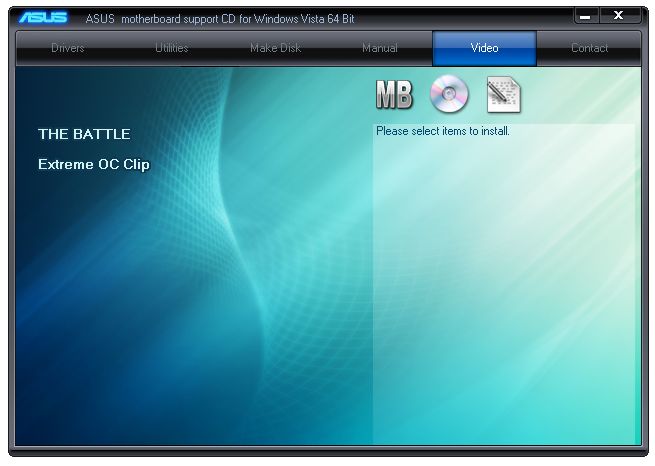
Promo videos.
Lastly there is a final page with useful web links, physical addresses and phone numbers if you need to get in touch with ASUS about something.
Useful links.
Let’s take a look at some of the programs…
Software page 2
There’s a raft of programs available to the end user of the Crosshair IV Formula. The first is the ‘ROG Connect’ suite which allows remote management via a remote console. Simply connect a PC to the Crosshair IV Formula via the supplied USB cable and you are able to use that connected PC to adjust BIOS parameters on the fly – even when the Crosshair IV Formula system is booted up and running an operating system!
Specific features of this system include the RC Remote which allow on/off, power reset, force shutdown and clear CMOS events to be triggered remotely.
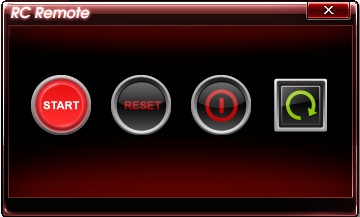
RC Remote.
The RC Diagram section allows monitoring and logging of a variety of board parameters such as current, voltage, temperature, fan speed and frequency. Very helpful when going for the absolute maximum overclock.
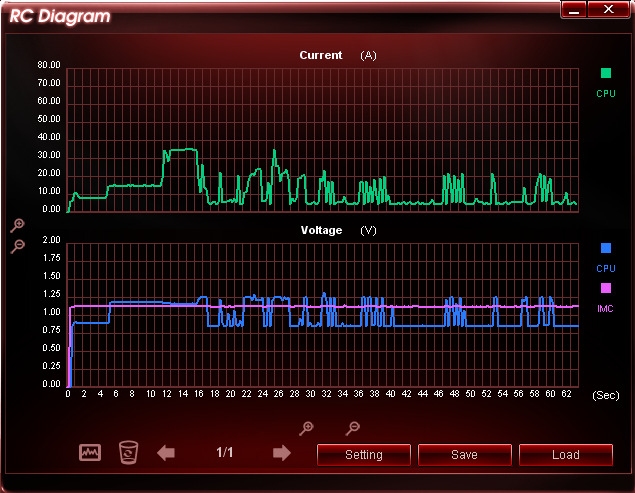
RC Diagram.
The Hardware monitor within RC Connect is a quick and simple display covering voltage, temperature and fan speed values. There’s even a ‘My Favourite’ section where you can choose specific items you’d like to keep an eye on!
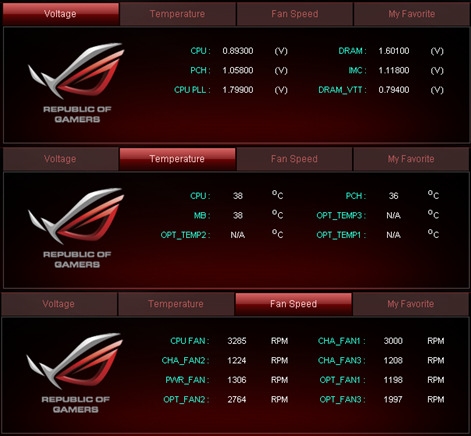
Hardware monitor.
RC TweakIT allows voltage and frequency options to be adjusted.
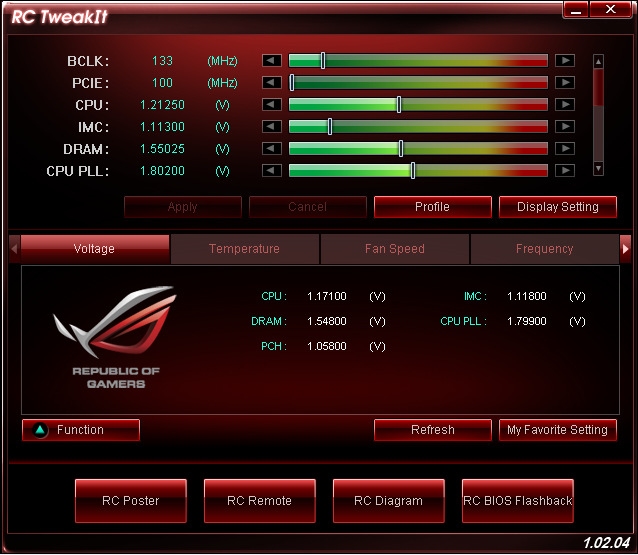
RC TweakIT.
Lastly RC Poster allows the post code or post message to be viewed as the CrosshairIV Formula boots up.
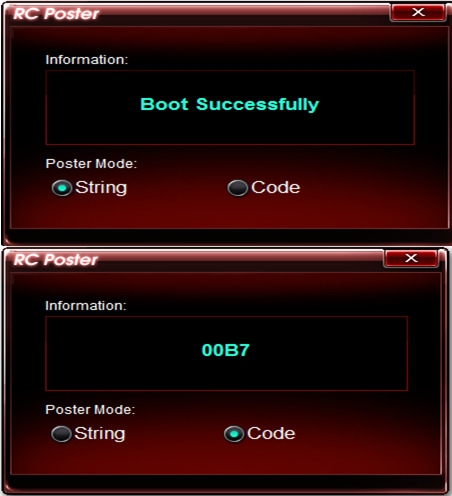
RC Poster.
Software page 3
Also included on the disk is the AI Suite which allows basic monitoring of system temps, fan speeds, clock speeds and voltage.
From the main screen you can choose one of three options. You can start up fan expert, activate EPU (an energy monitoring/saving program) or use TurboV Evo.
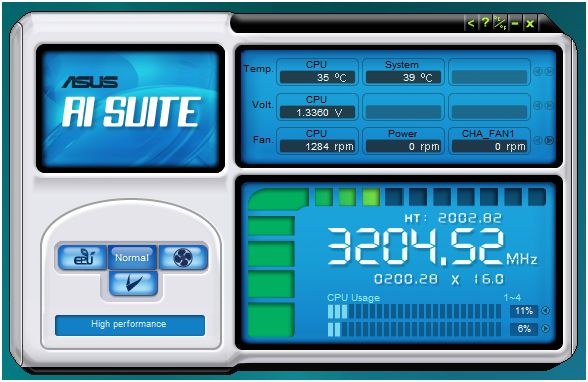
AI Suite.
Fan Expert is a complete fan control program where users are able to tailor their fan profiles to suit their specific needs. Here you can see modifiable CPU and chassis fan characteristics.
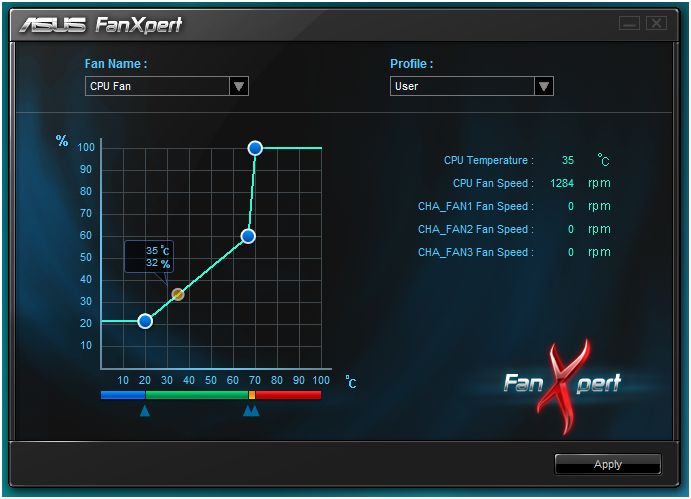
CPU fan speed control.
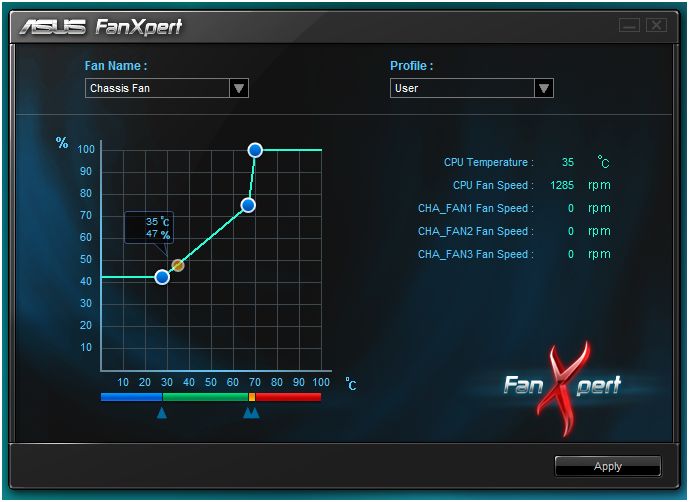
Chassis fan speed control.
EPU is an easy to use power saving program that tailors the PC’s performance characteristics to provide the best performance/power ratio.
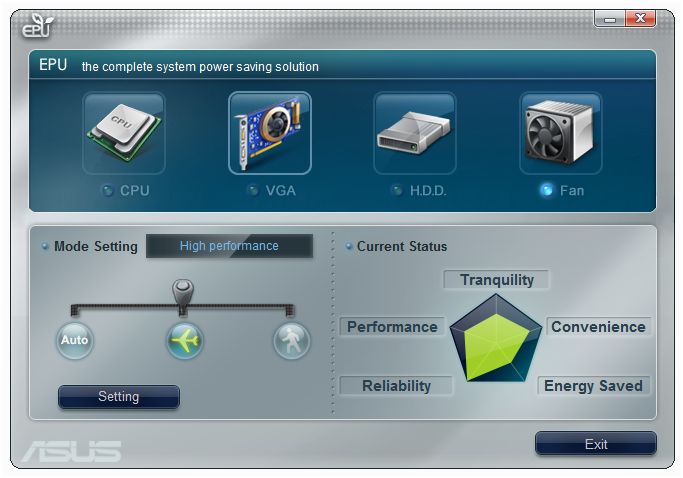
EPU.
The settings menu allows slightly more in depth control of the basic EPU functionality to tailor it completely to your needs.
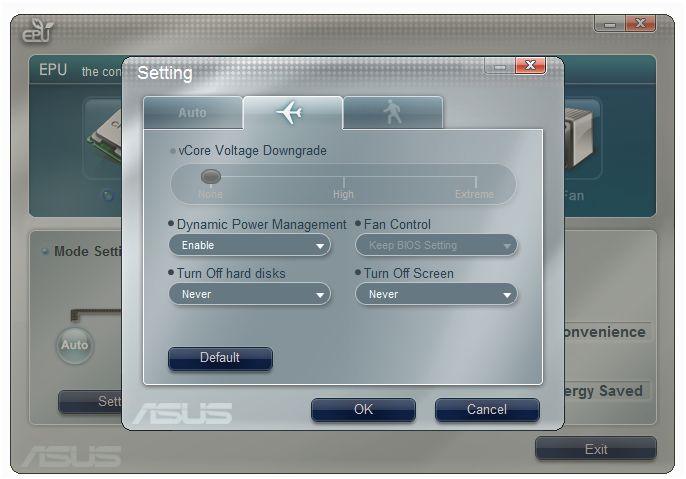
EPU settings.
Software page 4
TurboV Evo allows on the fly adjustment of various voltages and clock speeds across the board. This will for example allow users to clock up their PC for a gaming session and then return those clocks to normal afterwards.
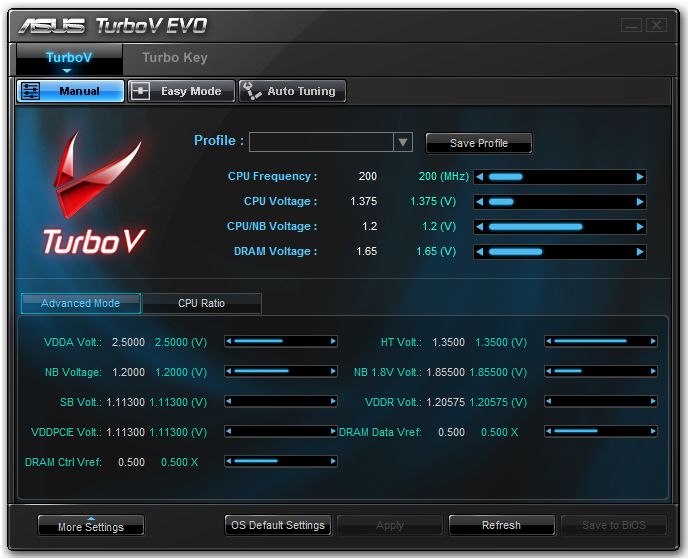
TurboV Evo.
CPU ratio’s (I normally consider these to be multipliers) can also be changed meaning fast straightforward overclocks can be achieved. This is much more convenient than the normal process of powering down the PC to make the same changes.
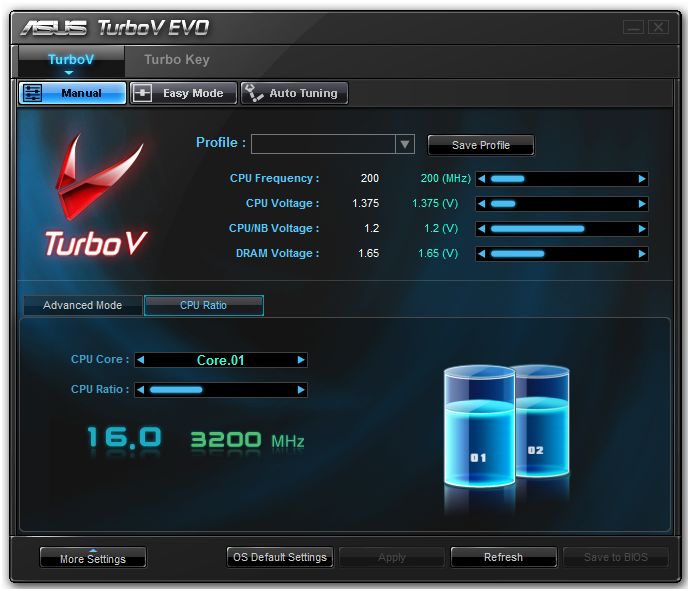
Simple CPU ratio adjustment.
The program even offers an ‘Easy Mode’ where CPU frequency can be changed for a simple boost.
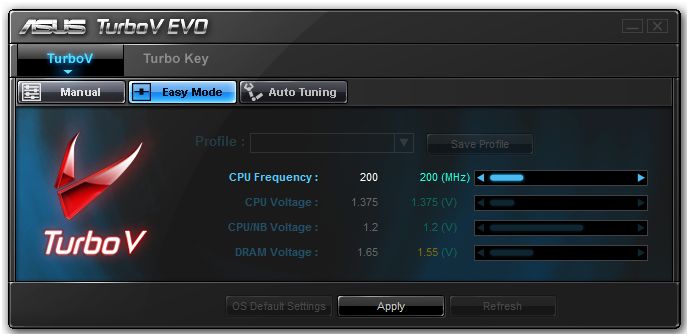
CPU frequency manipulation.
TurboV also offers an auto tuning suite where various tuning options can be selected depending on the ferocity of the overclock you would like. Once you have selected the set-up you like click ‘Start’ and the board does the rest. A series of restarts will ensue as it identifies the best stable overclock.
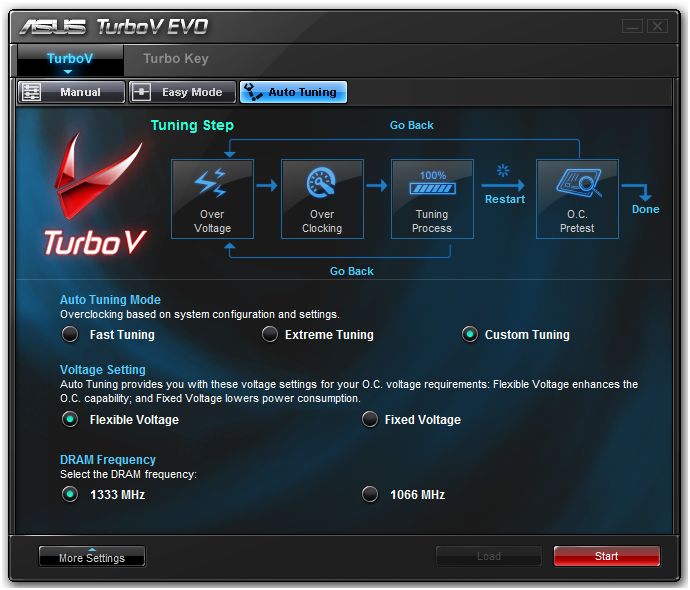
A full auto clocking suite.
Finally the ‘Turbo Key’ offers quick overclock profile selection by transforming the PC power button into an overclocking button.
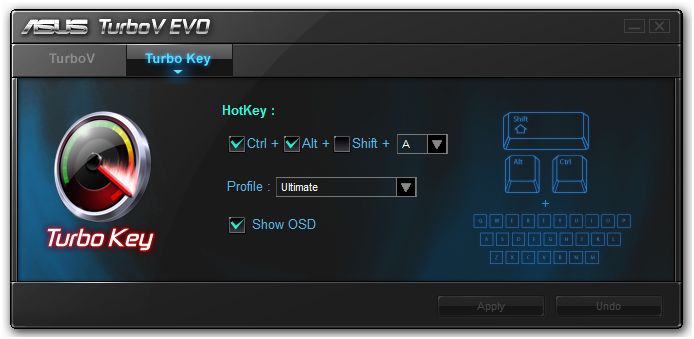
Turbo Key.
Software page 5
PC Probe II is also available. This offers some of the functionality of the others and allows monitoring of voltages, temps and fan speeds.
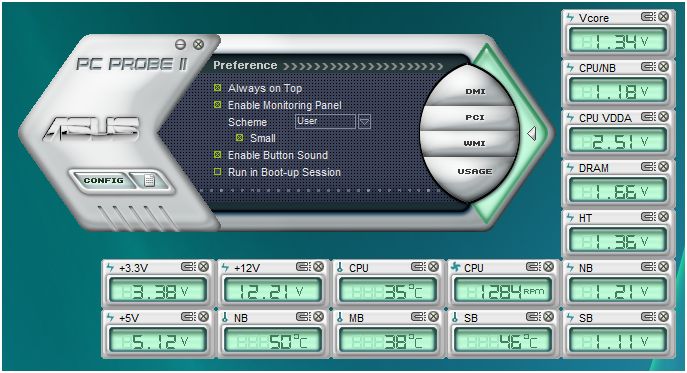
PC Probe II.
ROG GameFirst is a program that works with the motherboard’s Gigabit LAN connection to prioritise important data flow. It’s primarily designed with online gaming in mind to specifically keep pings low and tight so you don’t lose the edge.
The suite offers total control over web based connections so you can prioritise some incoming and outgoing streams over others.
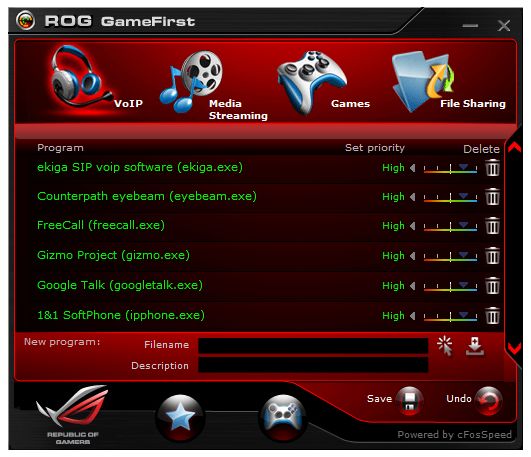
ROG GameFirst suite.
By clicking the controller icon at the base of the window above you enter ‘Game Mode’ for game specific network priority.

Game Mode – game priority activated.
The GameFirst suite also provides a status display showing network traffic activity.
GameFirst status display.
It also has individual buttons to view speed, TCP count, ping and latency values.
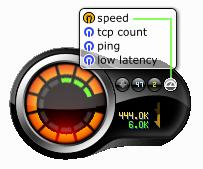
Lists all important network values.
Software page 6
The X-Fi SupremeFX suite uses an attractive GUI. From here you have total control over the 8 channel High Definition audio on offer.
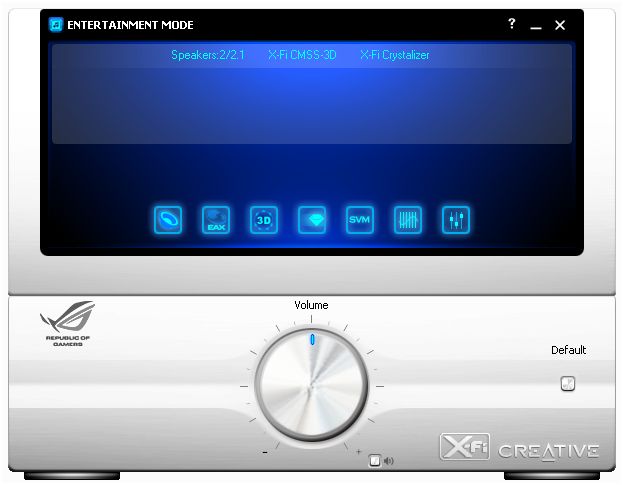
SupremeFX.
You can adjust speaker settings – position, bass response, stereo or surround, etc…
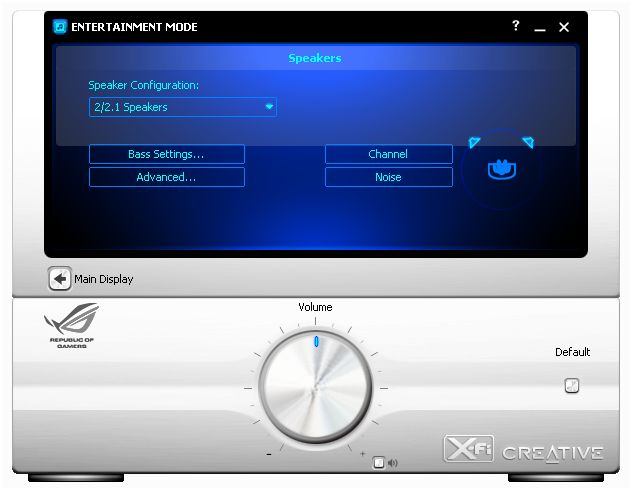
Speaker adjustment.
Full EAX effects are on offer giving you plenty of options to tailor your audio.
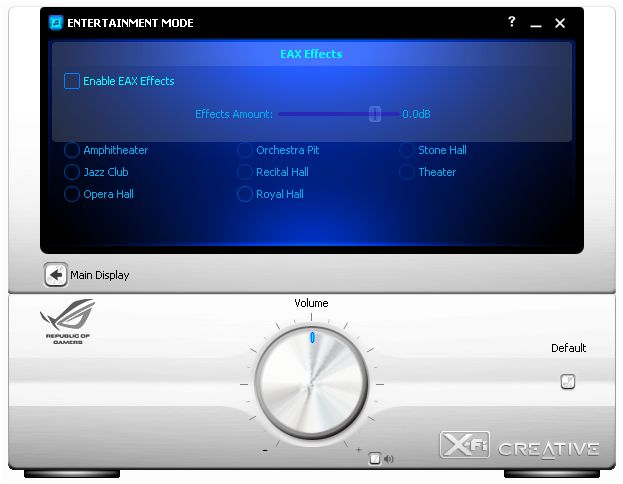
EAX effects.
An equaliser is also available to give you full control. Overall it’s virtually all you’d ever need as far as audio manipulation goes.
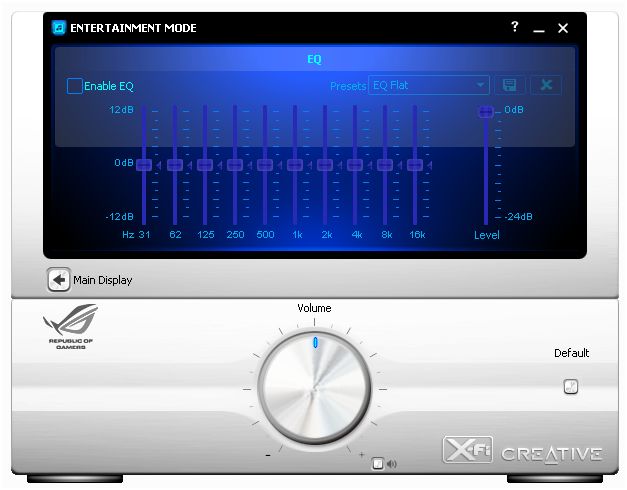
Onboard equaliser.
Lastly ‘My Logo’ is a fun addition to the fairly serious programs I’ve covered so far. From here you can select your own custom BIOS logo that will be displayed during start-up. You can select any 640×480 image you like to customise your PC!
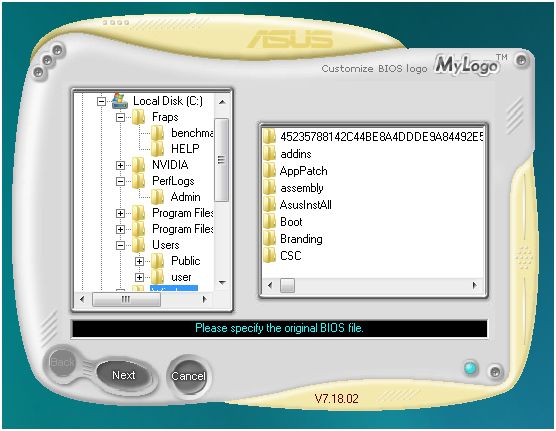
The fun ‘My Logo’ program.
These will then evolve through the next few days as the testing progresses further. |
Setup and Overclocking
Test Set-up
CPU: Phenom II x2 555 Black Edition @ 3.2GHz
RAM: 4GB Corsair Dominator GT DDR3 1600MHz
HDD: 160GB Samsung 7200RPM SATA HDD
Optical drive: LG Bluray/HDDVD Multidrive
CPU cooler: Coolermaster Hyper TX3
PSU: Hiper Type-R 580W
GPU: Gainward GTX260
Overclocking
Having recently tested the ASUS M4A89GTD PRO/USB3 I had high hopes for the Crosshair IV Formula. Yet again it had a very straight forward approach to performance enhancing overclocking and unlocking through the use of the inbuilt Turbo Key II and Core Unlocker switches. As with the M4A89GTD PRO/USB3 it allows the motherboard to decide on the best ‘stable’ overclock and also unlock any dormant cores that may be available.
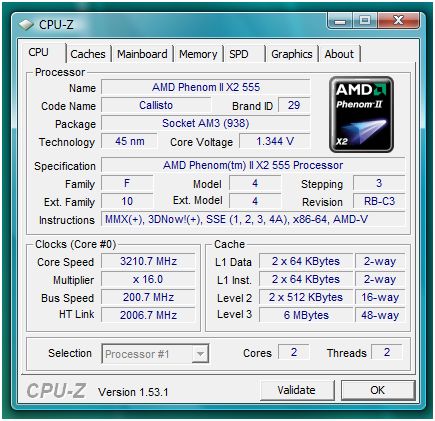
CPU-Z @ stock.
Knowing that this chip was good for unlocking to quad I initially used the Core Unlocker button. As expected this returned a quad core running at the stock speed of 3.2ghz.
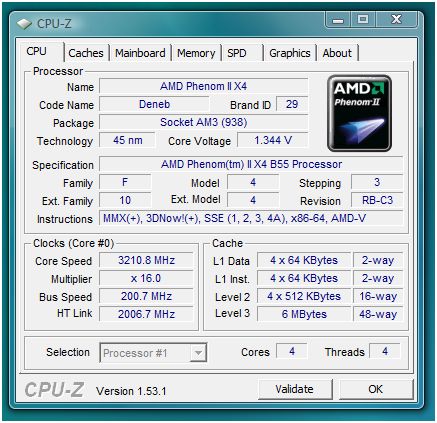
Unlocked to Quad core.
I benched and tested at this and found that the system was stable.
Then using the inbuilt Turbo Key II I was able to reach 3.456ghz.
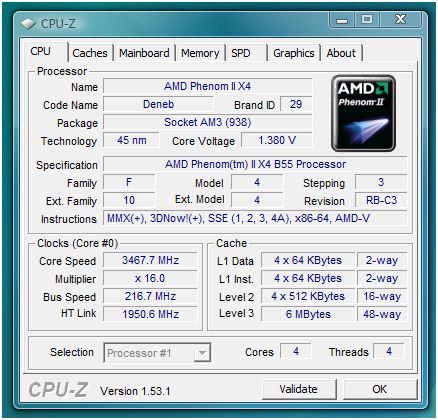
Overclocked – a Quad at 3.456ghz now.
As I’ve said before it’s always worth a proper stability test as some setting may need to be tweaked to attain rock solid stability or allow reductions in voltages to help with temperatures and/or longevity. However at this clock I suffered no system stability issues and all benchmark tests completed without any issues.
Install and initial testing
Installation
Like the last ASUS motherboard I looked at the installation was very easy. I’ve used many AMD systems in the past and since the advent of Socket 939 have always liked their retention system.
The install took place on a bench so the combination of the boards size plus its decent layout helped. This meant that the whole build was complete in no more than 10 minutes.
Sound
The ASUS Crosshair IV Formula’s PWM fan control was truly excellent just like the last batch of ASUS boards I’ve tested.
It barely throttled up during very high load which was nice to see. The passive design is obviously completely silent and even overclocked it certainly never ran hot.
The warmest components were the north and southbridge heatsinks but neither got close to being too hot.
Temps
Motherboard temps were kept well under control during testing – I never saw the board temp pass 45c which was nice.
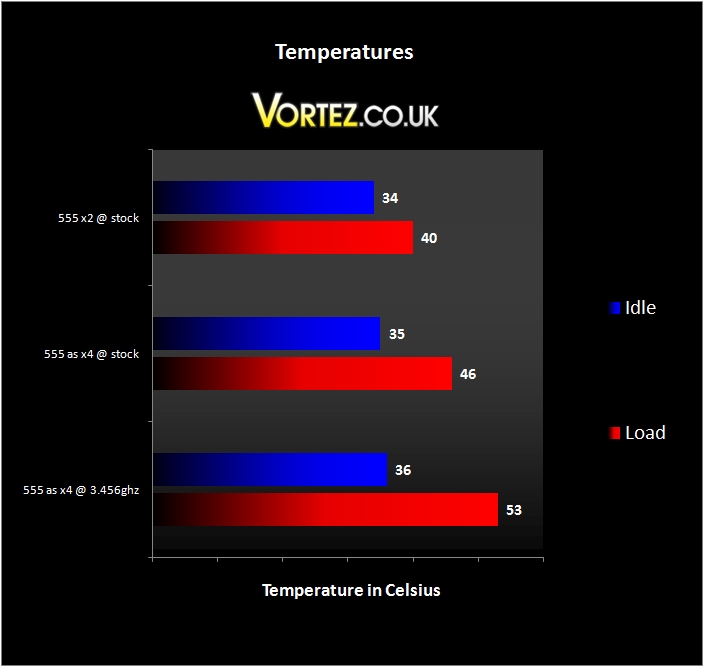
As you can see CPU temperatures were also very good.
PCMark05 and SuperPi
I tested the desktop performance of the Crosshair IV Formula initially and used Futuremark’s PCMark05, SuperPi, Cinebench and the x264 HD benchmark.
Up first is PCMark05 which is a benchmarking suite from Futuremark. It tests many aspects of desktop computing for a good overall impression of system performance.
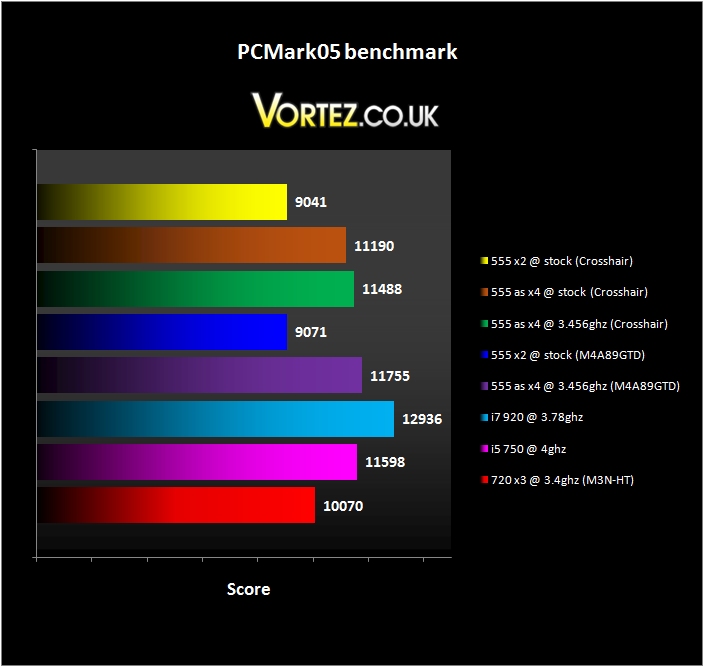
PCMark05.
The results are pretty good. Due to the identical RAM and CPU of the recently tested 890GX chipset the numbers are virtually identical.
SuperPi is a good measure of performance too so it was also used as a benchmark.
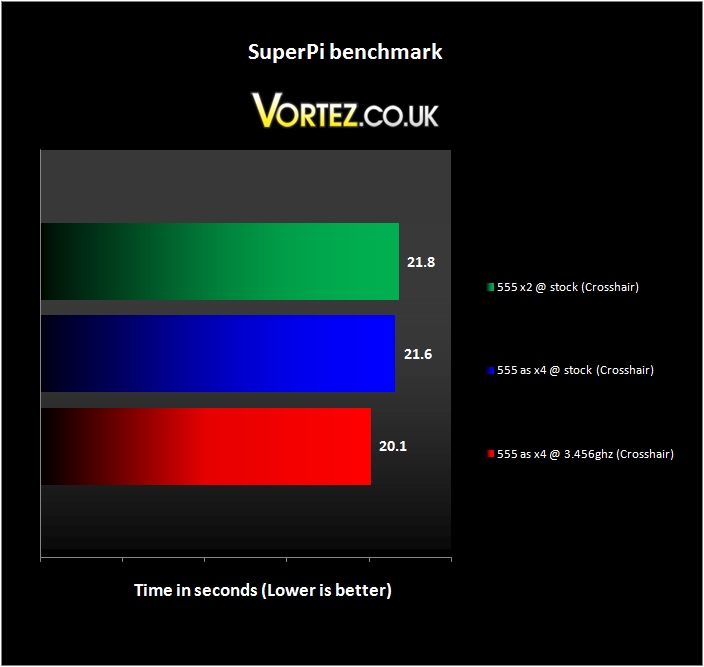
SuperPi.
As expected the biggest boost in performance using this bench is through the increase of clock speed rather than core count.
Cinebench and x264 HD
Cinebench is a very useful benchmark since it provides a real world test rendering a 3D image in real-time.
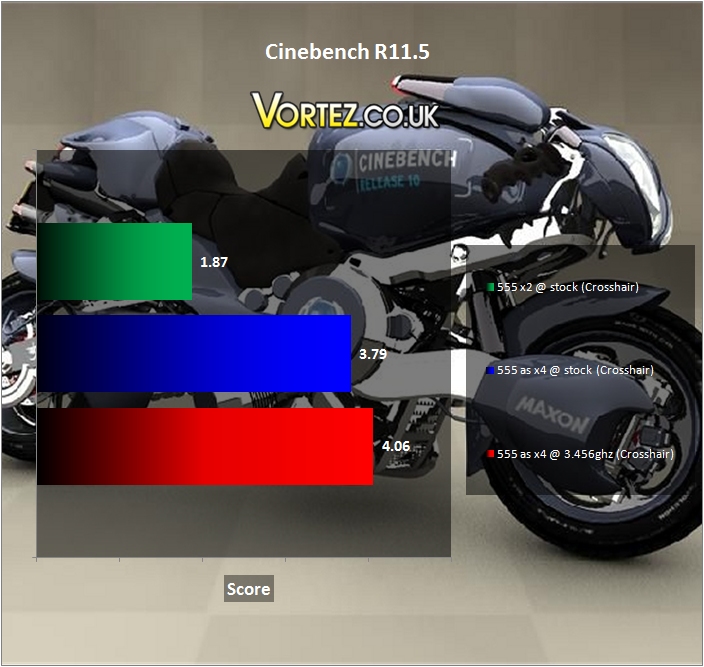
Cinebench R11.5.
Multi-threading is obviously the winner here since there is a marked boost in performance once the 555 Phenom II is unlocked to a full quad. Overclocking further boosts performance but not by the same amount.
Finally I used the x264 HD benchmark which consists of real-time video encoding – it makes four passes over two different files to generate a result. I took the average of each of the four results from the two groups to generate the final result.
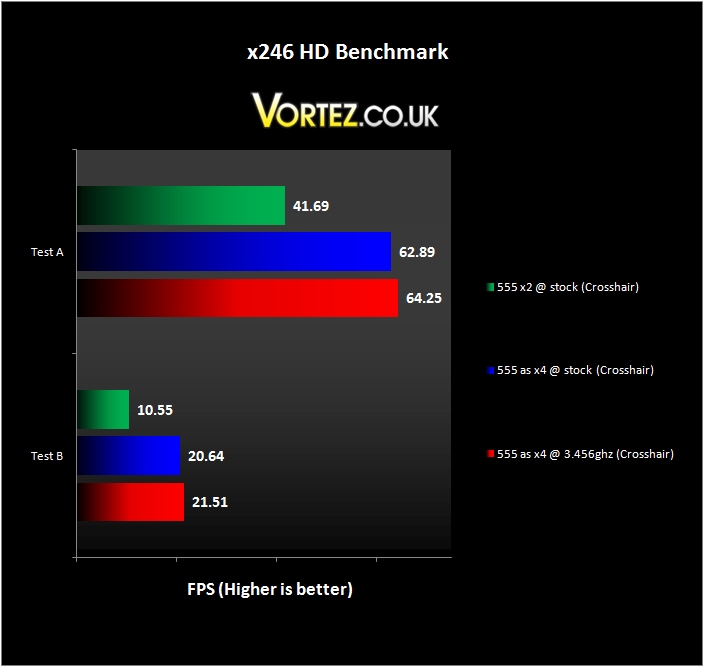
x246 HD Benchmark.
Once again multi-threading is the king here as the difference between dual and quad core is very noticeable. The first test returns a 50% increase in performance whilst the second test receives an almost 100% boost. Overclocking pushes performance a little further but not in the same way extra cores do!
3DMark06 and Vantage
We now move on to graphical performance – something of particular importance to ASUS’s ROG ethos and to the people that choose to purchase these boards.
First up we take a look at Futuremark’s 3DMark06 benchmark program.
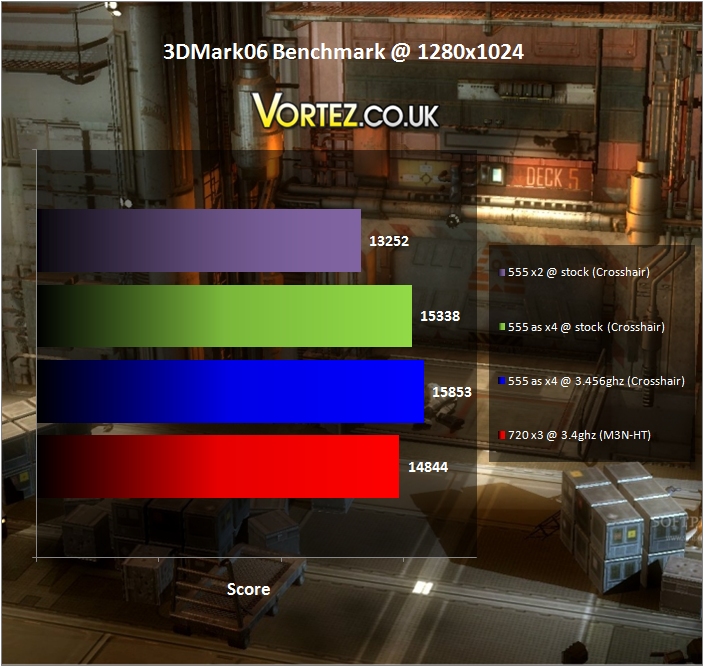
3DMark06.
The performance compared well to my own 720 triple core. Overall the Crosshair IV Formula seems to do well here.
I then tried Futuremark’s newer 3DMark Vantage benchmark program.

3DMark Vantage.
I had a little more data available for comparison here so there’s more to see. Rather unsurprisingly its results are virtually identical to the M4A89GTD.
Blacksite and Dead Space
Moving onto games Blacksite was up first and provided a decent test due to its beautiful visuals.
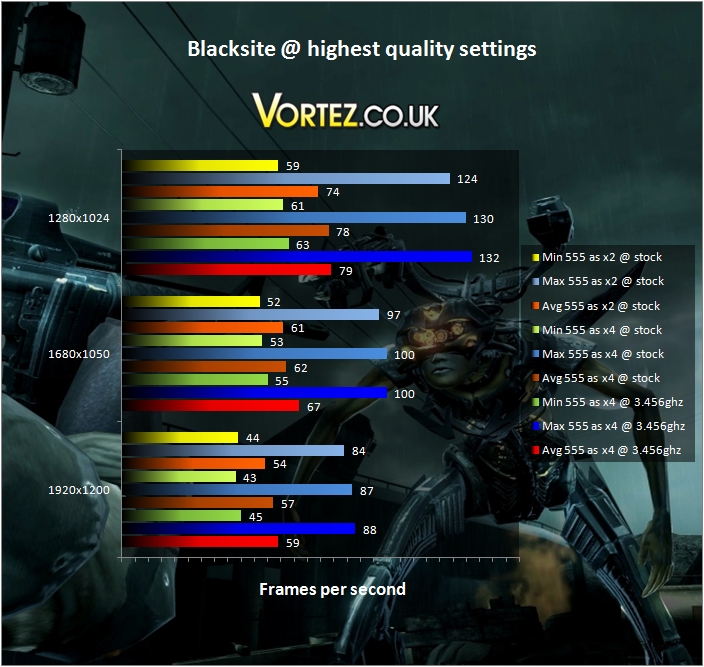
Blacksite.
Overall performance is very good and certainly directly comparable to the M4A89GTD tested recently as well as both the i5/Maximus Gene III and i7/P6T SE combos.
Next up was Dead Space – a popular survival horror game.
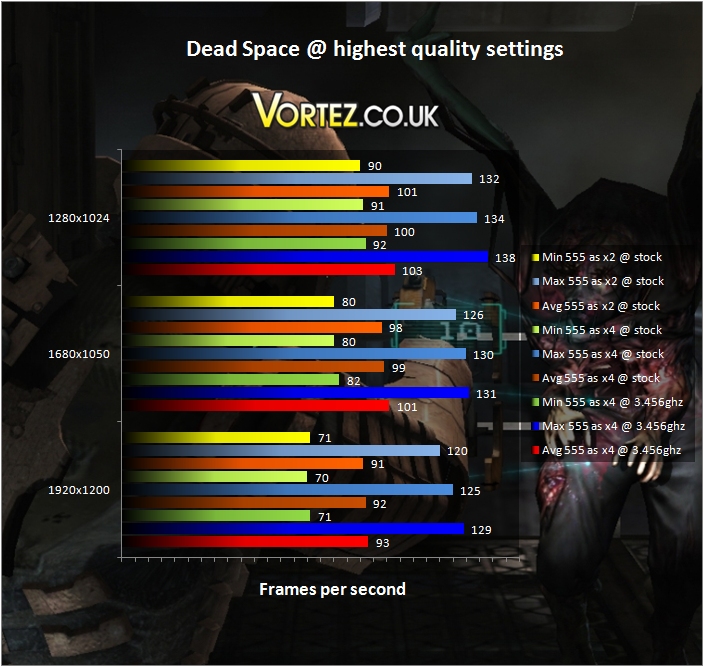
Dead Space.
Again performance is very good overall with smooth frame rates and good gains as overclocking progresses.
Far Cry 2 and Unreal Tournament III
Far Cry 2 is a useful test and provides a benchmarking program itself which makes it easy to test.
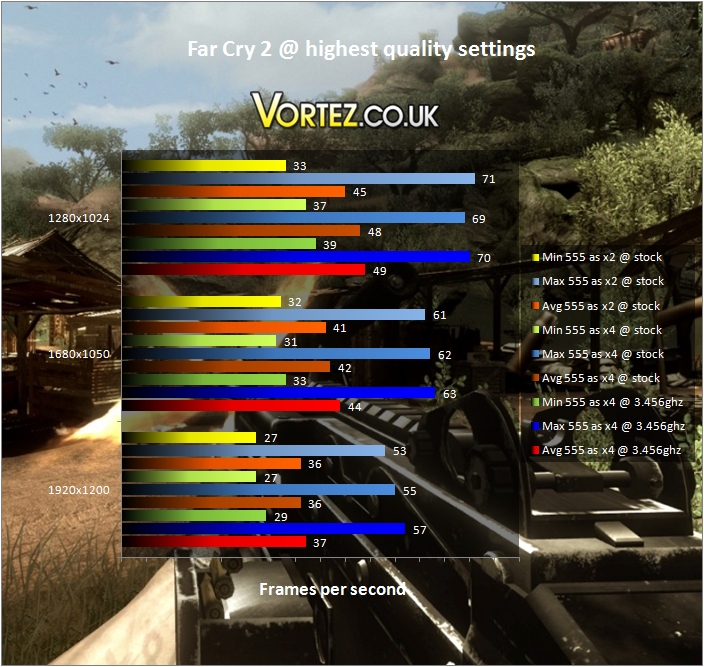
Far Cry 2.
Modest gains can again be seen through overclocking and I’d say it was still playable at the highest resolution.
The last game on test was Unreal Tournament III which is a highly regarded first person shooter with good online credentials.
The most important thing here is frame rate so let’s see how the Crosshair IV Formula fairs and whether overclocking boosts performance.
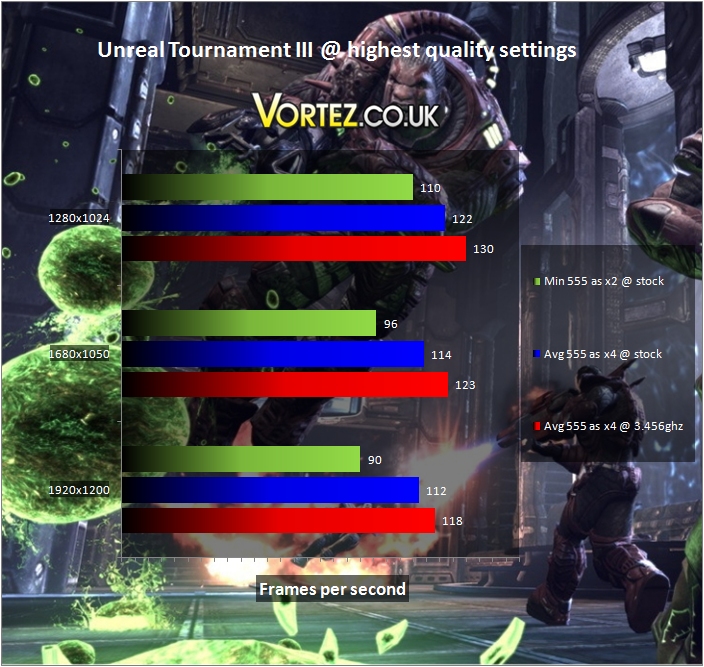
Unreal Tournament III.
As you can see the performance is there – plus there is a considerable boost when the 555 is unlocked to a quad and then again when it is overclocked. Very nice.
Overclocking ***UPDATE***
Having managed a moderate initial quad core auto overclock I had a look at pushing the Phenom II 555 even further. With the original test board I could not push any further and suspected a possibly faulty unit. Upon sorting a replacement I got down to testing to see if this board could push further.
I kept the additional two cores unlocked (would be a pity not to) so it was still running as a quad core and started to clock the board.
I upped the FSB from 200MHz to 220MHz and pushed the multiplier from 16x to 17x. This returned a 3.75GHz overclock. At this point the auto voltage control on the board gave the chip no more than 1.44V which was fine.
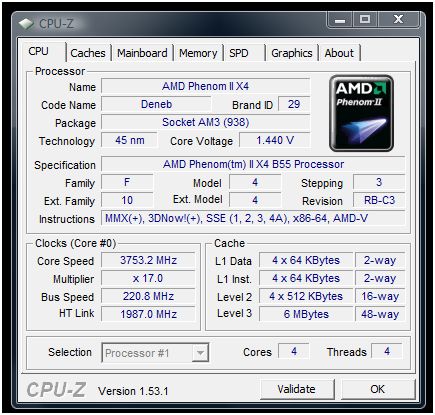
3.75GHz
That was easy.
Continuing the clock I upped only the FSB to 230MHz which gave a 3.92GHz overclock. I didn’t touch voltages manually and found that the Crosshair was still pumping 1.44V through the chip.
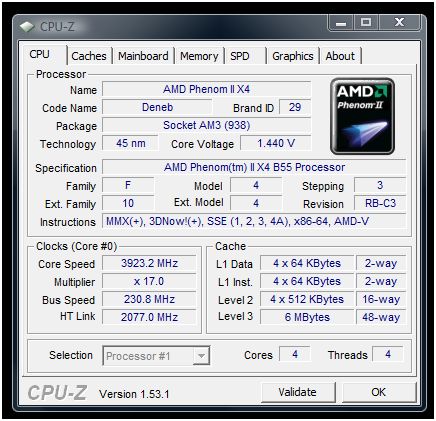
3.92ghz.
My aim here was now to break the 4GHz barrier. Something that had eluded me with the M4A89GTD I tested recently.
Moving back to the multiplier I adjusted the 17x setting to 17.5x which pushed the chip beyond its 4GHz goal to 4.04GHz. After some stability testing I set the load line calibration to up the voltage delivered to the chip when it was loaded since it didn’t get on with 1.44V at this clock.
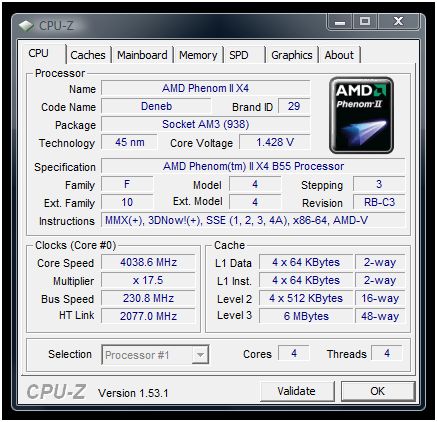
Yay… 4.04GHz!
That settled it down well and meant I could move onto testing the system in this configuration.
One thing that I noticed in particular was that despite the slight increase in voltage the chip in this board actually ran cooler than before. I also must mention that besides the DDR3 voltage (set to 1.65V) no other voltages needed to be increased over stock during this clocking session – very impressive indeed!
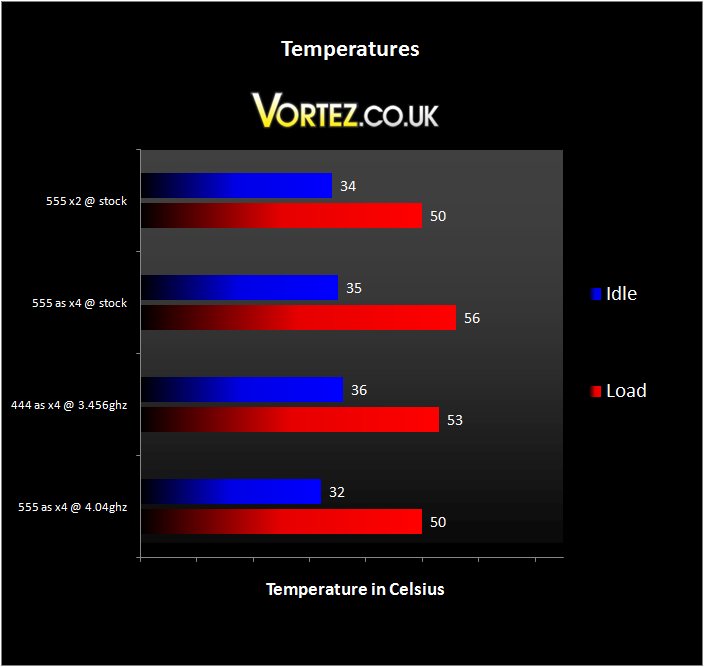
Temperatures.
4.04GHz – PCMark05 and SuperPi
Once again I tested desktop performance initially using Futuremark’s PCMark05, SuperPi, Cinebench and the x264 HD benchmark.
Up first is PCMark05.
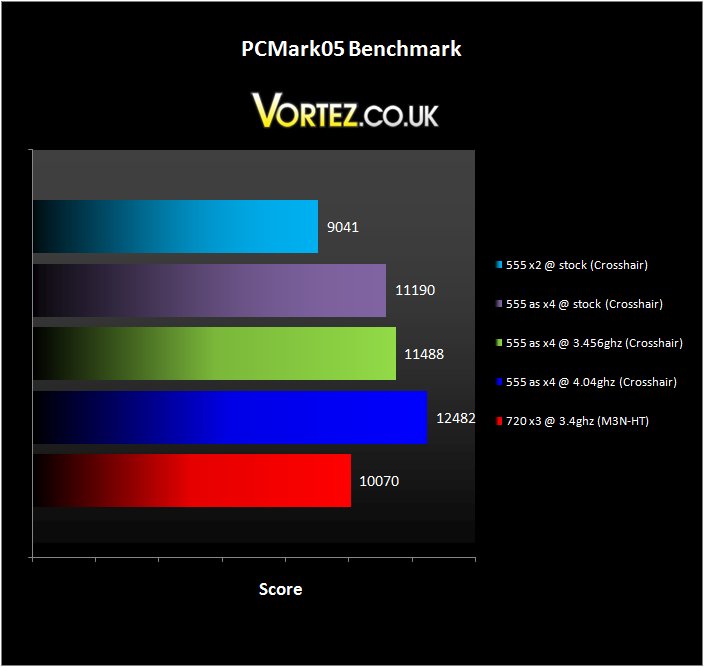
PCMark05.
The result shows a healthy increase in performance. The overclock has boosted performance here quite nicely
SuperPi was next.
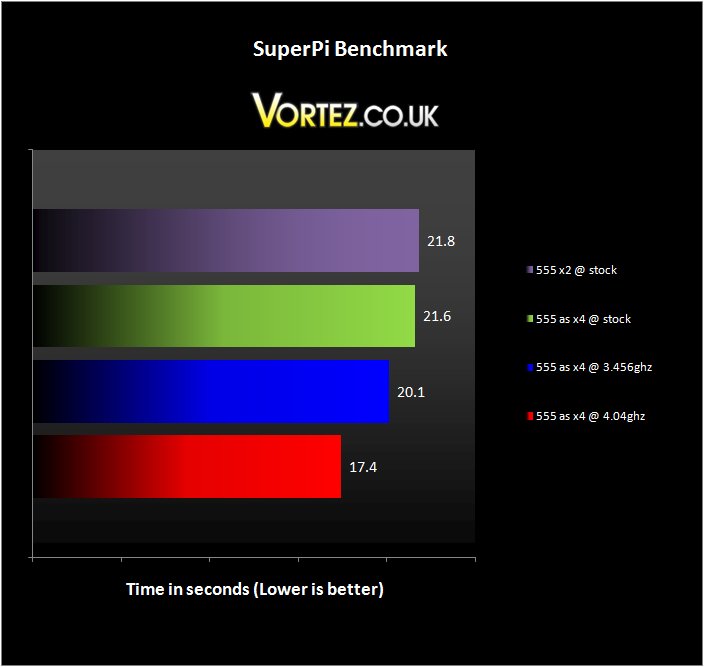
SuperPi.
A considerable boost was provided by the clock here. That’s a pretty decent result
4.04GHz – Cinebench and x264 HD
The Cinebench testing suite followed. Rendering a 3D image is quite a difficult task so this is a good test of raw performance.
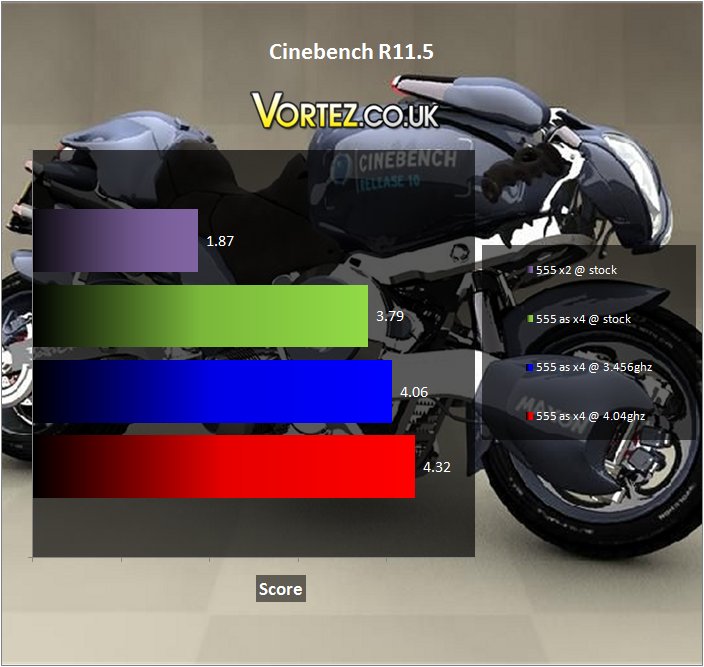
Cinebench.
As I stated earlier in the review multi-threading is obviously the winner here due to the marked increase in performance once the 555 Phenom II is unlocked to a full quad. Yet again overclocking boosted performance but not by an enormous amount.
The final desktop test was the x264 HD benchmark. This ‘real time’ video encoding test makes four passes over two different files to generate a result. As before I took the average of each of the four results from the two groups to generate the final result.
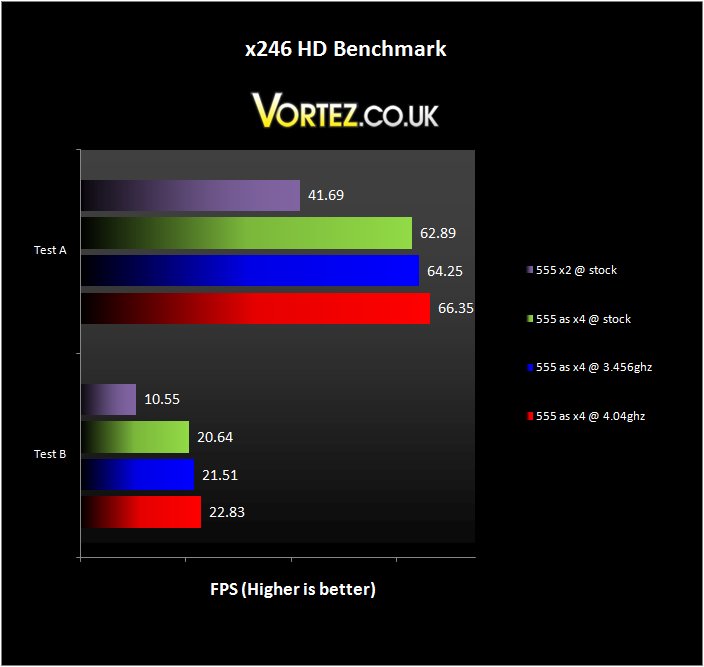
x246 HD Benchmark.
Again multiple cores are the king here. There is a boost offered by the 4.04GHz overclock which pushes performance a little further… but not in the same way extra cores do!
4.04GHz – 3DMark06 and Vantage
We now move look at graphical performance at over 4ghz.
First up again we take a look at Futuremark’s 3DMark06 benchmark program.
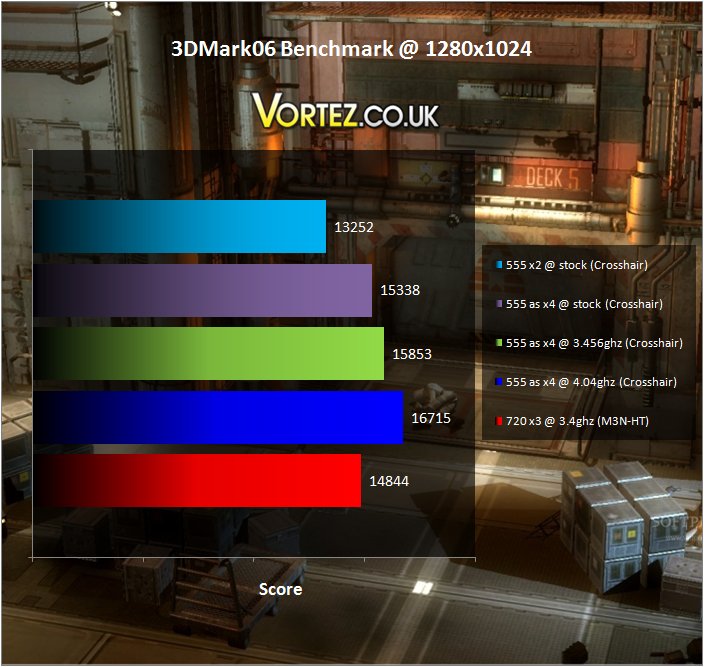
3DMark06.
A very decent boost is offered here over the 3.456GHz clock I initially achieved – almost 1000 extra points.
I then tried Futuremark’s newer 3DMark Vantage benchmark program.
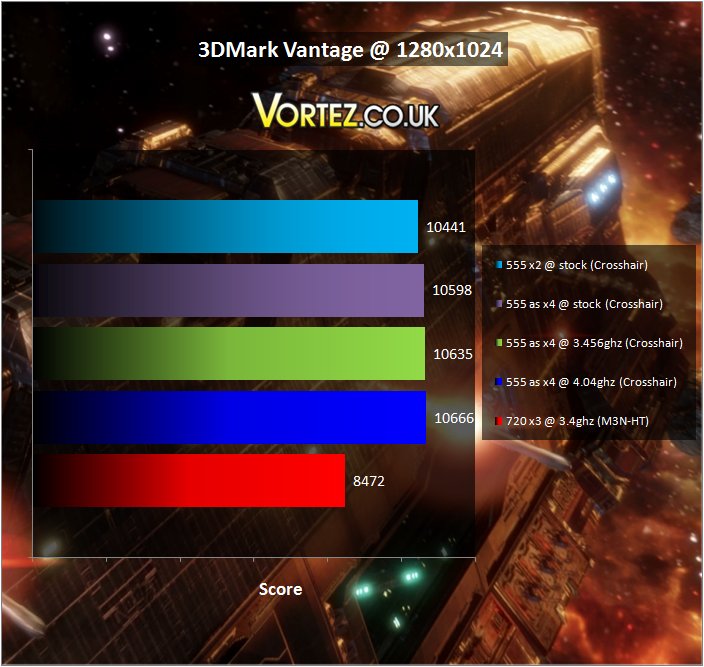
3DMark Vantage.
This returned a much smaller boost with almost no boost regardless of core number or speed. Perhaps it’s more interested in the GPU performance on offer.
4.04GHz – Blacksite and Dead Space
Moving onto actual games Blacksite was our first test.
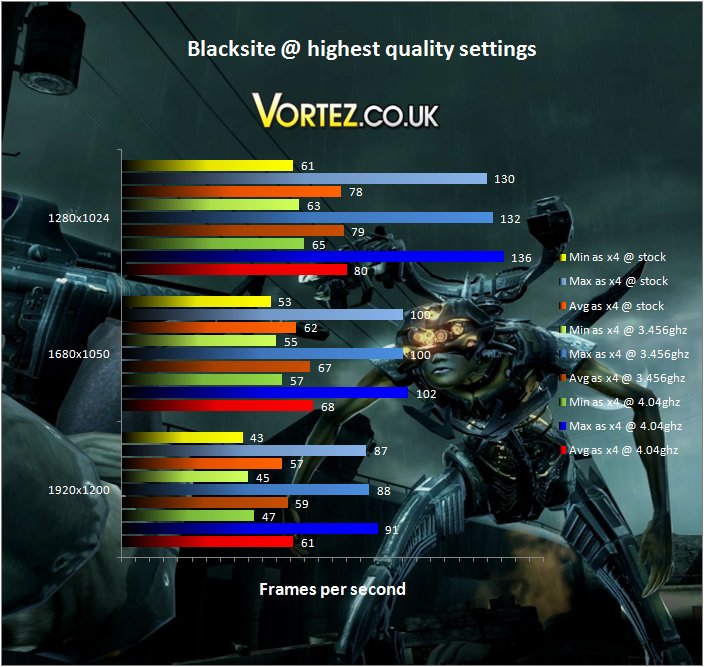
Blacksite.
The boost offered by the 4.04GHz overclock returned around 2-3 extra FPS. Not massive but every little helps.
Dead Space came next – let’s see if this 4.04GHz overclock boosted performance much.
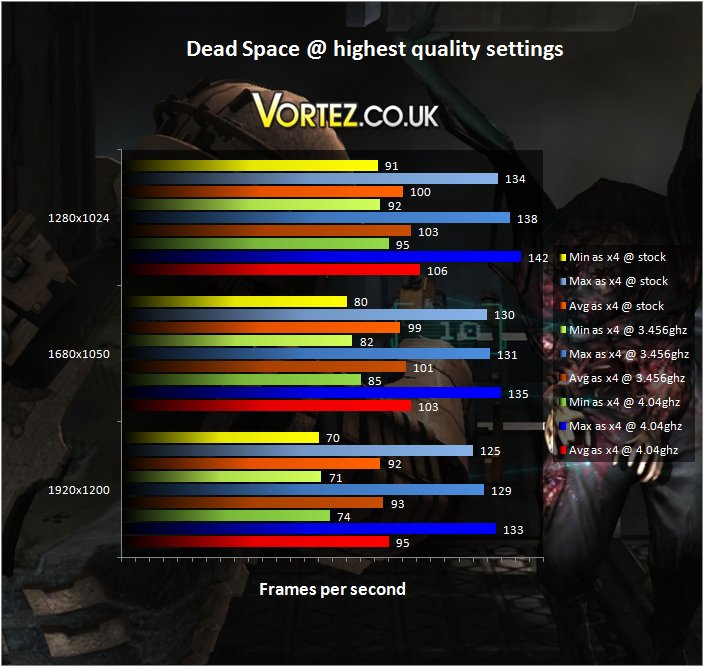
Dead Space.
Again the performance gain is moderate but still there – 3-4 FPS @ 1920×1200.
4.04GHz – Far Cry 2 and Unreal Tournament III
Next was Far Cry 2 – benching this game is quite straight forward due to the inbuilt benchmarking program.
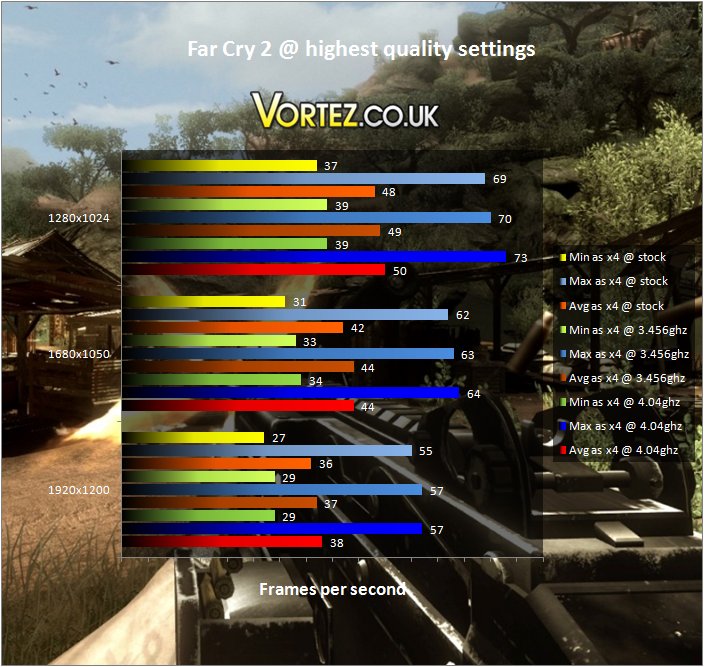
Far Cry 2.
Once again modest gains can again be seen through overclocking although the results plateau a little at 1920×1200.
The last game on test was Unreal Tournament III. Using a benchmarking program I was quickly able to test for any additional performance offered by the 4.04GHz overclock.
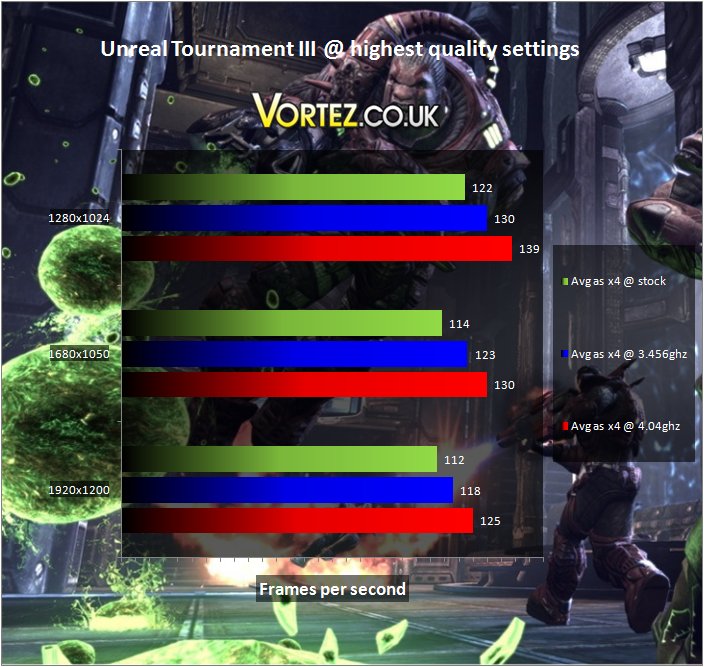
Unreal Tournament III.
The boost in FPS was quite noticeable – the game scaled particularly well as the CPU’s clockspeed rose.
Conclusion
Now that the testing process is totally complete I can offer some final comments about the Crosshair IV Formula.
It’s certainly a feature packed piece of kit – from both a hardware and software point of view pretty much everything you’d need is here.
All of the upcoming tech available to an AMD board is here and it’s all wrapped up in a very tidy package. The raft of features might seem over the top but I would say that everything here has its uses and you’d only miss it if it were absent so top marks to ASUS.
The ASUS Crosshair IV Formula.
For \’absolute performance\’ the Crosshair IV Formula is right up there. It’s already bettered the M4A89GTD I tested recently. Yes it costs a more but extreme users are happy to pay the extra for that extra performance or additional features.
The board very successfully allows stable and quick clocking – while the ROG connect features provide great levels of control and monitoring.
Pros
+ Very impressive overclocking performance
+ Cool running chipset with great passive cooling
+ Comprehensive software bundle
+ ROG connect provides excellent level of control and monitoring
+ Nice board layout
+ Great looking
Cons
– Not the most affordable AMD board on the block!
+ Very impressive overclocking performance
+ Cool running chipset with great passive cooling
+ Comprehensive software bundle
+ ROG connect provides excellent level of control and monitoring
+ Nice board layout
+ Great looking
Cons
– Not the most affordable AMD board on the block!
The result of this very positive performance is the Vortez Gold award.
Like many ASUS ROG boards before it the Crosshair IV Formula wholeheartedly deserves it\’s place as a true enthusiast board.
Vortez would like to thank ASUS for supplying the Crosshair IV Formula for review. Discuss this in our forums.