







ASUS have sent us their new Maximus III Gene motherboard for review. Lets see if this new P55 based board is as impressive as it looks!
Product on Review: Maximus III Gene P55
Manufacturer: ASUS
MSRP: Not mentioned on website
Street Price: £155.88
ASUS have been kind enough to send us their Maximus III Gene P55 motherboard for review.
ASUS are an incredibly well known and highly regarded company and are one of the major manufacturers in everything from motherboards and soundcards all the way to laptops and GPU\’s.
ASUS, a technology-oriented company blessed with one of the world\’s top R&
 teams, is well known for high-quality and innovative technology. As a leading provider of 3C (computers, communications and consumer electronics) total solutions, ASUS offers a complete product portfolio to compete in the new millennium.
To succeed in this ultra-competitive industry, great products need to be complimented by speed-to-market, cost and service. That\’s why all 100,000 over employees of ASUS strive for the \”ASUS Way of Total Quality Management\” to offer the best quality without compromising cost and time-to-market while providing maximum value to all customers through world-class services.
It definitely looks very impressive so let\’s see how this new motherboard performs.
Specifications
Cpu:
Intel Socket 1156 Core i7/Core i5 processor
Chipset:
Intel P55 Express chipset
Memory:
4x DIMM max 16gb DDR3 2133/2000/1600/1333/1066
Supports Intel Extreme Memory Profile (XMP)
Expansion Slots:
2x PCIe 2.0 x16 (support single at x16 or dual x8/x8 mode)
1x PCIe x4
1x PCI 2.2
Overclocking Features:
CPU Power Design
– 8-phase CPU power
– 2-phase VTT power
– 2-phase Memory power
ROG Connect
CPU Level Up
iROG
Extreme Tweaker
Loadline Calibration
Intelligent overclocking tools:
– ASUS TurboV EVO
– O.C. Profile
Overclocking Protection:
– COP EX (Component Overheat Protection – EX)
– Voltiminder LED
– ASUS C.P.R.(CPU Parameter Recall)
Back panel I/O Ports:
1 x External SATA
1 x S/PDIF Out (Optical)
1 x IEEE 1394a
1 x LAN(RJ45) port
9 x USB 2.0/1.1
1 x PS/2 Keyboard port (purple)
1 x Clr CMOS switch
1 x ROG Connect On/Off switch
8-channel Audio I/O with gold-plated jack
Internal I/O Connectors:
3 x USB connectors supports additional 5 USB 2.0 ports (1 port reserved for ROG Connect at rear)
1 x IEEE 1394a connector
7 x SATA connectors (one is from JMicron® 363 (black))
1 x Go Button
System panel connector
Support DVD:
– Drivers and applications
Kaspersky® Anti-Virus
Form Factor:
uATX Form Factor
9.6 inch x 9.6 inch ( 24.4 cm x 24.4 cm )
As you can see the Maximus III Gene looks to be a formidably specified board.
The P55 is a new chipset from intel so should offer great performance from its i5 and i7 chips.
Being a specifically ‘enthusiast’ level motherboard it has very powerful features ranging from its multi GPU compatibility and high quality components, all the way up to its raw overclocking potential provided by a full suite of tweaking tools!!!
I’m itching to try it out so let’s take a look at the board itself…
Packaging and board
As with other top end ASUS offerings the Maximus III Gene is immaculately packaged.
It comes in a typically slick looking ROG (Republic Of Gamers) branded box that outlines all the key functionalities of the motherboard.
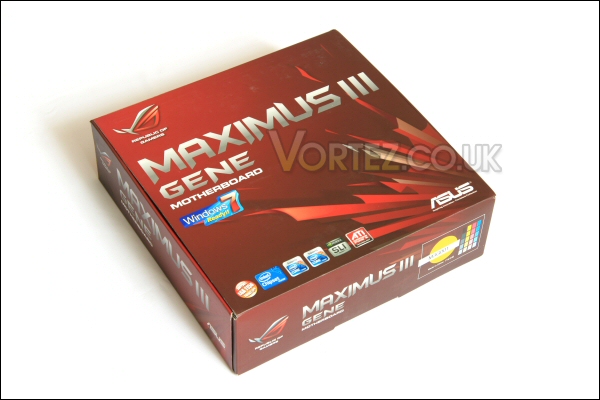
Box front.
The front states the name and specific functions of the board (with extra info contained under a flap) while the back provides far more detailed information about the boards great many features.

Flap reveals more features.
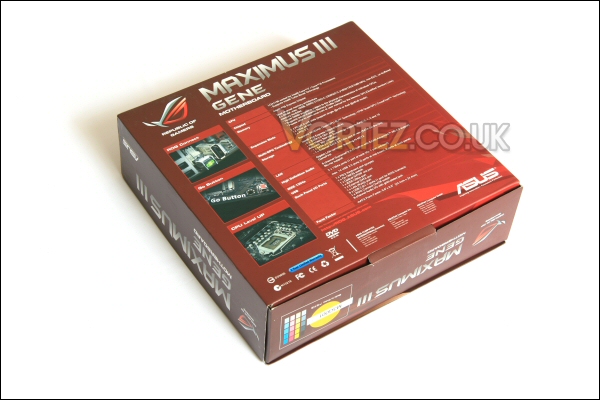
Box back has more detailed info.
Upon opening you are greeted by the motherboard itself. It’s protected by a transparent plastic cover which when removed reveals the board in all its glory. It’s nicely packaged and sits in its own cardboard tray within the main box.
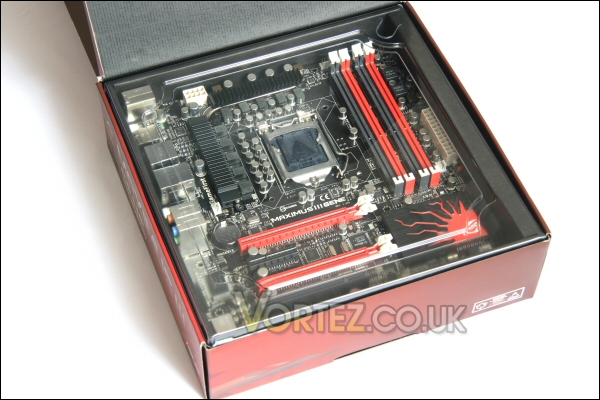
The motherboard with plastic cover in place.
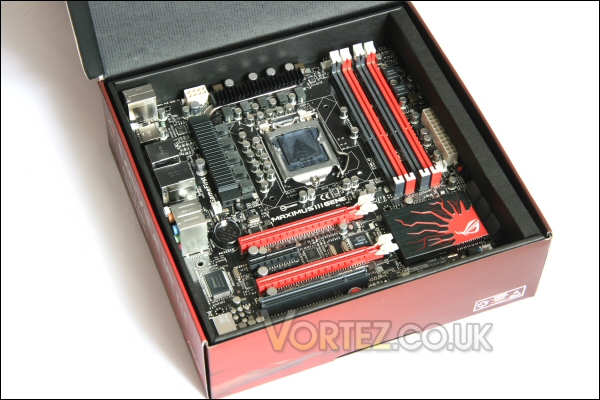
First look at the Maximus III Gene itself.
When this is removed we find the various instructions, cabling and other extras that ASUS supply with the Maximus III Gene.
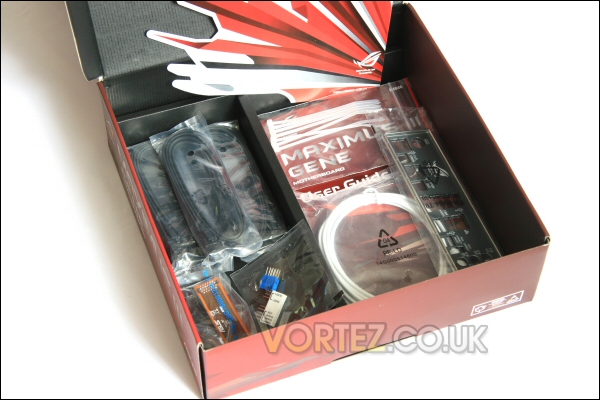
The extras hiding beneath.
More specifically we get 6x SATA cables, an I/O plate, an Nvidia SLi bridge (crossfire bridges are normally supplied with the ATi GPU’s themselves), ASUS’ proprietary Q-connector, a USB cable for using the ‘RoG connect’ remote overclocking feature, and a selection of ZIP ties to help keep your pride and joy nice and tidy.
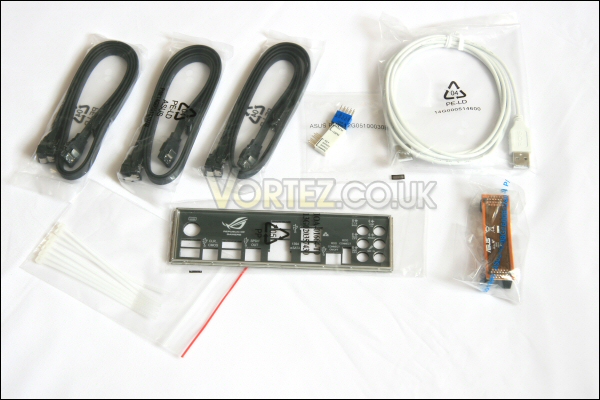
A variety of cables, ties and plates.
Paperwork wise you get a manual, large case sticker, driver DVD (includes Kaspersky Anti Virus too) and some label stickers for your optical and hard disc drives.

Manual and a large case sticker.
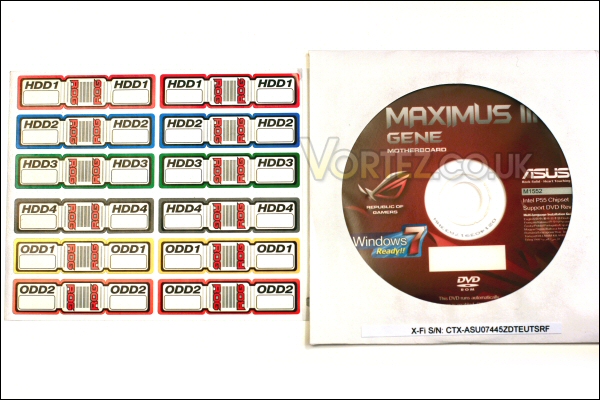
HDD and optical drive SATA labels and the driver DVD.
There’s no denying that the Maximus III Gene is an impressive looking board. I particularly like the simple but effective two tone colour scheme.
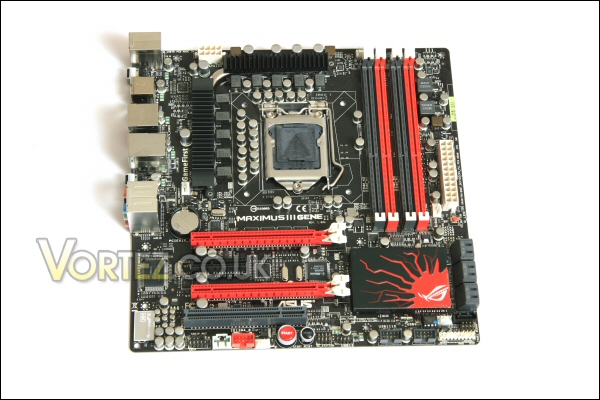
The Maximus III Gene.
Around the back we see the foxconn branded cpu backplate and also notice that the mosfet heatsinks and chipset cooling is screwed in place rather than pushpinned. This should hopefully mean that cooling is the best it can possibly be.
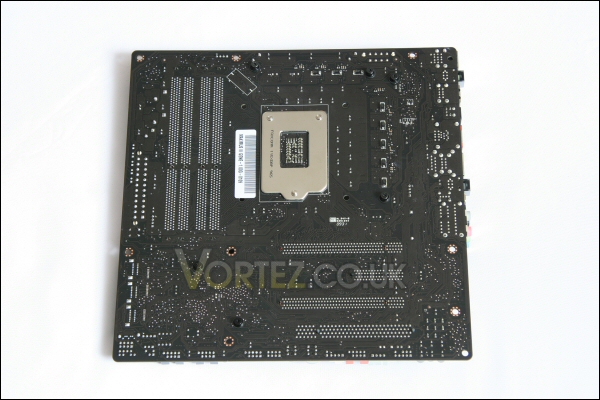
Rear of the board shows heatsinks are secured by screws… nice touch.
Board continued
This is the intels new LGA1156 cpu socket which uses a slightly different clamp mechanism to the previous s775 and X58 offerings. It seems to work just as well, is as secure and i’d say is probably a little easier to use too.
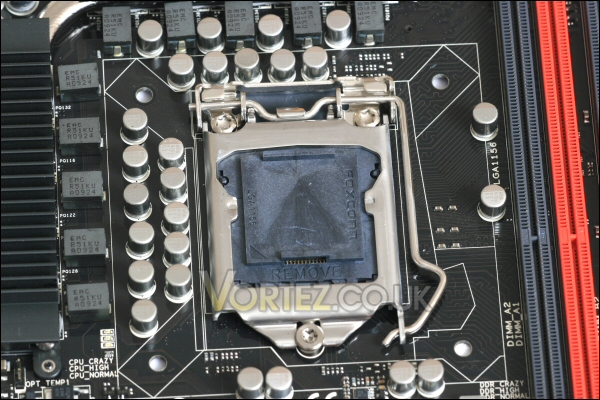
Intels new LGA1156 cpu socket.
Surrounding this we see the mosfet heatsink which is screwed to the motherboard and sports an integrated heatpipe to boost cooling performance. At the top of the image you can also see the 8-pin 12v supply socket for the CPU. It’s a neat arrangement which shouldn’t interfere with heatsink installation.
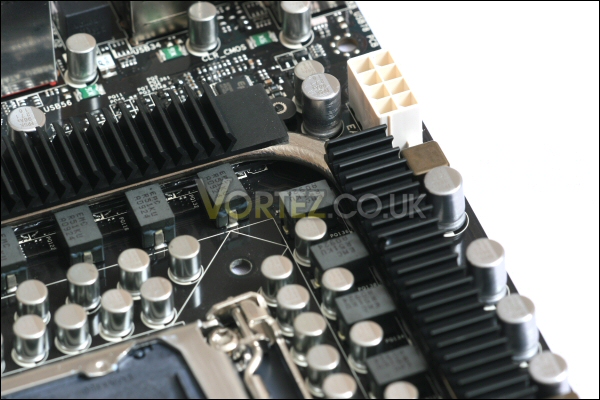
Mosfet sinks and 8-pin 12v supply.
The dual channel DDR3 sockets allow for up to 16gb of memory to be installed. Should be plenty for any power user. I like the new single sided clip – gone are the days of the GPU blocking the removal of those DIMMs!
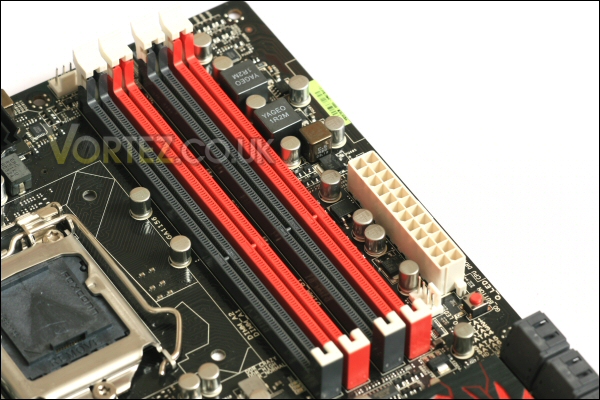
DDR3 sockets.
Next to the DIMM sockets is the 24-pin ATX socket. The absence of an ide socket means there’s plenty of room for installation. You can also see a selection of motherboard status LED’s as well as the GO_BUTTON which (through a feature called Mem-OK) allows a failed memory overclock to be rescued without changing all other overclock settings. Very nice idea!
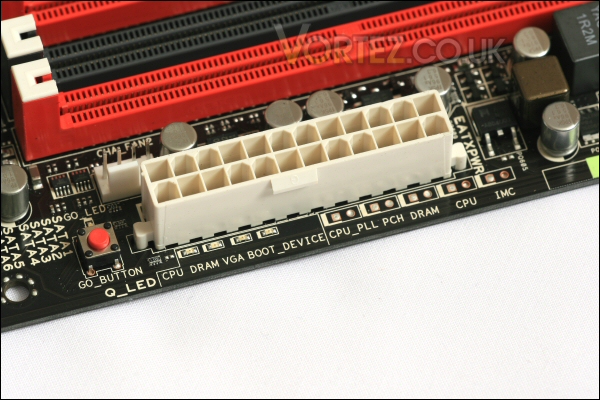
24-pin ATX socket and ASUS’ GO_Button.
Below these we find the six 3Gb/s sata sockets which are run directly from the P55 chipset. An additional controller powers the single upright sata socket you can see as well as the eSATA socket we’ll see on the I/O panel.
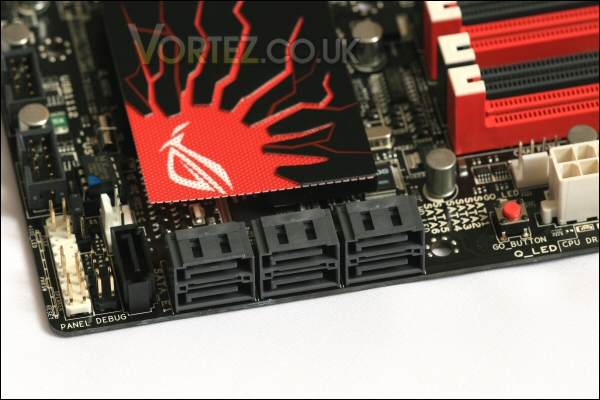
Right angled SATA sockets help keep cabling clear of the GPU.
At the bottom of the board we see the front panel connectors. These are normally annoyingly fiddly to populate but with ASUS’ Q-connector the process is made easy. Also shown here are the two main USB motherboard headers.
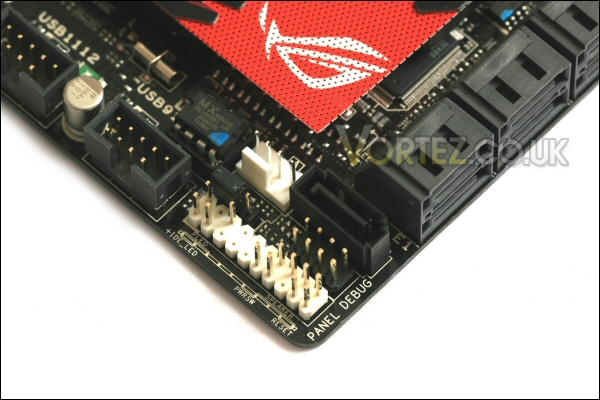
Front panel connectors and USB headers.
Next we find the ‘typically RoG’ Start and Reset buttons. These are a handy feature especially when testing and tweaking the motherboard out of the case.
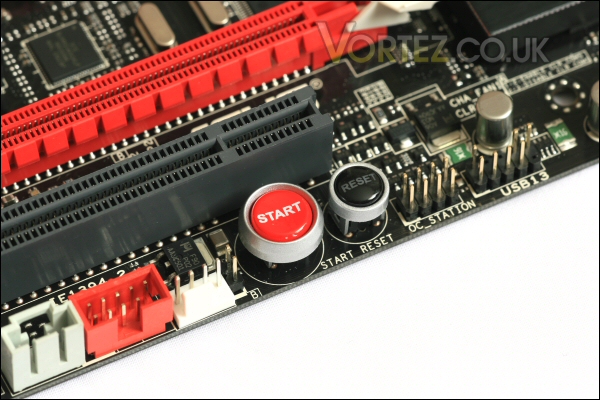
The boards Start and Reset buttons.
Being a M-ATX motherboard the Maximus III Gene has little available room for additional expansion cards (especially if you go the whole hog and install two high end GPU’s!) so ASUS have included the X-Fi SupremeFX from Creative Labs. This should provide a very immersive gaming experience.
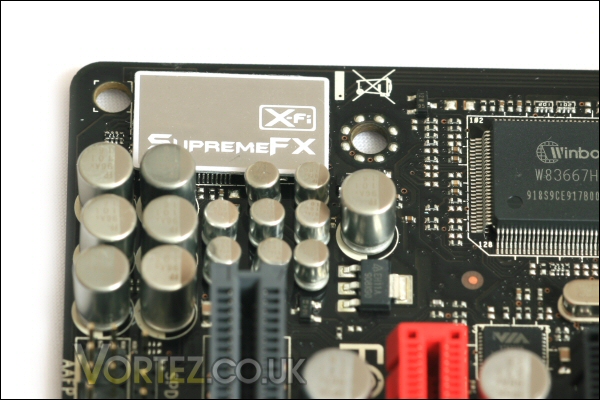
X-Fi should provide good gaming audio.
The large RoG branded feature at the base of the board is in fact the P55 chipset heatsink. When powered up it is tastefully backlit and should be well out of the way when multiple GPU’s are installed due to its low profile design.
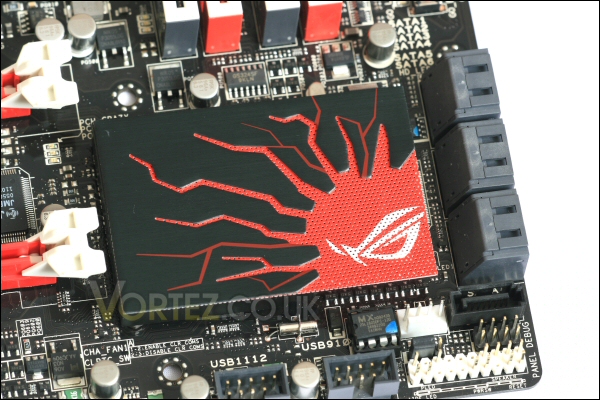
The heatsink covering the boards P55 chipset.
Beside the heatsink we find the four expansion slots. Dual x16 PCIe slots (x16 with a single card or x8/x8 when running dual GPU’s), a x4 PCIe slot and a standard PCI 2.2 slot. Also note the new retention clips which are a much improved design. I always found the single sided clips nearly impossible to remove when a large GPU was installed. There should be no such trouble here! Nice one ASUS!!!
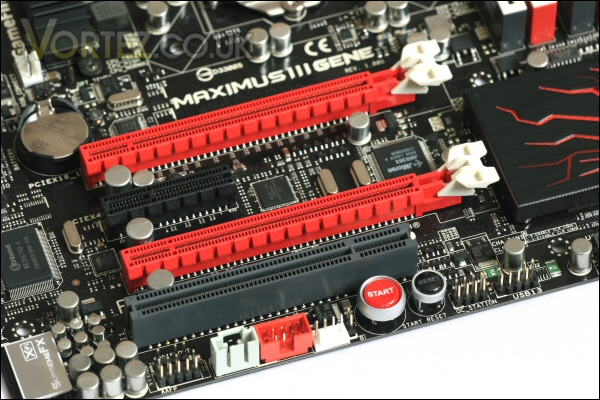
The PCIe slots improved retention clips are great.
Finally we can take a look at the backplate. It’s a fairly tidy layout with decent spacing between all of the 9 USB sockets! Also present are the standard PS2 keyboard socket, firewire, eSATA, optical digital output, the usual 6x analogue audio sockets and a Gigabit lan sporting ASUS’ new ‘GameFirst’ to keep ping and latency times low. Ideal for gamers looking for the edge!
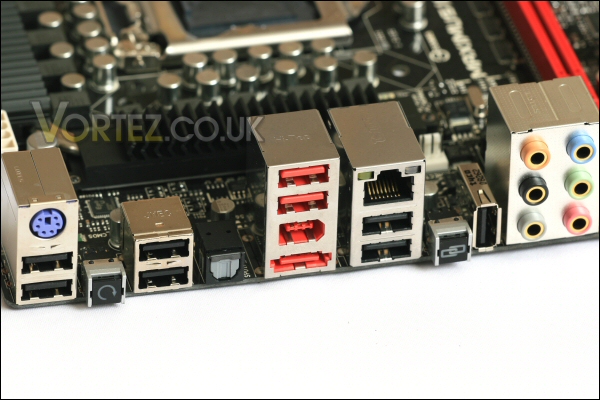
The Maximus III Gene backplate.
The eagle eyed amongst you will also notice the two buttons included on the backplate. The leftmost switch is a CMOS reset incase your overclocks failed and you need to recall stock settings.
The switch to the right is a RoG feature (RoG Connect) that utilises the vertically orientated usb socket to its right. Simply plug that port into another PC/laptop with the supplied Connect software installed and you’ll be able to monitor and change many aspects of the Maximus III Gene’s overclock settings.
Bios
Here are some of the various screens available to you. The Maximus III Gene can be very carefully tuned. The level to which you explore this is up to you – it’s a very straightforward process.
The Extreme Tweaker page greets you as soon as you get into the bios. From here you can choose to go the easy route using the ‘CPU Level Up’ option which is a single command overclock system. With this in place the Core i5 750 i have here can go all the way up to 3.2ghz (from 2.66ghz stock) at the push of a single button so to speak! Very clever!
In a similar fashion you can also ‘Level Up’ the memory too.
For those wanting more there are a myriad of options including all aspects of the board and it components. Voltage, frequency, multipler, etc are all here too!
Serious clocking is just a tweak away.
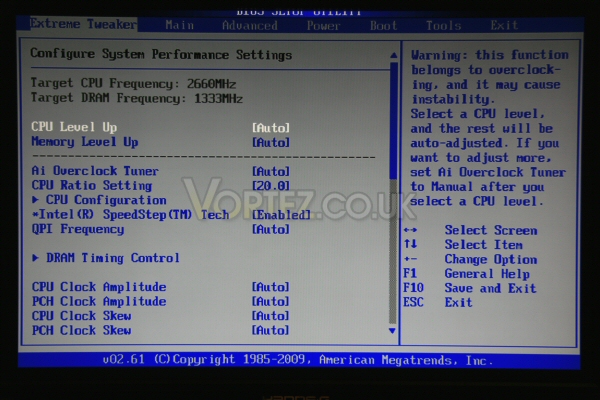
Upper section of the Extreme Tweaker page.
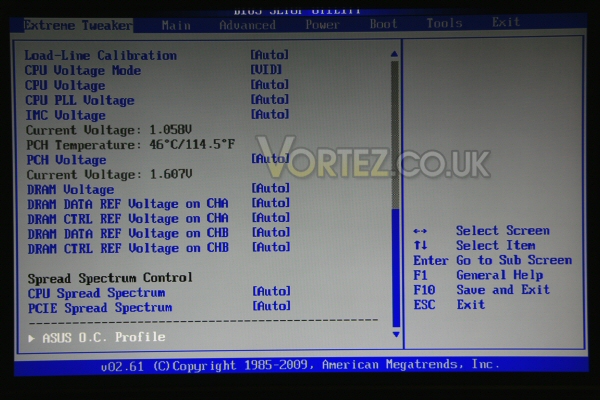
Lower section of the Extreme Tweaker page.
From the ‘Extreme Tweaker’ page you can call up the OC profile page. Here you can save any clock settings you have decided upon.
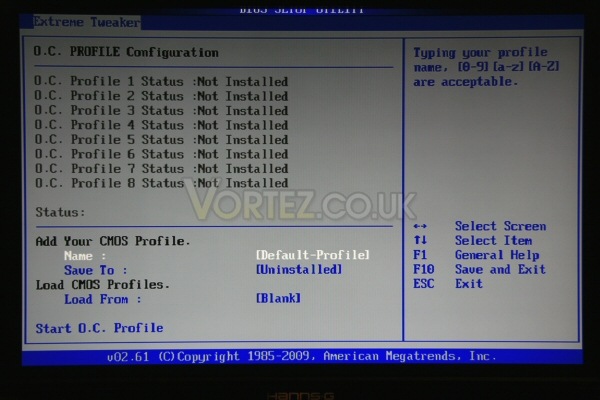
The OC Profile page.
The ‘Advanced Options’ section provides a similar selection of functions to the above including some of the RoG functionalities of the board.
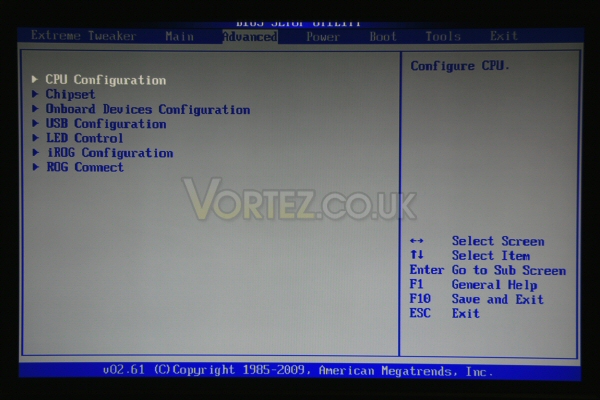
The Advanced Options page.
The ‘Power’ section in the BIOS allows temperature, voltage and other aspects of the boards function to be checked.
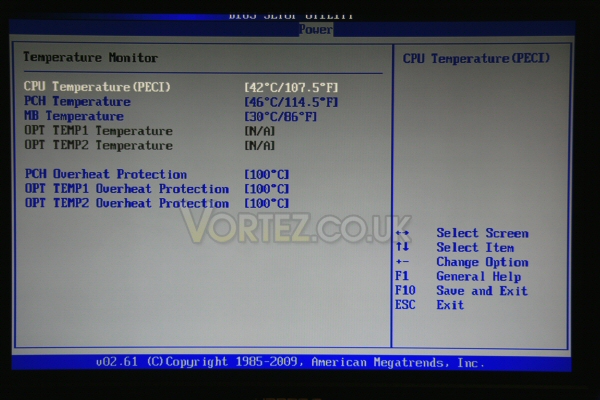
Temp monitoring is available.
Tools provides access to the OC Profile section as well as other ASUS prorietary systems including the GO_BUTTON suite and their BIOS’ EZ Flash 2 utility.
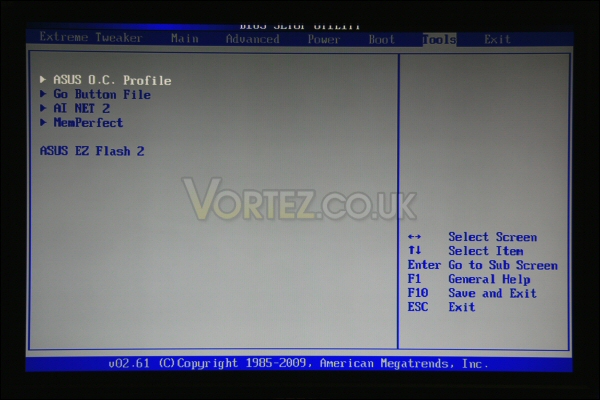
The tools section.
Test setup and installation
CPU: Core i5 750 @ 2.66ghz
RAM: 4gb Kingston HyperX DDR3
HDD: 250gb WD 7200rpm SATA HDD
Optical drive: LG Bluray/HDDVD Multidrive
CPU cooler: Coolermaster Hyper TX3
PSU: Hiper Type-R 580w
Case: Lian Li V350
Installation was very straightforward. The new CPU socket worked a charm and all other components fitted well. The layout helped a great deal and the whole build was complete in around 15 minutes.
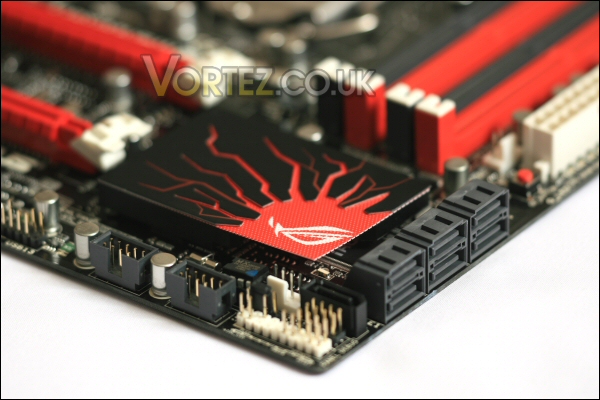
Maximus III Gene.
Overclocking
Beginning with the board and chip at stock speeds i decided to try two approaches for the overclock. The first was to let the board do all the work so i used the ‘CPU Level Up’ and set it to ‘Extreme’!
This provided a 3.2ghz clock speed which is around 540mhz over stock.
After a little testing it proved stable so i set about pushing the board manually.
By altering some basic settings (multipler to 21x – bus speed to 190mhz) and upping the CPU’s core voltage to 1.33v it rather easily managed 4ghz. After a batch of stability testing i found this to be a good overclock… a 50% overclock straight out of the box. Very impressive!
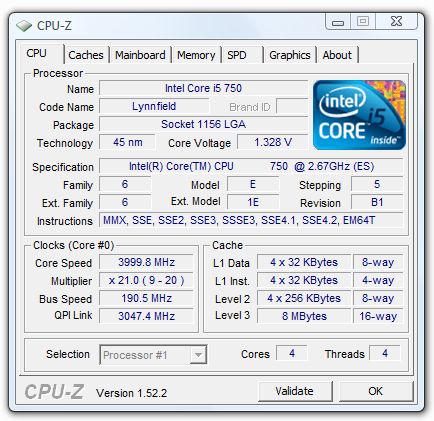
4ghz CPU-Z.
The Maximus III Gene’s power section probably has a lot to do with this clocking performance – it’s 8-phase CPU, 2-phase VTT and 2-phase Memory power sections mean it should supply a strong and stable feed of power to the components that need it.
I checked temperatures for each clock and all was fine.
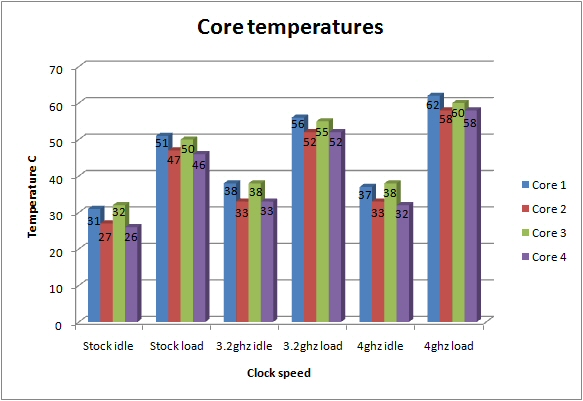
CPU temps at all three clock speeds.
I wonder how these clocks will effect performance.
Test results
Below are a selection of desktop based hardware tests from both Everest Ultimate (Trial Edition) and Futuremark’s PCMark05.
First up we see the Everest results – i didn’t have a price comparable chip to test against but i’ve added an overclocked Core 2 (e2160 @ 3ghz) and an overclocked Phenom II (720 @ 3.4ghz) to the mix for a performance comparison.
Everest
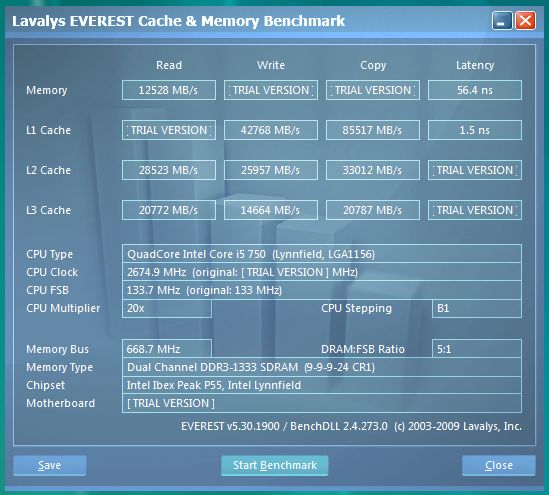
i5 750 @ stock results with Everest.
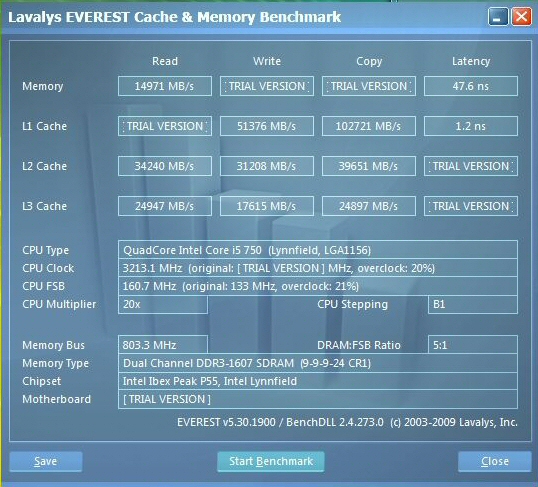
i5 750 @ 3.2ghz results with Everest.
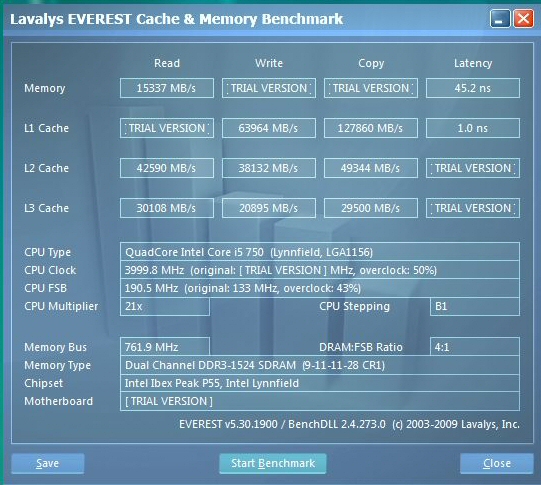
i5 750 @ 4ghz results with Everest.
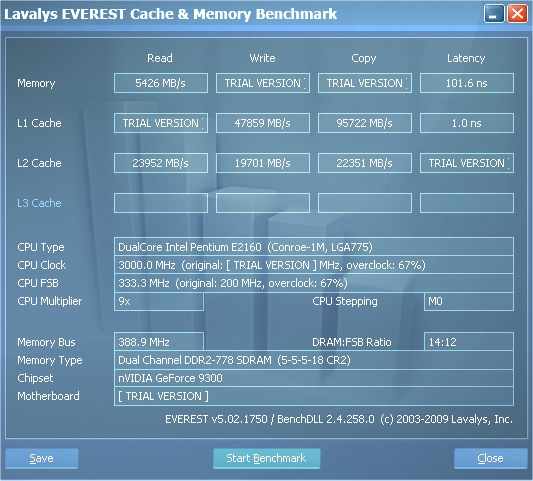
e2160 @ 3ghz results with Everest.
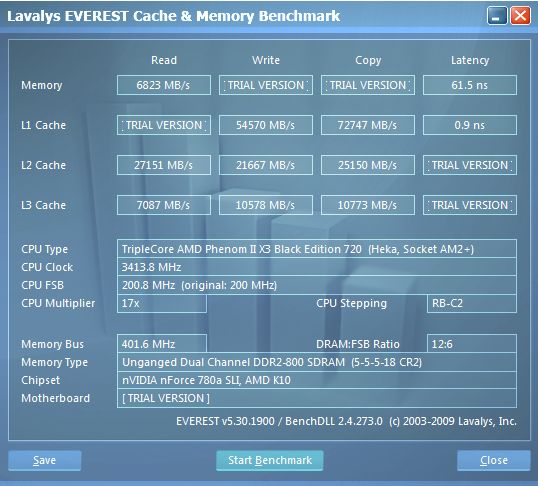
Phenom II 720 @3.4ghz results with Everest.
As you can see there’s quite a performance difference in memory latency speeds and cache capabilities too!
PCMark05
i5 750 @ stock – Score 9843
Physics and 3D 275.01 FPS
Web Page Rendering 3.67 Pages/s
File Decryption 71.56 MB/s
Multithreaded Test 2
Text Edit 156.83 Pages/s
Image Decompression 36.75 MPixels/s
Multithreaded Test 3
File Compression 11.19 MB/s
File Encryption 68.36 MB/s
i5 750 @ 3.2ghz – Score 11598
Physics and 3D 330.19 FPS
Web Page Rendering 4.13 Pages/s
File Decryption 85.44 MB/s
Multithreaded Test 2
Text Edit 198.93 Pages/s
Image Decompression 44.56 MPixels/s
Multithreaded Test 3
File Compression 13.69 MB/s
File Encryption 81.75 MB/s
i5 750 @ 4ghz – Score 12797
Physics and 3D 406.18 FPS
Web Page Rendering 5.28 Pages/s
File Decryption 106.56 MB/s
Multithreaded Test 2
Text Edit 234.72 Pages/s
Image Decompression 55.46 MPixels/s
Multithreaded Test 3
File Compression 16.49 MB/s
File Encryption 104.29 MB/s
e2160 @ 3ghz – Score 8803
Physics and 3D 158.98 FPS
Web Page Rendering 3.88 Pages/s
File Decryption 82.3 MB/s
Multithreaded Test 2
Text Edit 196.39 Pages/s
Image Decompression 41.82 MPixels/s
Multithreaded Test 3
File Compression 6.88 MB/s
File Encryption 40.96 MB/s
PII 720 @ 3.4ghz – Score 10070
Physics and 3D 268.86 FPS
Web Page Rendering 3.69 Pages/s
File Decryption 82.47 MB/s
Multithreaded Test 2
Text Edit 178.53 Pages/s
Image Decompression 43.29 MPixels/s
Multithreaded Test 3
File Compression 10.37 MB/s
File Encryption 86.62 MB/s
The i5 soundly beats the other CPU’s here – AMD’s Phenom II even struggles to keep up with the i5 only clocked to 3.2ghz.
Test results continued
Next up we take a look at gaming performance. Is the P55 board able to produce great results with the i5 750 onboard? Let’s take a look.
Initially i took a look at Futuremarks 3DMark Vantage benchmarking test.
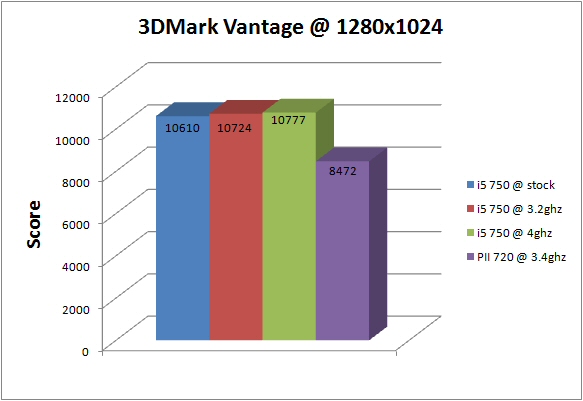
3DMark Vantage performance.
The results show quite a considerable score increase for the Maximus III Gene. Hopefully this is because of extra raw performance rather than the i5 750 having an extra core to play with!
Next i looked at the first person shooter ‘Blacksite’, a good test of any system that scales well as resolution changes.
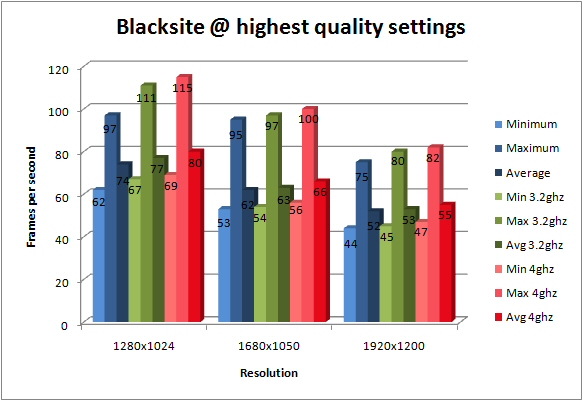
Blacksite performance.
The performance was good. Compared to the same test with the Phenom II 720 @ 3.4ghz (Min 44/Max 70/Avg 50fps) it provided better performance at stock and then increased that lead as the i5 750 was overclocked.
Finally i tested the Maximus III Gene with ‘Race Driver GRID’.
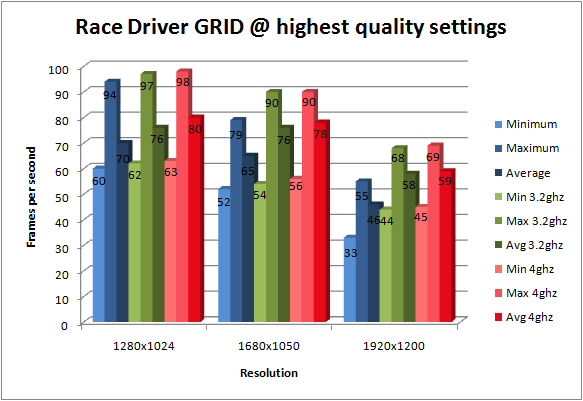
Race Driver GRID performance.
At stock clocks the Maximus trailed the overclocked Phenom II’s results (Min 42/Max 58/Avg 50fps) but once the Maximus III Gene overclocked the i5 750 to 3.2ghz and beyond the setup obliterated the AMD.
This has been a very impressive performance.
Sound
During testing i carefully considered the volume level of the set up.
Maximus III Gene.
The Maximus III Gene’s PWM fan control was exemplary. It only ever throttled up during high load and even then did it in an unobtrusive and gradual manner. As you can see the board itself is a passive design too meaning the lack of fan noise really gives it extra brownie points!
Overall a quiet and effective approach to cooling – other motherboard manufacturers take note!
Conclusion
The Asus Maximus III Gene is everything i\\\’d hoped it would be and probably a little more.
In my opinion it\\\’s not overly pricy compared to others, indeed it takes the middle ground in this regard. What is impressive is that it provides true high end performance at this price point and does it in style. The layout, list of bundled extras, board features and just general competence in all aspects is astonishing. Plus Intel\\\’s new P55 chipset seems like a peach too!
Speaking of board features in particular i personally like the ability to install both i5 and i7 LGA1156 chips as well as the flexibility to utilise multi GPU solutions from both ATi and Nvidia.
It\\\’s overclocking capability is excellent (as you have seen) and should be relatively untroubling for even novice overclockers. The CPU-level up option reaps great rewards in terms of additional \\\’free\\\’ performance that is only a single BIOS option away. It\\\’s stable too… during testing i encountered no issues whatsoever. Plus the bundled copy of Kaspersky Anti Virus and a nice 3 year warranty helps round out the bundle nicely.
If you\\\’re in the market for a top end M-ATX motherboard for reasonable money then the Maximus III Gene might just be the board for you!
Pros
+ Very well laid out
+ Fanless design means silent operation
+ Competitively priced
+ Well specified and supplied with a decent bundle
+ Exceptional performance
+ Great overclocking for both novice and expert users
+ 3 Year Warranty
Cons
– I honestly struggle to find one
I choose to give the ASUS Maximus III Gene our \\\’Gold\\\’ award. An impressive level of performance from an easy to use and great looking package. Thumbs up from me!
Vortez Hardware would like to thank ASUS for supplying the Maximus III Gene for review. To Discuss this review please visit our forum.
