ASUS have downsized their latest flagship ROG motherboard to give us the new Rampage III Gene.
Product on Review: ASUS Rampage III GENE
Manufacturer and Sponsor: ASUS
MSRP: £200
Street Price: Not listed yet
For many years, the ATX form factor has dominated the PC landscape and certainly the enthusiast market was restricted to this. While the E-ATX factor was reserved solely to high end workstation and server motherboards, micro-ATX motherboards were more popular in no thrill pre-built systems whose sole tasks were running office applications or browsing the web. However, more recently, the demand in HTPCs and Lan rigs has meant that people now want performance in a smaller package, whether it be for playing high definition content or playing the latest games without the cumbersome traditional midi/full tower cases presenting an eye sore. Many companies have attempted to provide a solution for this ever growing market, none more successful than ASUS, whose Rampage II Gene brought the best features of its flagship motherboard and the Intel X58 platform into the much smaller micro-ATX form factor. For the most part, it didn’t compromise on performance or features despite its size, and even proved to be a viable solution for enthusiasts who weren’t necessarily restricted to smaller motherboards.
Today, we have the successor to the Rampage II Gene, the aptly named Rampage III Gene. As with the Rampage III Extreme we reviewed earlier this year, the Gene is an evolution of ASUS’s flagship platform. One of the caveats of the Extreme was its size, which at 1inch wider, potentially created compatibility problems but the Gene manages to pack most of the features from its bigger brother into its smaller dimensions. As such, unique ASUS features such as Probelt, COP EX and other ROG capabilities are present. We can also expect to see SATA 6Gb/s and USB 3.0 implementation thanks to the Marvell and NEC controller chips. More notably, the ASUS SupremeFX X-Fi 2 onboard sound makes a comeback. For the hardcore enthusiasts, the LN2 specific modifications have been given a miss but the ROG connect feature has been integrated for remote overclocking. The board may not cater to overclockers like the Extreme does but at its price point, the Gene promises to deliver excellent performance and a feature rich experience to even compete with other full sized ATX motherboard.
A bit about ASUS:
ASUS comes from the last four letters of Pegasus, the winged horse in Greek mythology that represents the inspiration of art and learning. ASUS embodies the strength, creative spirit and purity symbolized by this regal and agile mythical creature, soaring to new heights of quality and innovation with each product it introduces to the market.
ASUS pursues technological and aesthetic perfection through continuous innovation. We place ourselves in our customers’ shoes to develop a deep understanding of, and genuine empathy for, their needs—enabling us to create user experiences that transcend the norm.
ASUS Design Philosophy
ASUS Design develops high-quality solutions our customers will enjoy.
Our design process is built on thorough research, early anticipation and well-planned execution.
We act with a global vision and a focus on local strengths, conditions and heritage.
ASUS comes from the last four letters of Pegasus, the winged horse in Greek mythology that represents the inspiration of art and learning. ASUS embodies the strength, creative spirit and purity symbolized by this regal and agile mythical creature, soaring to new heights of quality and innovation with each product it introduces to the market.
ASUS pursues technological and aesthetic perfection through continuous innovation. We place ourselves in our customers’ shoes to develop a deep understanding of, and genuine empathy for, their needs—enabling us to create user experiences that transcend the norm.
ASUS Design Philosophy
ASUS Design develops high-quality solutions our customers will enjoy.
Our design process is built on thorough research, early anticipation and well-planned execution.
We act with a global vision and a focus on local strengths, conditions and heritage.
Following the ROG lineage, let’s see how the much awaited Rampage III Gene fares.
Specifications
CPU
-Intel® Socket 1366 Core™ i7 Processor/Core™ i7 Processor Extreme Edition
-Supports Intel® Turbo Boost Technology
*Note: This board does NOT support the i7 8xx series of CPU
Chipset
-Intel® X58/ICH10R
System Bus
Up to 6.4 GT/s with QuickPath Interconnection
Memory
– 6 x DIMM, Max. 24 GB, DDR3 2200(O.C.)/2133(O.C.)/2000(O.C.)/1800(O.C.)/1600/1333/1066 Non-ECC, Un-buffered Memory modules
-Tri Channel memory architecture
Expansion Slots
– 2 x PCIe 2.0 x16 (Dual x16 mode)
– 1 x PCIe x4
– 1 x PCI 2.2
Multi-GPU Support
-Supports NVIDIA® SLI™ Technology / ATI® CrossFireX™ Technology
Storage
Intel® ICH10R Southbridge
-6 x SATA 3.0 Gb/s ports
-Intel Matrix Storage Technology Support RAID 0,1,5,10
Marvell® 9218 PCIe SATA 6Gb/s controller
– 2 x SATA 6.0 Gb/s ports (Red)
LAN
– Gigabit Intel® PHY
Audio
SupremeFX X-Fi 2 Built-in
– EAX® Advanced™ HD 5.0
– THX TrueStudio PC
– X-Fi® Xtreme Fidelity™
– Creative ALchemy
– Supports Blu-ray audio layer content protection
– Supports Jack-detection, Multi-streaming, Front Panel Jack-retasking
– Supports 1 x Optical S/PDIF out port at back panel
IEEE 1394
2 x 1394a ports (1 port onboard, 1 port at back I/O)
USB
NEC® USB 3.0 controller
– 2 x USB 3.0/2.0 ports (at back I/O)
Intel® ICH10R Southbridge
– 11 USB 2.0/1.1 ports (4 ports at mid-board, 6 ports at back I/O, 1 port at back I/O reserved for ROG Connect)
Back Panel I/O Ports
-1 x IEEE 1394a
-1 x LAN(RJ45) port
-8 -Channel Audio I/O
-1 x Clr CMOS switch
-1 x PS/2 Keyboard port (purple)
-2 x USB 3.0/2.0 ports
-7 x USB 2.0 ports (1 port also for ROG Connect)
-1 x ROG Connect On/Off switch
-S/PDIF Out (Optical)
Software
-Drivers and Applications
– Sound Blaster X-Fi MB2 Utility
-Kaspersky Anti-Virus
– ROG GameFirst Utility
-ASUS PC Probe II
-ASUS Update
-ASUS AI Suite II
ASUS Specific Features
Power Design:
– 8-phase CPU power
– 2-phase QPI/DRAM power
– 2-phase NB power
ROG Features:
-ROG Connect
-ProbeIt
-iROG
-GameFirst
-Extreme Tweaker
-Q-Fan Plus (without thermal sensor cables)
-Loadline Calibration
Intelligent Overclocking Tools:
– ASUS TurboV EVO
– O.C Profile
Overclocking Protection:
– COP EX (Component Overheat Protection – EX)
– Voltiminder LED
– ASUS C.P.R.(CPU Parameter Recall)
Other Features
-CPU Level UP
-MemOK!
-Onboard switches: Power/Reset/ Clr CMOS
-ASUS MyLogo3
-ASUS Fan Xpert
-ASUS EZ Flash 2
-ASUS CrashFree BIOS 3
-ASUS Q-Connector
-ASUS Q-Led (CPU, DRAM, VGA, Boot Device LED)
-ASUS Q-Slot
-ASUS Q-Dimm
Form Factor
micro-ATX Form Factor: 9.6 inch x 9.6 inch ( 24.4 cm x 24.4 cm )
-Intel® Socket 1366 Core™ i7 Processor/Core™ i7 Processor Extreme Edition
-Supports Intel® Turbo Boost Technology
*Note: This board does NOT support the i7 8xx series of CPU
Chipset
-Intel® X58/ICH10R
System Bus
Up to 6.4 GT/s with QuickPath Interconnection
Memory
– 6 x DIMM, Max. 24 GB, DDR3 2200(O.C.)/2133(O.C.)/2000(O.C.)/1800(O.C.)/1600/1333/1066 Non-ECC, Un-buffered Memory modules
-Tri Channel memory architecture
Expansion Slots
– 2 x PCIe 2.0 x16 (Dual x16 mode)
– 1 x PCIe x4
– 1 x PCI 2.2
Multi-GPU Support
-Supports NVIDIA® SLI™ Technology / ATI® CrossFireX™ Technology
Storage
Intel® ICH10R Southbridge
-6 x SATA 3.0 Gb/s ports
-Intel Matrix Storage Technology Support RAID 0,1,5,10
Marvell® 9218 PCIe SATA 6Gb/s controller
– 2 x SATA 6.0 Gb/s ports (Red)
LAN
– Gigabit Intel® PHY
Audio
SupremeFX X-Fi 2 Built-in
– EAX® Advanced™ HD 5.0
– THX TrueStudio PC
– X-Fi® Xtreme Fidelity™
– Creative ALchemy
– Supports Blu-ray audio layer content protection
– Supports Jack-detection, Multi-streaming, Front Panel Jack-retasking
– Supports 1 x Optical S/PDIF out port at back panel
IEEE 1394
2 x 1394a ports (1 port onboard, 1 port at back I/O)
USB
NEC® USB 3.0 controller
– 2 x USB 3.0/2.0 ports (at back I/O)
Intel® ICH10R Southbridge
– 11 USB 2.0/1.1 ports (4 ports at mid-board, 6 ports at back I/O, 1 port at back I/O reserved for ROG Connect)
Back Panel I/O Ports
-1 x IEEE 1394a
-1 x LAN(RJ45) port
-8 -Channel Audio I/O
-1 x Clr CMOS switch
-1 x PS/2 Keyboard port (purple)
-2 x USB 3.0/2.0 ports
-7 x USB 2.0 ports (1 port also for ROG Connect)
-1 x ROG Connect On/Off switch
-S/PDIF Out (Optical)
Software
-Drivers and Applications
– Sound Blaster X-Fi MB2 Utility
-Kaspersky Anti-Virus
– ROG GameFirst Utility
-ASUS PC Probe II
-ASUS Update
-ASUS AI Suite II
ASUS Specific Features
Power Design:
– 8-phase CPU power
– 2-phase QPI/DRAM power
– 2-phase NB power
ROG Features:
-ROG Connect
-ProbeIt
-iROG
-GameFirst
-Extreme Tweaker
-Q-Fan Plus (without thermal sensor cables)
-Loadline Calibration
Intelligent Overclocking Tools:
– ASUS TurboV EVO
– O.C Profile
Overclocking Protection:
– COP EX (Component Overheat Protection – EX)
– Voltiminder LED
– ASUS C.P.R.(CPU Parameter Recall)
Other Features
-CPU Level UP
-MemOK!
-Onboard switches: Power/Reset/ Clr CMOS
-ASUS MyLogo3
-ASUS Fan Xpert
-ASUS EZ Flash 2
-ASUS CrashFree BIOS 3
-ASUS Q-Connector
-ASUS Q-Led (CPU, DRAM, VGA, Boot Device LED)
-ASUS Q-Slot
-ASUS Q-Dimm
Form Factor
micro-ATX Form Factor: 9.6 inch x 9.6 inch ( 24.4 cm x 24.4 cm )
The specifications are certainly very impressive on initial looks. Due to its size, it misses out on several features compared to its Extreme brethren, most noticeably the 2 extra PCIe x16 lanes but this is understandable. The gene also lacks the ROG Bluetooth connectivity, which I found to be very useful when overclocking the Extreme variant but those looking for remote overclocking can still rely on the ROG connect cable to use external windows based devices to do so. One of the complaints of the Extreme, as shown by some potential buyers, was the inclusion of only 1 USB front panel header but the Gene rectifies this by incorporating two headers for an additional 4 USB ports integrated into cases. The Extreme Engine Digi+ power delivery system that made the Extreme such a good overclocking board is somewhat limited on the Gene with the absence of the ML Caps and power delivery to the QPI/DRAM and Northbridge is only handled by two phase power as opposed to 3. However, the upside of the Gene is the inclusion of the built-in SupremeFX X-Fi 2 chip for superior sound quality.
Features
| iROG Intelligent multiple control at hand The iROG is a special IC which enables several ROG highlighted functions that gives users full disposal of the motherboard at any stage! This design allows advanced user control and management to be processed purely at a hardware level. iROG greatly increases fun during overclocking for PC enthusiasts and it offers system maintenance and management with more control and efficiency. Voltiminder LED Friendly reminder on Voltage Settings In the pursuit of extreme performance, overvoltage adjustment is critical but risky. Acting as the “red zone” of a tachometer, the Voltiminder LED displays the voltage status for CPU, PCH, and Memory in a intuitive colour-coded fashion. The voltiminder LED allows quick voltage monitoring for overclockers. Probelt Get all hands-on with hardware-based overclocking ProbeIt takes the guesswork out of locating the motherboard´s measurement points, identifying them clearly in the form of 5 sets of detection points so you´ll know exactly where to get quick yet accurate readings using a multimeter. Extreme Tweaker One stop performance tuning shop Extreme Tweaker is the one stop shop to fine-tune your system to optimal performance. No matter if you’re looking for frequency adjustment, over-voltage options, or memory timing settings, they’re all here! ROG Connect Plug and Overclock – Tweak it the hardcore way! Monitor the status of your desktop PC and tweak its parameters in real-time via a notebook—just like a race car engineer—with ROG Connect. ROG Connect links your main system to a notebook through a USB cable, allowing you to view real-time POST code and hardware status readouts on your notebook, as well as make on-the-fly parameter adjustments at a purely hardware level. ROG Connect even allows you to flash your BIOS from the notebook, which means that you can OC your system to the max without any fear of permanently bricking the motherboard due to a corrupted BIOS. GameFirst The speed you need to pwn Low Internet latency allows you to frag more, and get fragged less. That’s why ROG has introduced GameFirst, a feature that manages the flow of traffic according to your needs so that you can still listen to online music, download and upload files, and engage in Internet chats without sacrificing the low ping times you need to pwn your opponents. CPU Level Up A simple click for instant upgrade! Ever wish that you could have a more expansive CPU? Upgrade your CPU at no additional cost with ROG’s CPU Level Up! Simply pick the processor you wanted to OC to, and the motherboard will do the rest! See the new CPU speed and enjoy that performance instantly. Overclocking is never as easy as this. COP Ex Maximum OC with confidence with burn proof protection to chipsets and GPU! The COP EX allows overclockers to increase chipset voltages without the worries of overheating. It can also be used to monitor and save an overheating CPU. The COP EX allows more freedom and less constraint for maximum performance achievement. Loadline Calibration Optimal power boost for extreme CPU overclocking! Maintaining ample voltage support for the CPU is critical during overclocking. The Loadline Calibration ensures stable and optimal CPU voltage under heavy loading. It helps overclockers enjoy the motherboard’s ultimate OC capabilities and benchmark scores. SupremeFX X-Fi 2 Built-in Play with ultra-real cinematic in-game surround sound! SupremeFX X-Fi 2 delivers incredible gaming audio experiences to ROG die hards. It features hardware-accelerated EAX 5.0 and OpenAL for ultra-real cinematic in-game audio. It even comes with THX branding, which makes games, music and movies sound way better! SupremeFX X-Fi 2 also implements gold-plated jacks and high quality capacitors to ensure high definition adventures in audio. Onboard Switch No more shorting pins or moving jumpers Go Button ASUS Q-Connector Make connections quick and accurate ASUS Q-DIMM ASUS Q-Slot ASUS Q-LED ASUS Q-Shield |
Most of the features from the Rampage III Extreme is still retained on the Gene. A few of the enthusiast features such as the LN2 jumpers, dual BIOS system and EZPLUG didn’t make it to the Gene but the board wasn’t designed to cater for this market as much as the Extreme variant. EZPLUG is unnecessary since the board will not require additional power to support more than two power hungry graphics cards. Unfortunately, one of the features that I will miss is the ability to flash the latest BIOS through the ROG connect port. For some strange reason, ASUS haven’t implemented it despite the port still integrated into the board.
So, while the Rampage III Gene still sports a vast range of impressive features, it isn’t as fully laden as the Rampage III Extreme but considering the price difference, we can’t expect more.
Packaging and Content
Front of the box
We’ll all be familiar with ASUS’s ROG packaging by now, the vibrant red box with the motherboard’s name printed in bold across the top. It makes for a very attractive packaging, oozing with style. The Republic Of Gamers logo gives it a sense of exclusivity and premium quality ASUS has become renowned for. The size of the box itself is tiny in comparison to the Rampage III Extreme’s packaging. Measuring at 28 x 26.5 x 8cm, it is dwarfed by the 36.5 x 32.5 x 12.5cm volume of Extreme’s box. At the bottom, we can see that the board supports Intel Core i7 LGA 1366 CPUs, Nvidia SLI and ATI CrossFireX.
Back of the box
Turning to the back of the box, ASUS lists some of the specifications that was detailed two pages back. These are neatly tabled for easy reading and on the left, some of the key features are shown with illustrations. The board’s unique aspects are the ROG Connect feature, which we will cover later on, the GameFirst application and the SupremeFX X-Fi 2 chip supporting 8-audio channels.
Closer look at the back
A closer look at the back and it becomes clearer what each feature does. If the size of the box wasn’t enough of a give-away, the specifications makes it clear that the Gene is a micro-ATX motherboard spanning 24.4 x 24.4cm.
Side of the box
Each side of the cuboid box has the Rampage III Gene name emblazoned on.
The front flap
As we have seen before, the front of the box makes use of a flap to accommodate more information on the board. Each feature is followed with by a short description to inform users how each will benefit their experience. Under the tweak-ability tab, the board offers the ROG Connect and Probelt feature for remote overclocking and more accurate voltage probing. The latter was also a feature on the Rampage III Extreme and Maximus III Extreme reviewed here. For performance, the motherboard has CPU Level Up which can instantly overclock the processor to clock speeds of higher SKUs. Of course, the ROG motherboards fame themselves on providing a number of ways in overclocking the CPU and the Rampage III Gene is no exception to this philosophy. At the top, ASUS have kindly written what exactly makes the Republic Of Gamers products superior to other competing solutions. We’ll have to see for ourselves if their words hold true.
Opening the flap
Rather than using a clear Perspex to showcase the motherboard inside, ASUS lists even more features below the flap, this time telling users how the Gene can deliver the best gaming experience with its superior sounds quality and GameFirst application. Kaspersky Anti-Virus is also bundled for users to take advantage of.
Closer Look: The Bundle
The interior
Opening the front lid, the Rampage III Gene is revealed in all its glory. The board is protected by a touch plastic cover moulded to fit the smaller packaging inside.
The motherboard box
Unlike with the Rampage III Extreme, there is only one smaller package inside that holds the motherboard. The square box does a good job at securing the motherboard without it getting dislodged during transit. However, due to a design flaw on the motherboard, it did get slightly damaged and I’ll touch on that later on.
The bundle
Rather than using extra packaging for the bundled accessories, everything is packaged at the bottom of the main box. It is divided into two compartments separating the cables from the manual and connectors. The bundle is fairly rich but it does lack certain accessories that were bundled with the Extreme, namely the E-SATA + 2 x USB 2.0 module and the additional chipset cooling fan. A few of the cable connectors are also absent such as an extended CrossFireX cable and Tri-SLI cable, thermal sensor cables and the ROG Probelt cables. Before people exclaim that there are quite a few things missing, I have to point out that those accessories are unnecessary on the Gene. The Gene has two additional onboard USB 2.0 ports, thus not requiring the Extreme’s additional bundled module. Since there are only two PCIe x16 slots, the extended CrossFireX and Tri-SLI cables are pointless anyways and finally the design of the Probelt probe points renders the cables useless.
The cables and stickers
In the first compartment, we have:
1 x 2-in-1 SATA 6.0Gb/s Cables
3 x 2-in-1 SATA 3.0Gb/s Signal Cables
1 x ROG Connect Cable
1 x 12-in-1 ROG Cable Label
1 x ROG theme label
The SATA 6.0Gb/s cable is distinguishable by its white coloured end. Each pack holds two cables with one cable being straight ended and the other with one right angled connector at one end. This is enough to fill all the 6 Intel and 2 Marvel SATA ports on the motherboard. The white ROG connect cable supplied enables connectivity between the motherboard and other windows based devices for remote hardware monitoring and overclocking. The labels are very helpful in identifying SATA cables installed and demonstrates ASUS’s attention to detail and focus on better user experience
The rest of the content
In the second compartment are:
1 x User’s Manual
1 x Driver disk
1 x I/O Shield
1 x SLI Cable
1 x 2-in-1 ASUS Q-Connector Kit
1 x Cable Ties Pack
The I/O plate continues ASUS’s trend of offering padding on both side of the metallic plate. Thankfully, the plate doesn’t have any protruding metal clips that we are accustomed to see with other manufacturers. The foam padding helps ease installation. The manual is a very in depth booklet that covers every aspect of the board, from its layout, installation and specifications, to a more comprehensive look at the software utilities and the BIOS features. The support disc includes ASUS AI Suite II, ASUS ROG Connect, ROG GameFirst and all the required chipset drivers. The former is an all in one application that incorporates several ASUS utilities such as ASUS Probe II, EPU and FAN Xpert. More on that later on. As mentioned before, only one SLI cable is bundled.
The Rampage III Gene
And finally we have the Rampage III Gene in the flesh. Complying to the micro-ATX form factor, the board is 24.4 x 24.4 cm while still retaining 8 SATA ports, two PCIe x16 slots, 6 DIMM slots, the LGA1366 socket and an adequate chipset cooling system. The motherboard is very striking, continuing ASUS’s trend in using red and black theme on all their latest Republic Of Gamers motherboards. Despite its size, the board isn’t cluttered and all the connectors have been placed appropriately for ease of use and to prevent conflicts with installed hardware. Most impressively has been their ability to include a number of onboard switches and the iROG integrated chips.
Closer Look: The Motherboard
The motherboard in a Micro-ATX form factor
ASUS makes efficient use of space to install all the integrated chips so it’s no surprise to see very little bare PCB. With the P6X58D-E, I mentioned that ASUS were using a unique design layout such that the CPU socket was place in line with the middle of the RAM slots to minimize the trace distance between the CPU and the RAM. This feature is not present here, as was the case with the Rampage III Extreme and instead, ASUS promise to deliver lower latencies using superior components. Memory support and overclocking was class leading with the Extreme so hopefully we see more of that heritage with the Gene.
The back of the motherboard
Turning the board around, the LGA1366 socket retention backplate can be seen. The MOSFET chipset heatsink also has a thin backplate for extra support and better contact. The X58 chipset heatsink in the middle is also screwed on as opposed to using push pins for optimal pressure and better cooling potential. The smaller Southbridge chipset heatsink uses the push pin mechanism but since the ICH10R chip does not get too hot anyway, so opting for this method is understandable.
The I/O ports
The Gene hasn’t been compromised in terms of I/O connectors apart from the absence of the Bluetooth adapter. Going from left to right, there are the:
-PS/2 keyboard port (purple)
-2 x USB 2.0 ports
-Clear CMOS button
-Optical S/PDIF Out port
-IEEE 1394a port
-2 x USB 2.0 ports
-LAN (RJ-45) port
-2 x USB 2.0 ports
-ROG Connect switch
-ROG Connect port
-2 x USB 3.0 ports (blue)
-8 Channel Audio I/O ports
Four more USB 2.0 ports are supported using the onboard front panel headers giving a total of 10.
The I/O shield installed
The I/O plate is clearly labelled to help users with installation and it also gives a more professional finish compared to standard metal I/O shields. The switches and some of the ports are also lit up to further aid in accessing the back, especially if the computer is placed in a dark corner. In terms of connectivity, the Gene is very similar to the Extreme whilst lacking the RC Bluetooth functionality.
The NEC D720200F1 chip
Behind the I/O ports, the board sports the NEC D720200F1 chip that delivers USB 3.0 support to the board. It uses the PCIe 2.0 bus for the USB 3.0 controller (5Gb/s). This chip is found in all current motherboards that provide the same functionality.
One 8 pin ATX 12V power connector
The Gene only sports a single 8 pin ATX 12V power connector. This should provide more than enough power for overclocking the CPU. Looking closer at the MOSFET heatsink, they utilise spring loaded screws for a more secure mount.
Closer Look: The Motherboard (Continued)
The motherboard chipset cooling
The chipset cooling uses the similar “Crystal Clash” design that ASUS have attributed to the ROG line of motherboards. While not as angular as the Rampage, its uses a number of fins for efficient heat dissipation. The X58 chipset heatsink links to the MOSFET one with one single heat pipe. The cooling is more akin to the P6X58D-E and similarly, the ICH10R heatsink is a small block isolated on the board. The X58 chipset heatsink stands quite high for a larger surface area but thankfully it does not conflict with larger heatsinks such as the Noctua NH-D14. The heatsink does a good job of keeping the motherboard chipset temperature at around 50C or less under load.
The CPU socket and RAM slots
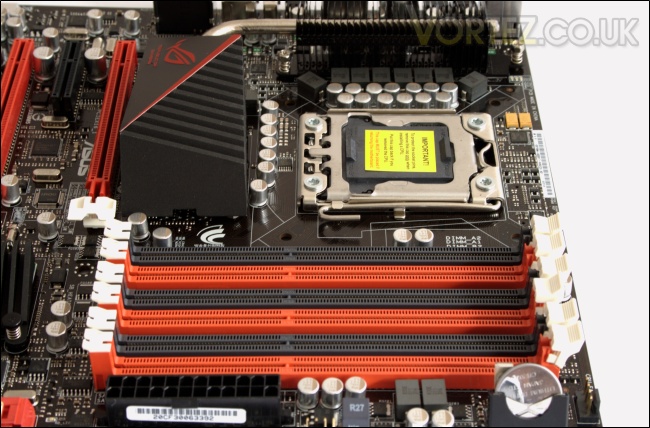
Tri-channel support from the X58 chipset means that the Gene sports 6 DIMM slots, like most other motherboards based on this platform. To avoid conflicts with the upper most PCIe x16 slot, ASUS use the Q-DIMM feature, meaning that the latch is only on one side of the DIMM slots. As well as compatibility, ASUS have convenience in mind. The VRM design for power delivery is somewhat inferior to the Extreme’s using an analog design rather than a hybrid digital and analog design. The board delivers 8 phase VRM power to the CPU, 2 phase for QPI/DRAM power and 2 phase for Northbridge.
The CMOS battery
The CMOS battery uses a unique vertical retention slot to avoid the using more PCB real estate. On first look, this appears to be a brilliant idea but the awkward positioning at the edge of the motherboard makes it more of a fragile asset. I have to mention that the slot is soldered to the PCB at three points and on arrival, one of the connections had come loose, eventually the whole thing coming off during installation. Of course, the damage was the courier’s fault but placing the slot somewhere more secure where it can’t bend back would be more ideal. Nevertheless, the slot makes for easier removal of the battery.
ASUS Probelt
Along with the 24 pin ATX motherboard connector is the ASUS probelt tool. The individually labelled point connections can be probed using a multimeter to monitor the corresponding voltages accurately and in real time. Unlike the Rampage III Extreme, the Gene lacks the small onboard connectors so users have to manually probe the motherboard. It’s still a handy tool for enthusiasts who don’t like to reply on software voltage monitoring. Between the motherboard power connectors and Probelt tool are the Q LEDs which illustrate if everything is functioning fine. The lights represent the boot device, VGA, DRAM and CPU so users can immediately diagnose what a problem is should the board not boot.
Ferrite chokes
Next to 24 pin ATX motherboard connector, we can see that the Rampage III Gene uses ferrite chokes for better power delivery and efficiency.
8 SATA II & III ports
There are a total of 8 SATA ports, with the black ones being the Intel ICH10R SATA II ports and the two red SATA III 6Gb/s ones supported through the Marvell controller.
Closer Look: The Motherboard (Continued)
The iROG chip and onboard jumpers
The various iROG chips on the motherboard provides the unique ASUS ROG functionality such us ROG Connect, for real time remote overclocking, and on the fly hardware tweaking using the TurboV EVO application. Just below the heatsink are two jumpers, the top one being the QPI_LL_SW, which enables QPI load line calibration, and the bottom one being the CMOS reset jumper. Of course, there’s a button on the I/O panel that does the same function.
The front panel headers
The front panel headers and pin connectors are all found at the base of the motherboard. To the left are the front panel audio connectors and going to the right, there is the IEEE 1394a port connector, two 4 pin fan headers and the BIOS chip, the Go Button, the Start and Reset buttons, two USB front panel connectors and finally the system front panel connectors for which the Q-Connectors have been supplied for easy connection/disconnection.
Onboard switches
A key emphasis of ASUS is ease of use and to do so, they have implemented a number of onboard buttons. Here, we can see a Start and Reset button facilitating turning on/off the system outside of a case. The red Go button can be seen to the left. When the system is off, holding the button on boot activates MemOK! which initiates self-memory patching if there are compatibility issues. Otherwise, it acts as a quick OC button based on the user’s profile as set in BIOS.
The VIA based SupremeFX X-Fi 2 chip
Like earlier ROG motherboards, the Gene makes use of the SupremeFX X-Fi 2 audio chip. While the sound quality delivered is no doubt better than onboard Realtek solutions, the SupremeFX shouldn’t be mistaken for a real X-Fi chip. Under the metal hood is a VIA chip running the X-Fi Codec enabling software support for EAX 5.0 and other X-Fi specific features.
4 expansion slots
The motherboard in its micro-ATX format is restricted to just 4 expansion slots, these being two red PCIe x16 slots, one PCIe x4 slot and a PCI slot. Thanks to the X58 chipset, both PCIe slots can run at x16 link width with dual cards.
ASUS EPU engine
For increased efficiency in daily usage, ASUS have implemented their EPU engine, allowing users to control power management and clock speed based on their needs. More will be covered on that later on.
Rampage III Gene VS Rampage III Extreme
Finally, here’s a shot of the Rampage III Gene alongside the Extreme for size comparison.
Test Setup
Graphics card – XFX HD5870 1024MB
Power Supply – Enermax Revolution 85+ 850W
Hard Drive – Samsung F1 320GB
Western Digital Caviar WD3200AAKS 320GB
Drivers – ATI Catalyst 10.5
Cooler – Noctua NH-D14
CPU/Motherboard/RAM
CPU – Intel Core i7 920
RAM – 6GB (3x2GB) OCZ platinum DDR3 1333mhz
Motherboard – ASUS Rampage III Extreme
CPU – Intel Core i7 920
RAM – 6GB (3x2GB) OCZ platinum DDR3 1333mhz
Motherboard – Biostar T-Power x58
CPU – Intel Core i7 920
RAM – 6GB (3x2GB) OCZ platinum DDR3 1333mhz
Motherboard – ASUS P6X58D-E
CPU – Intel Core i7 920
RAM – 6GB (3x2GB) OCZ platinum DDR3 1333mhz
Motherboard – Rampage III Gene
Benchmark Suite
Core Temp 0.99.5
LinX stress Test
PC Wizard
3DMark Vantage
3DMark 06
Cinebench 11.5
x264 HD Benchmark
SiSoftware Sandra
Everest 5.01.1700
Far Cry 2
Street Fighter IV
Batman: Arkham Asylum
BIOS
Same as the Rampage III Extreme, the first screen we are greeted with when entering the BIOS is the Extreme Tweaker one where users can configure system frequencies and voltages. The number of tweaking options is staggering but thankfully ASUS provide a simple tool named CPU Level Up. The feature allows users to choose from a list of pre-overclocked profiles giving a maximum speed of 3.20GHz on the i7 920. Tuning mode can be set to either Extreme OC or Gaming OC, the former revealing more extreme settings such as Spread Spectrum Control. Setting the AI Overclock Tuner to manual reveals a plethora of frequencies and settings that can be tweaked such as BCLK, DRAM, QPI and voltages.
The main screen presents a number of basic system configurations, all of which can be accessed and configured as the user wishes. Here, the time/date and SATA controllers can be configured.
Moving on to the advanced window, a range of other chipset features can be configured. Onboard devices such as the HDA/1394/J-Micron controller can also be configured from here. More uniquely, the ROG features can be controlled, such as being able to sync remote software to the motherboard for real time tweaking.
Selecting the CPU Configuration tab, a range of CPU settings can be enabled/disabled. Disabling unneeded settings such as the Virtualization Tech may improve overclocking headroom. Power features such as SpeedStep, Turbo Mode and Intel C-State technology can also be set.
The power tab is where users can configure power management features such as s3 sleep state.
Going into the hardware monitor tab, users can monitor voltages, temperature and fan speed with the additional benefit of being able to control fans. With 5 four pin fan headers on board, PWM functionality is supported with compliant fans, allowing users to control them based on temperature.
The Tools menu contains the EZ Flash 2 utility to safely flash the BIOS, and other utilities.
Going to the ASUS O.C. Profile sub menu, users can save their system settings on up to 8 CMOS profiles. This is a very handy tools for overclockers who may want to save a certain overclock for access later on. It is also possible to name the profiles prior to saving them.
Users can configure the Go Button to their desired settings such that simply pressing the onboard button will load up the file.
Software Bundle
The driver CD comes with all the essential motherboard chipset, controller and sound drivers. Also included is the browser configuration utility but it’s not necessary to install. As can be seen, audio drivers comes from the VIA as opposed to creative. The Marvell and USB 3.0 drivers enable SATA III 6Gb/s and USB 3.0 support respectively.
ASUS include a number of useful utilities such as ROG Connect, for remote overclocking, ROG GameFirst, for the lowest latencies when gaming, and AI Suite II. The latter is an evolution of the old software and incorporates other ASUS tools such as PC Probe II, Fan Xpert and EPU.
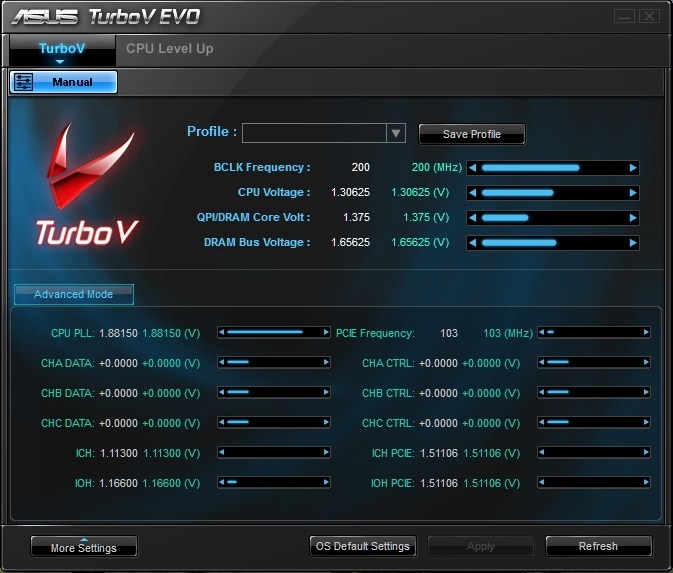
ASUS’s TurboV Evo is a unique overclocking software. It gives users a more comprehensive list of settings/voltages that can be configured, similar to that given in BIOS. Through this software, settings can be tweaked in real time when overclocking to improve stability or to push the CPU further. Changes made here are permanent but they can also be saved as profiles for future use. I ended up using this myself to gain a better insight as to what settings made high clock speeds unstable, without requiring to reboot every time to access BIOS. I recommend only making small changes using the utility since big changes will require a reboot or be unstable. TurboV Evo isn’t bundled with the Gene but can be downloaded from the ASUS Rampage III Extreme software page.
Alternatively, the easy option is to use the CPU Level Up feature, again as found in BIOS. The maximum frequency option is 3.2GHz but choosing this setting requires a reboot. Again changes are made on a BIOS level rather than software. With the Gene, the CPU Level Up feature is integrated into TurboV Evo.
AI Suite II
ASUS AI Suite II is very intuitive utility with a range of configurations and monitoring options that’s presented in a sleek user interface. The tabs indicate the different types of utilities present in AI Suite II.
Clicking on the Tool tab, we can see four different utilities. Sensor recorder allows users to monitor voltages, component temperatures and fan speed, similar to the hardware monitor page in BIOS. Thanks to the iROG chip, users can monitor all the sensors in Windows. A graph is presented to show any fluctuations in voltages. On the right hand side, the CPU tab shows the frequency at which it’s running and the CPU usage across all cores.
Staying on the Sensor Recorder tool, the temperature tab monitors CPU, motherboard and chipset temperatures in real time. The sensor tab on the right lists all the important voltages numerically.
PC Probe II is no longer a standalone program with AI Suite II. Unfortunately, it’s not a very useful program in terms of overclocking. Its main use is to change the threshold values of the voltage, temperature and fan speed options to prevent overvolting or overheating.
Fan Xpert takes advantage of the PWM functionality of the onboard fan headers to give users the ability to control their PWM fans’ speed based on temperature. The graph can be used to construct a profile for each fan.
The EPU Engine demonstrates ASUS’s keen interest in producing greener products in these environmentally conscious times. The system allows users to control various compatible components for the most efficient operation. The utility even informs users by how much CO2 emission has reduced as a result of the power saving settings. The chipset has 5 different settings; auto, turbo, high performance, medium power saving and max. power saving modes. Turbo and high performance mode overclock the CPU dynamically for the best performance while retaining stability and the latter two modes underclock the CPU for tranquillity, convenience and reducing power consumption. The status is displayed as a radar chart telling users how each mode setting will benefit their system. EPU only works if the CPU is at stock speed.
Here we can see how each mode can be customized by the user to suit their needs. ASUS have done a tremendous job in giving users an intuitive graphical user interface to control many aspects of their system without having to rely on other third party programs.
The update tab allows users to download the latest BIOS and install it. I personally recommend saving the BIOS to a USB stick and updating using EZ Flash 2 or remotely using ROG Connect.
The final tab provides some basic system information on the CPU and memory specifications.
ROG Connect
The RC TweakIt software makes its way back into the Rampage III Gene but this time it’s limited to being used on a remote Windows based system. Unlike the Rampage III Extreme and P55 based Maximus III Extreme, the Gene doesn’t have the Bluetooth functionality. Instead, to enable the feature, all that is required is to plug the white bundled USB 2.0 male to male connector into the motherboard on one end and to a laptop running Windows XP or above operating system on the other. Following that, the ROG Connect switched has to be pressed. The application is very intuitive tool that allows users to remotely overclock and monitor the motherboard remotely without requiring to access BIOS. All changes done are in real time and permanent making it excellent for fine tuning and tweaking settings when looking for the highest clocks.
The software allows you to change a number of settings using the corresponding sliders. It’s very similar in style to the ASUS TurboV EVO application and similarly different profiles can be saved. Let me iterate that changes made here will also be applied to the BIOS! Everything is nicely laid out for ease of use with plenty of different options to manipulate.
Moving on from the voltage screen, there is the temperature monitoring screen keeping track of the CPU, motherboard and chipset temperatures.
All 5 possible fans that can be plugged into the motherboard can be monitored using the RC TweakIt software. It is important that there is always one fan connected to the CPU fan connector to make sure that the motherboard does not detect an error on boot. (Note that the screenshot above is from the Rampage III Extreme installed, hence the 8 fan speed monitor)
Finally, the individual clock speeds can be monitored.
Similarly to the AI Suite II utility, a number of settings can be logged to watch for fluctuations during overclocking. This allows overclockers to go to the root of any possible problem or catch wild fluctuations. The whole log can be viewed by simply going through each page/cycle.
Here we have a range of different settings that can be logged. A maximum of three items can be selected from each sections.
RC Remote, as you can imagine, can remotely turn the Gene on/off, reset it or clear the CMOS. It proves priceless during overclocking sessions when the computer locks up and has to be forced to switch off restart. When restarting the motherboard, it’s still possible to adjust the voltages to render the system more stable without going into BIOS.
Another useful feature is the ability to flash the BIOS remotely. Simply save the file on the remote computer and point to it when updating the BIOS. There is less risk associated to this method because a failed update can still be reflashed. (Note that this screenshot is also from the Rampage III Extreme and the Gene only has a single BIOS chip.)
Overclocking
There are several methods to overclock on the Rampage III Gene. CPU level up is the simplest way to get a quick boost by setting the CPU to the clock speed of higher SKUs. Alternatively, the EPU engine can also overclock the CPU dynamically based on CPU load and the mode selected in the application. The TurboV Evo utility is another option but this is mostly for small tweaks rather than large overclocks. The RC Tweakit utility works in the same way. The Go Button is another way of getting an overclock at the press of a button, depending on the profile it’s assigned to in BIOS, as defined by the user. Lastly, there is of course the BIOS, where users will have a plethora of settings to configure at their disposal. It’s the best method of achieving a high overclock, along with RC TweakIt software and TurboV Evo helping to fine tune the system.
The Rampage III Gene does not sport the same components as the Extreme but that’s not to say it’s a bad overclocker. Getting to 4GHz was easy enough with the BCLK set to 200MHz. However, it did require slightly more voltage than the Extreme or the P6X58D-E to get stable.
Setting the core voltage to 1.3125V and the QPI/DRAM voltage to 1.35V in BIOS, 4GHz could be attained. The 8 phase analog VRM power design means inferior power delivery compared to the Extreme’s but this didn’t stop the board attaining high clocks.
Pushing further, the Gene achieved an impressive 220MHz BLCK stably. To do so, a voltage of 1.36V was required on the CPU and 1.375V on the QPI/DRAM. Relatively speaking, these voltages are slightly higher than those used on the Rampage III Extreme but it was stable nonetheless. A PCIe frequency of 105MHz was also needed to unlock the higher BCLK.
Memory overclocking was a bit disappointing on the Gene. Getting the OCZ 1333MHz 7-7-7-20 RAM to work at 1600MHz was only possible with the CPU at stock speed. At 4GHz+, I had to settle on a 1:6 multiplier so the RAM operated at 1200MHz and 1323MHz with the two overclocked speeds.
Cinebench 11.5 & x264 HD Benchmark
Cinebench 11.5
Based on the MAXON animation software CINEMA 4D, Cinebench is a test suite that uses the system’s processing power to render a photorealistic 3D scene. This makes it an excellent benchmark to measure CPU and motherboard performances.
The Gene does very well in Cinebench, outperforming the other motherboards at stock and when fully overclocked. At 4GHz, its performance is on par with the Extreme. Impressively, the Gene takes quite a lead from the P6X58D-E despite its slight clock disadvantage when fully overclocked.
x264 HD Benchmark
The x264 HD Benchmark from Tech ARP is a useful benchmark that demonstrates the encoding performance of systems by encoding a short HD quality video clip into a high quality x264 video file. The test uses multiple cores efficiently to give a good representation of real world performance.
This benchmark displays another strong showing by the Rampage III Gene. The difference is marginal for the most part but it keeps up very well with the more expensive Extreme. The Gene leaves the Biostar board trailing behind.
SiSoftware Sandra
SiSoftware Sandra is a Windows system analyzer that includes benchmarking, testing and listing modules. It tries to go beyond other utilities to show you more of what is really going on under the hood so comparisons can be drawn. With an array of CPU and memory tests, it is ideal in comparing the P55 platform against the x58 chipset.
In the CPU tests, the Gene provides some very mixed results. In the Dhrystone ALU test, it lags behind the other motherboards at all clock speeds but manages to gain the lead in the Whetstone FPU test. Multi-core performance is exceptional at stock speed but less impressive once overclocked. Memory performance is the main downfall of the board. At stock speed, the memory worked stably at 1600MHz CAS 8-8-8-22, hence the higher bandwidth, but this was its only redeeming test. Throughout the other tests, it cannot keep up with the other two ASUS motherboards, with higher latencies and lower Cache/Memory bandwidth. The overall performance is still respectable.
Everest
Everest Ultimate is another useful computer diagnostic tool that provides the most up-to-date hardware information. It is home to a number of CPU and memory benchmarks, supporting all the latest motherboard chipsets and processors. Everest also provides accurate hardware monitoring capabilities that makes it a must have tool for system tweaking and maintenance.
Cache & Memory benchmark
Stock speed
ASUS Rampage III Extreme
ASUS Rampage III Gene
Using the same CPU and RAM clock speeds, the Gene performs very similarly to the Rampage III Extreme, even yielding better L3 Cache speeds and lower latencies. The memory copy speed is also much higher.
Overclocked 4GHz
ASUS Rampage III Extreme
ASUS Rampage III Gene
At 4GHz, the Gene couldn’t keep the overclocked memory stable so the RAM had to settle at 1200MHz with tightened latencies to compensate. The result is higher memory speeds but also higher latency compared to the Extreme. While the L1 and L2 Cache performance are nearly matching, the L3 Cache performance is much lower on the Rampage III Gene.
Overclocked 4.19GHz
ASUS Rampage III Extreme
ASUS Rampage III Gene
With both boards running overclocked CPUs at 4.19GHz and the memory at 1323Mhz, the Gene exhibits lower memory and L3 cache performance. This is strange considering that at stock speed, the Gene managed to outperforms the Extreme in the memory test. Considering the superior components used on the Extreme however, this comes as no surprise.
The CPU tests shows very marginal difference in performance across all the motherboards.
Far Cry 2
One of the most hyped games of 2008, Far Cry 2 had some big shoes to fill. It was built to be the next best thing since well… Far Cry I suppose. Combining an open-world game play with highly detailed graphics, physics and AI, what more could we possibly want? The game puts us in the body of a malaria inflicted mercenary hunting down the “Jackal” in the heart of Africa, in a bid to stop an ongoing conflict between two rival factions. The storyline can be hard to follow sometimes but I’m no game reviewer, so let’s concentrate on the graphics and performance. After all, we all need to know if our hardware will be able to handle the scorching savannah burning at the hands of our flamethrowers.
The Rampage III Gene performs very well in Far Cry 2. There is very little difference in the average FPS but what difference there is, favours the Gene. Overclocking has very little benefit on the average FPS but does contribute to higher minimum and maximum FPS.
Street Fighter IV & Batman: Arkham Asylum
Street Fighter IV
Street Fighter is back in its 4th iteration and its bigger and better than ever. Combining fluid, fast based sparring with stunning artistic visuals, the game delivers tremendous game play. Be reacquainted with some of the most popular characters in video game history while you battle your way to the top, be it with Ryu or the mighty Bison. The game might be frustratingly hard in some cases but there’s nothing like the satisfaction of K.O’ing your opponent with a well stringed death bringing combo.
Street Fighter IV follows the trend set in Far Cry 2. Here, the difference remains marginal but the Gene still manages to outperform the other two ASUS boards. Again, overclocking has no noticeable impact on performance.
Batman: Arkham Asylum
The Dark Knight takes on his greatest challenge yet when he becomes trapped with all of his most dangerous villains inside the insane asylum of Gotham City – Arkham Asylum. The game exposes you to a unique, dark and atmospheric adventure that takes you to the depths of Arkham Asylum, Gotham’s psychiatric hospital for the criminally insane.
At both settings, the Gene provides exceptional performance. Overclocking helps improves the minimum FPS in Batman to ensure smoother gameplay.
3DMark 06 & Vantage
3DMark06
Futuremark has been the testing ground for enthusiasts ever since their first release in 1999! While 2006 is long gone, it’s still very popular amongst benchers.
Again, the Gene performs admirably, especially at stock speed. When the CPU is overclocked, the Rampage III Extreme still retains its crown, not surprisingly given its design as an enthusiast oriented board.
3DMark Vantage
This latest benchmark suite from Futuremark introduces DX 10 PhysX support. Despite being on the verge of DX 11 games arriving, Vantage is still the chosen benchmark amongst enthusiasts these days.
The Gene takes the crown in Vantage, outperforming even the Rampage III Extreme albeit by a few points.
Power Consumption
Load power consumption was recorded by fully loading the system running LinX and MSI Kombustor simultaneously. The maximum power usage recorded was then assigned to the load power consumption, while the minimum recorded without loading the system was assigned to the idle consumption.
The Rampage III Gene is quite an efficient board in comparison to the others. At stock CPU speeds, it consumes the least power under load conditions but idles at 20W higher than the Biostar. Of course, overclocking has a dramatic effect on the load power consumption and at 4GHz, the Gene is still more efficient than the P6X58D-E and the Biostar, only the Extreme consuming 1W less. Overclocking further, we find that the Gene uses 20W more than the Extreme, the reason most likely being the higher voltage required to keep it stable. Thankfully, it’s still not as power hungry as the P6X58D-E.
Conclusion
Throughout the review, I compared the Rampage III Gene to the Extreme and that in itself is testimony to its quality. The Gene wasn\’t designed to be the engineering masterpiece that the Extreme is and the price tag, at over £100 less, reflects that. It lacks some of the high end components of the flagship motherboard such as the Extreme Engine Dig+ design and multi-layer polymer capacitors. However, it stays true to its ROG name by incorporating a plethora of features that will appeal to a range of users. The micro-ATX form factor already makes it a very practical motherboard, and delivering class leading performance is icing on the cake for users who want an all purpose HTPC or compact gaming rig. In terms of features, the Gene supports USB 3.0 and SATA III 6Gb/s, ROG Connect and a high end onboard audio solution with the SupremeFX X-Fi 2 chip and Codec.
Although overclocking is not the main focus of this board, the Rampage III Gene still generated some impressive results. A maximum of 220MHz BCLK was achieved and the chipset cooling was more than capable of handling the extra voltages. A few enthusiast features were still retained to aid in the process such as Probelt and the various onboard switches. The Gene also came bundled with excellent utilities to not only overclock but to enable power saving features thanks to the EPU engine.
The board isn\’t without its flaws. The main one is the awkward positioning of the CMOS battery and retention slot. At the edge of the motherboard, it is prone to damage so extra care has to be taken. Another complaint I have is memory overclocking. It wasn\’t possible to get the RAM working at 1600MHz when the CPU was at 4GHz unlike on the P6X5
 -E or Rampage III Extreme. However, the Rampage III Gene still performed very well and wasn\’t hindered by the slower memory speed.
Pros
+ Loaded with features
+ ROG functionality
+ Good overclocking headroom
+ Cool and efficient
+ USB 3.0 and SATA III 6Gb/s
+ Attractive finish and brilliant layout
+ Excellent performance
+ Micro-ATX form factor
+ Price
Cons
– CMOS battery placement
– Memory overclocking
The Rampage III Gene\’s shortcomings doesn\’t deter the overall exceptional quality we are accustomed to seeing from ASUS. It earns itself the Vortez Hardware Gold Award.
I would like to again thank ASUS for providing us with this sample. To discuss this article or product, please visit our forums.