Overclockers UK kindly invited us down to review their de-lidding and speed-binning process; read on for our verdict and results.

De-lidding CPUs has recently become much more popular in recent years, with many enthusiasts seeking the lowest possible temperatures, and in turn, the highest achievable overclock from their piece of silicon.
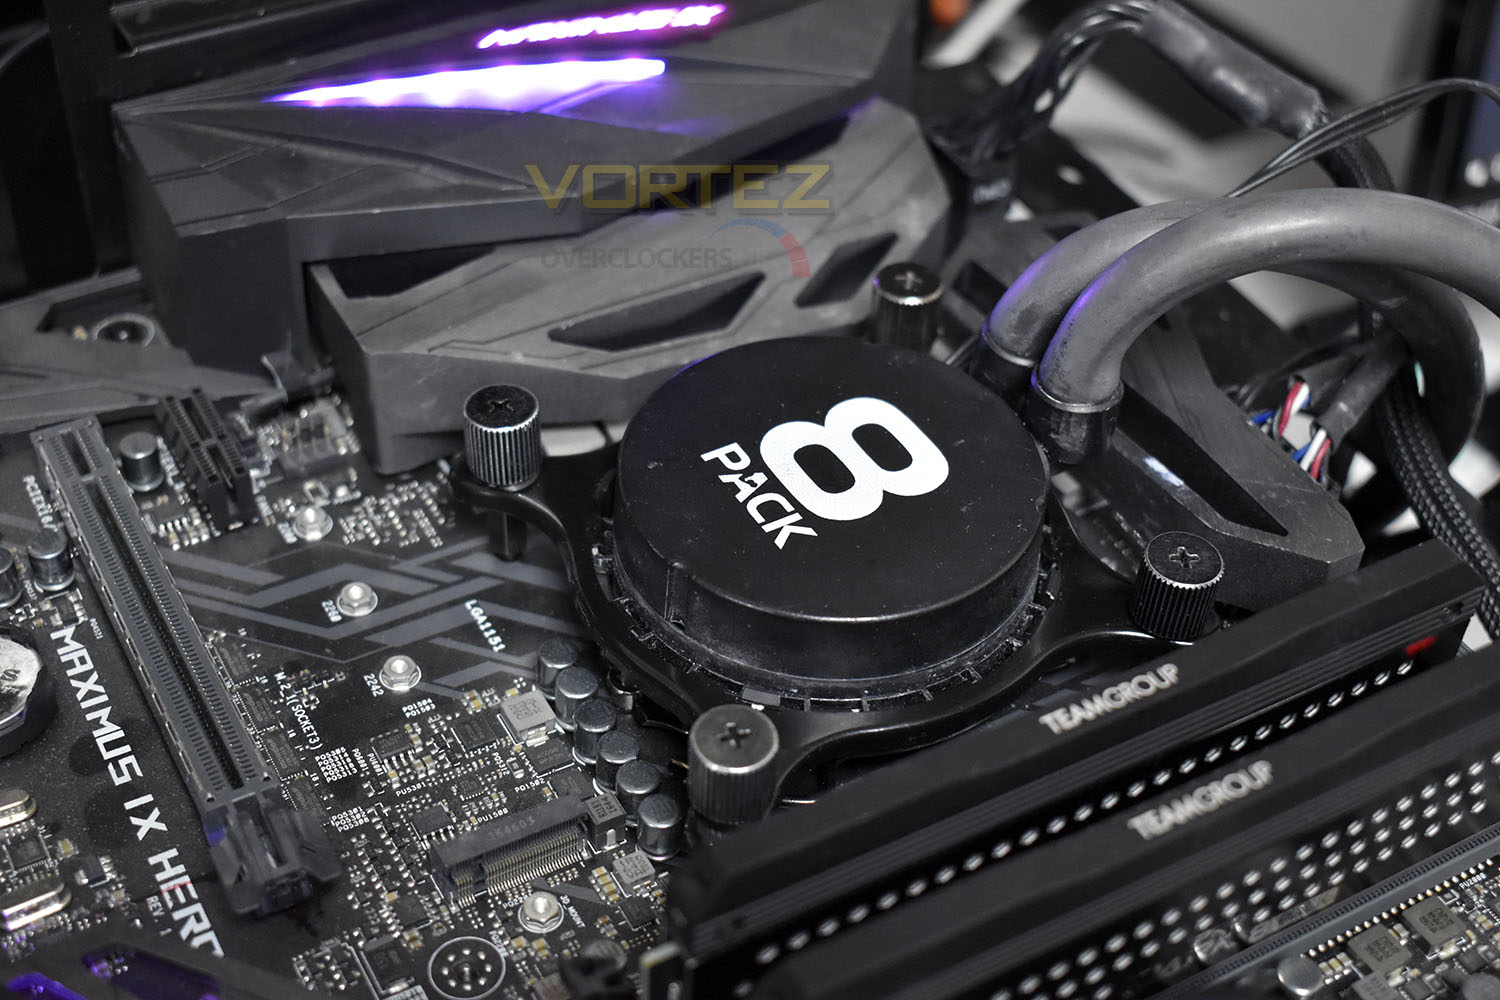
Overclockers UK, based in Newcastle-Under-Lyme, invited us down to investigate their de-lidding and speed-binning process. We spent a day working alongside Ian 8-Pack Parry, world-renowned overclocking guru, and the OcUK Tech Labs Team to witness the procedure first hand.
You might be left wondering “what on Earth is de-lidding and speed-binning?” The process of de-lidding a CPU is removing the Integrated Heat Spreader (IHS), cleaning off the factory-applied thermal paste and replacing it with a more efficient liquid metal, aiding heat transfer from the CPU die to the heatsink above, with the aim of decreasing temperatures.
Speed-binning involves running a CPU through a series of stringent tests, designed to identify any weakness within the CPU; think of this as a military selection exercise, where only the best will be selected. This process is necessary due to the unique properties of each CPU; where tiny imperfections within the silicon can affect their ability to overclock above their rated boost speeds. This is referred to as the “Silicon Lottery”, which 8Pack kindly removes for you.
De-lidding is an inherently risky procedure, with a chance of completely ruining your CPU. Does the temperature difference warrant such a risk? Or is it best to leave this to the professionals at OcUK?
Overclockers UK on de-lidding:
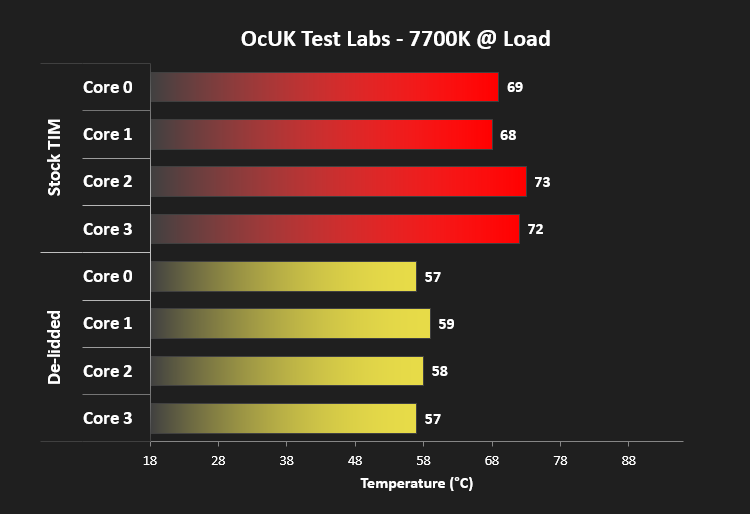
All of the CPU’s that make the grade are de-Lidded. This is a process of whereby the CPU’s IHS (Integrated Heat Spreader) is momentarily removed and the TIM (Thermal Interface Material) is replaced with one that has far superior heat transfer properties such as Liquid Metal. The technique of De-Lidding can reduce load temperatures on average by 10-20°c offering the ultimate in overclocking thermal performance.
Why De-Lid Your CPU?
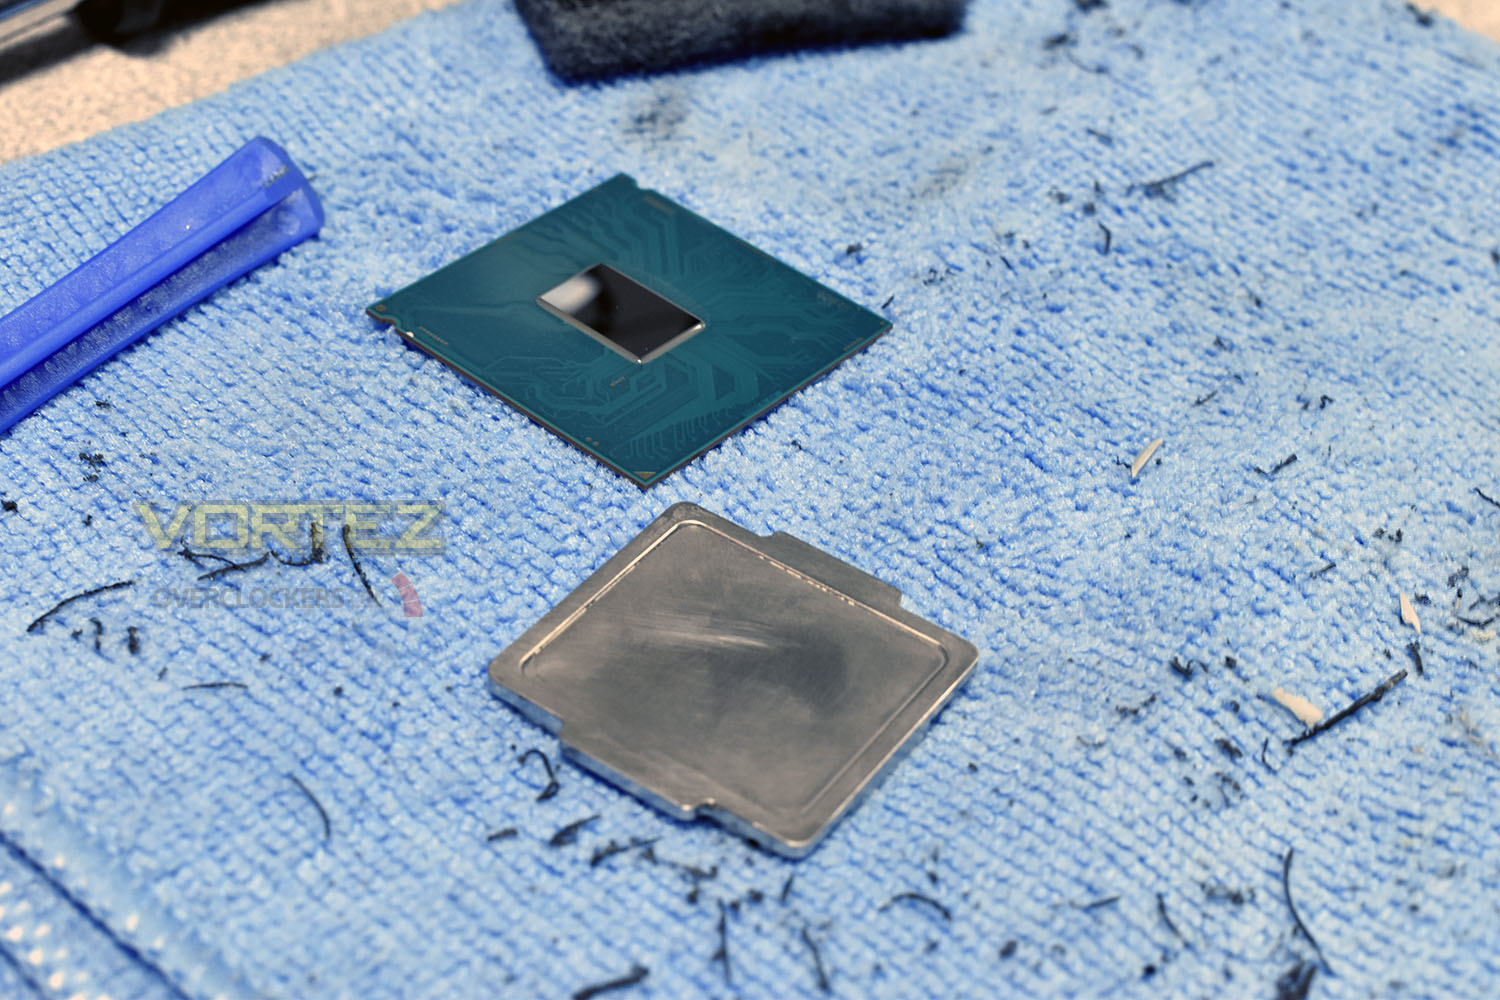
A CPU is essentially made up of 3 fundamental parts, the PCB, onto which everything is mounted, the core, where the silicon is hidden, and the IHS, the large copper heatsink, designed to protect the core from damage as well as distribute the huge amounts of heat generated underneath.De-lidding a processor involves breaking the gasket seal between the CPUs PCB and the IHS, giving clear access to the core, allowing you to replace the manufacturer’s pre-applied Thermal Interface Material. Removing the IHS gives two clear advantages; firstly, the distance between the IHS and the CPU is smaller, due to the removal of the gasket around the IHS, immediately resulting in better temperatures. Secondly, the Thermal Interface Material is replaced with Thermal Grizzly Conductonaut, a much more effective interface between the copper IHS and the CPU core, allowing the heat to dissipate more efficiently. Some hardcore enthusiasts go as far as leaving the IHS off the chip and instead apply their heatsink directly to the core, removing a barrier where heat transfer can be slowed.
When overclocking, extra voltage is often required to increase stability at higher frequencies. This extra voltage is your worst enemy in terms of heat generated, sometimes sending temperatures skyward rapidly. Increasing the thermal efficiency of your CPUs IHS gives your heatsink the best possible chance of keeping everything cool and in order; if the heat from the CPU isn’t efficiently transferred away, your overclocking headroom will be severely hindered.
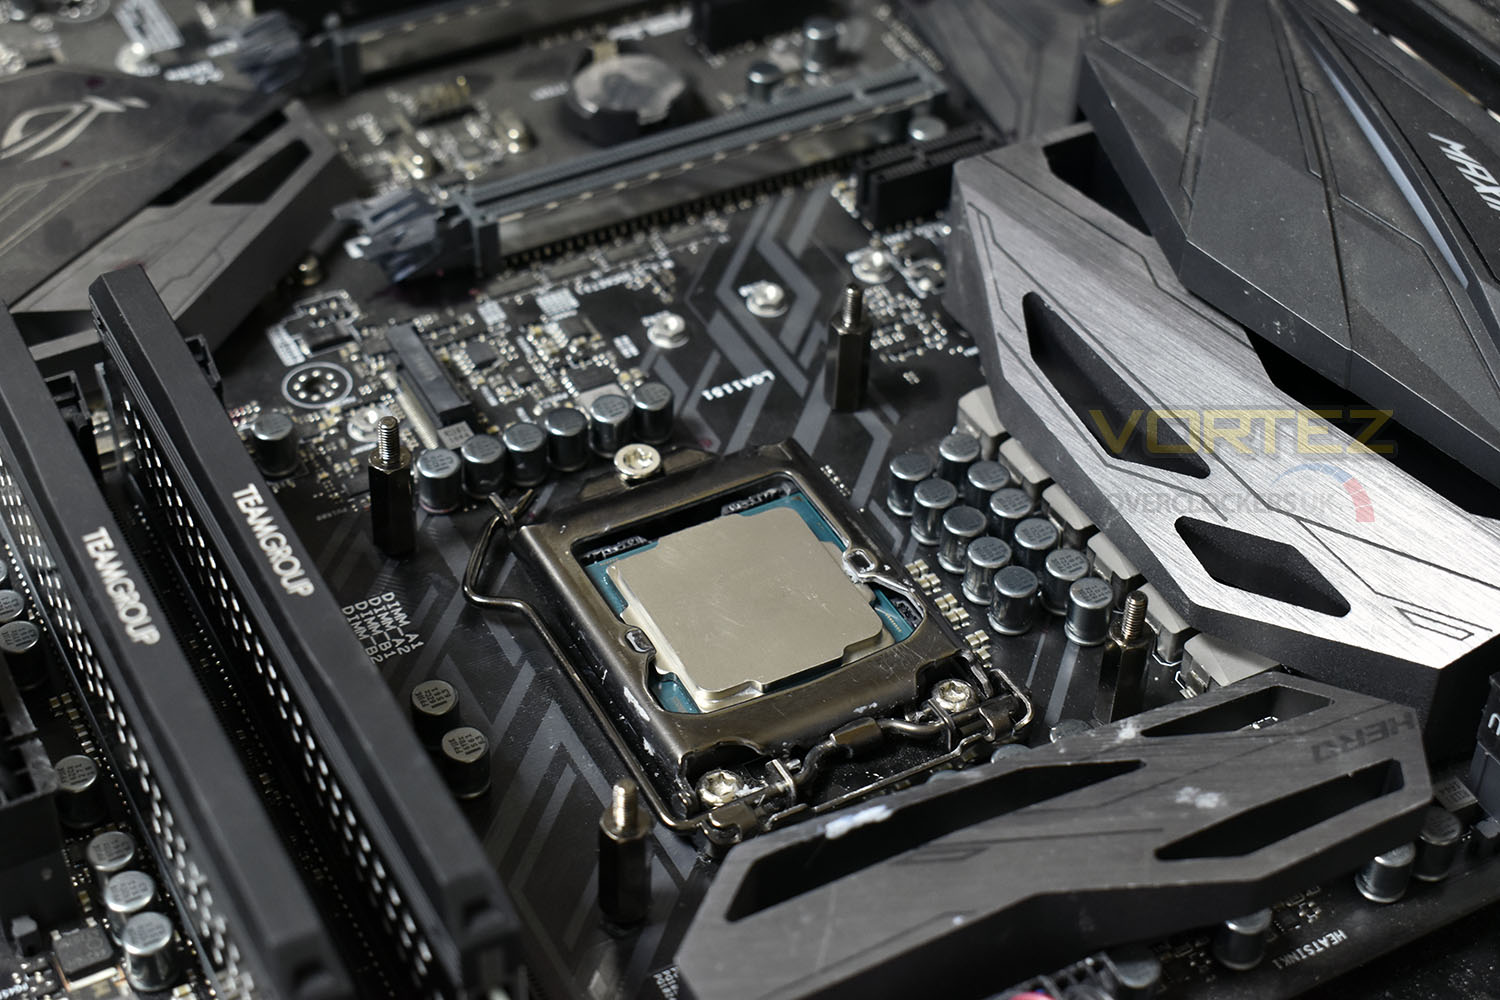
We took along an Intel Core i7-7700K CPU from our office, a CPU which was regularly hitting 90°C during stress testing; we were obviously keen to reduce these temperatures to a more manageable level.
De-lidding Process
Disclaimer: Before we proceed with any instructions or information, we need to make it perfectly clear that this will void any warranty your CPU currently has, and there is a risk involved. You may end up with a dead CPU if you try this yourself. This applies to Intel, AMD and any other manufacturers. We do not endorse any action you take on your own processor.In the past, professional overclockers and the like would remove the lid from their prized processor using razor blades and brute force; this was incredibly risky, both to the CPU and the offender’s hands. 8Pack worked alongside Roman Harthung, also known as Der8auer, to design and produce a de-lidding tool – Der8auer is a talented overclocker who works at OcUK’s sister company, CaseKing in Germany. CaseKing holds the global patent on this range of de-lidding tools.
Obviously, no two ranges of CPUs are the same, with small differences to the IHS and PCB, so each range of CPUs needs a separate tool. Luckily for us, Intel have retained their design from Skylake through to the most recent Coffee Lake, with Kaby Lake in-between; this meant that no re-design was needed for the previous 3 generations of 1156 socket CPUs from Intel.
To begin the process of removing the IHS, you must first align the CPU within the base of the de-lidding tool, ensuring the PCB is held firmly in place.
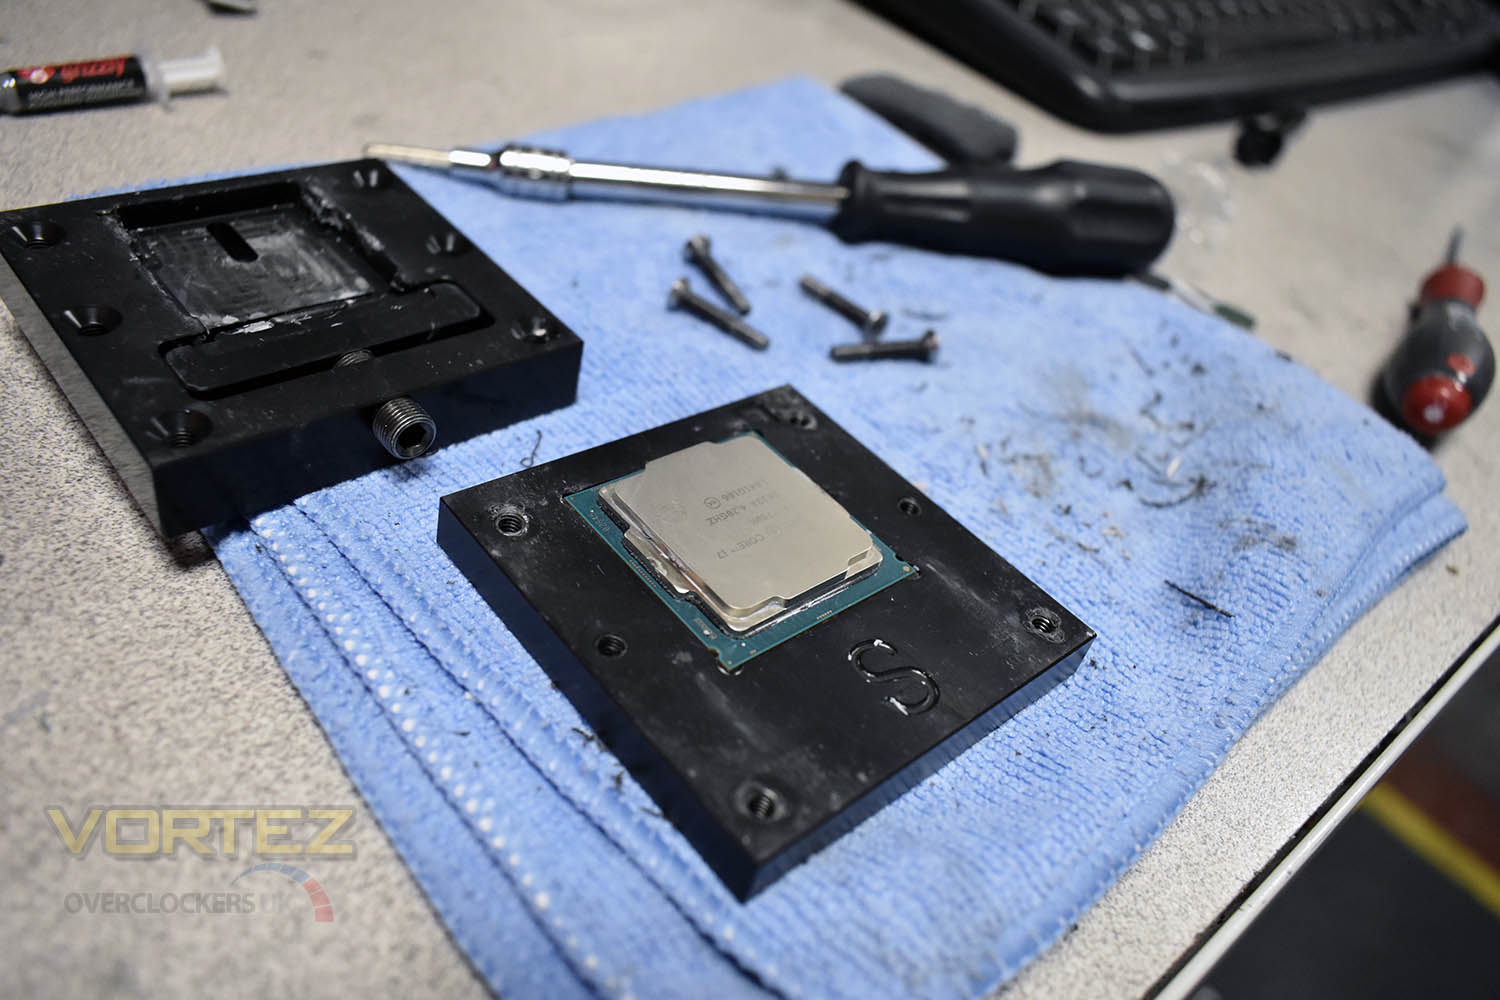
The second step is marrying the lid with the base, ensuring all four screw holes line up, then tightening in sequence to prevent the CPU from moving within the jig.
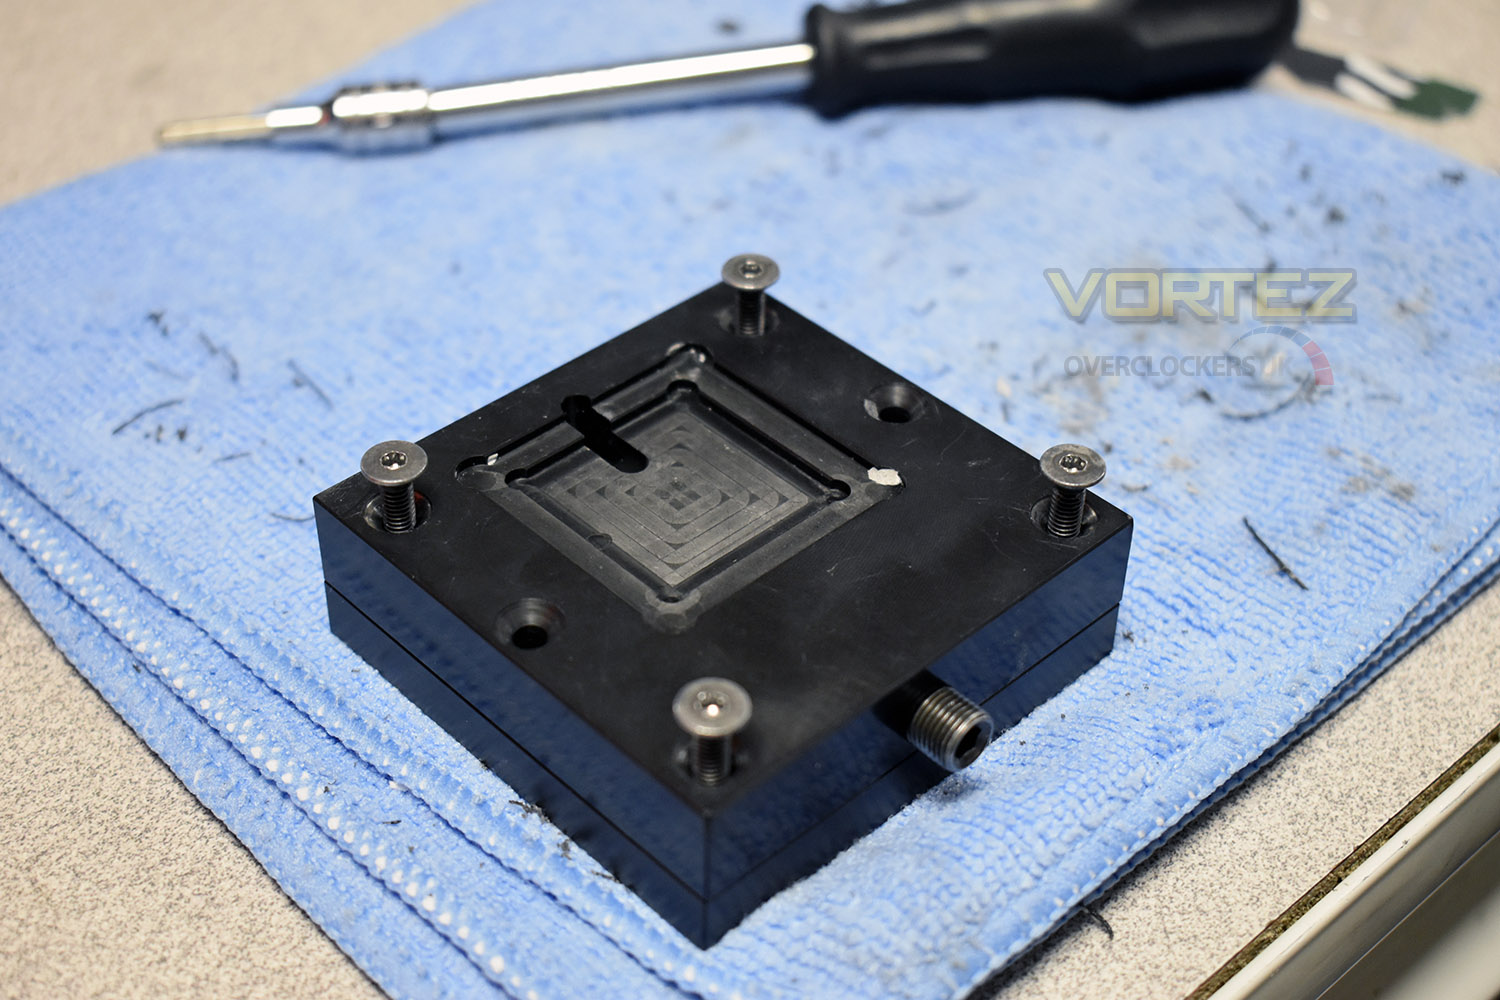
Once your CPU is entombed within its acrylic chamber, it’s time to pop the IHS off the PBC. This is, by a long way, the scariest moment of the entire procedure. To remove the IHS, the hex-holt at the bottom is slowly turned until pressure builds against the side of the heatspreader. Eventually, after a few moments of worry, there’s a terrifying crack as the Intel-applied glue is broken.
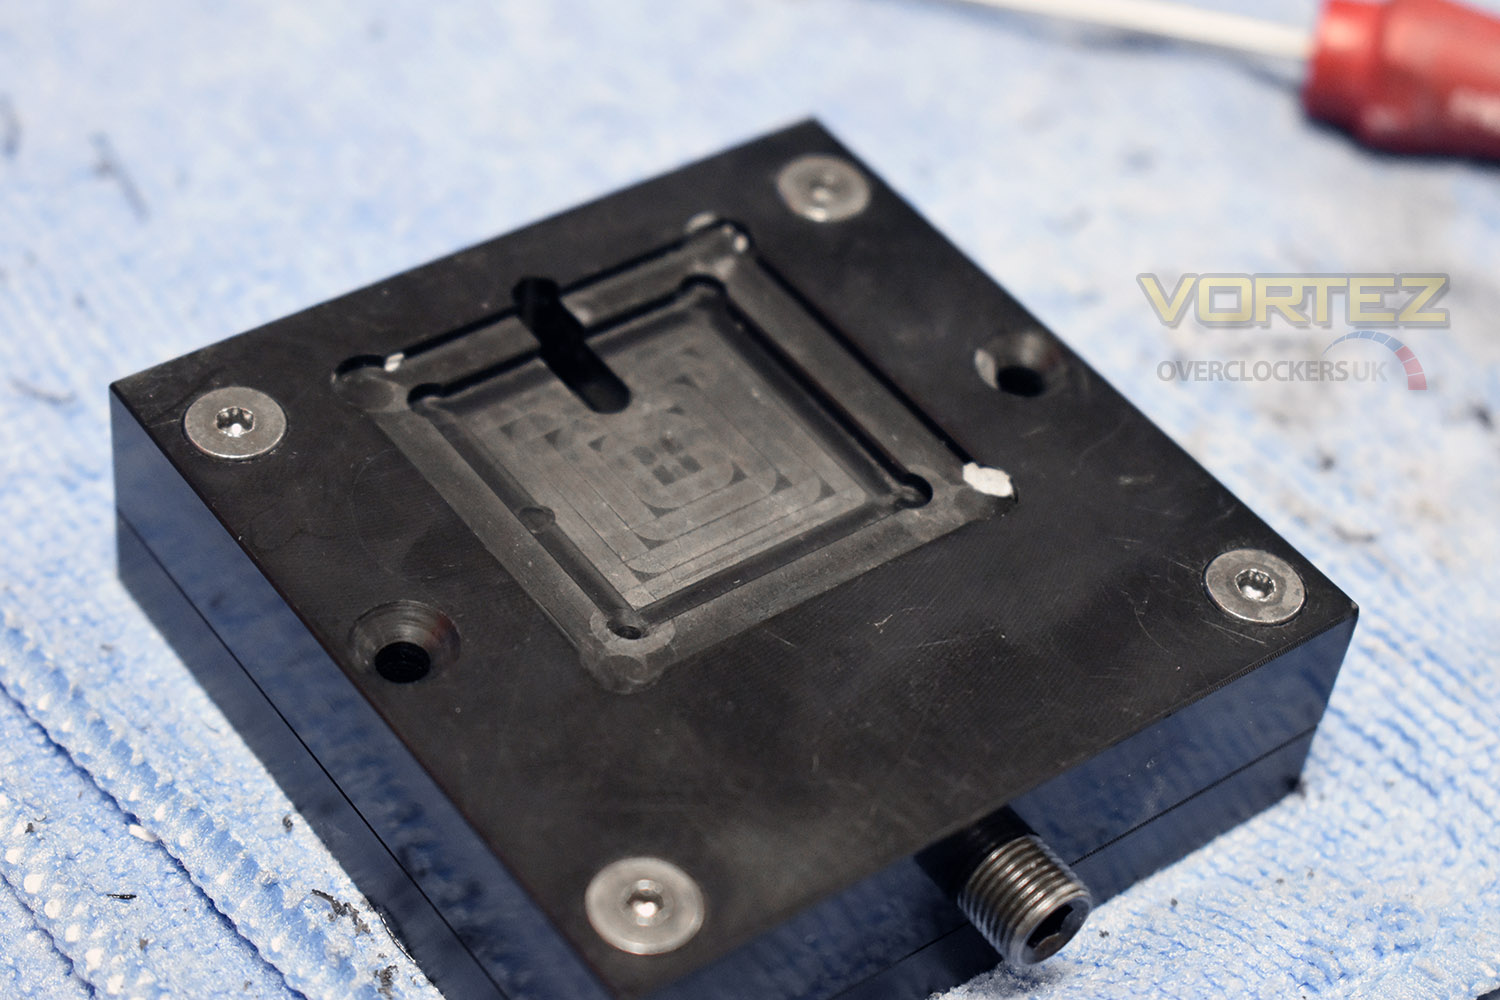
After releasing the processor, it was evident that the procedure had worked with the gasket being visible and the heatspreader now lying loose on top.
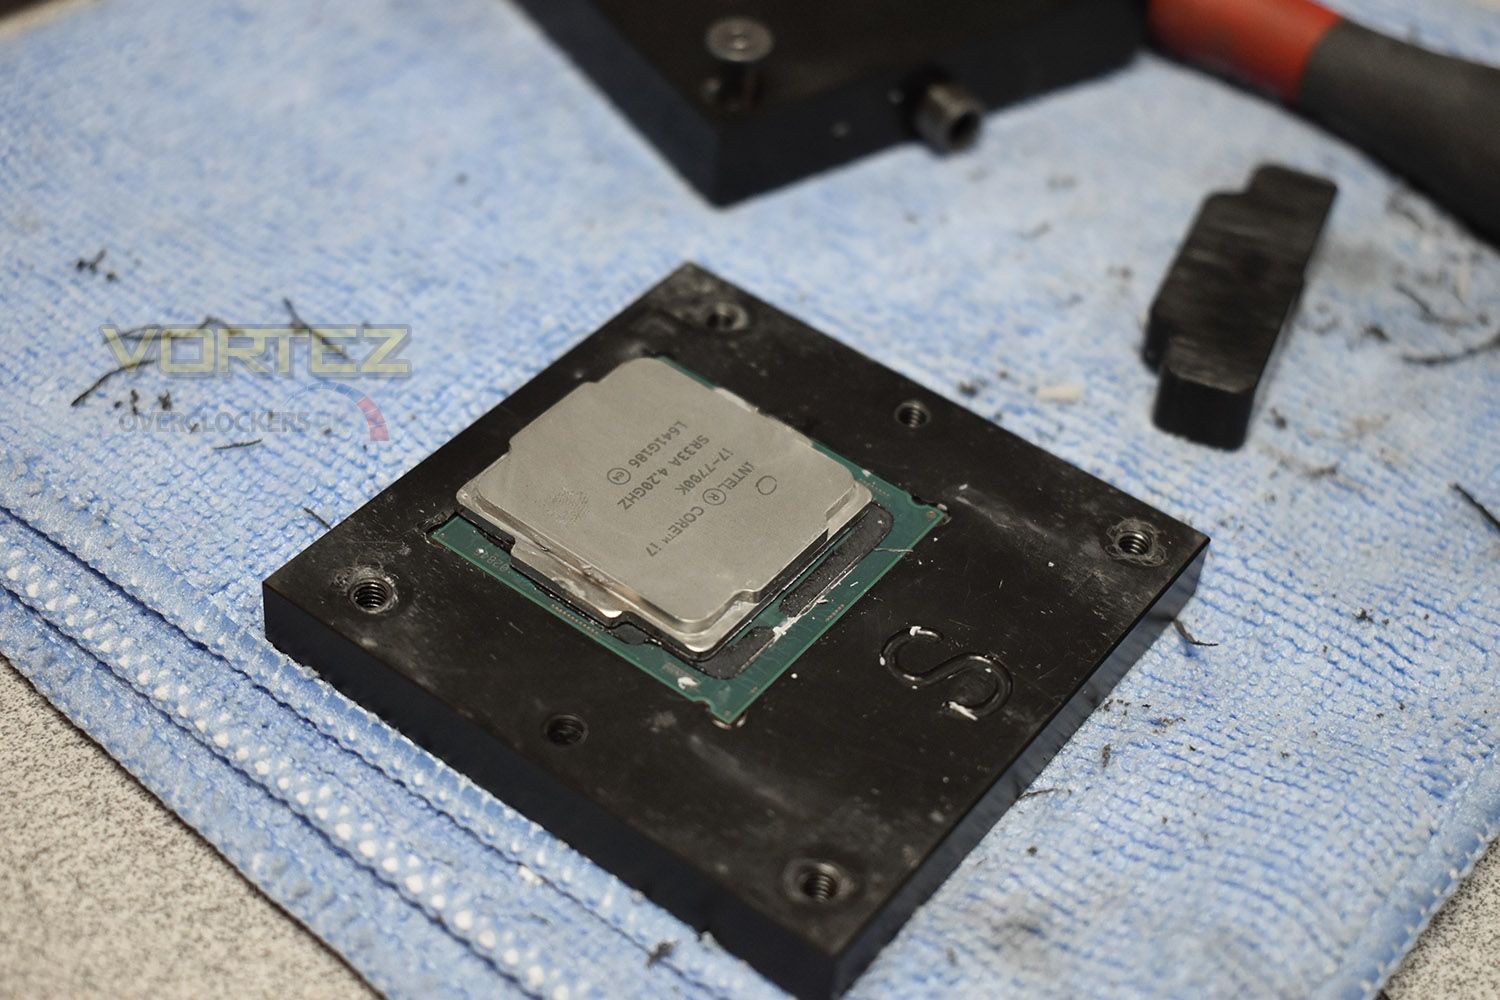
Now the delicate procedure begins – removing the glue and Thermal Interface Material. The TIM is removed using pure alcohol and a lint free cloth, then a high grade scouring pad, to ensure that any residue is taken away and to prepare the surface for the liquid metal, this practice is done with extreme care and the full attention of the technician. The gasket was removed using the fingernail – the dexterity required to remove the glue without damaging the PCB is only reliably possible with this method.
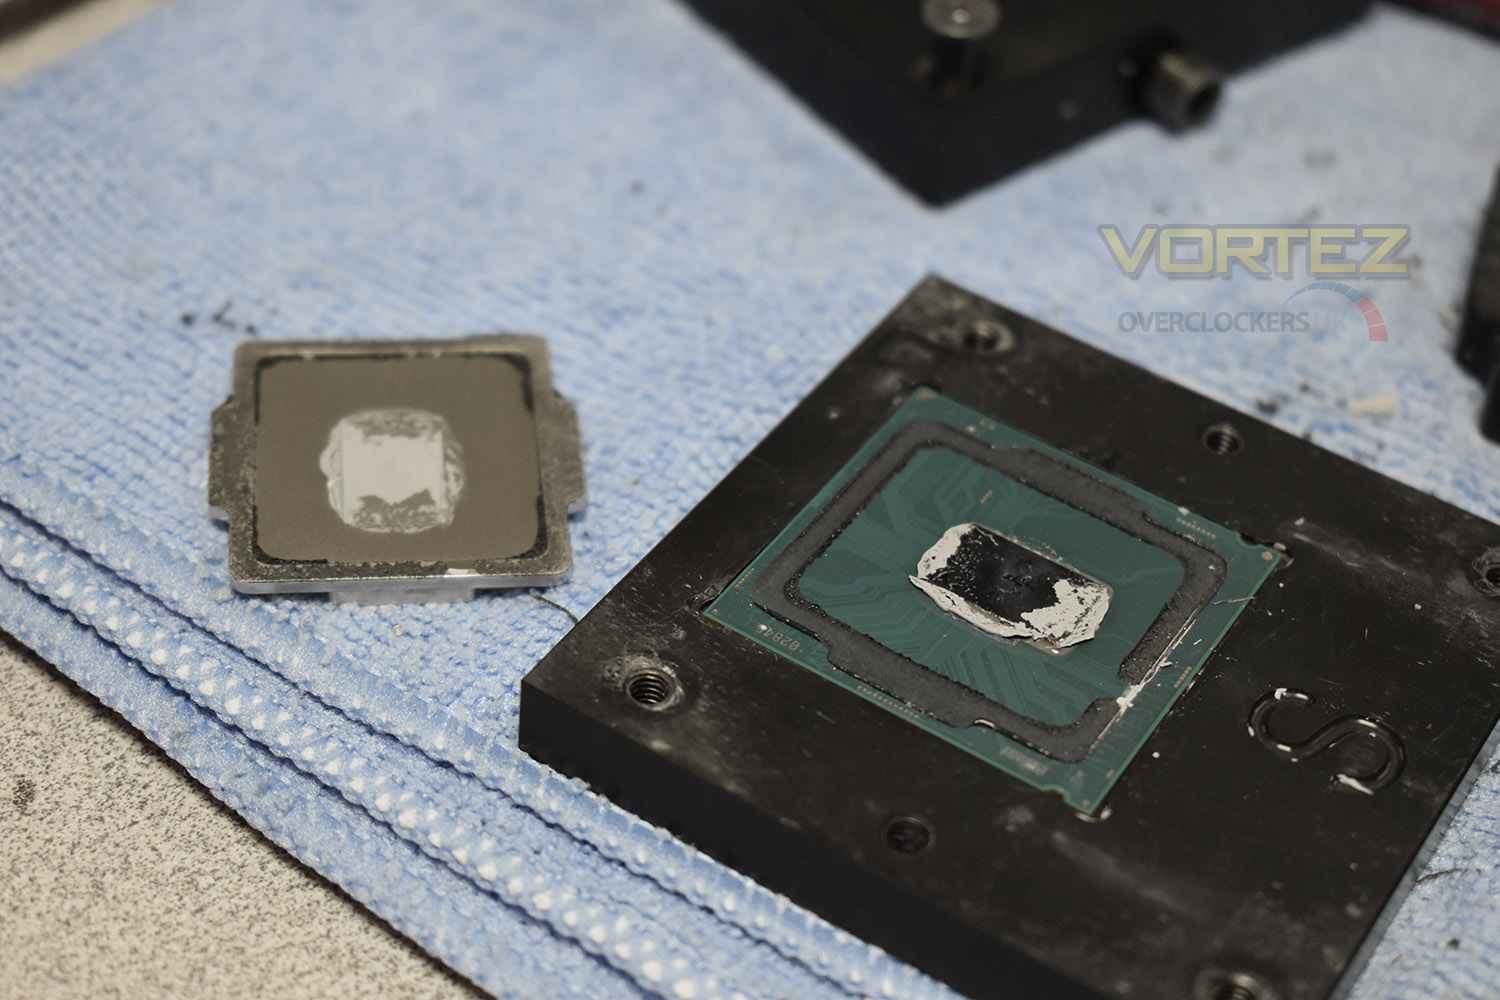
De-lidding Process (Continued)
After the cleaning procedure, you’re left with a shiny CPU core and a smooth IHS, ready for the liquid metal treatment.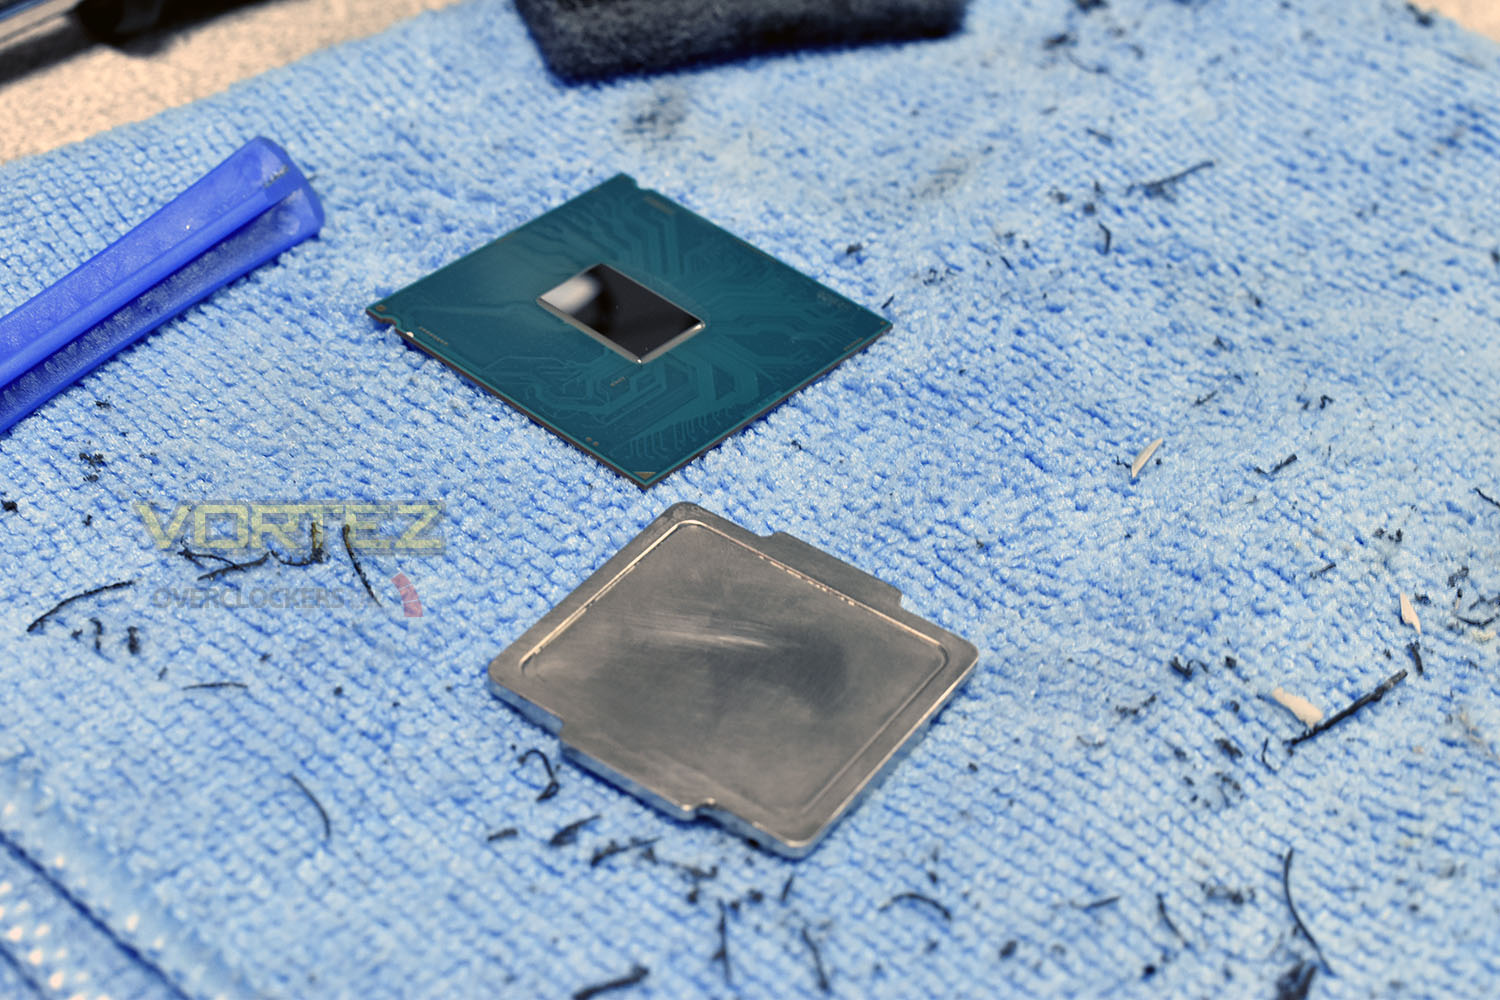
OcUK use Thermal Grizzly Conductonaut, a liquid metal with incredible thermal conductivity properties. Extreme care has to be taken here due to the conductivity of the product; if this ends up anywhere it shouldn’t be, short circuits could occur, possibly causing irreparable damage. The 7700K features no resistors on top of the PCB but other CPUs can house them, causing extra issues where prevention techniques must be applied – such as covering them in a heat-resistant glue to prevent any ingress from the liquid metal.
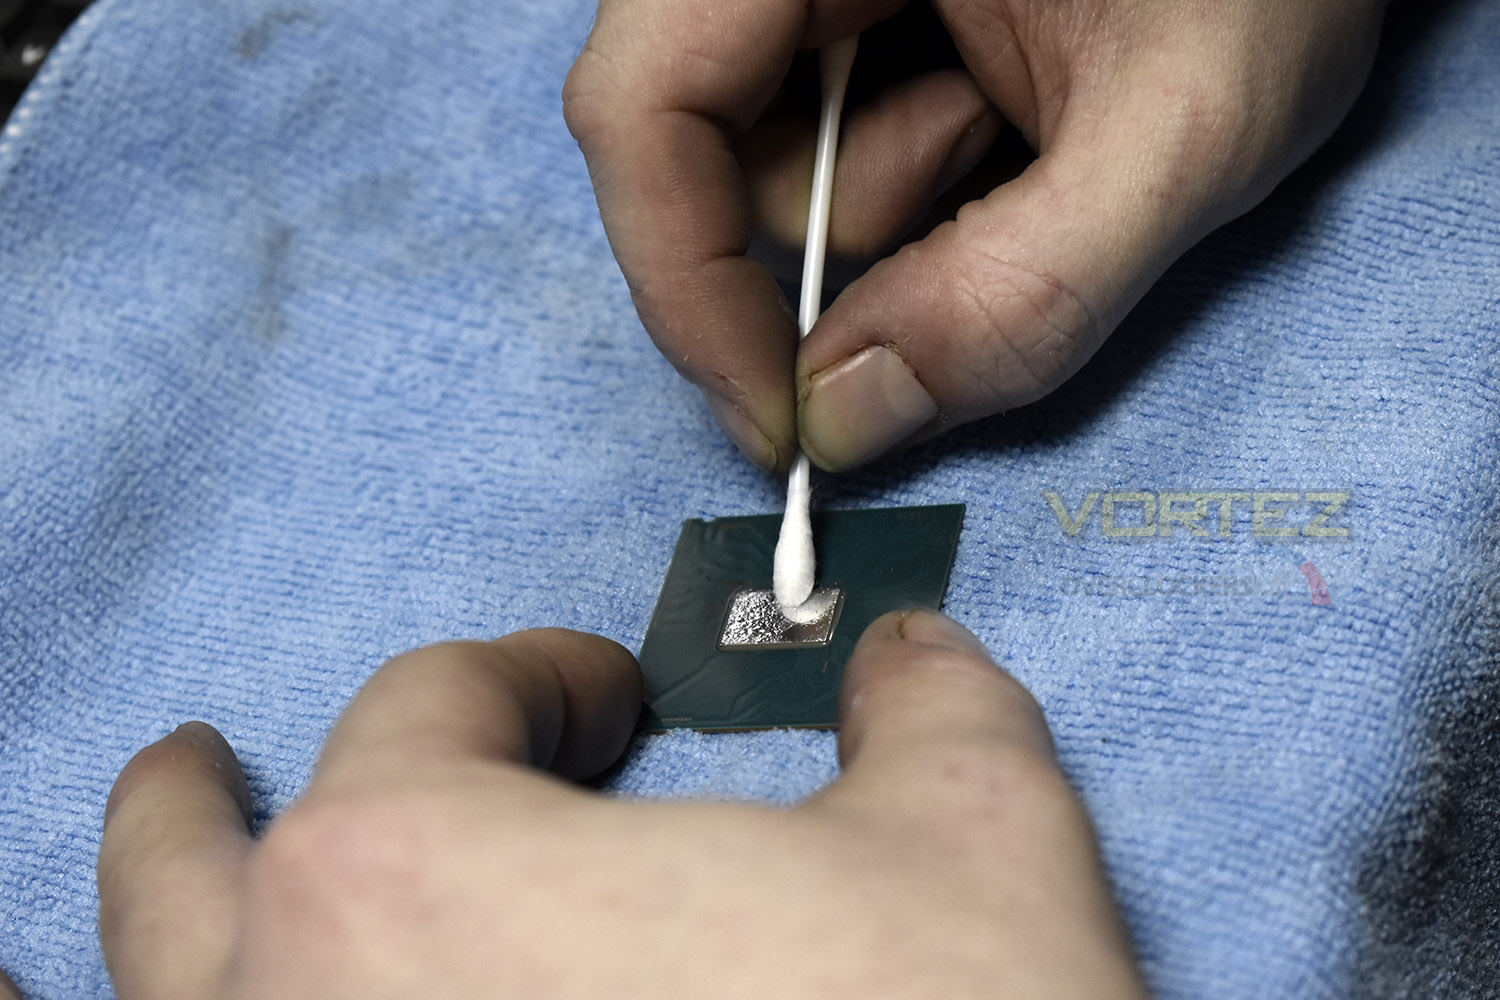
A tiny amount of Thermal Grizzly is applied to the core and the corresponding position on the inside of the IHS, this is then spread into a thin, even layer using a cotton bud. Getting the liquid metal as thin and even as possible helps to equalise the CPU core temperatures; OcUK will re-apply the liquid metal if any two cores vary by more than 6°C (Maximum temperature) during a stress test.
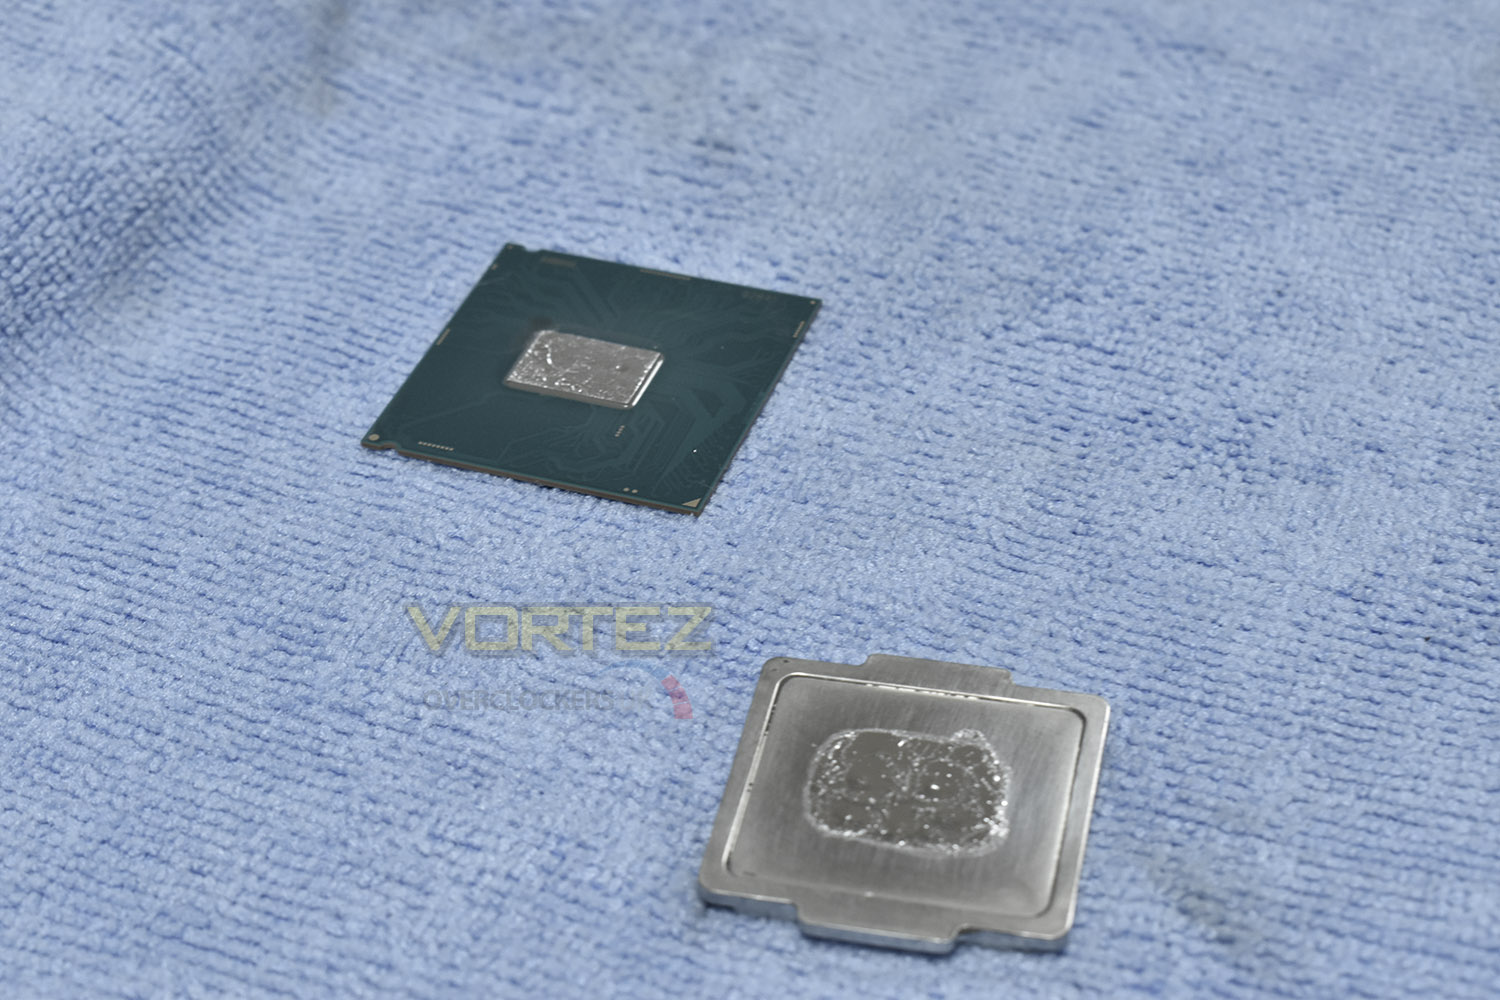
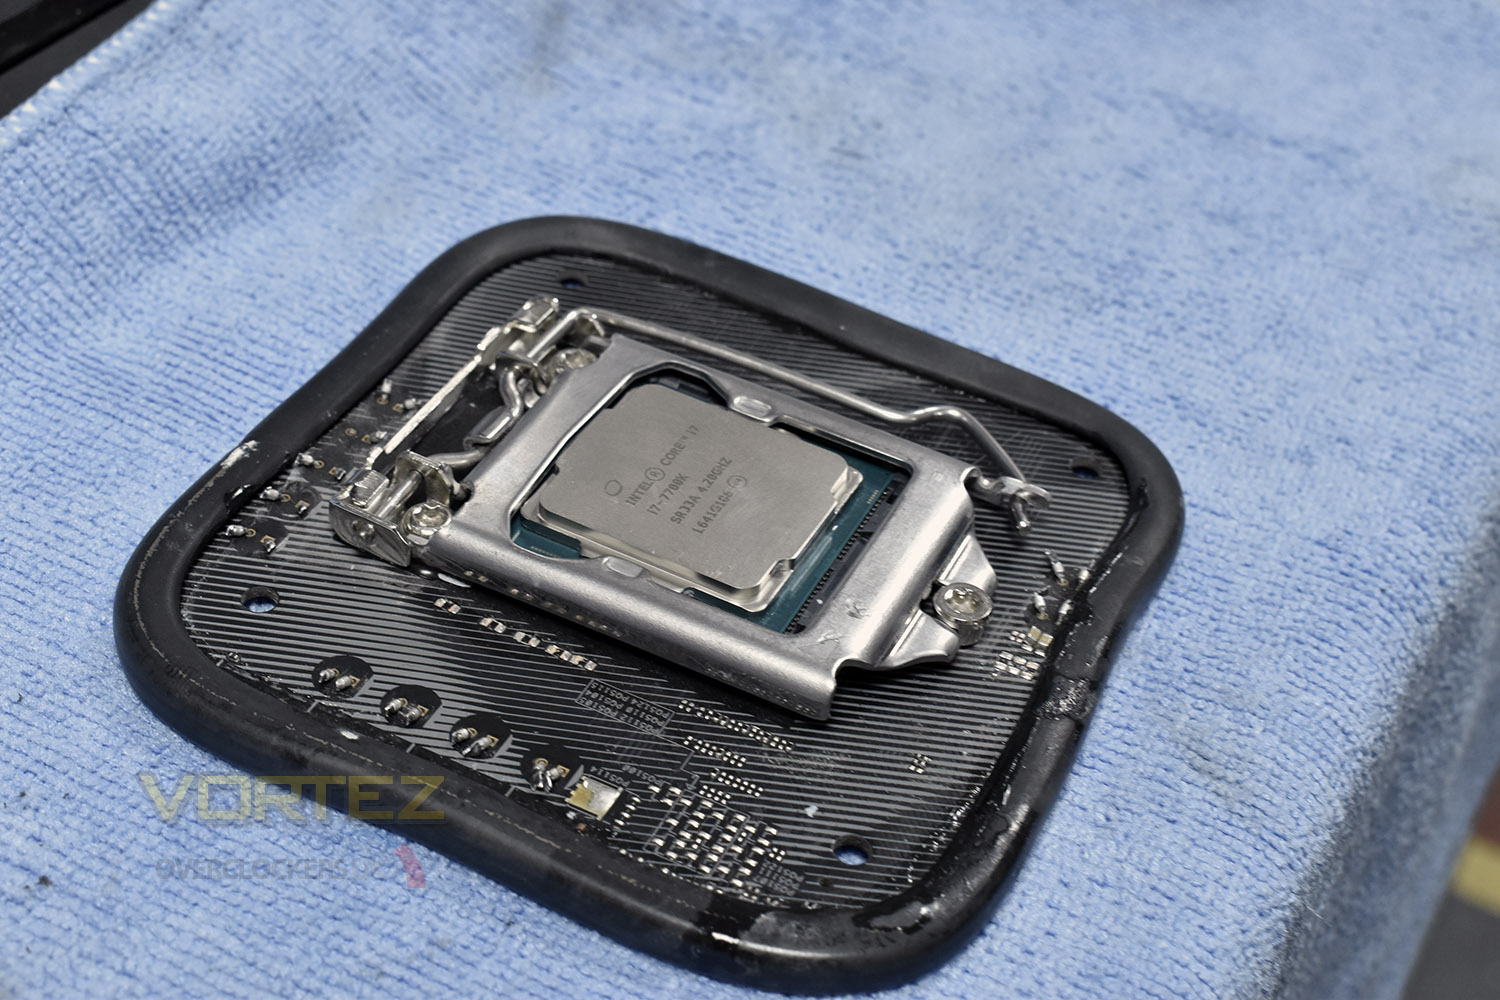
Replacing the IHS can be done in two different ways. The ILM on the motherboard socket is designed to apply an exact amount of pressure in a uniform manner, ensuring the CPU is properly seated. This precise locking mechanism can be used to hold the IHS in place on top of the CPU, without any need for glues or adhesives; the benefit of this is being able to quickly and easily re-access the CPU die if the de-lid results aren’t perfect.
The other method is to use heat-resistant silicon glue or superglue, aiming to keep the layer as thin as possible to reduce the distance between the IHS and the core of the CPU.
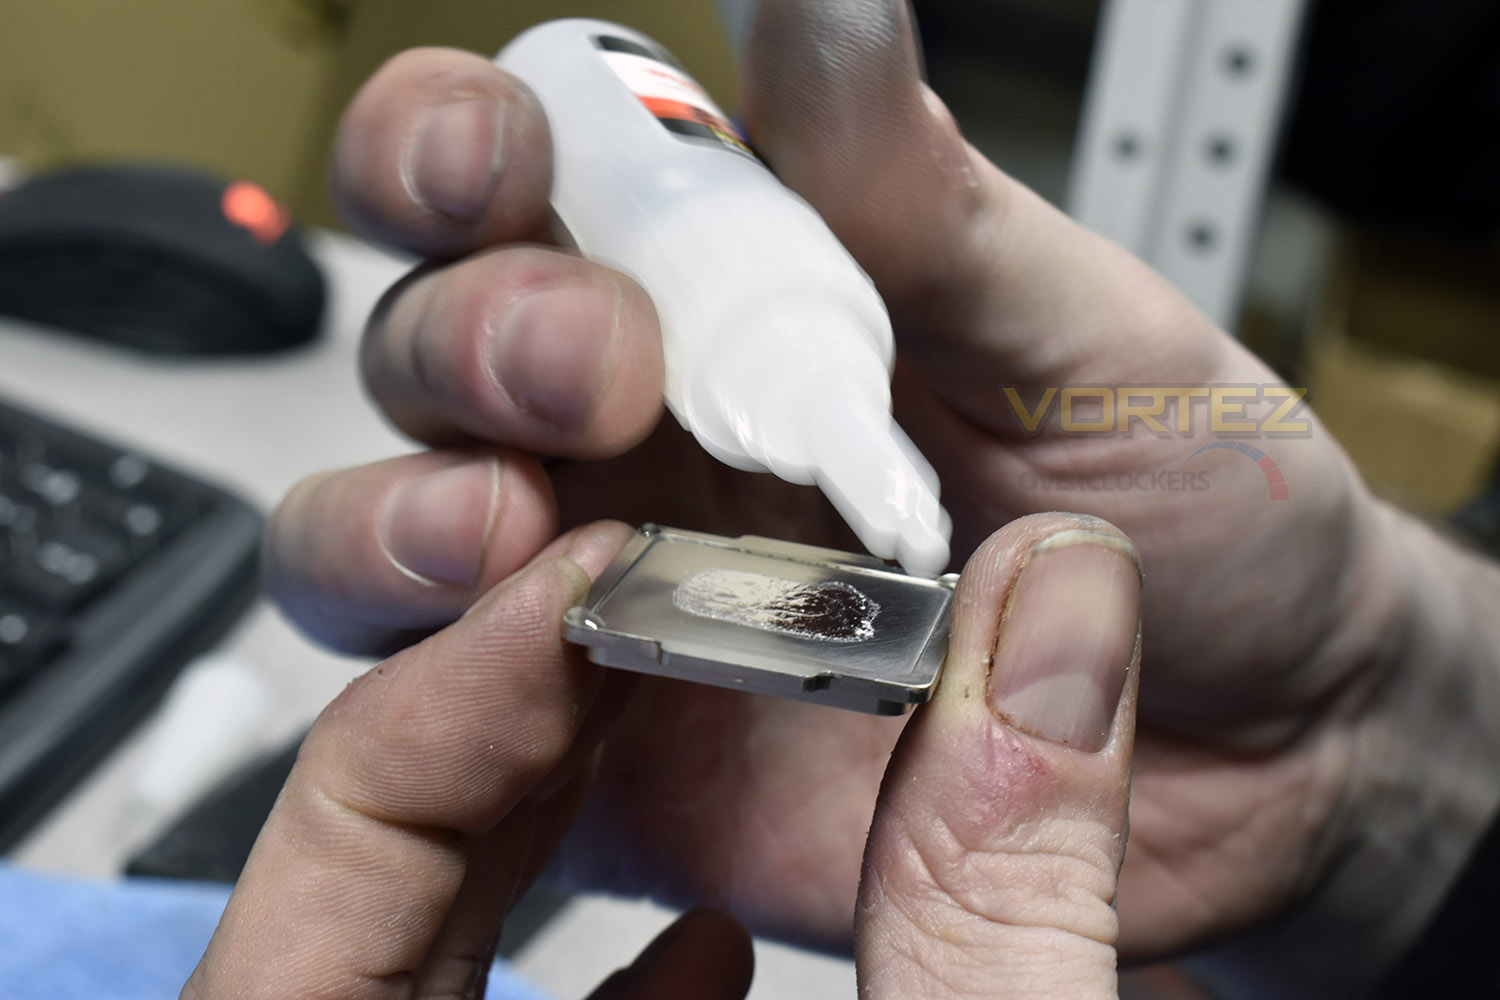
Assuming that an adhesive has been applied, that must be allowed time to cure. There’s several ways you can hold the IHS in place, but OcUK have found an old, faulty ILM from a broken motherboard is the best possible method, relying on years of Intel’s research into socket designs to apply the perfect amount of pressure. It’s “rough and ready” but it works a treat!
Now it’s time for testing.
Speed-binning
Part of the 8Pack promise is to ensure that the CPU you are purchasing is guaranteed to work at a given frequency. There are some caveats, but they’re perfectly reasonable. All Ian asks is that the user is running a high-end motherboard, such as an ASUS Maximus, AS-Rock Taichi, Gigabyte Gaming 7 or something of that calibre, along with a 240mm all-in-one watercooling loop, to ensure the chip is adequately cooled.All of the speed-binned chips are de-lidded to ensure thermals are kept as low as possible, and to increase the overclocking headroom where possible. They’re then run through a stringent testing procedure which involves stressing the CPU using known, good values, in terms of voltages and frequencies. As the CPUs fail to reach each specific grade, they’re then tested extensively at their current “bin level” to ensure they’re 100% stable.
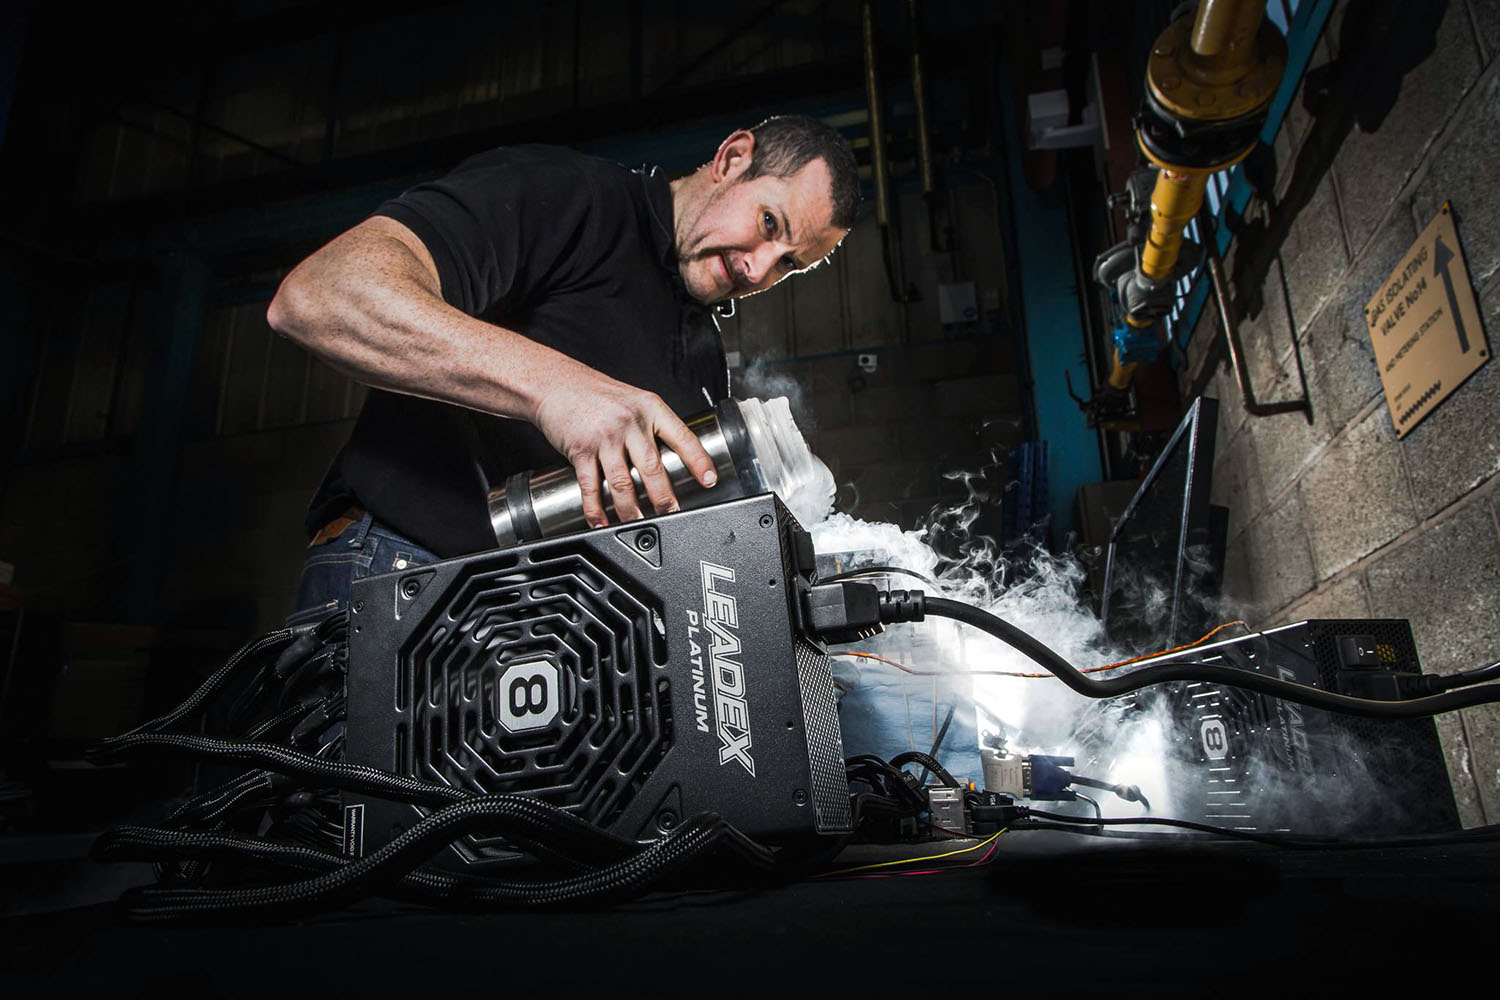
Only a small percentage of CPUs achieve 8Pack’s highest tier, roughly 5%, so the Silicon Lottery is real. His latest 8700K binning process offers chips guaranteed at 5.2GHz, a massive 1.5GHz above the stock clocks, and 0.5GHz above the maximum turbo frequency of the processor.
You can check out 8Pack’s range of speed-binned CPUs here.
Temperature Results
As we’ve previously mentioned, the main aim of this investigation was to find out whether temperatures dropped, and if so, by how much. We were struggling to overclock our processor at all, due to the 7700K already reaching 90°C-93°C at stock speeds, so we also decided to see if there was any extra overclocking headroom from the process.Test setups:
Vortez Office
Intel Core i7 7700K
MSI Z270 Gaming M7
Corsair Vengeance 3000MHz LPX
Corsair H150i Pro RGB
Ambient Temperature: 21°C
Intel Core i7 7700K
MSI Z270 Gaming M7
Corsair Vengeance 3000MHz LPX
Corsair H150i Pro RGB
Ambient Temperature: 21°C
Overclockers UK Test Labs
Intel Core i7 7700K
ASUS Strix Z270 MAXIMUS IX Hero
TeamGroup 3200MHz
OcUK Tech Labs 240mm Liquid Cooling All-In-One
Ambient Temperature: 11°C
Intel Core i7 7700K
ASUS Strix Z270 MAXIMUS IX Hero
TeamGroup 3200MHz
OcUK Tech Labs 240mm Liquid Cooling All-In-One
Ambient Temperature: 11°C
We began by testing the CPU, both at Overclockers UK, in one of their Z270 test bench systems, as well as in a system here at Vortez. We used a popular stress testing application called Prime95; this piece of software stresses the logical cores of a CPU to 100%, generating a significant amount of heat.
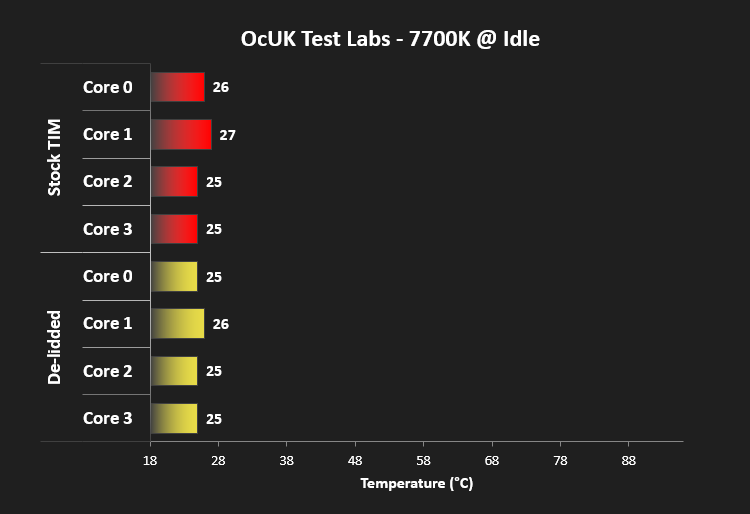
We began by comparing temperatures between the stock Intel TIM and the de-lidded liquid metal within the OcUK Test Labs.
Then, putting some load onto the cores for 30 minutes with Prime95, we compared the core temperatures again.
Now, after returning back to our office, we decided to run our tests again, having previously tested it before venturing out to OcUK.
As we did at OcUK, we compared idle temperatures after leaving the PC to idle for 10 minutes.
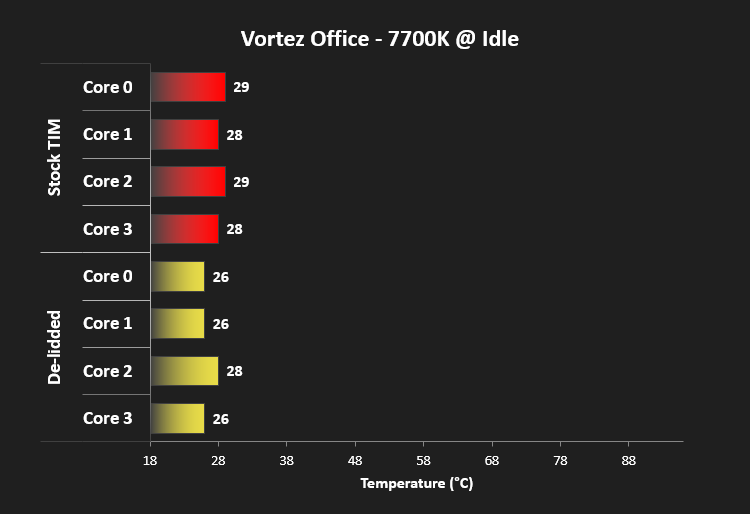
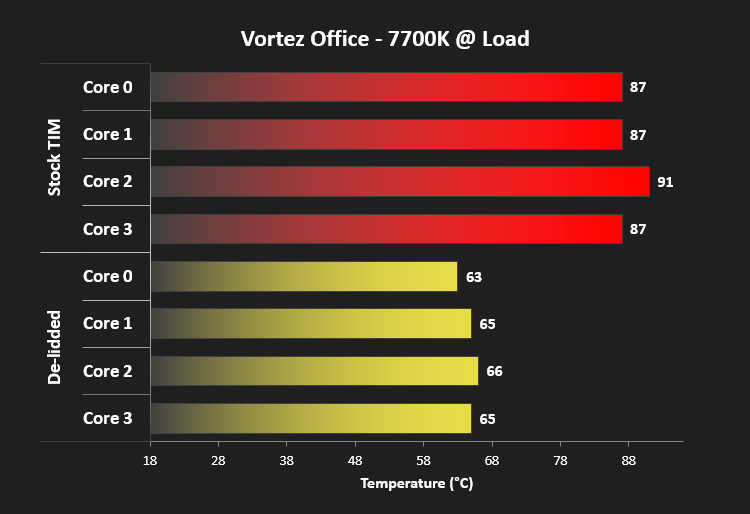
Then we pumped some workload through the 7700K with Prime95 for 30 minutes, recording the maximum core temperatures.
Overclocking
Not many people will be willing to risk invalidating their warranty purely to achieve lower temperatures – the overall aim is to generally increase any overclocking headroom; that’s certainly the underlying aim when 8Pack performs the procedure, anyway.A great alternative is to purchase a pre-delidded CPU from Overclockers.co.uk. They offer a full years guarantee, the same as you would expect from an OEM chip, and take all of the risk into their own hands. Plus, you get the peace of mind that your chip will reach a decent overclock.
Having said that, we were interested to see what kind of difference de-lidding a chip could make to overclocking results. Before we set off down to Overclockers UK, we were unable to overclock our chip at all without hitting a thermal throttle, where the 7700K would automatically cut power to the silicon to prevent permanent damage.
Once we returned to the office, we were keen to crank up the settings and see what it was really capable of. Ian Parry kindly gave us some pointers before we were on our way, so we could hopefully eke out a little more performance from the Kaby Lake chip.
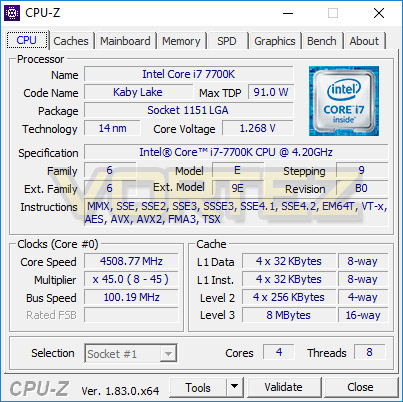
Our 7700K chip required 1.268V at 4.5GHz, when using the turbo-clock.
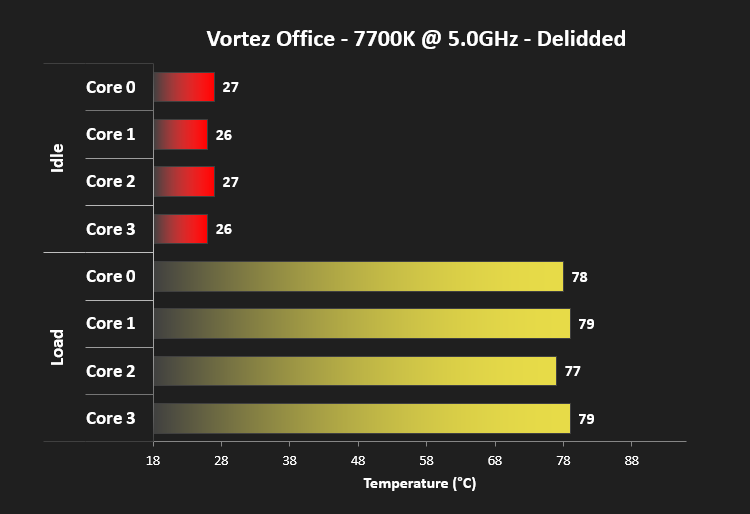
After tweaking in the BIOS and running an hour long Prime95 stress test, we found that 5.0GHz was stable at 1.360V, but pushing for 5.1GHz would cause instability within a few minutes – we could possibly push the voltage a little higher but we’re aiming for a 24/7 overclock at this time.
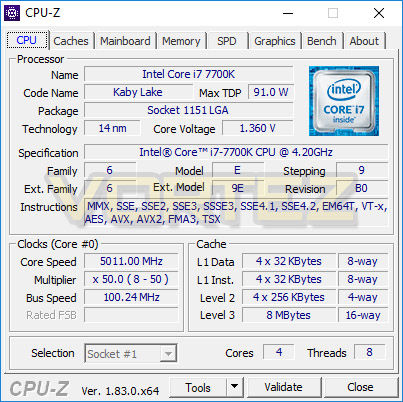
As you can see, the overclocked temperatures, with around 0.1v more than stock are still considerably lower than the stock Thermal Interface Material.
Conclusion
Being given the opportunity to take along our own chip, knowing full well it wasn’t “cherry picked” or selected in any way, gave us the ability to trust our results and feel we were giving a reader a true representation of what to expect.As is evident from the pages describing the procedure, the risks involved are high, with some aspects being incredibly fiddly. If you’re serious about achieving an overclock, have OcUK remove the Silicon Lottery and bathe in the joy of that overclocked goodness.
There’s no denying that de-lidding a CPU provides huge drops in temperature. Our own CPU, in the Vortez office, experienced an average core temperature drop of 23°C at full load, opening up a vast window for overclocking headroom.
Following on from the de-lidding, we tested overclocking. Our experience went from no overclocking at all, to a 5.0GHz stable chip, with lower temperatures than stock. We couldn’t be happier with the results.
Our professional opinion would be, don’t undertake the procedure yourself and have OcUK use their years of experience to provide you with a stable, overclockable, de-lidded chip, complete with 12 months warranty.
Stay connected with the Vortez Social Media pages:
Join in with the discussions on Discord