Raijintek are relatively new to the party, founded in 2013, but with their German design and Taiwanese manufacture, they promise quality at an affordable price. How does the Orcus 240 RGB CPU Cooler fare in our tests?

Product on Review: Raijintek Orcus 240 RGB CPU Cooler
Manufacturer: Raijintek
Street Price: £94.99
Raijintek design and build a range of PC components, including power supplies, fans, cases and CPU coolers in both closed loop watercooling and aircooling. They’re still incredibly new to the scene, being founded in 2013. Raijintek seem keen to make the user aware of their “German design and Taiwanese manufacturing” suggesting some pride is involved in that partnership.
With the popularity and improved ease of use of all-in-one watercooling solutions, many companies now offer these in all different shapes and sizes – some a little more unique than others.
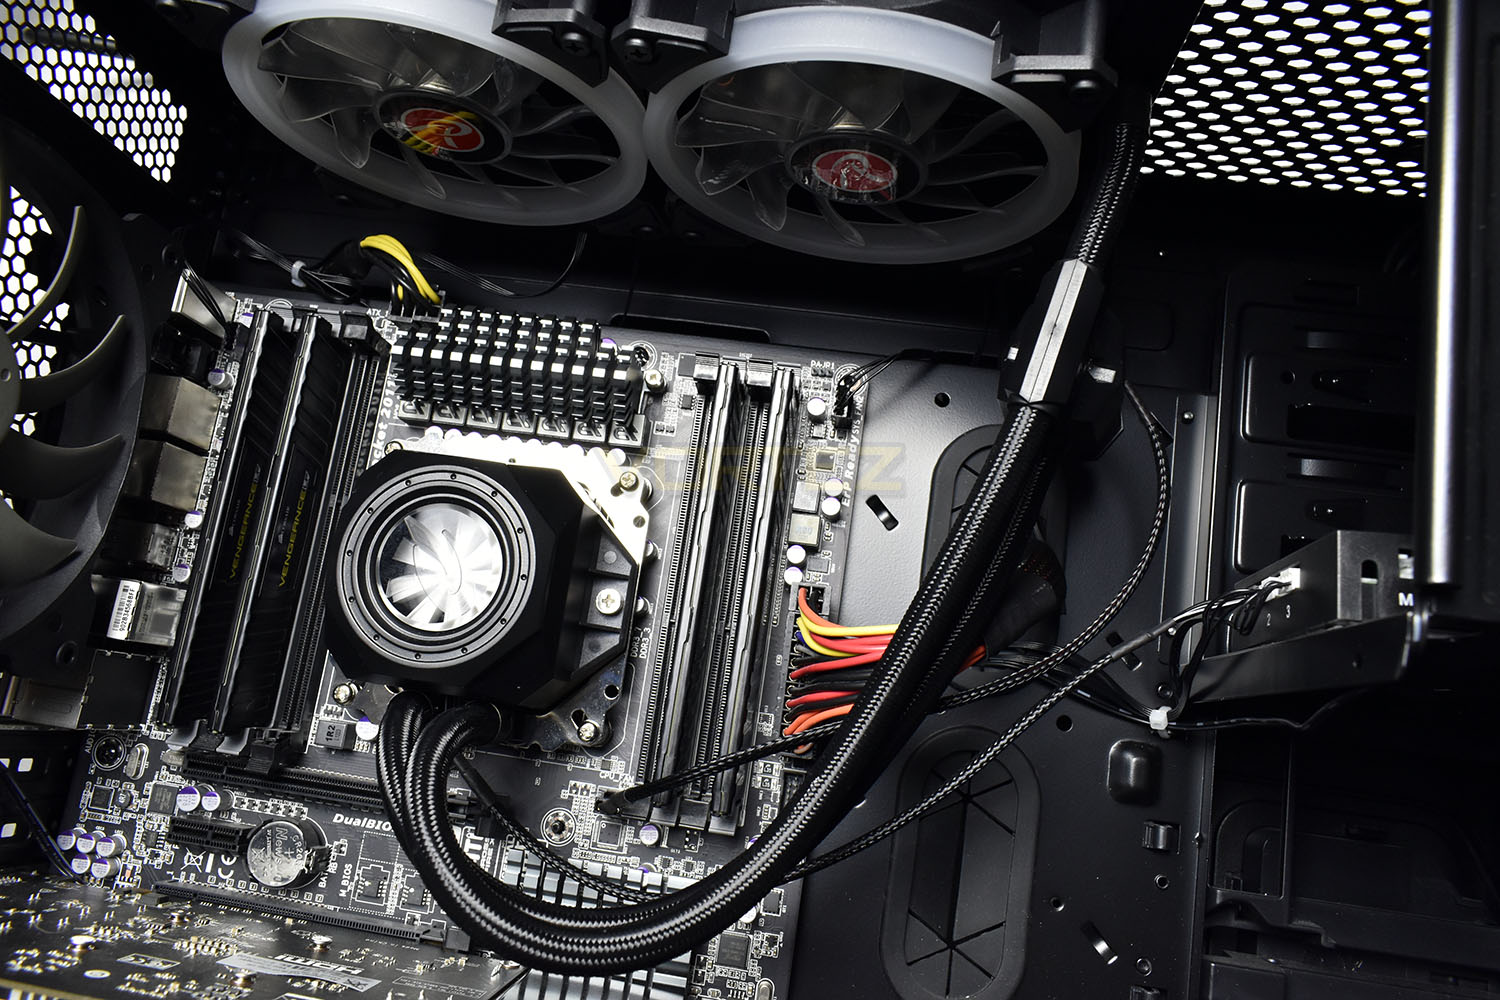
Today, we’ve been provided with the Raijintek ORCUS 240, an all-in-one watercooling loop for your CPU, featuring a pair of 120mm RGB fans, an RGB CPU header and Teflon sleeved tubing. Something we’ve not seen before is the pump mounted on the tubes themselves, instead of being within the CPU head itself.
We’ve not tested a CPU cooler from Raijintek for quite some time now, so we’re not sure of what to expect. Read on to find our verdict.
Raijintek on the ORCUS 240:
ORCUS, RAIJINTEK’s evolution All-In-One liquid cooling CPU cooler, designed in Germany and made in Taiwan. With several years of experience in liquid cooling products and cooperation with global engineers and manufactures, RAIJINTEK’s RD team developed the concepts of most performing AIO CPU liquid cooler and spent years to design one of most user friendly and spot light product for enthusiasts.
Technical Specifications
SPECIFICATION
Product Name: ORCUS 240
Product Number: 0R100069
Radiator Dimension [W×H×D]: 272×120×27 mm
Weight [Block+Pump+Radiator]: 900g
Thermal Resistance: 0.1 °C/W
Liquid Capacity: 150ml ±10%
Fan Q’ty: 2 pcs
Tubing Dimension :ID – 5mm / OD – 10.6mm
Material: Copper Cold Plate / Alu. Radiator
PUMP
Dimension [W×D×H]: 69.5×40×33 mm
Bearing type: Ceramic Axis
Q-max: 66 L/H
Pressure Head: 1.3 Meter
Noise level: 25 dBA [Max.]
Life Expectancy: 10000 hours
Speed: 5000±10% R.P.M. at 12VDC
Rated Current: 180mA
Voltage Rating: 12 V
Power consumption: 2.2 W
FAN
Dimension [W×H×D]: 120×120×25 mm
Voltage Rating: 12V
Starting Voltage: 5V
Speed: 800~1800 R.P.M.
Bearing Type: Hydraulic Bearing
Air Flow: 42.17 CFM [Max.]
Air Pressure: 1.7 mmH2O [Max.]
Life Expectance: 40,000 hrs
Noise Level: 23 dBA [Max.]
Connector: RGB 4 pin, PWM 4 pin
Rated Current: 0.14±10% A
Power consumption: 1.68±10% W
Accessories: 8 port RGB LED Hub × 1 ; Remote Controller × 1 ; Connecting to M/B RGB Cable × 1
APPLICATION
Intel®: All Socket LGA 775/115x/1366/201x/2066 CPU (Core™ i3 / i5 / i7 / i9 CPU)
AMD®: All AM4/AM3+/AM3/AM2+/AM2/FM2+/FM2 CPU
Product Name: ORCUS 240
Product Number: 0R100069
Radiator Dimension [W×H×D]: 272×120×27 mm
Weight [Block+Pump+Radiator]: 900g
Thermal Resistance: 0.1 °C/W
Liquid Capacity: 150ml ±10%
Fan Q’ty: 2 pcs
Tubing Dimension :ID – 5mm / OD – 10.6mm
Material: Copper Cold Plate / Alu. Radiator
PUMP
Dimension [W×D×H]: 69.5×40×33 mm
Bearing type: Ceramic Axis
Q-max: 66 L/H
Pressure Head: 1.3 Meter
Noise level: 25 dBA [Max.]
Life Expectancy: 10000 hours
Speed: 5000±10% R.P.M. at 12VDC
Rated Current: 180mA
Voltage Rating: 12 V
Power consumption: 2.2 W
FAN
Dimension [W×H×D]: 120×120×25 mm
Voltage Rating: 12V
Starting Voltage: 5V
Speed: 800~1800 R.P.M.
Bearing Type: Hydraulic Bearing
Air Flow: 42.17 CFM [Max.]
Air Pressure: 1.7 mmH2O [Max.]
Life Expectance: 40,000 hrs
Noise Level: 23 dBA [Max.]
Connector: RGB 4 pin, PWM 4 pin
Rated Current: 0.14±10% A
Power consumption: 1.68±10% W
Accessories: 8 port RGB LED Hub × 1 ; Remote Controller × 1 ; Connecting to M/B RGB Cable × 1
APPLICATION
Intel®: All Socket LGA 775/115x/1366/201x/2066 CPU (Core™ i3 / i5 / i7 / i9 CPU)
AMD®: All AM4/AM3+/AM3/AM2+/AM2/FM2+/FM2 CPU
Packaging & Bundle
Raijintek have packaged the ORCUS 240 in a substantial, solid box. There’s little to no information on the front, apart from a picture of the product.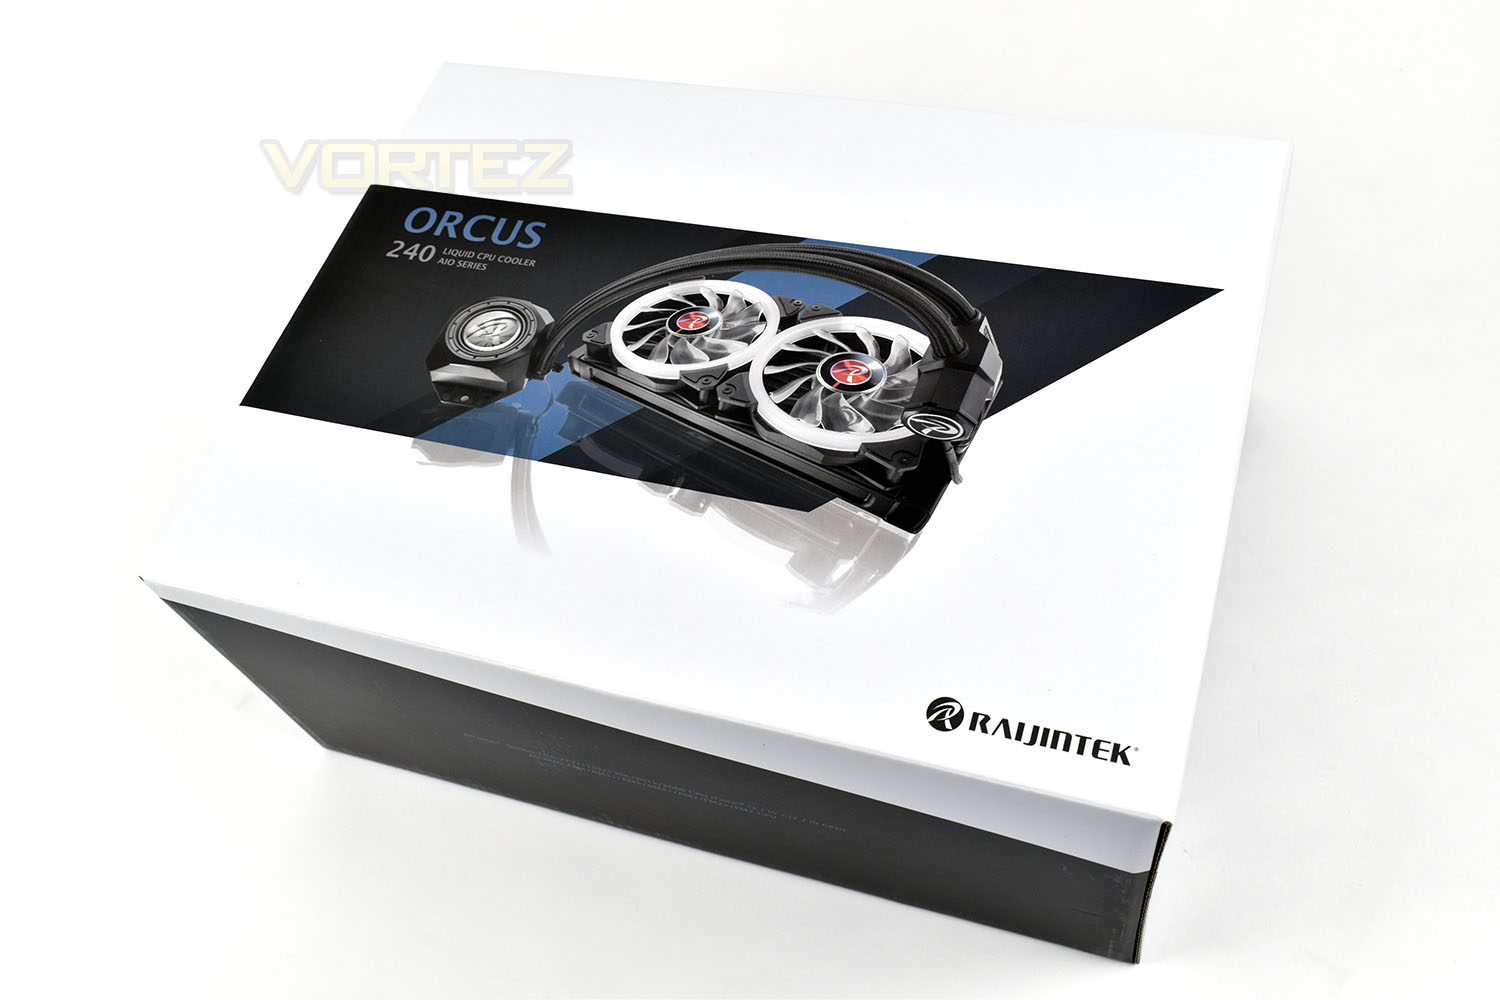
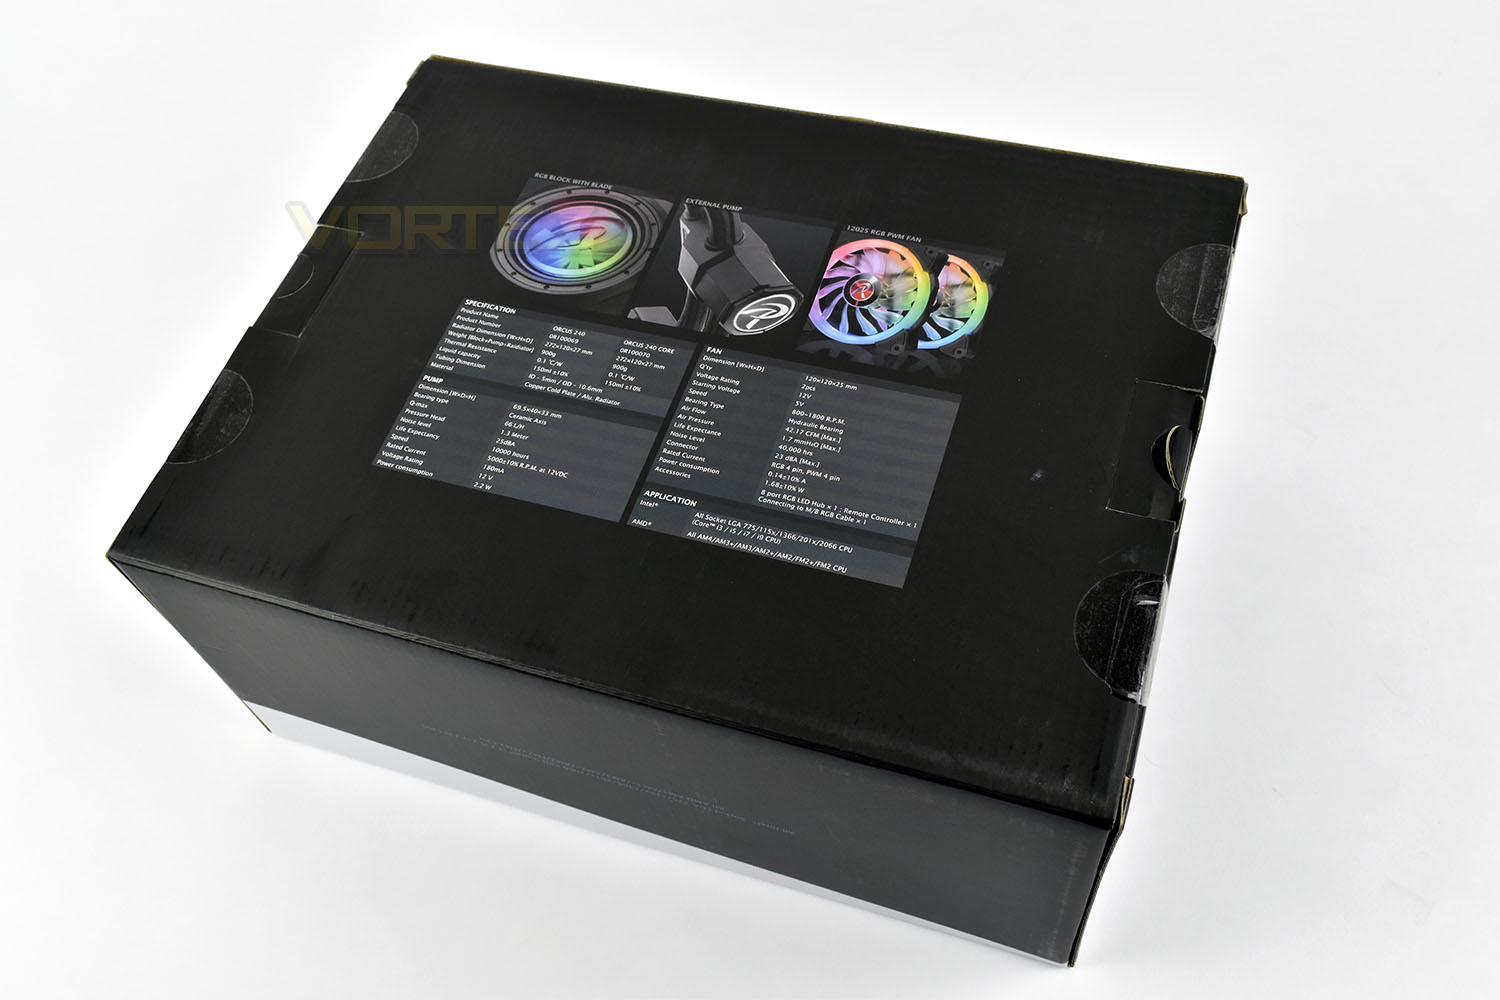
The rear of the box gives a print out of the online specifications as well as some close up images of the enclosed cooler and fans.
The internal packaging seems sturdy enough to keep things in good shape – always good to know your CPU cooler won’t be damaged when you’re essentially introducing liquid into your PC.
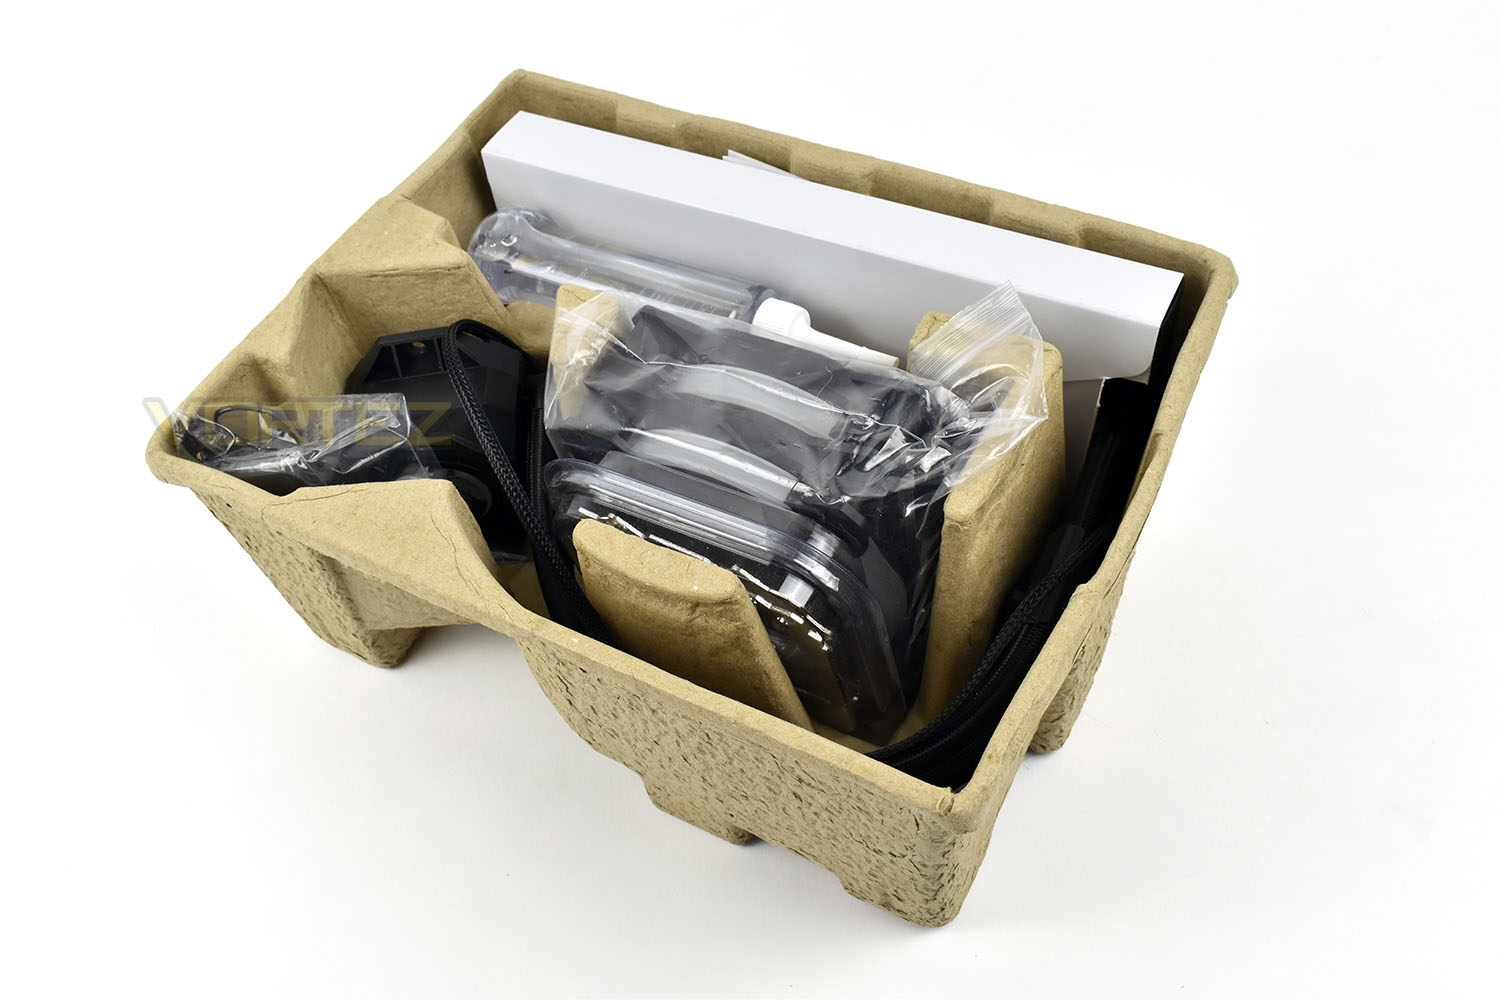
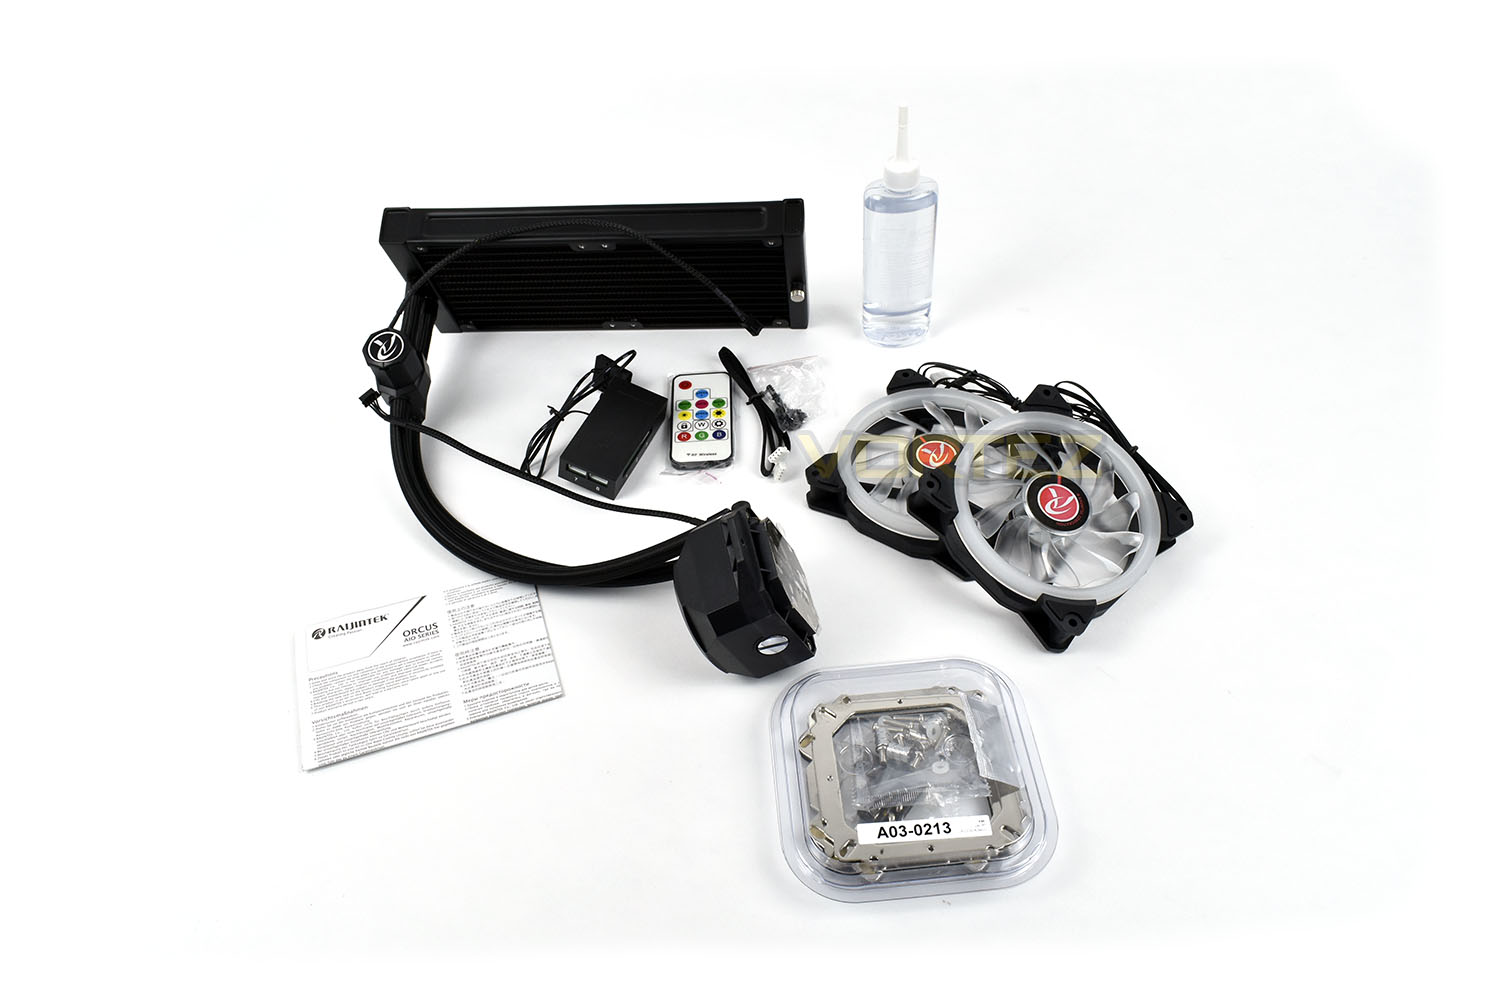
Arriving with the CPU cooler is a pair of 11-blade RGB PWM 120mm fans, mounting brackets and screws for all of Intel and AMD’s current sockets, an RGB controller, capable of powering up to 8 Raijintek devices, an RF remote control for the RGB lighting and a bottle of distilled water for topping up the system further down the line.
Closer Look
The face of the CPU header is a clear plastic, allowing the user to see the spinning blades inside the chamber, as well as indicating fluid levels. There’s also a ring of RGB LEDs inside, illuminating the liquid and spinning blades.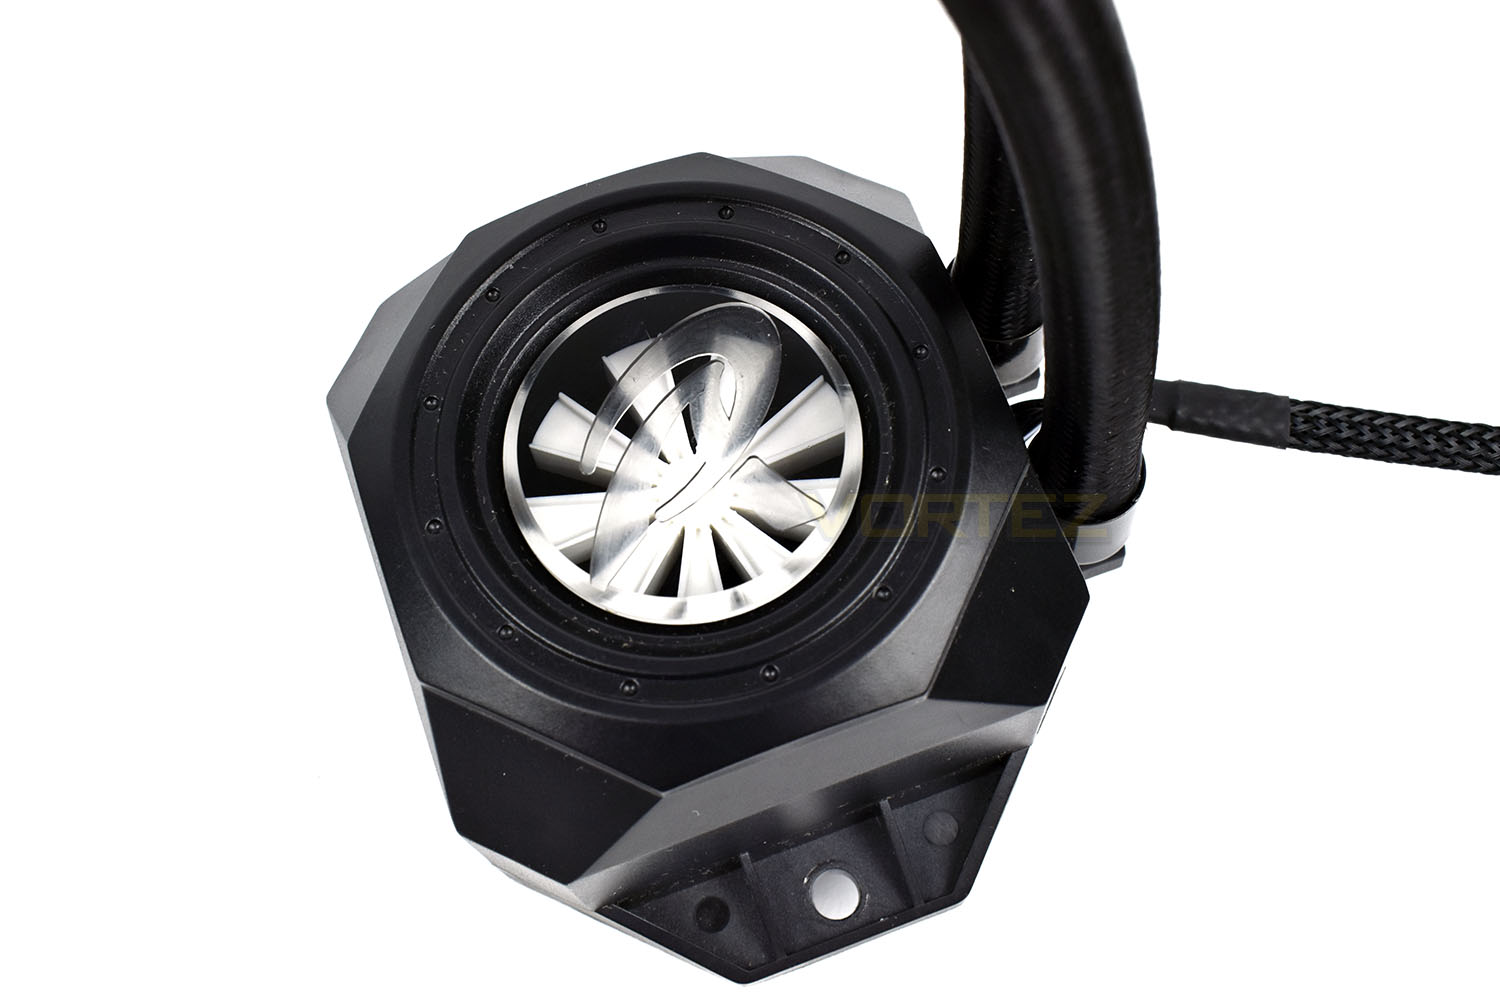
The base of the CPU cooler is more than large enough to cover most CPUs, save for perhaps AMDs ThreadRipper series.
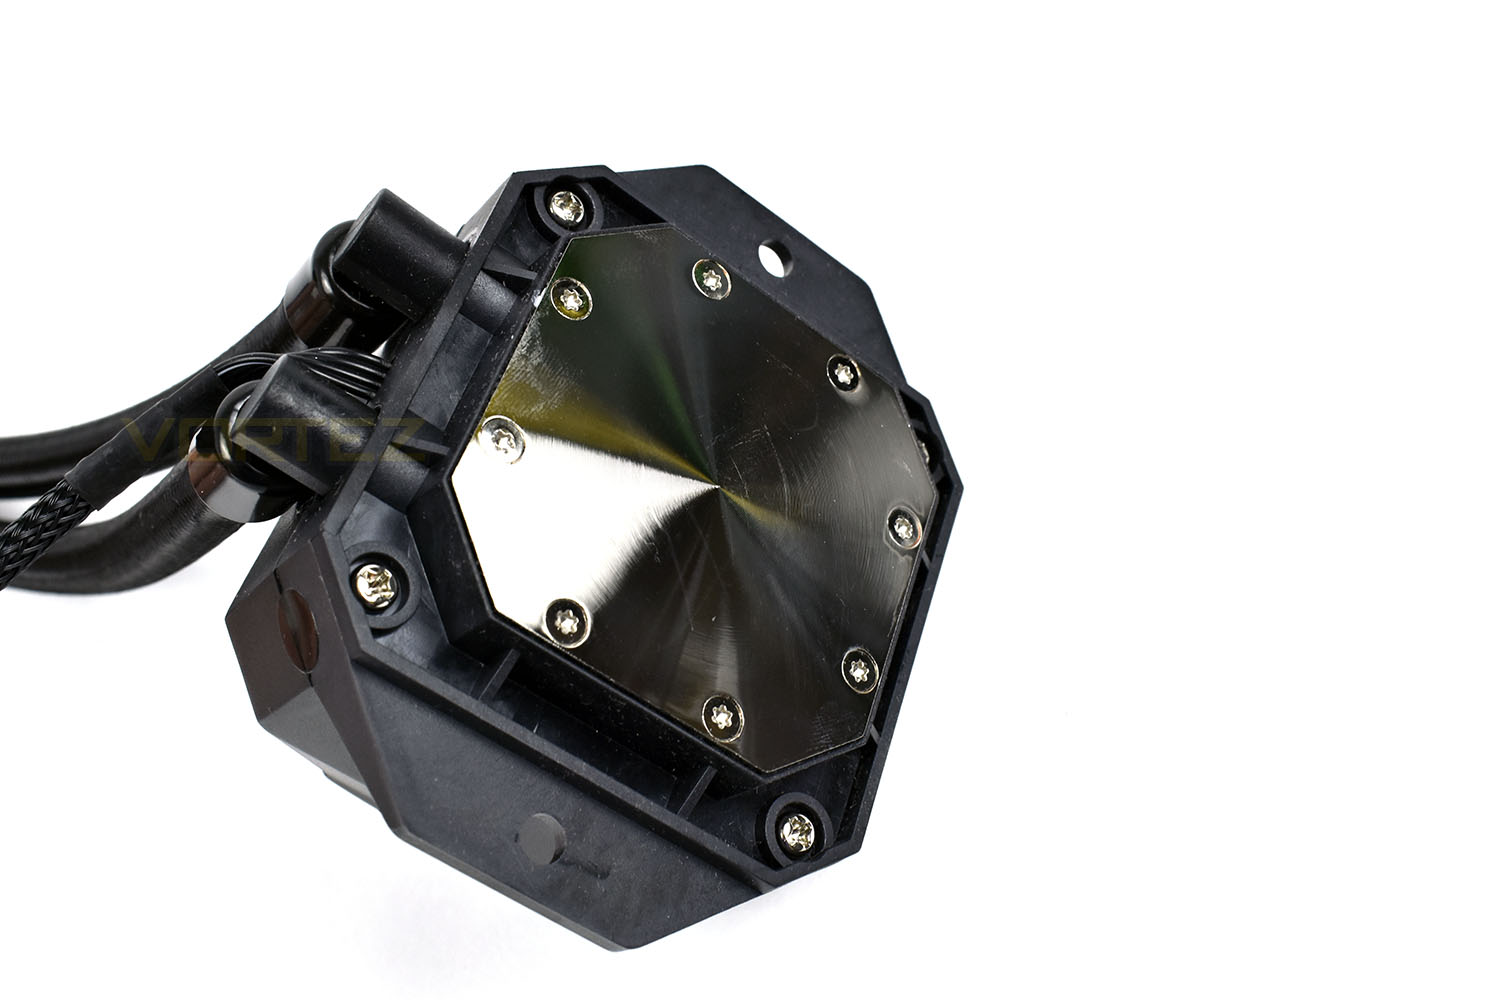
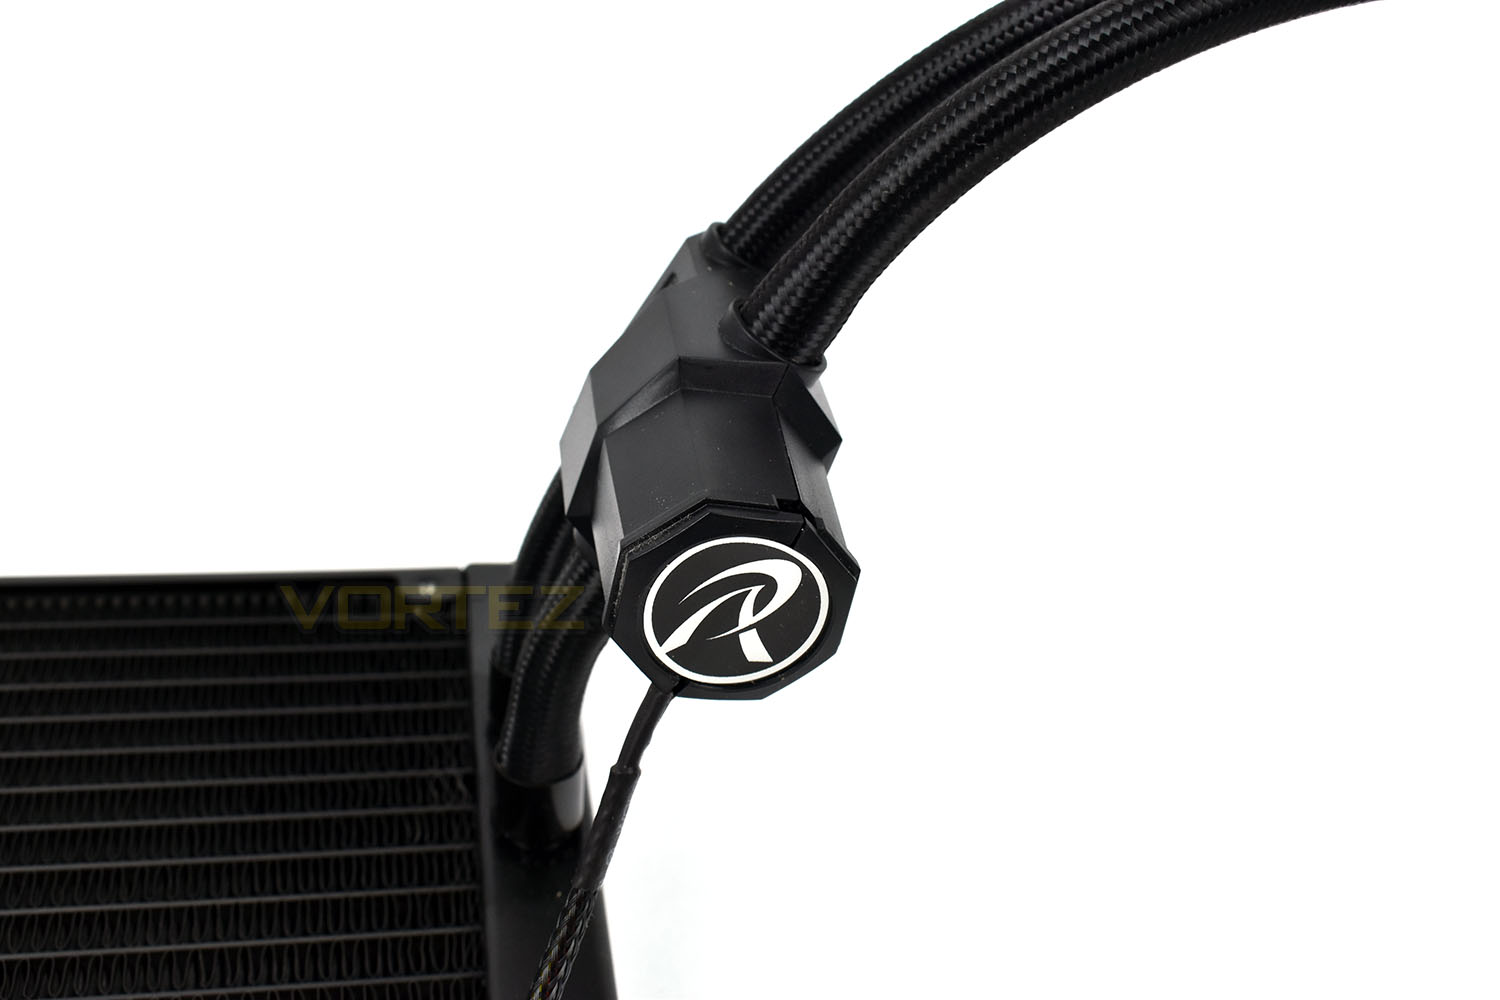
Unlike any other all-in-one watercooling loop we’ve looked at, the pump isn’t located above the CPU, instead being suspended on the tubes between the radiator and the CPU. Raijintek claims this helps to reduce vibration and therefore noise.
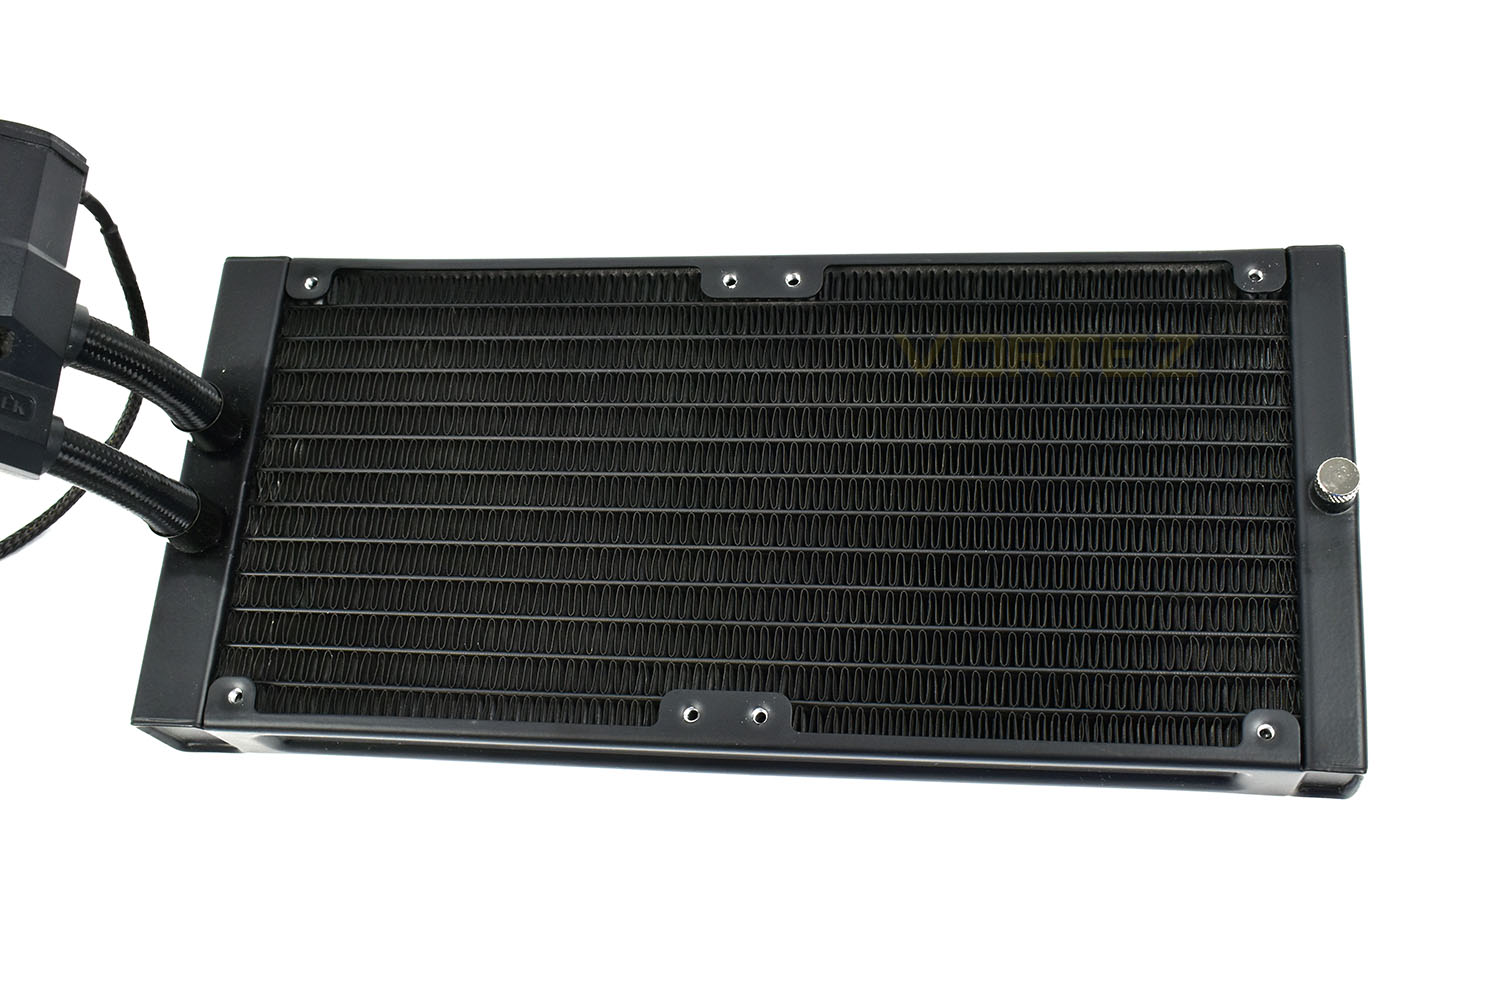
The radiator measures 272mm x 120mm x 27mm, meaning there’s plenty of surface area for heat dissipation.
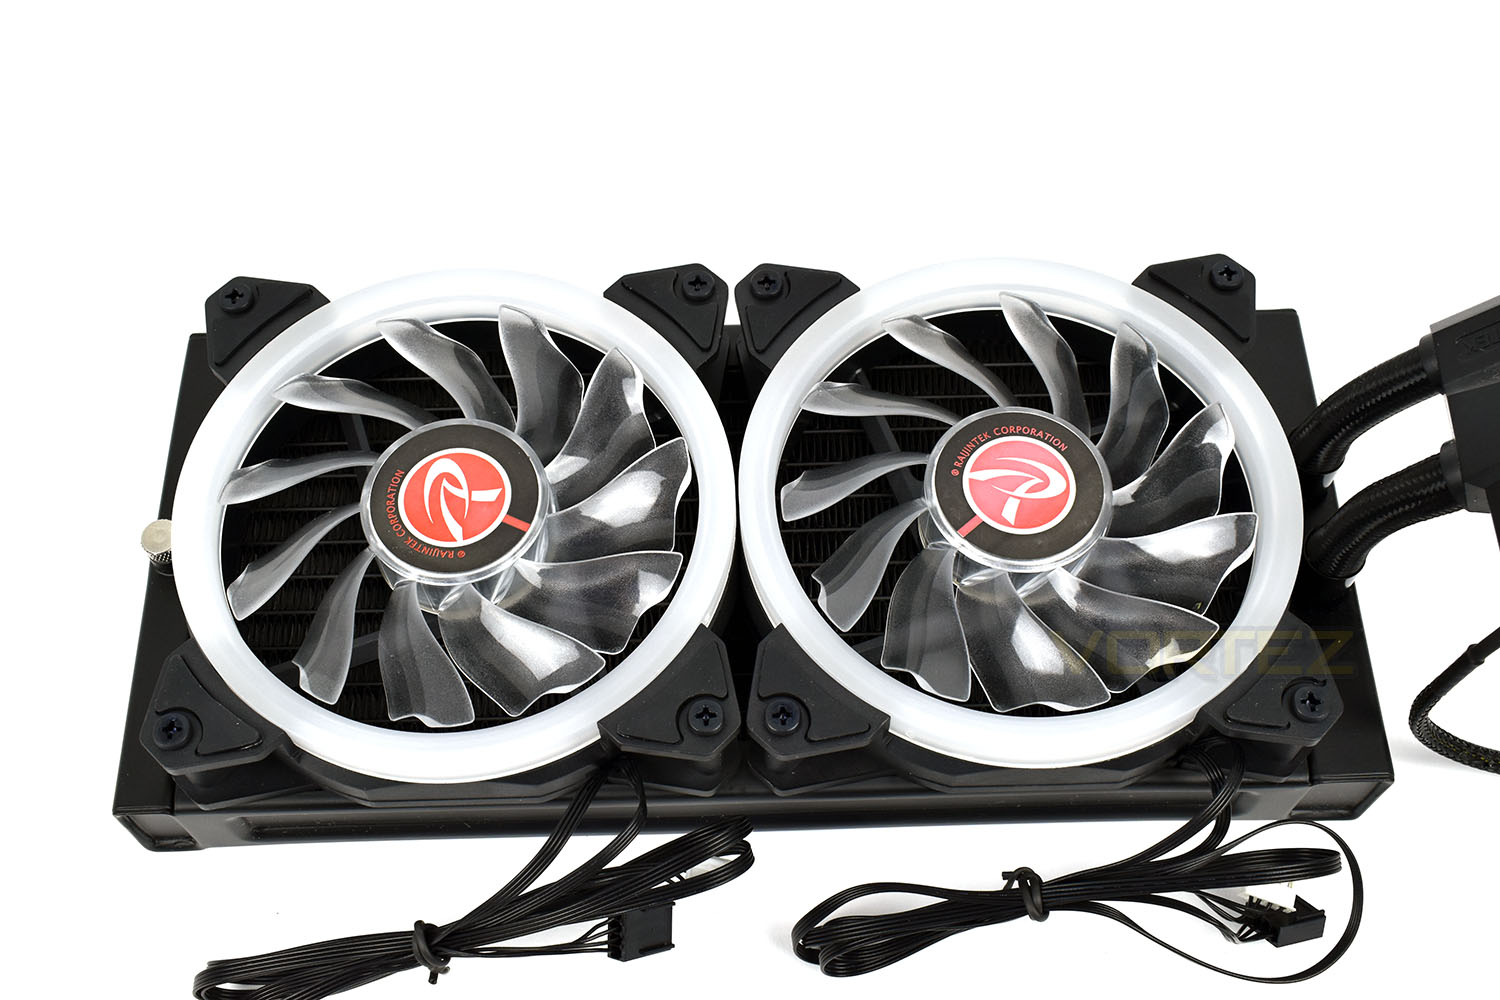
The provided 120mm RGB PWM fans feature white rings to exaggerate the RGB lighting, as well as 11 blades to force air through the densely packed radiator. Each fan also has rubber corners to help prevent vibrations between the radiator and the fans.
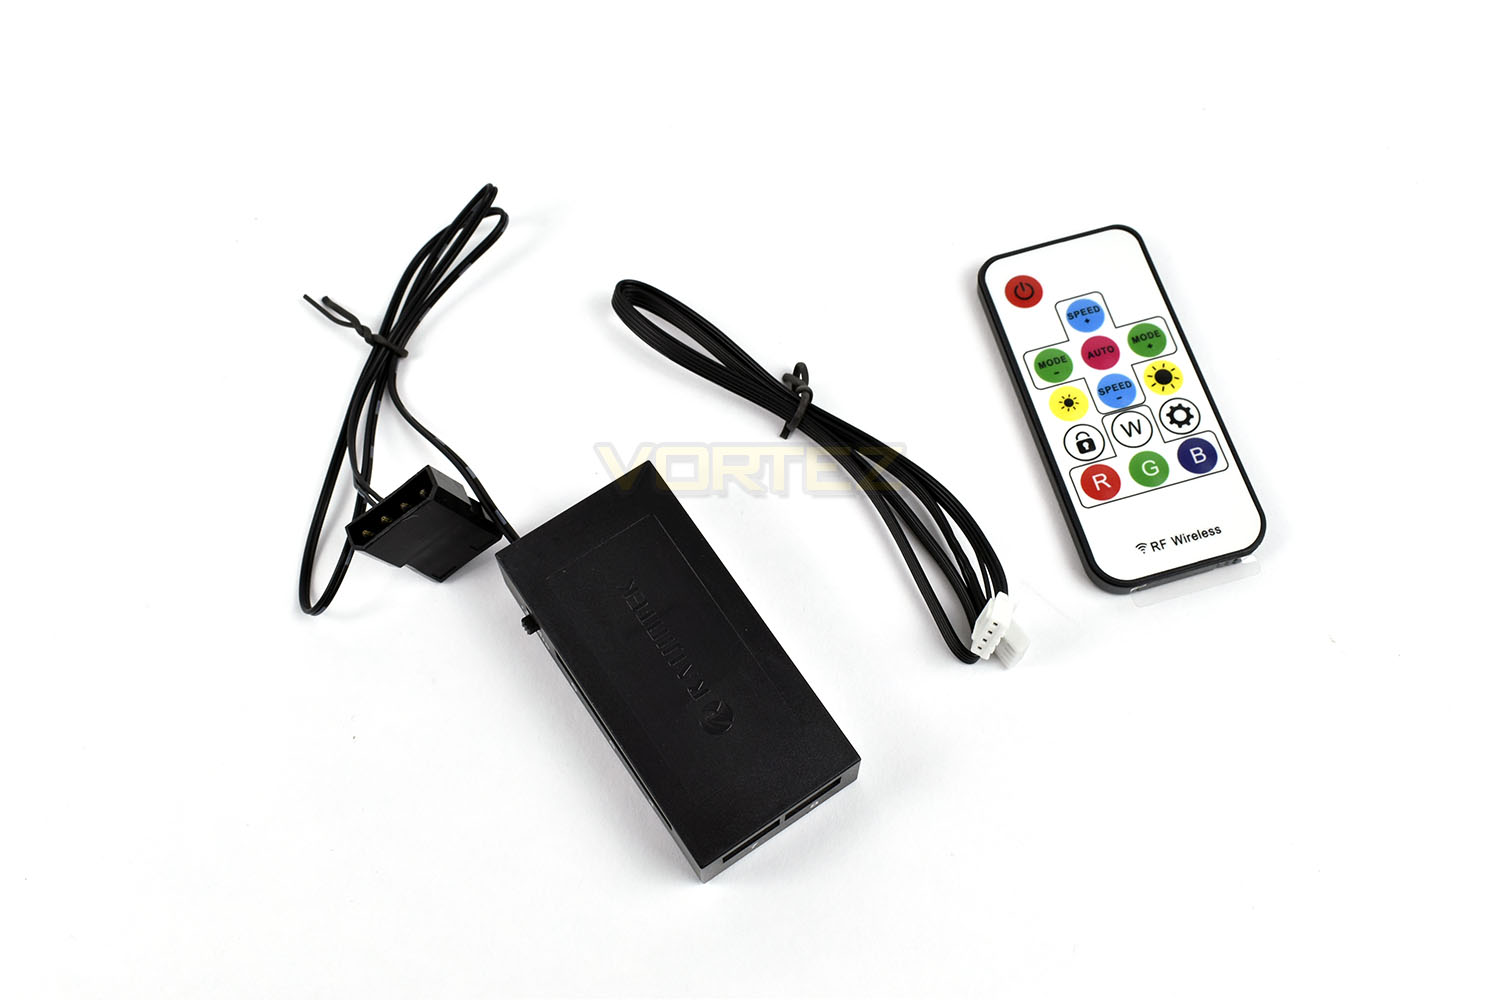
To provide RGB lighting without the use of software, Raijintek have provided an RGB controller, powered by MOLEX. This can connect to ASUS motherboards via the included wire or be controlled via the basic remote control. The remote control uses RF to communicate due to the controller likely being hidden away inside a case, making infrared useless.
Installation
We have some bad news as far as installation goes – the CPU cooler, with the strange design that Raijintek have employed, doesn’t fit onto our Gigabyte Socket 2011 motherboard. We have researched the issue and found the issue is likely isolated to Gigabyte motherboards only, but this does highlight some short-sightedness from Raijintek, not taking into account small differences in sockets between manufacturers.The issue we faced was a small clearance issue, between one of the locking arms and a stand-off screw. The mounting mechanism uses a threaded standoff to ensure the CPUs integrated heat spreader (HIS) and the CPU cooler is spaced correctly. A fixing screw goes through the entire assembly and screws into the socket enclosure.
As you can see below, the clearance between the locking arm and the screw hole is tiny and doesn’t leave enough room for the standoff to fit between.
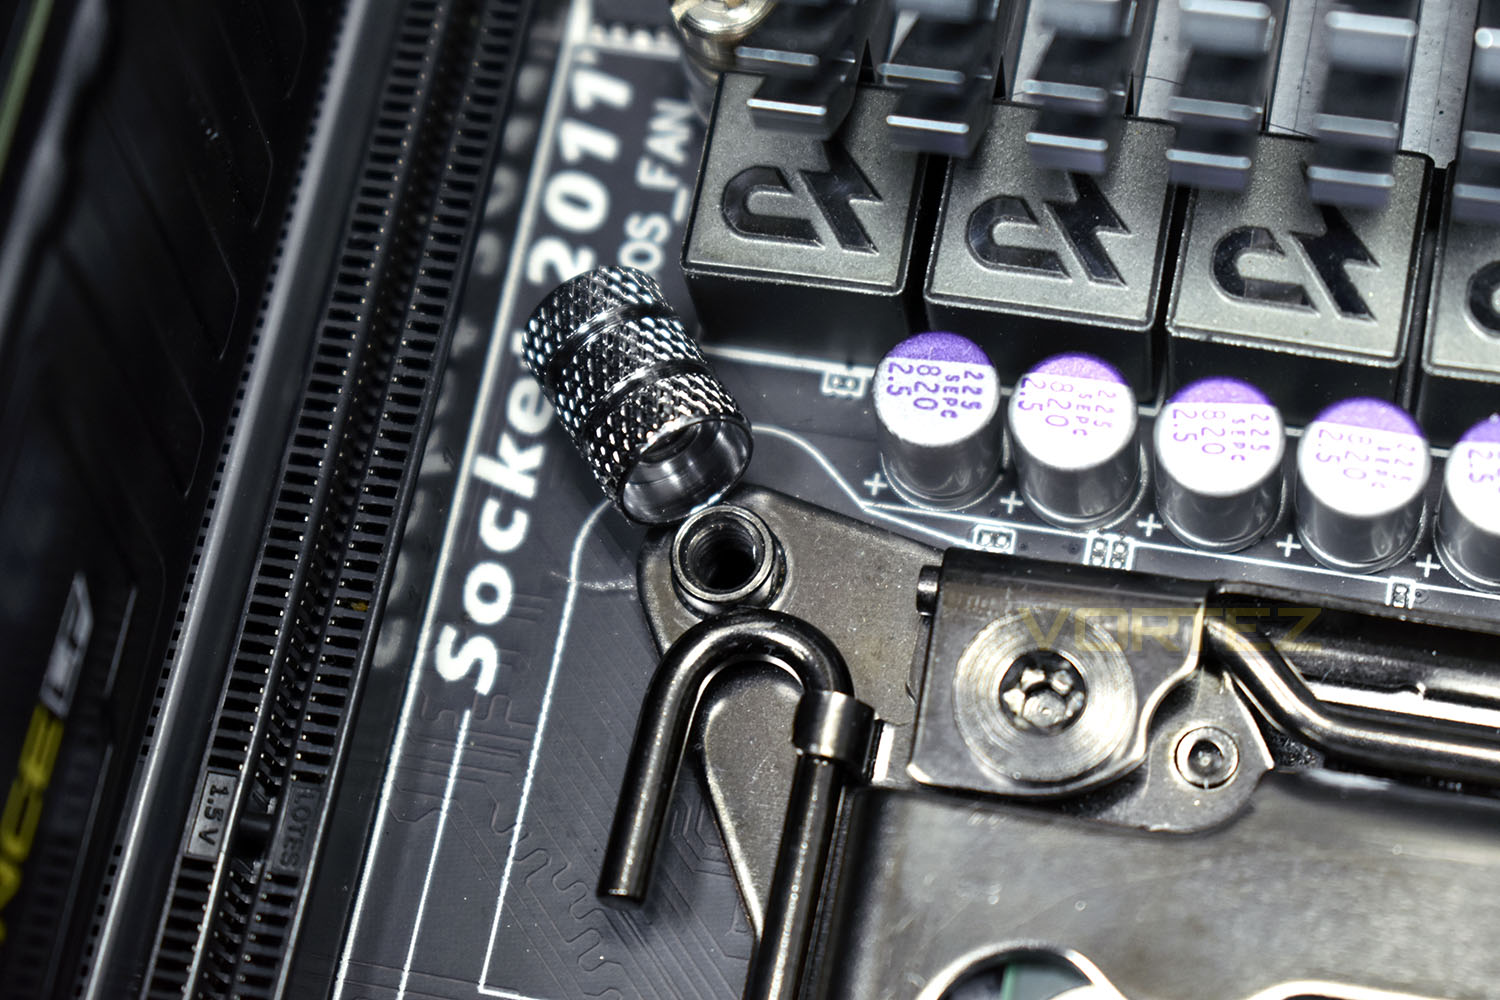
Our fix was to use the mounting plate to hold the locking arm in place – a risky move that thankfully worked to allow our testing to take place, but we certainly wouldn’t recommend this to anyone.
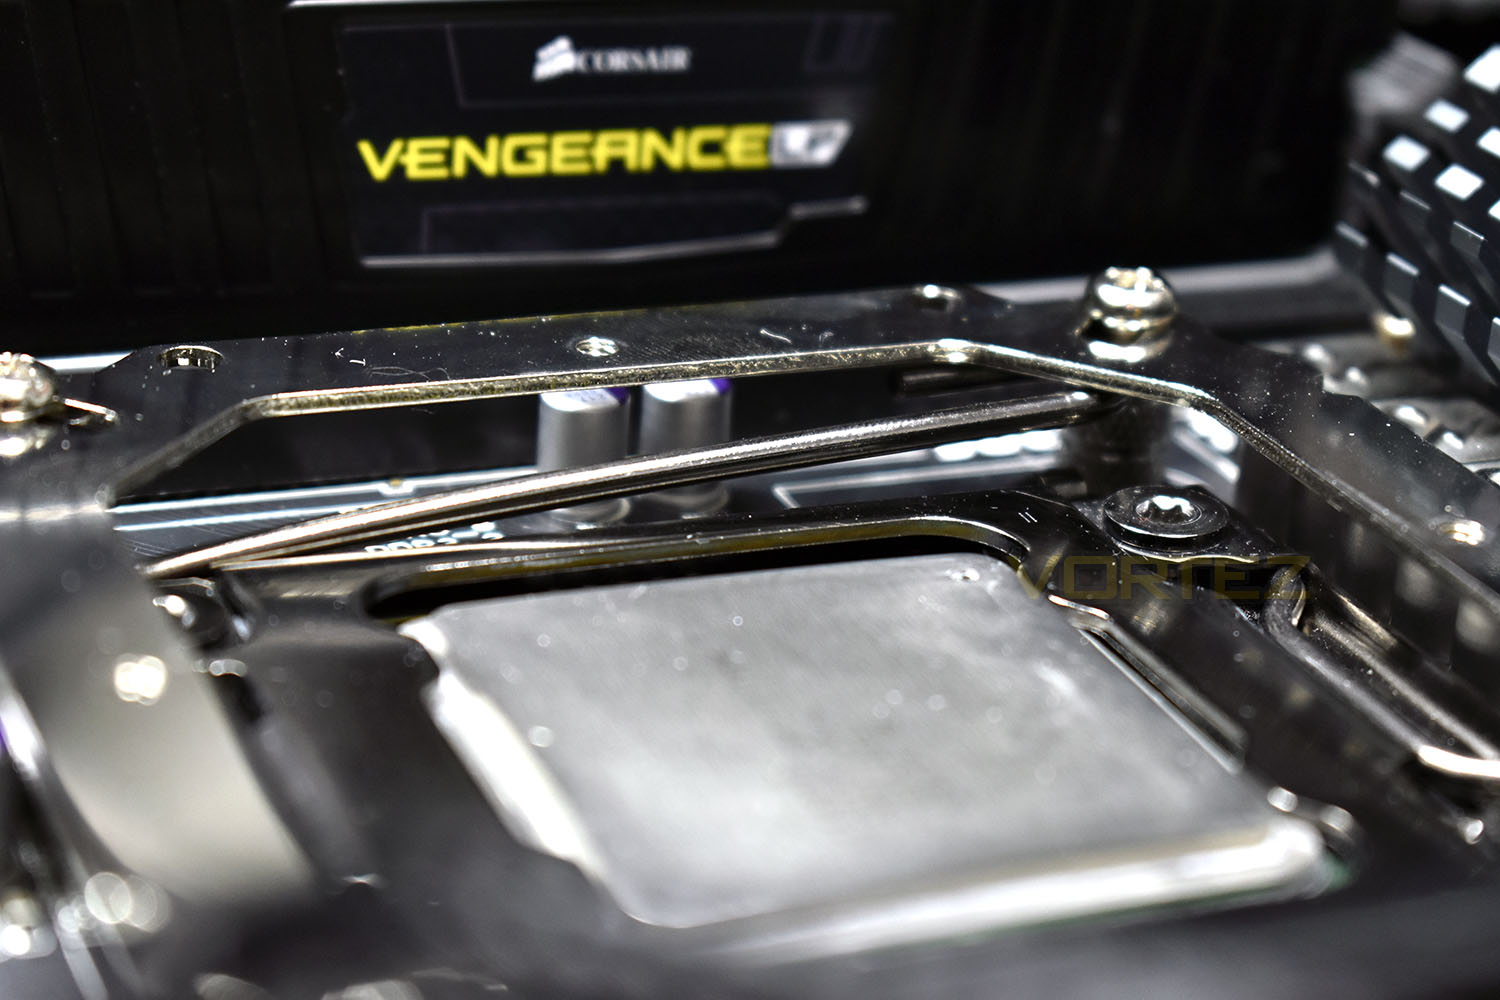
We feel that Raijintek have almost attempted to reinvent the wheel with this mounting system. Most other brands we’ve looked at in recent years have used a system which varies very little, but it works and is compatible with everything. This mounting mechanism has introduced a problem which shouldn’t exist.
However, having said that, we did manage to install the CPU Cooler onto the Intel chip, but we weren’t 100% happy with the route we were forced to take.
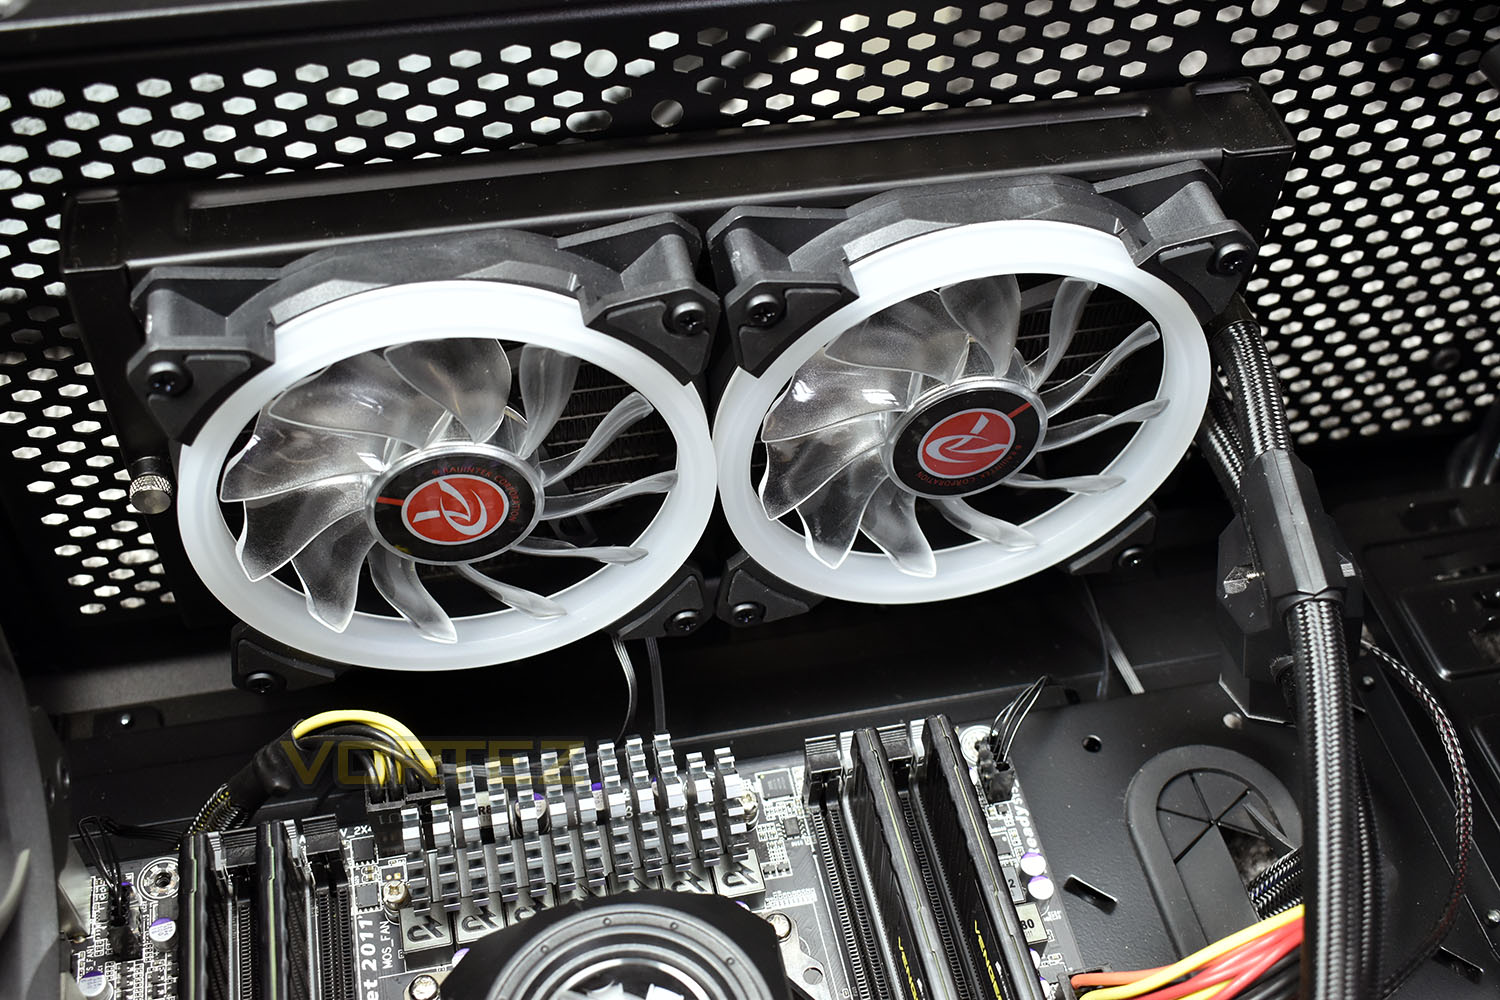
Installing the radiator into the top of the case was a doddle, with the included screws using a large head and of a decent quality. Due to the location of the water pump, we had issues routing the braided cable while maintaining a clean and clutter-free aesthetic. We know this is incredibly important to some!
Installing the CPU cooler onto the mounting bracket was relatively easy, requiring only a screw at each side – we’re not convinced that this equally applies pressure to the entire CPU, however, due to the use of only two screws. We’d much prefer a system that uses 4 equidistant screws to secure the CPU heatsink onto the IHS.
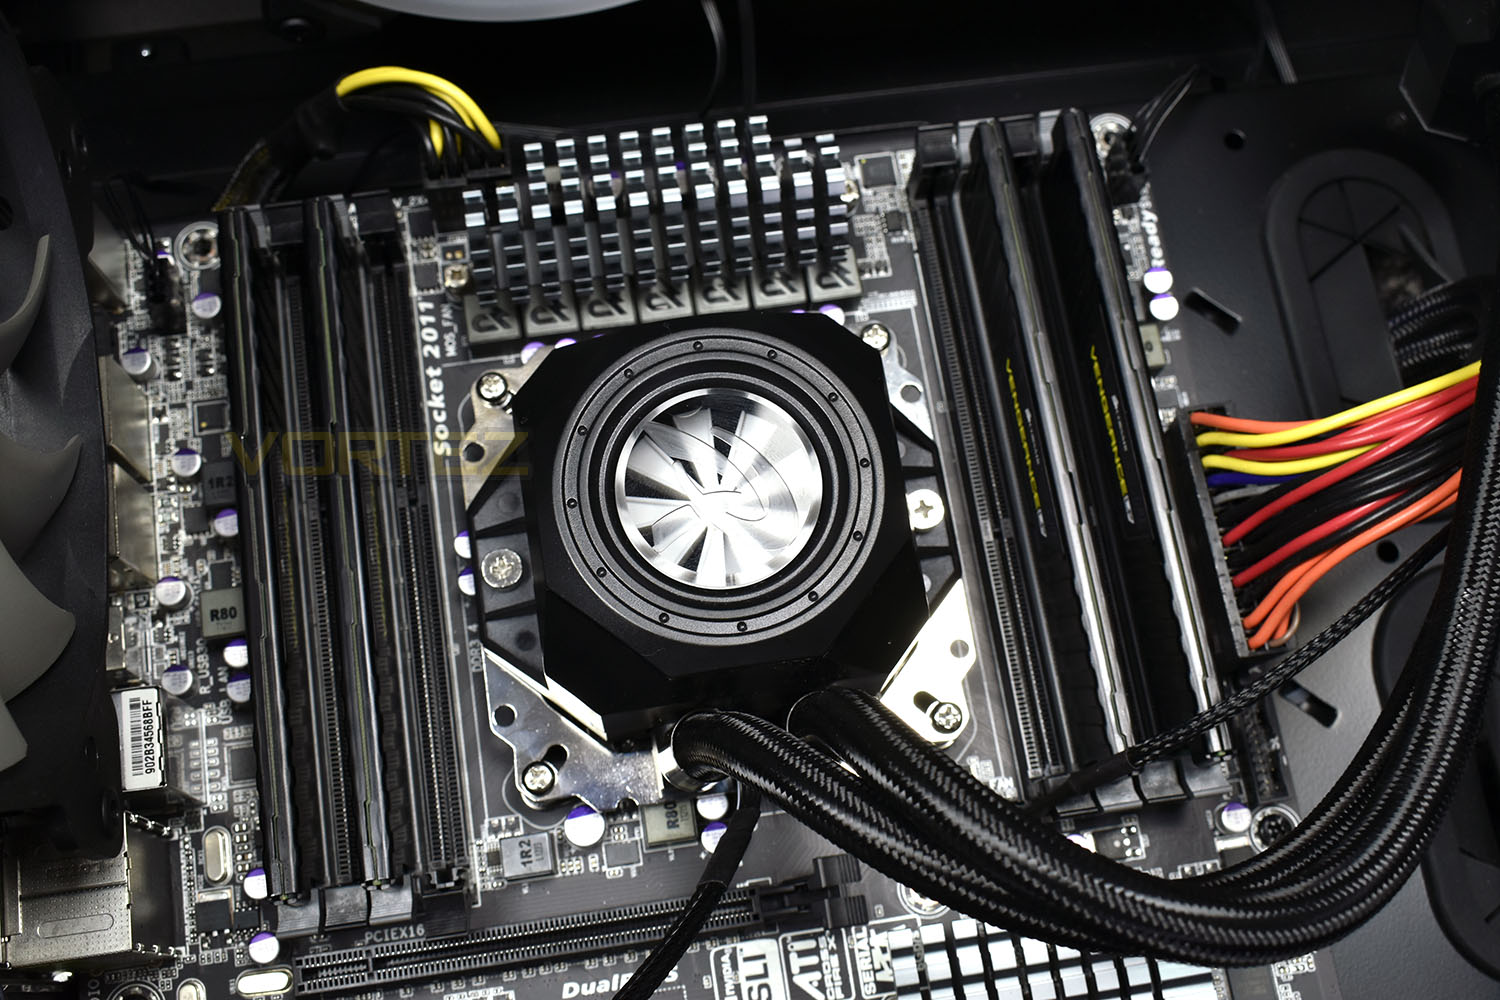
One final note is cable length. The two included fans both have ample cable length, but the braided cables for the pump and the RGB lighting within the CPU header were both around 8” (200mm) in length. This made hiding the RGB controller very difficult. The remote control that controls the RGB lighting also arrives without a battery, despite having a plastic tab to remove, as if to suggest a battery is present.
Overall, installing this CPU cooler took far longer than we ever anticipated, and required a trip to the shops for a CR2025 battery. Poor effort from Raijintek.
RGB Lighting
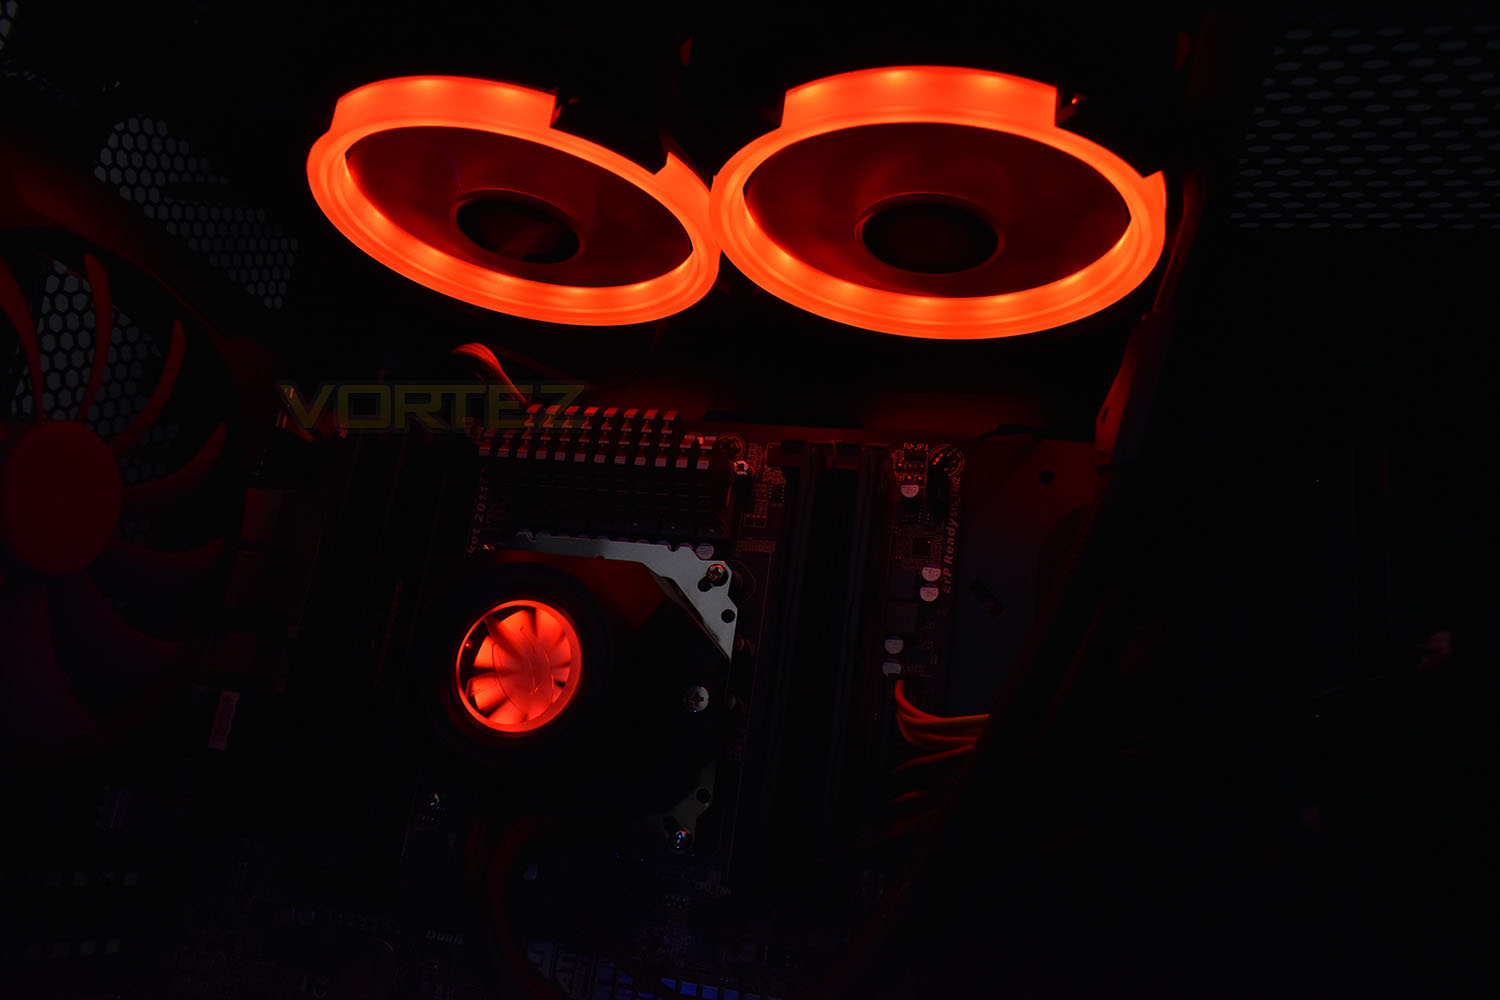
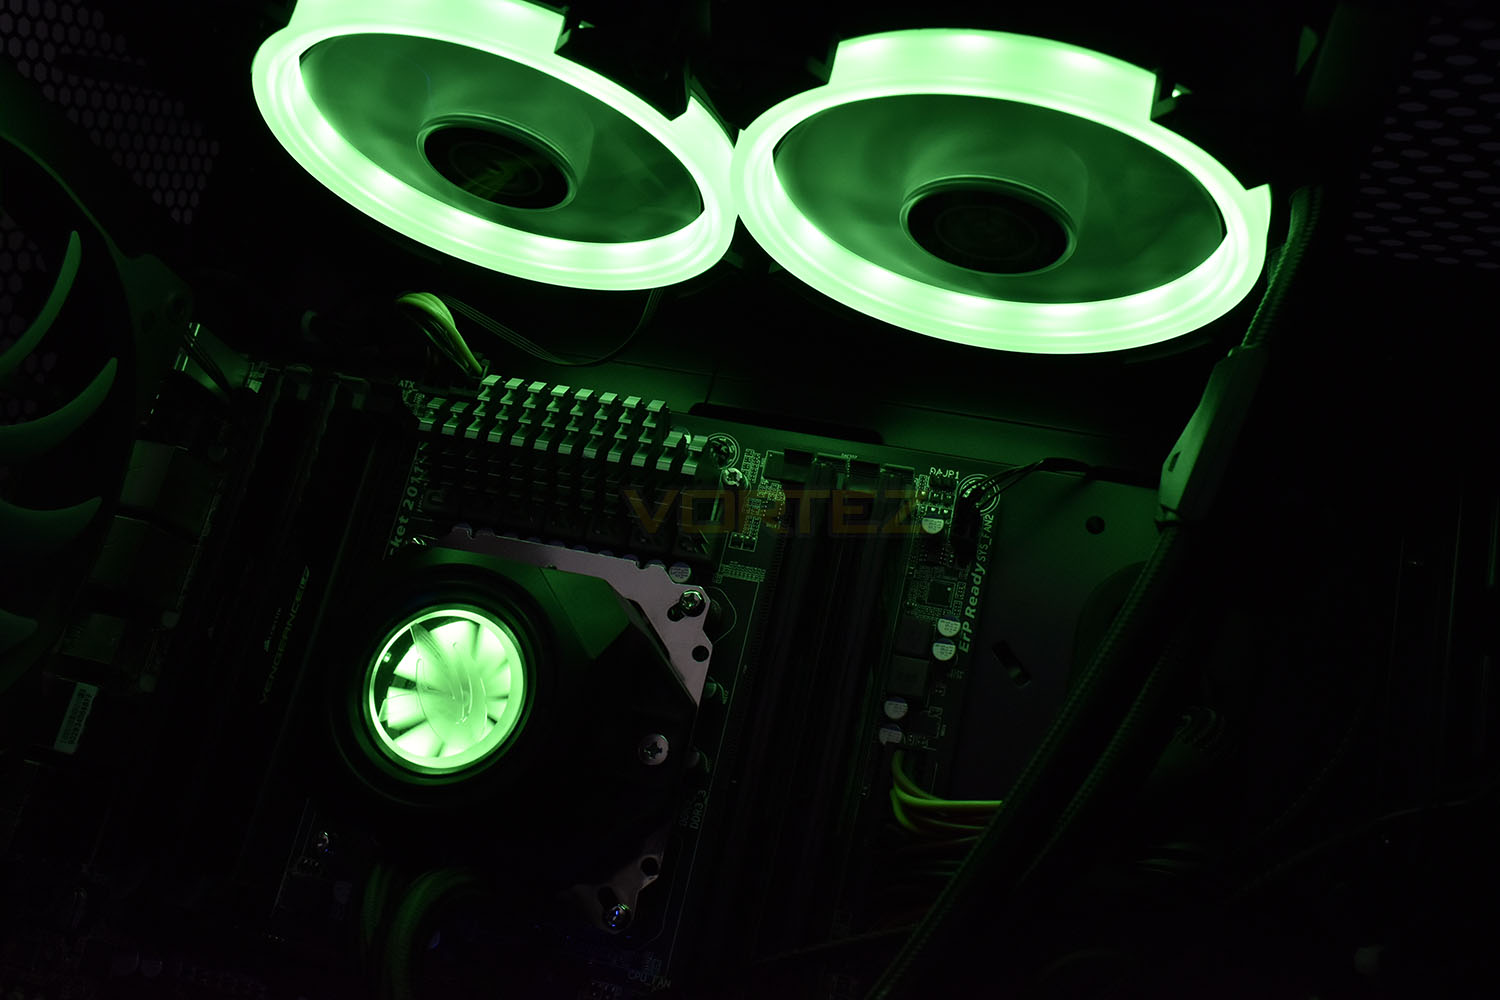
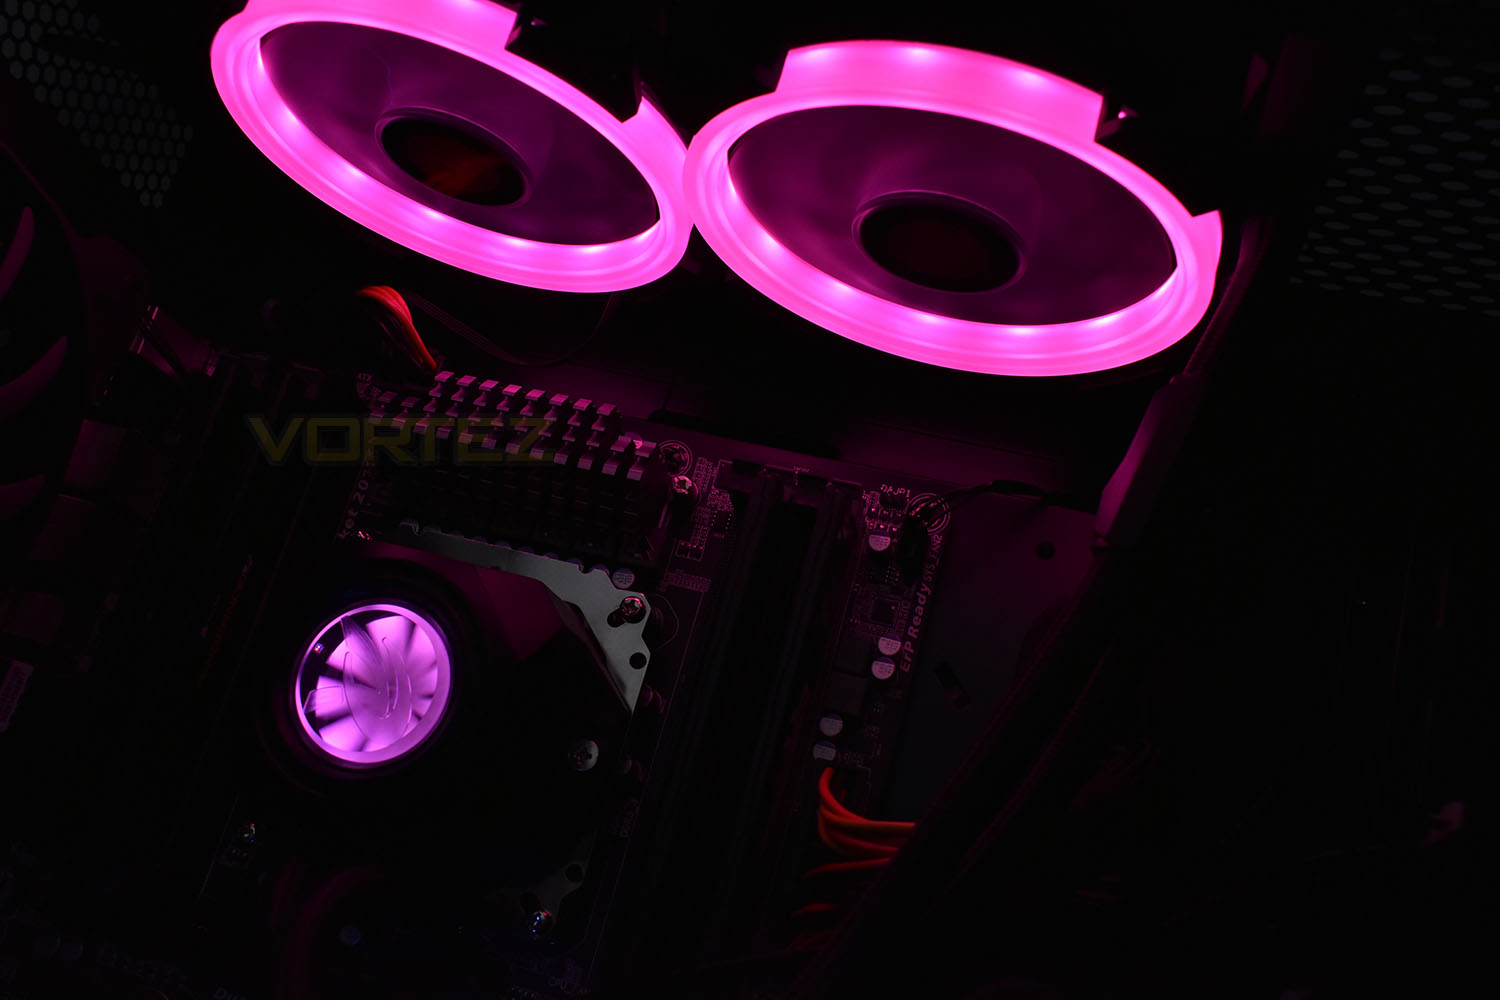
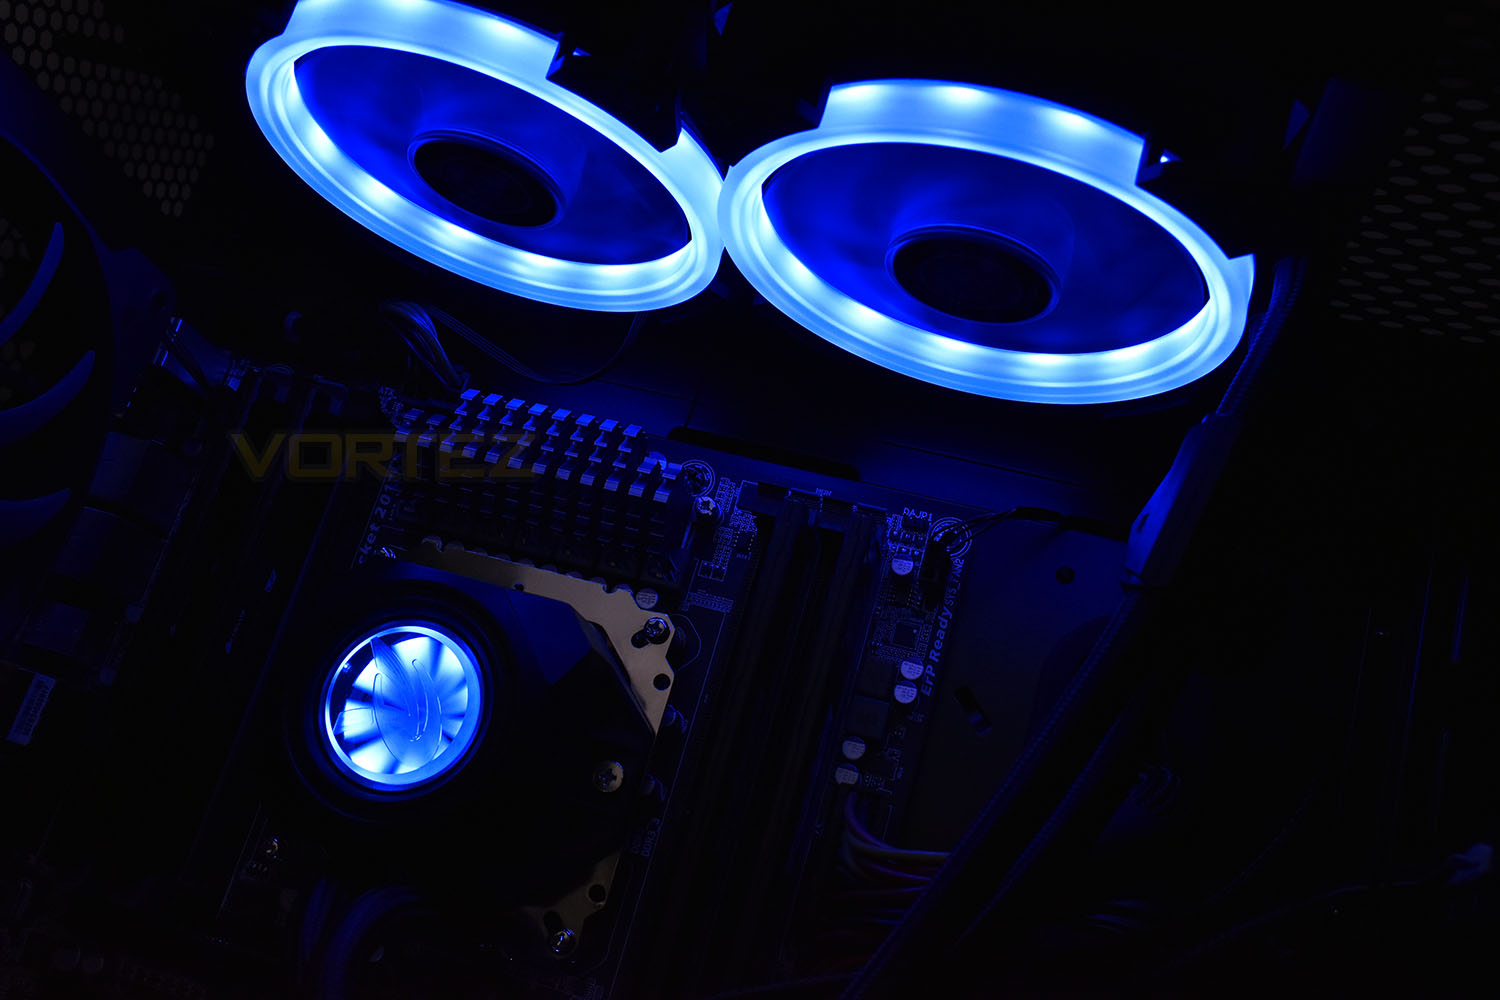
RGB lighting is obviously a huge feature of the Orcus 240, so we decided to dedicate a page to that alone, with both stills and a short video clip.Unfortunately, we aren’t able to offer any digitally addressed RGB lighting due to a lack of an ASUS Aura Sync motherboard but the remote control, with RF transmittance, offers a decent selection of pre-loaded effects and control over colours and speed.
The end result, with RGB lighting. Enjoy!
Test Setup & Methodology
We have recently made changes to our cooling department and the associated testing methodology, so please note that the number of results shown will increase over time as we add additional products. We hope that these results will appear clearer to the majority of our readership and look forward to building upon the baselines that we currently have.We perform two individual testing routines with each CPU cooler that we receive – temperatures and acoustics. The system used is as follows and all tests are performed at stock 3.8 GHz and overclocked 4.4 GHz frequencies.
Processor – Intel Core i7-3930K
Motherboard – Gigabyte X79-UP4
Memory – 8GB Corsair Vengeance LP 1600MHz CL9
Video Card – Sapphire Radeon HD 6850 1GB
Power Supply – NZXT Hale90 650W
Storage Drive – Kingston HyperX 240GB SATA III SSD
Case – Corsair Carbide 760T
Monitor ASUS ROG SWIFT PG278Q
Motherboard – Gigabyte X79-UP4
Memory – 8GB Corsair Vengeance LP 1600MHz CL9
Video Card – Sapphire Radeon HD 6850 1GB
Power Supply – NZXT Hale90 650W
Storage Drive – Kingston HyperX 240GB SATA III SSD
Case – Corsair Carbide 760T
Monitor ASUS ROG SWIFT PG278Q
To keep our tests consistent, we always review CPU coolers as they come out of the box – with their factory cooling fans, as the manufacturer intended and as the consumer expects. It should, however, be noted that we do not use supplied thermal paste but instead, Noctua NT-H1 paste to, again, ensure consistency. The paste is applied and the CPU allowed to run for a couple of hours, at idle, to give the thermal compound some time to “bed in.”
In the first test, we record idle and load temperatures as shown by the most current version of the Real Temp monitoring utility. The test system is booted to the Windows desktop and left to idle for 20 minutes to ensure temperatures have stabilised. The average core temperatures are then recorded over a 1 minute period and averaged across the six cores. We then perform a continuous 20 minute AIDA 64 stress test. The maximum absolute core temperatures are recorded immediately after the test has completed and averaged across the six cores. All results are displayed as delta temperatures – these are calculated by subtracting the ambient room temperature from the average core temperatures recorded. For temperature testing, the Corsair 760T chassis door is closed and has all three systems fans powered on to simulate real-world conditions.
Our second test follows a similar methodology to the first, with the key difference being that the Corsair 760T chassis door is now left open and all three systems fans are disabled. This allows for the CPU cooler fans acoustic profiles to be captured in isolation. From cold, the system is again booted to the Windows desktop and left to idle for 20 minutes to ensure temperatures have stabilised. The acoustic level is then recorded at a distance of 20cm from the CPU cooler and where the individual result is an average level over a 1 minute period. We then perform our continuous 20 minutes AIDA 64 stress test. Acoustic levels are again recorded at a distance of 20cm from the CPU cooler and where the individual result is an average level over a 1 minute period.
Benchmarks – Thermal Results
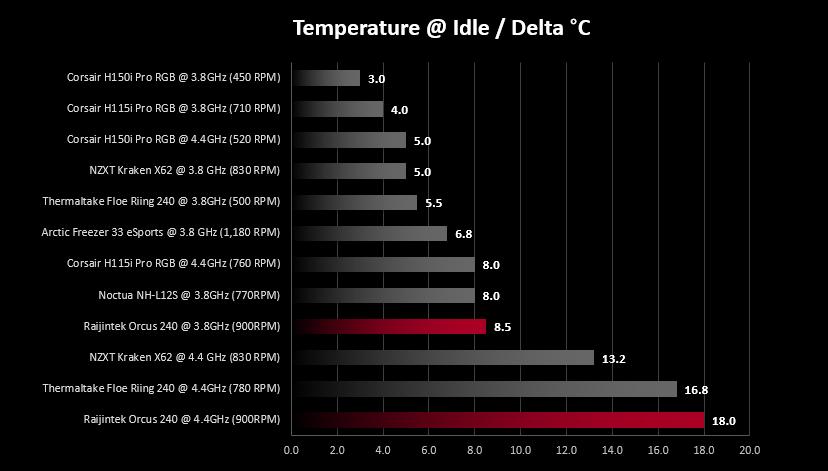
We have recently made changes to our cooling department and the associated testing methodology, so please note that the number of results shown below will increase over time as we add additional products. We hope that these results will appear clearer to the majority of our readership and look forward to building upon the baselines that you see below.We start off by letting the CPU cooler “bed in” for a couple of hours, to ensure the paste has time to move around and form an even layer, after which an idle result is taken.
Due to the absence of any associated software with the Orcus 240, as well as a total absence of any fan splitter, setting fan curves or having the system recognise temperature rises was incredibly difficult.
With the CPU at stock frequency and voltage, the cooler kept temperatures in check, at around 8.5°C above ambient. Once overclocked, with an increase in voltage, the Orcus began to struggle, barely keeping the CPU under 40°C in a 20°C ambient room.
After firing up AIDA64 for 20 minutes, we found this CPU cooler was the worst that we’d looked at so far, on a purely temperature based measure. This was down to an absence of any software or a way to associate CPU temperatures with the fan speeds.
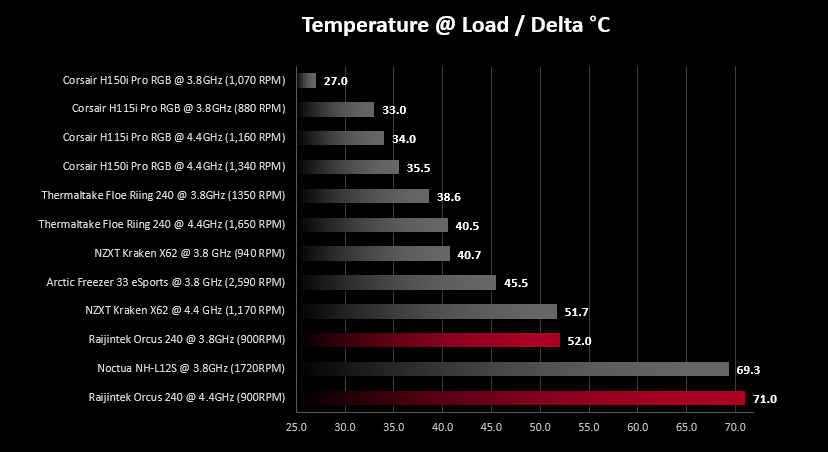
We also noticed the tubes and CPU header getting warm after a short period of time, which suggests that the pump is incapable of moving enough liquid around the loop.
Perhaps the acoustic results will fare better?
Benchmarks – Acoustic Results
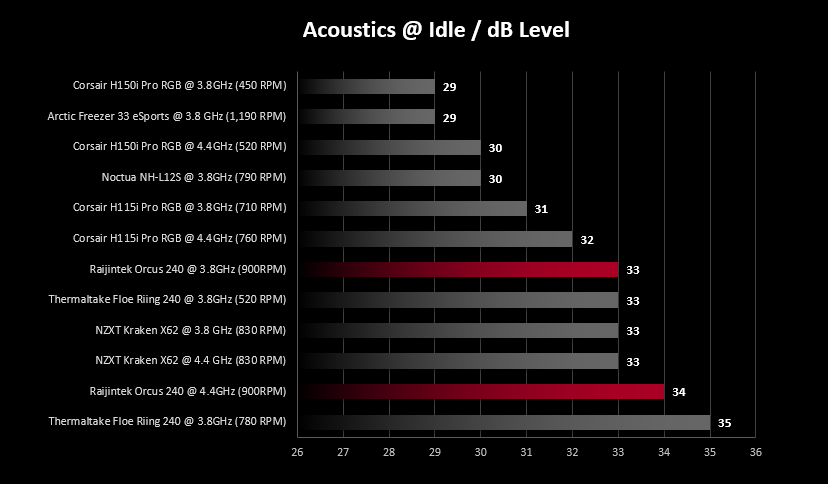
As mentioned on the previous page, we’ve made some recent changes to our cooling department and the testing methodology. Therefore our results graphs are starting from fresh – we’re working tirelessly to populate these graphs, but we hope you can appreciate that these results must be done fairly, and more importantly, correctly.With the fans being stuck at 900RPM, the Orcus 240 performed in line with other CPU coolers in the idle noise test.
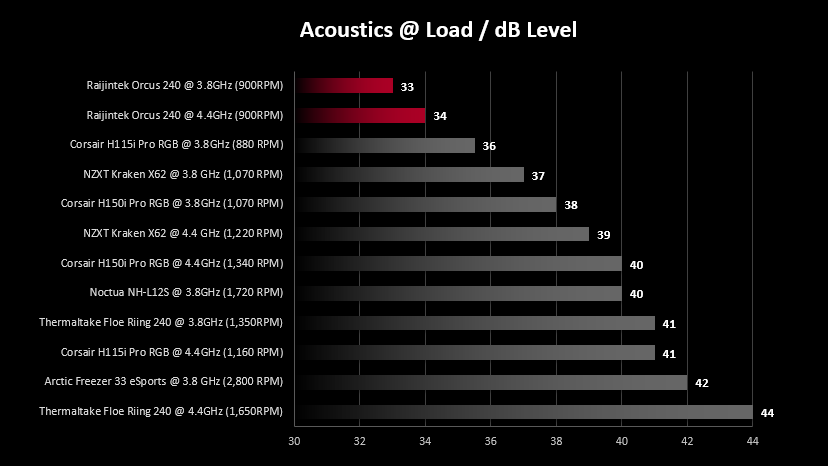
As above, the fans are stuck at 900RPM, meaning the load acoustics were the best we’ve seen so far! The pump’s vibration is also absorbed by the tubing, helping to drop the noise somewhat.
Conclusion
Installation was far more difficult than it should have been, we encountered several issues including the bracket not fitting our Gigabyte 2011 Socket, there’s no real need for any kind of crazy design here – All of the big brands use a largely similar design, but it works – Raijintek should’ve taken a leaf out of their book. The pump cable was too short, the RGB cable for the CPU header was too short, and the fan cables were far too long. We also had to buy a CR2025 battery for the remote control (we should really factor this into the cost of the CPU Cooler).The £95 pricetag puts it right in the firing line of some high-end air-cooling solutions, or the 120mm radiator variants from some bigger brands. All of which will dissipate more heat than the Orcus.
Idle noise was average, at best, but the load acoustics were impressive, due to the fans not reacting to the heat generated by the CPU, however, temperatures were terrible, with the CPU hitting 96°C on one of the cores – we feel that a closed loop watercooling solution should be able to handle a 160W TDP without any huge issues.
As mentioned on the thermal results page, the tubes got warm after a very short period of time, which would suggest that the pump isn’t moving the liquid around the loop quickly enough – this is further evident by the lack of movement from the fidget spinner inside the CPU header, completing a revolution in roughly 3 seconds. We would hope to see this spinning much faster considering its design is to show the rate of flow within the system.
To round up the test, we’re not overly impressed by the Orcus 240. It looks good with the RGB lighting, and the remote control keeps things simple, but we would never recommend you buy one.
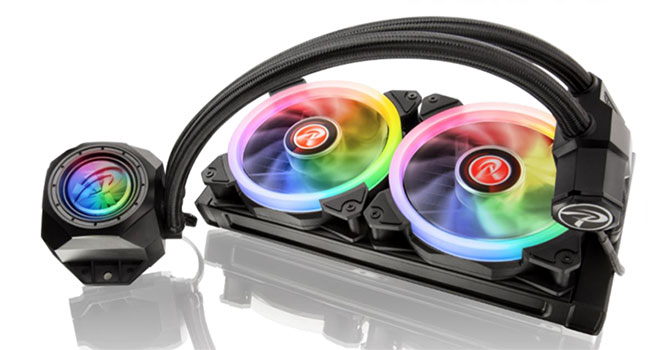
The Raijintek Orcus 240 looks good and the RGB lighting is bright and easy to configure, but the cooling performance is questionable and the mounting system is the worst we’ve come across.
Pros
+ RGB lighting is attractive
+ Relatively cheap for a 240mm all-in-one watercooling loop
Cons
– Mounting system doesn’t properly fit our motherboard (Gigabyte 2011)
– Poor cable lengths
– Terrible heat dissipation
– Spinning CPU header doesn’t really “spin”
– No battery included with the remote control
+ RGB lighting is attractive
+ Relatively cheap for a 240mm all-in-one watercooling loop
Cons
– Mounting system doesn’t properly fit our motherboard (Gigabyte 2011)
– Poor cable lengths
– Terrible heat dissipation
– Spinning CPU header doesn’t really “spin”
– No battery included with the remote control
Click here for an explanation of our awards at Vortez.net.
Stay connected with the Vortez Social Media pages: