







Today we have Thermaltake’s new Frio CPU cooler hoping to take the crown from the current cooling Kings; Noctua and Thermalright.
Product on Review: Thermaltake Frio
Manufacturer and Sponsor: Thermaltake
MSRP: $59.99USD
Street Price: £38.19
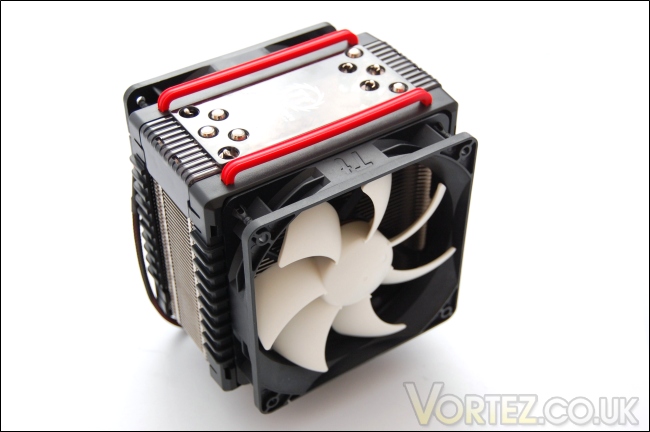
Thermaltake has been a household name for over a decade, bringing us a range of hardware from cases and power supplies to smaller storage solutions, drive bays and accessories. One of their key departments has also been cooling solutions, as their name would imply, and their focus have span to both air and water coolers. They have produced some very interesting concepts in the past and it’s always been good to see Thermaltake coming up with innovative designs to tackle the problem of heat, such as the SpinQ and the V1 AX. Although they may not have had the same success as other prolific manufacturers such as Noctua and Thermalright in recent times, Thermaltake hopes to change this with the Frio. The Frio is a standard tower cooler but as we are accustomed to see from Thermaltake, they introduce some innovative touches to differentiate their products from the vast array of coolers already on the market. More importantly, the cooler has been designed with overclocking in mind so we can expect to see some good results on our test bed.

A few words from Thermaltake
Started from the passion for the DIY (Do It Yourself) concepts and the desires to realize the goal of “Ideas are originated from humanity; Realizing ideas is our belief.” Thermaltake Technology was established in January, 1999 and has been market to the world with “Thermaltake” brand name ever since.
The brand personality of Unique, Aggressive, Vivid, and Stylish makes Thermaltake an expert in creating Exciting things and Fascinating environment for gamers and enthusiasts, also Keep them Constantly High physically and mentally. Excellent technical expertise and integration ability, plus dare to experiment on the new possibilities give Thermaltake the source of authority in the market. Moreover, Thermaltake get close to consumers and observe lead users’ behaviour and requirement, to design aesthetic and high quality products which will greatly improve system performance and bring the user to the up most potential. With innovative design and unique style, Thermaltake products spread rapidly among the enthusiasts in DIY market and soon become the number one choice for PC DIY enthusiast worldwide.
Major Product
Thermaltake became the number one choice for PC DIY enthusiast worldwide with its innovatively breakthrough product designs. The concept of “Quality”, “Performance”, and “Reliability” have been incorporated into the design of Thermaltake PC Chassis, Cooler and Power Supply to assure the components meet the highest standard. Thermaltake’s devotion in making products with leading edge technology, best performance, and a more comfortable user experience will continue, because we believe that a product inspired by good innovative concept can improve the living standard at any time.
Generally, the philosophies that Thermaltake work by would increase costs but as a company, they have always delivered products at an affordable price point and the Frio being reviewed today is no different. Could we have a new cooling champion on our hands? Read on to find out.
Feature and Specifications
| Features Ultimate Overclocking Thermal Structure Design •excellent cooling capacity – supports 220W •0.5mm aluminium fins with large surface for heat dissipation •5x8mm U-shape copper heat pipes for accelerated heat conduction •tower side flow design efficiently optimizes cooling performance Ultra Powerful 12cm VR Fan and Eye-Catching Cover •12cm VR Fan, adjustable between 1200 and 2500 RPM max. for best overclocking performance •additional 12cm VR Fan enhances cooling performance •black and red cooler top add aesthetic appearance Universal Socket Compatibility & Accessory Package •universal socket support: Intel: LGA1366, LGA1156, LGA775 AMD: AM3, AM2(+) •premium thermal grease maximizes heat transfer from the CPU into the cooler copper base for rapid dissipation Specifications Physical Specifications •Dimensions: 139 x 98 x 165 mm (L x W x H) •Weight: 1042g •Heat pipe: 8mm x 5 •Heatsink Material: Aluminium fins, Aluminium & Copper base •Fan Dimension: 120 x 120 x 25 mm (L x H x W) •Rated Voltage: 12V •Started Voltage: 6V •Rated Current: 0.5A •Power Input: 6W •Fan Speed: 1200 – 2500 RPM (VR) •Max. Air Flow: 101.6 CFM (MAX.) •Max. Air Pressure: 4.2mmH2o (MAX.) •Noise: 20-43 dBA •Life Expectation: 50,000 hours @ 40 degrees centigrade •Connector: 3 pin |
Dimensions
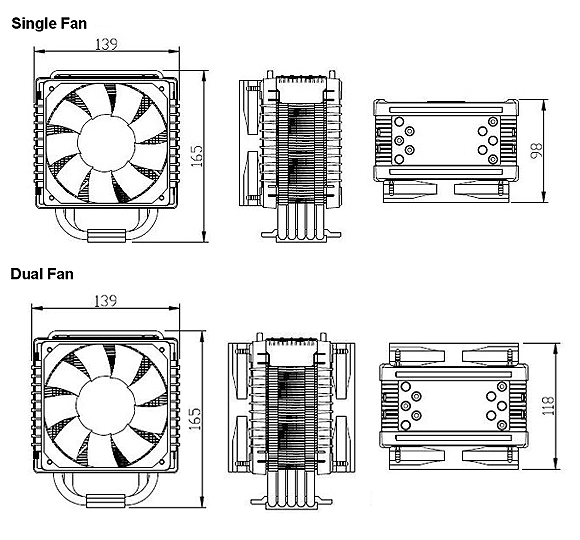
The Frio’s specification has been honed to conform to its overclocking philosophy. The key emphasis of the design are the two 12cm VR fans, the VR moniker most likely representing the voltage regulators on each for manual fan control. In terms of size, it is slightly larger than the Thermalright, but this is due to the fan brackets extending the dimensions of the heatsink itself. In total, the aluminium construction and the two fans puts it at a heavy 1042g, 200g less than the mighty dual radiator Noctua NH-D14. The inclusion of the two fans makes the Frio an excellent budget solution, given that the price would normally afford a high end heatsink without them. Sporting five thick 8mm heat pipes also promises to increase heat transfer efficiency from the base. One of the notable features is the claim that it can cope with a CPU at 220W. The test setup uses a Core i7 running at 4GHz under 1.3V, putting the load consumption at 255W, slightly higher than that advertised on the Frio. However, it should still be a very capable cooling solution and with two high RPM fans, the Frio looks even more promising compared to the current Noctua and Thermalright offerings.
Packaging and Content
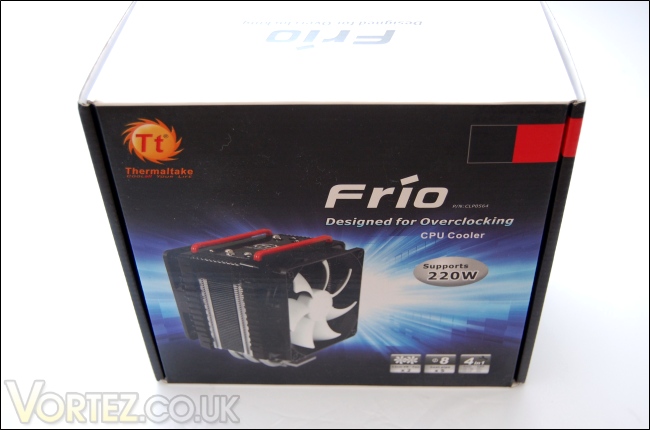
The front of the box
Having never reviewed a Thermaltake product in the past, I was quite interested in how they packaged their coolers and I was pleasantly surprised at the professional finish of the box. Thermaltake use a traditional cardboard construction for its packaging. The black and white colour theme accentuates Thermaltake’s focus on delivering aesthetics with performance. On the front, the cooler itself is displayed with both fans installed and its key features are listed with small illustrations. The Thermaltake logo is also portrayed in the top left corner.
The Frio logo
Frio gives the impression of coolness, making it an appropriate name for a CPU cooler. This is clearly labelled on the box with the Frio printed in bold and the tagline “Designed For Overclocking” below. This also appears on the other side of the box.
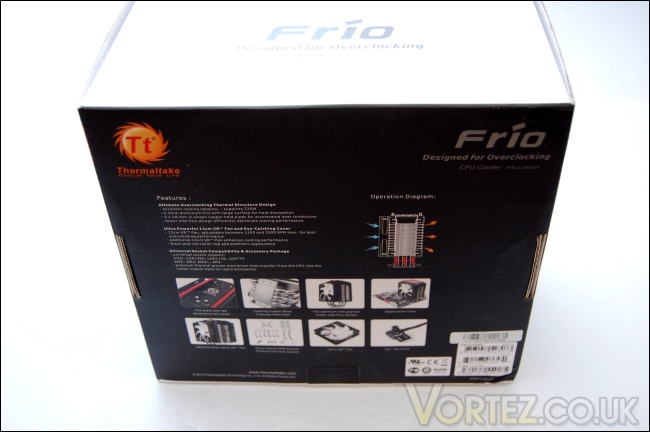
The features…
The features are listed at the back of the box, with small illustrations of the coolers key characteristics. The main features are targeted at overclocking, aesthetics and compatibility which are achieved with the five 8mm heat pipes, two fans with voltage regulators and universal socket support. The cooler comes with two fans with the second being optional, but recommended. A small operation diagram demonstrates how a push-pull setup will help in efficient heat dissipation.
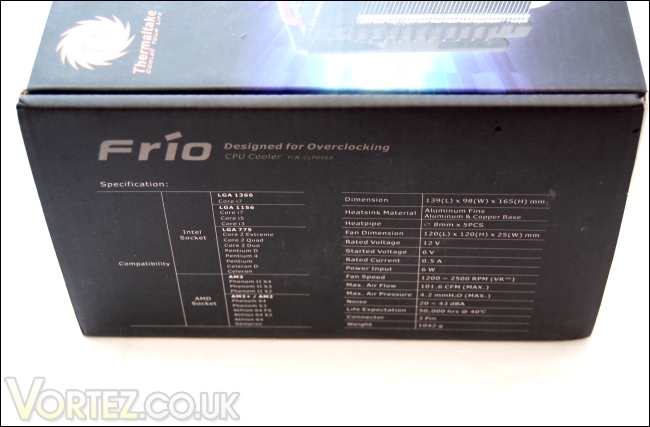
…and specifications
On the left hand side are the specifications of the heatsink itself, the fans and the sockets it is compatible with. This was detailed on the last page and from those, we can immediately see the appeal of the Frio.
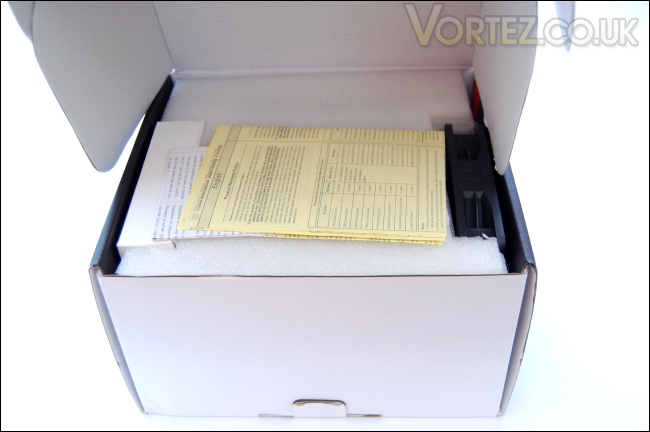
The box opened
Opening the box, everything is securely placed in a foam enclosure. On either side of the top piece of foam is one fan and the accessories’ box. Below, the heatsink is placed in another foam cut out with one of the fans already installed. The packaging is very well thought out and one of the most secure I have ever seen so there is no risk of damage.
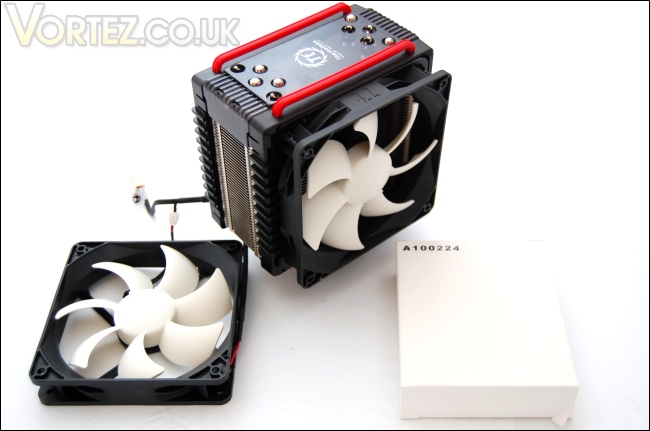
The content
And finally, we can see all that comes packaged in the box, the Thermaltake Frio heatsink, two 12CM VR fans and a box of accessories to mount the heatsink.
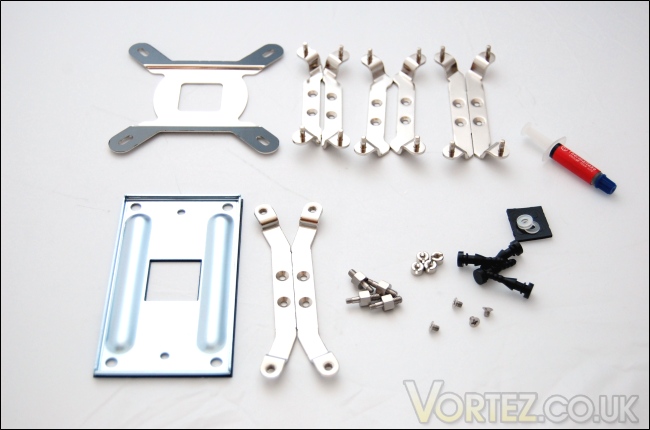
The rest of the bundle
The installation kit includes a number of parts that makes the Frio compatible with Intel socket 775/1156/1366 and AMD socket AM2(+)/AM3. At the top, there is the universal Intel backplate and 3 sets of mounting brackets for each Intel socket, all labelled appropriately for ease of use. At the bottom, there is the universal AMD backplate and bracket. Also included are four nuts, screws and washers and 4 bolts for the AMD installation. Four additional vibration absorbing rubber mounts have been provided for the second fan bracket.
Closer Look
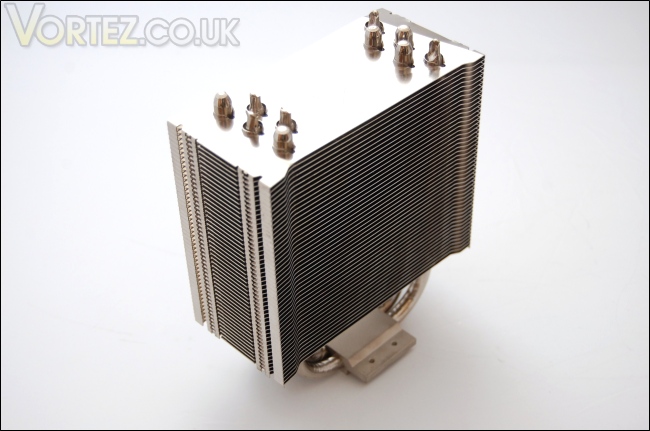
The heatsink laid bare
Once the plastic fan mounts and top is removed, we are left with the heatsink. The cooler uses a fairly large tower heatsink design with an aluminium construction and five heat pipes. Without the fans, the heatsink is 63mm thick and stands 165mm tall. Already, this makes it comparable to the highly revered Thermalright Venomous X. A clear distinction from the Thermalright though, is the use of 5 heat pipes as opposed to 6 but to compensate for this, the heat pipes are 8mm in diameter instead of 6mm.
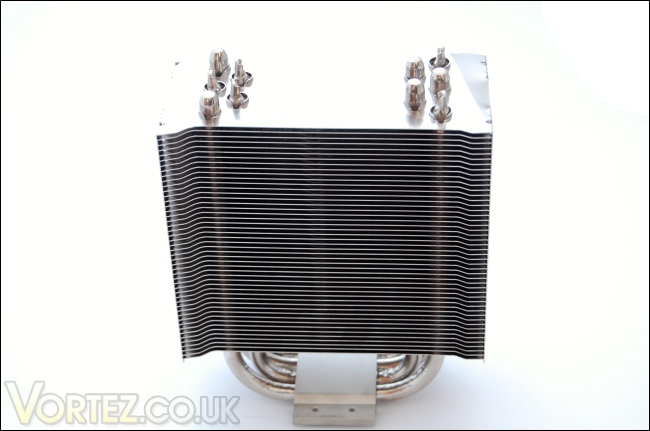
The fin array
The Thermaltake Frio has a much more linear design that previous coolers we have tested. There is a total of 48 fins, all very planar in shape giving each face a flat profile. It’s a very minimalist design but one that is tried and tested. At each end of the fins, they are angled downwards on the left and upwards more obtusely on the right. This bent winglet design is similar to that found on Thermalright heatsinks and this ensures that hot air gets transported more quickly across the fins to cover a greater surface area per time.
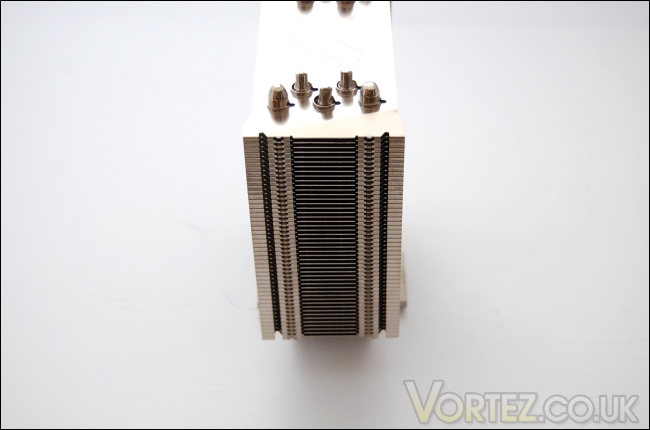
Side of the heatsink
Turning to the side, we can see that the Frio is quite thick. However, thanks to the design of the fins such that the heatsink is thinner in the centre compared to the sides, the fans can sit snugly in the middle depression. The result is that the overall width of the heatsink and fans doesn’t come into conflict with any RAM slots once installed. On the side, we can also see two long grooves which the plastic fan mounts clip into when installed.
The heat pipes
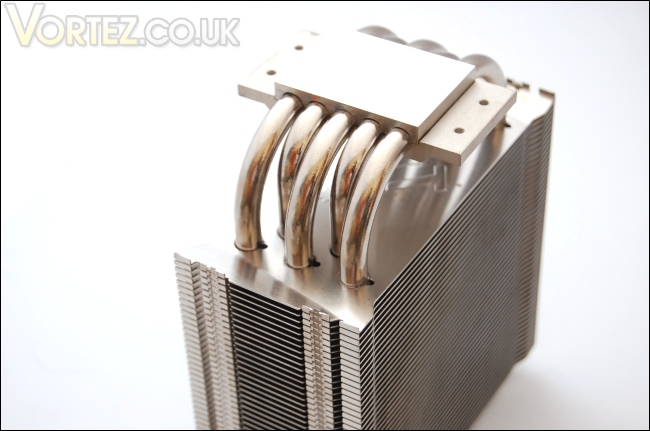
The Frio makes use of 5x8mm U-shaped heat pipes that spread from the base. They are in direct contact with the copper base for more efficient heat transfer and quicker dissipation from the CPU. The heat pipes form two rows on each side of the heatsink, again very similar to the Thermalright Venomous X.
Top of the heat pipes
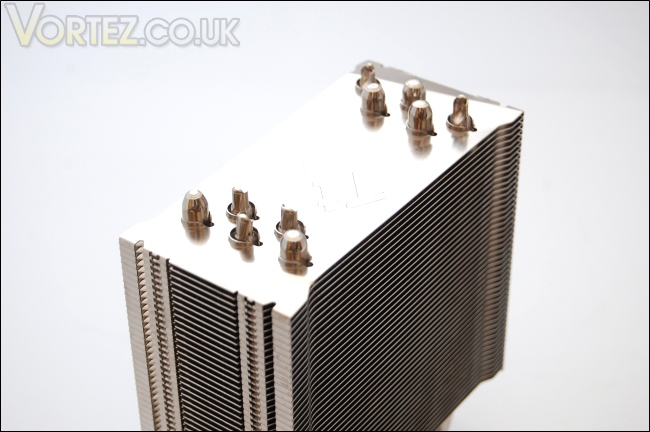
At the top, we can see the protruding ends of the heat pipes. Each rounded end has a corresponding grooved end on the other side. We can also see how the edge of the fins are straight without any patterns or grooves like we have become accustomed to seeing with other heatsinks.
The base of the heatsink
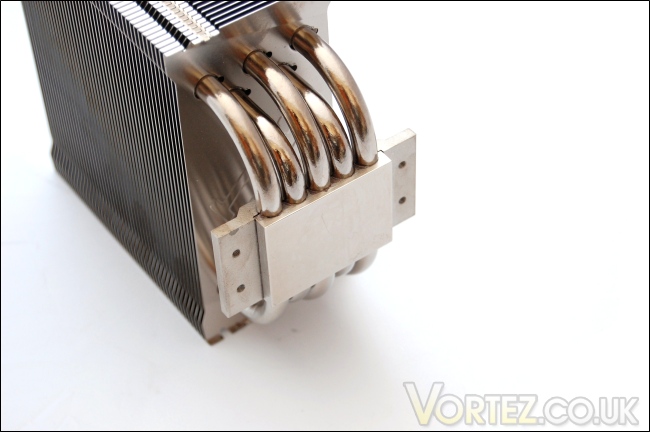
The copper base is nickel plated and flat. It lacks a perfect mirror finish but the it is still quite smooth. It also has a very large rectangular surface area to match the largest CPUs currently in retail, thereby providing adequate contact for optimum heat dissipation. Part of the mounting mechanism is integrated in to the base but more on the installation procedure later on.
Closer Look (Continued)
The Frio with a single fan
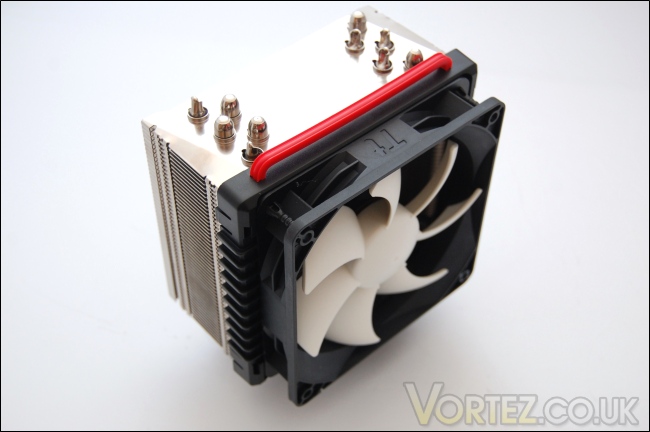
By default, the heatsink only comes attached with one fan although an optional one is included in the bundle. The fan bracket is a plastic mount that clips on to the heatsink and holds the fans with four rubber pieces in each corner. For some reason, the brackets seem to have a red handle bar at the top which appears to be merely for cosmetic reasons. While it does add a finishing touch to the cooler, it has no use.
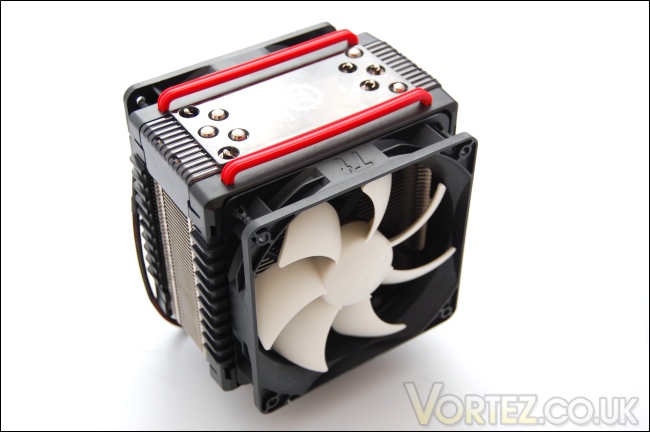
The Frio in a push/pull configuration
Thermaltake bundle two fans with the Frio so a push/pull configuration can be achieved. With both installed, the Frio ends up as quite a beast of a cooler. There is an additional plastic top cover that can be installed/clipped on between the fan brackets. It sports the Thermaltake logo and company motto, “Cool Your Life”. Personally, I prefer the metallic look of the heatsink but the cover certainly makes the cooler appear more complete. Additionally, it also hides the ends of the heatpipes.
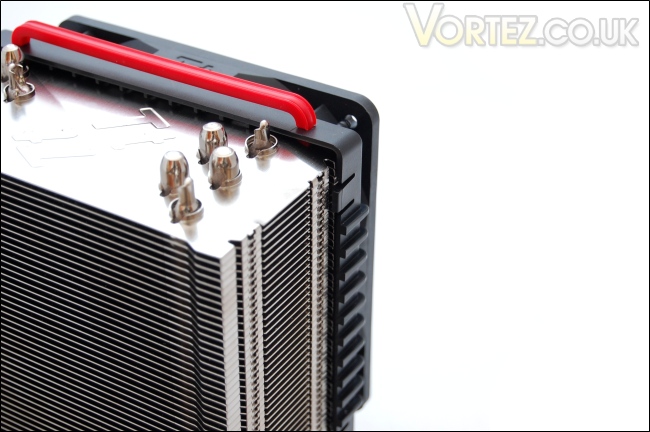
The plastic fan holder
Here, we can get a better look at the bracket installation mechanism. The fan holder simply clips into the grooves at the side of the heatsink. Taking it off requires a bit of effort, the best method being to pull the side notches so it unclips and then removing the whole bracket. However, I would recommend leaving both fan brackets on and simply taking the fan off if necessary.
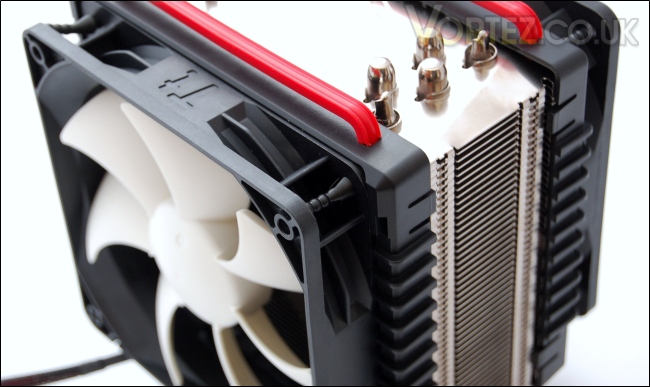
Installing the fan
The fan sits snugly into the fan bracket thanks to the rubber mounts in each corner. Another benefit of the mounting is that the rubber will prevent vibrations to ensure quieter and rattle free operation. When installing the fan, line each hole up with the rubber mounts and pull the ends when they are inserted through. It saves users dealing with metal wire clips which can be cumbersome at times.
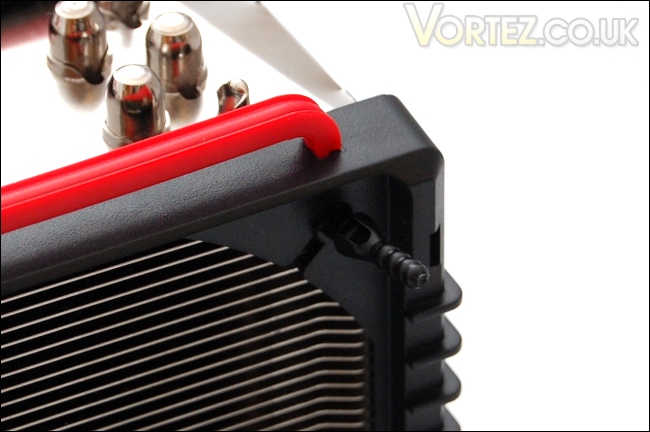
Anti vibration rubber mounts
Taking a closer look at the rubber mount, we can see that there is a small opening in the corner of the fan bracket into which the rubber mount can slide through.
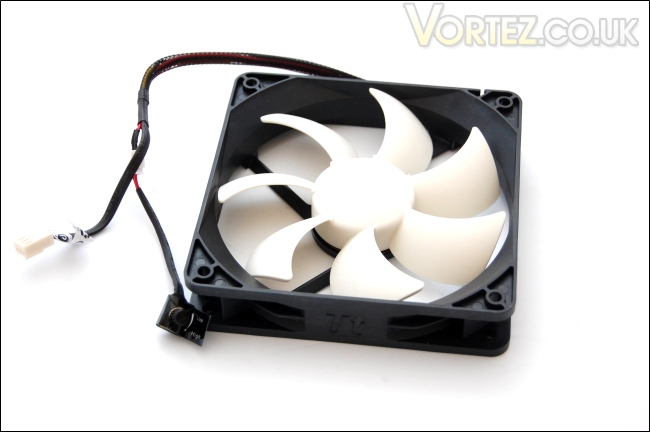
The fan with added voltage regulator
The VR fans sport an attractive black and white colour theme, making it an pleasing addition to the heatsink. The seven bladed fan is specified to run at a maximum of 2,500 RPM but Thermaltake have attached a small fan controller to the fan to allow users to manually control the rotation speed between 1,200 – 2,500 RPM. This ensures that users can choose between quiet operation or full on cooling potential. The fan uses a 3-pin connection so lacks PWM functionality, hence the use of a voltage regulators (VR). On the side of the fan frame are arrows indicating the direction of airflow. The two cables, for power and fan control, come pre-braided and the latter can be disconnected if necessary. One complaint is that to access the fan controller, users will have to go inside the case, which isn’t always convenient so my advice would be to settle on a speed for optimum cooling/noise.
Test Setup
CPU – Intel Core i7 920 – 4.0GHz
RAM – 6GB (3x2GB) OCZ platinum DDR3 1333MHz
Motherboard – Biostar T-Power x58
Graphics card – XFX HD5870 1024MB
Power Supply – Enermax Revolution 85+ 850W
Hard Drive – Samsung F1 320GB
Western Digital Caviar WD3200AAKS 320GB
Drivers – ATI Catalyst 10.4
CPU Coolers:
Thermaltake Frio (Low/med/high speed) including tests using 2 Noctua NF-P12s
Corsair H50 including tests using 2 Noctua NF-P12s and 2 SWiF2-120Ps
CoolIT ECO A.L.C including tests using 2 Noctua NF-P12s and 2 SWiF2-120Ps
Thermalright Venomous X using 2 Noctua NF-P12s and 2 SWiF2-120Ps
Coolink Corator DS including tests with dual fan setups
Tuniq Propeller 120(High speed fan)
Noctua NH-C12P SE14
Prolimatech Megahalem
Noctua NH-D14 (U.L.N.A and default speed)
Noctua NH-U12P SE1366
Thermolab Baram (with 2 Noctua NF-P12 fans)
CoolIT Domino A.L.C
Sunbeam Core Contact Freezer
Coolermaster Hyper 212 Plus including test with 2 Noctua NF-P12 fans
Alpenföhn Nordwand including test with 2 Noctua NF-P12 fans
Tuniq Tower 120 Extreme (Low/med/high speed)
Program Suite:
Core Temp 0.99.5
LinX stress Test
PC Wizard
How I tested:
Testing will be based on temperatures recorded by Coretemp and PC wizard after 20 passes of LinX stress test. The absolute temperatures recorded in the tables are averages of the 4 cores and the delta value provided for a fair comparison, taking into account ambient temperatures. The test will be run at stock speed and at an overclocked speed of 4GHz.
Installation
Installation was not a strong point of the Frio’s design. Although the instructions given are straightforward, the nuts and screws provided are very small, rendering the process less user friendly. The way the cooler is mounted also means that it has to be done outside of the case. Of course, all high end coolers require users to install a backplate support onto the motherboard but once this has been placed, it’s generally still possible to install or remove the heatsink inside a case. However, with the Frio, it’s impossible to remove the cooler from the motherboard without taking out the latter first. The instructions below should make it clearer:
1.) Place washers at the each end of the mounting clips/brackets.
2.) Use the smallest screws to install the appropriate bracket to the heatsink base, making sure that the ends face downwards. (Note that for AMD installation, an additional bolt has to screwed to the brackets)
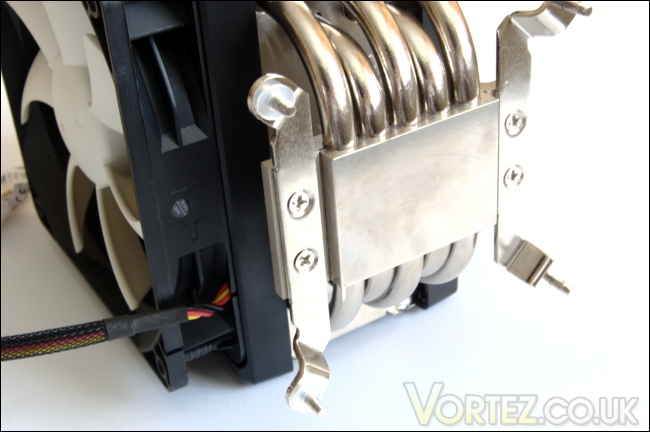
3.) After applying thermal paste to the CPU, place the heatsink on top ensuring that the mounting brackets are lined up with the mounting holes on the motherboard.
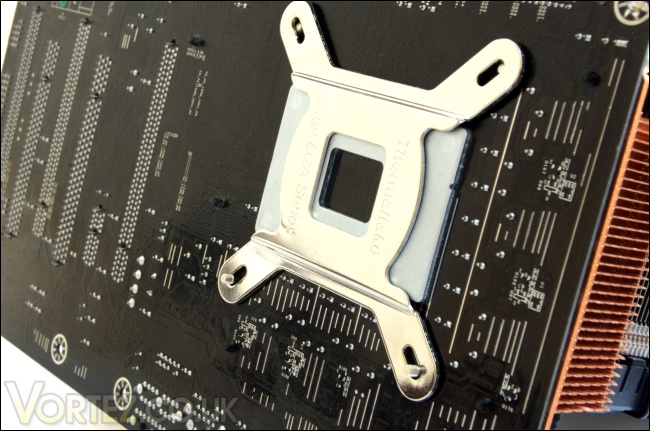
4.) Install the backplate, which will be branded for either Intel LGA sockets or AMD sockets, to the back of the motherboard.
5.) Secure the backplate and heatsink with the 4 nuts. A flat headed screwdriver is recommended to tighten each corner.
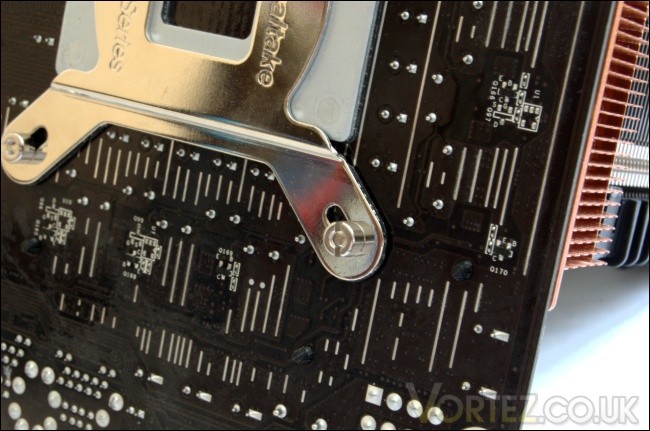
6.) Fully installed!
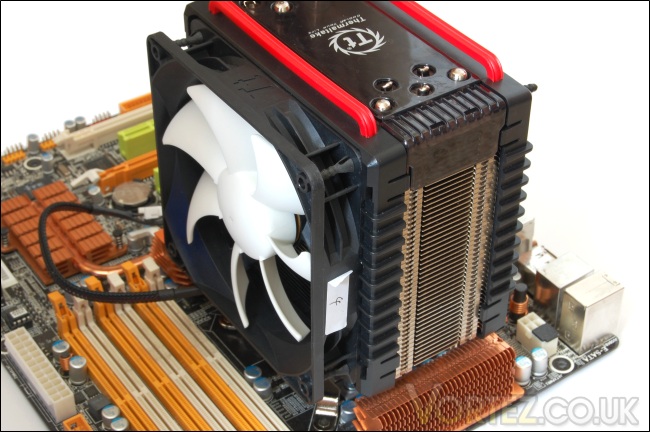
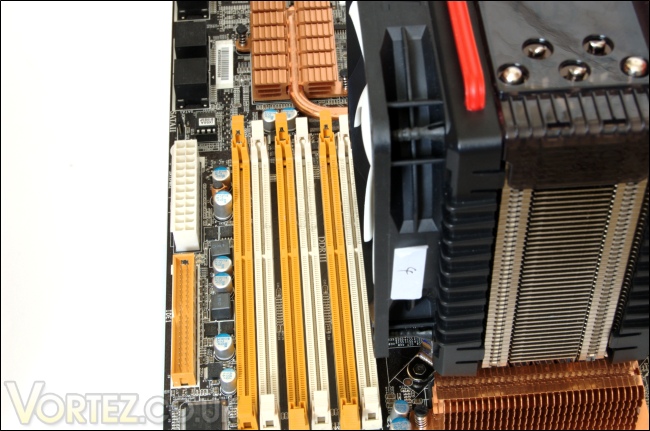
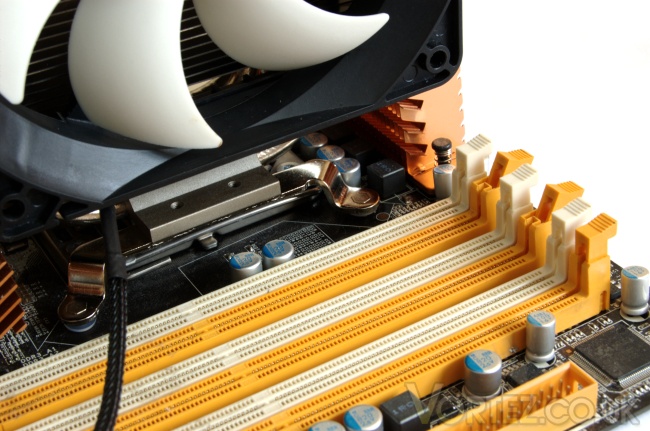
On the X58 motherboard, the front fan comes very close to the first RAM slot but unlike the Thermalright Venomous X, the slot isn’t fully covered. It allows users to install modules with tall heat spreaders in that particular slot. However, there would be very little clearance between the Frio fan and the memory module.
Some of the steps in the installation process clearly show that mounting the Frio isn’t an easy process. Trying to bolt on the nuts to the backplate whilst holding the heatsink in place at the top of the motherboard requires some patience and once complete, the only way to remove the heatsink (should the user want to apply more thermal paste for instance) is to take the motherboard out of the case. It’s not the most practical solution but on the whole, it’s very secure and shouldn’t bother the majority of users.
Results
Stock
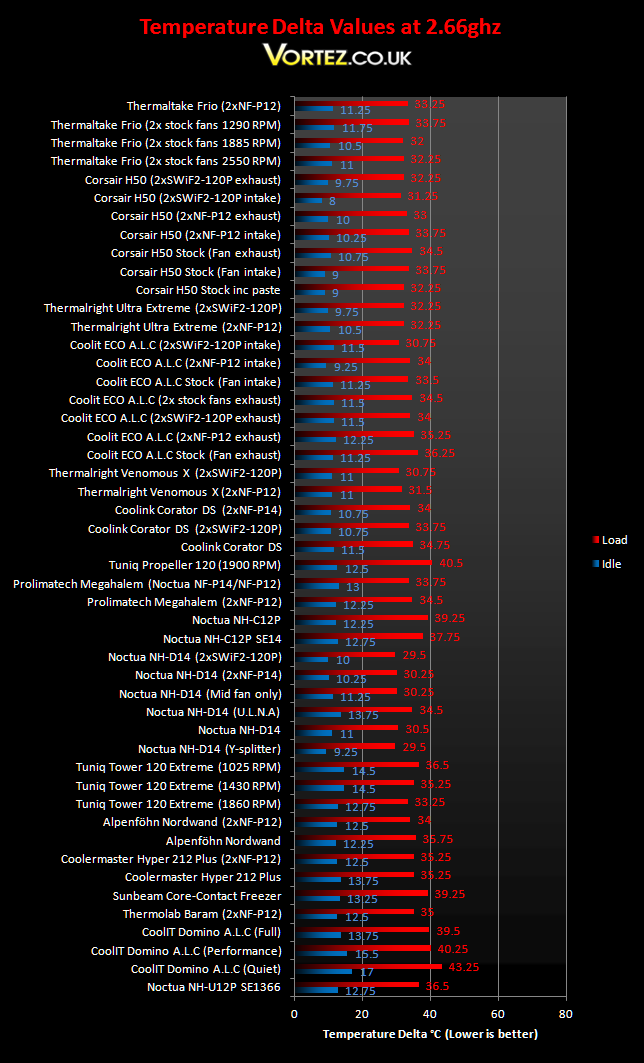
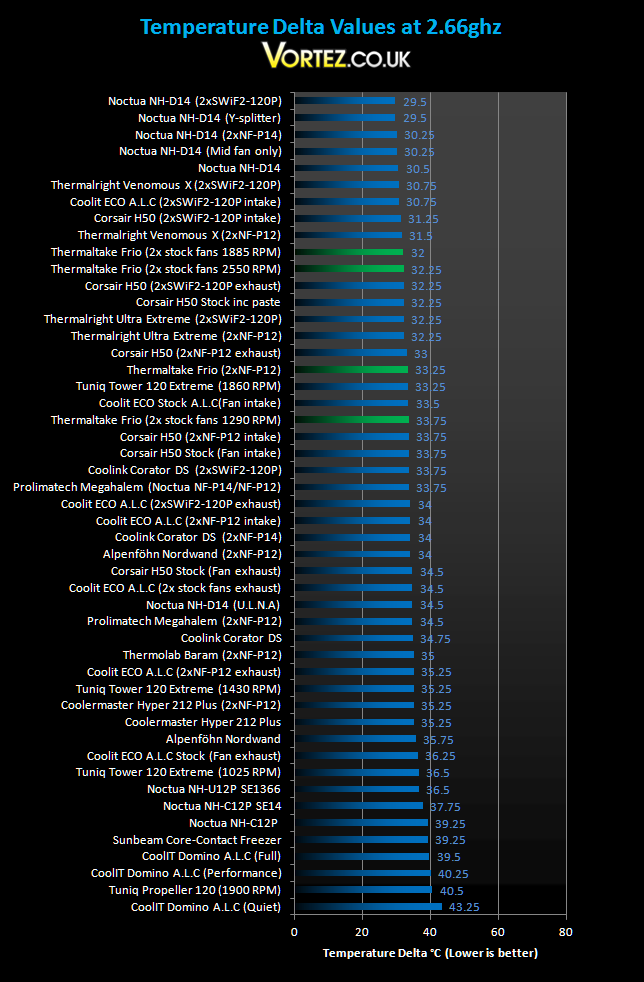
At stock speeds, the Thermaltake Frio is certainly very impressive. Using the lowest fan speed of 1290 RPM, it kept up with the Corsair H50, Coolink Corator DS and Prolimatech Megahalem, all more expensive solutions. Using the two Noctua fans improved cooling performance by 0.5C, not surprising considering that they are faster but what it shows is that the fans bundled with the Frio are very efficient and don’t need replacing. Once the fans are set to medium and maximum fan speeds, the Frio performs even more remarkably, falling just 0.5C short of the Thermalright Venomous X with two Noctua NF-P12s.
Result (Overclocked)
4GHz
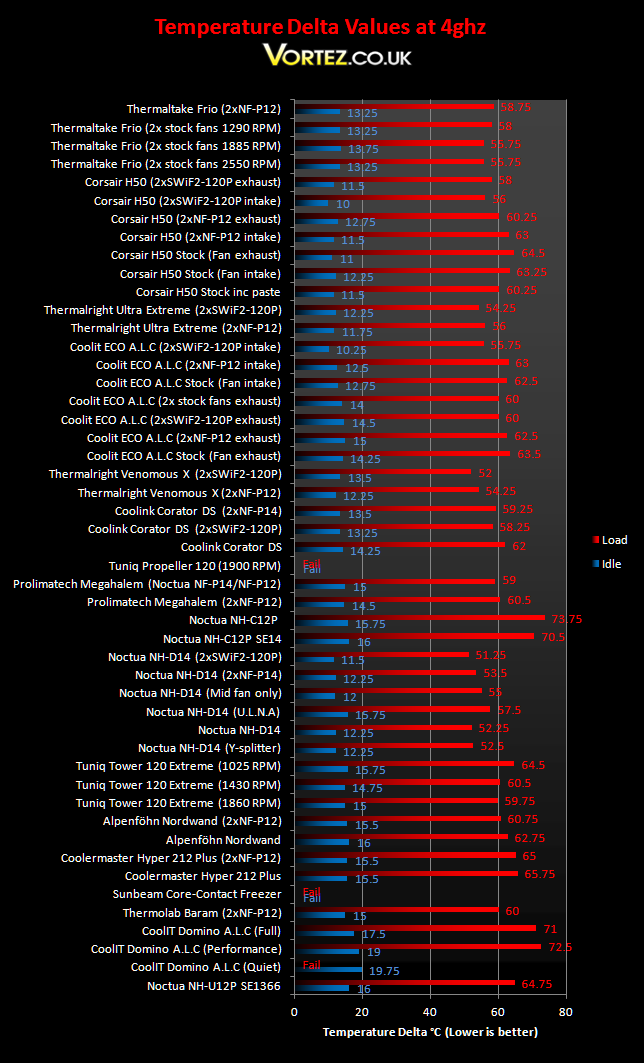
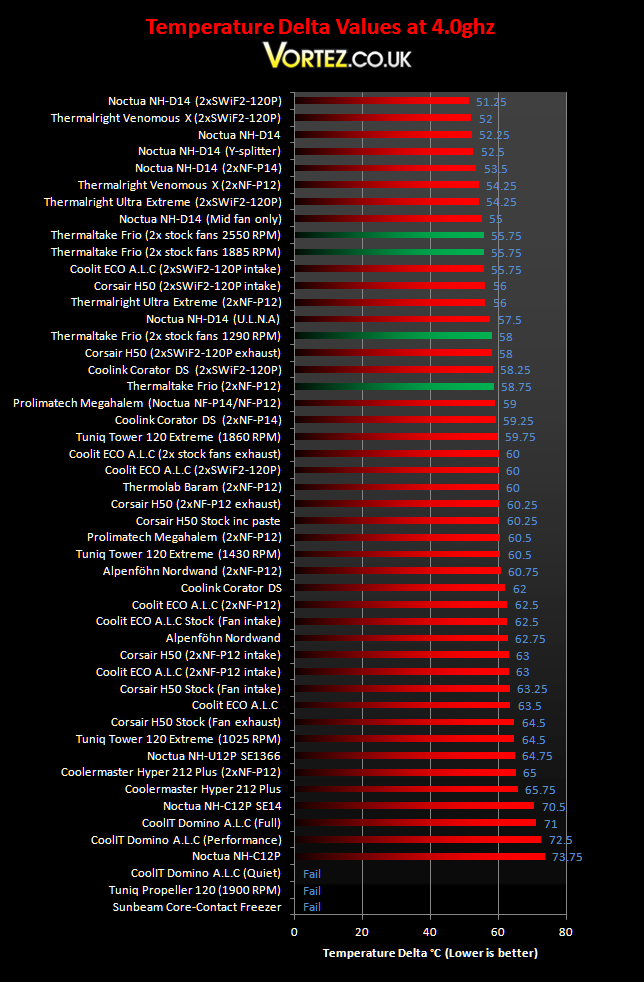
The Frio is made for overclocking and this is where its true colours really shine. At the lowest fan speed, the Frio does a commendable job with a delta temperature of just 58C, making it better than the likes of the Prolimatech Megahalem, Coolink Corator DS and Thermolab Baram. It’s impressive to see it breaking the 60C barrier which had only been achieved by the Thermalright, Coolink and Noctua heatsinks previously, air cooling wise. At the higher fan speeds, the Frio manages to outperform the Thermalright Ultra Extreme with two Noctua NF-P12s, and the Corsair H50 with two Coolink SwiF2-120Ps. Interestingly, having the fan at the maximum recorded speed of 2550 RPM proved to be of no benefit over 1885 RPM, suggesting that the heatsink design is limiting the fans’ cooling potential. Another observation is that the Frio performs better with its own fan at 1290 RPM than with the NF-P12s at 1400 RPM showing that the former has better static pressure than the already impressive Noctua fans.
Noise
One of the advantages of the Frio is the possibility to manually control the speed of the fans. The result is that users can balance noise and performance to meet their needs. At the lowest speed setting, the fans rotate at 1290 RPM, operating quietly but sacrificing on cooling performance. Increasing the speed to 1885 RPM, the fans become audible but not intrusively so. They were generally quieter than the CoolIT ECO fans and the Coolink SwiF2-120P which also work at similar speeds on maximum. At 2550 RPM, the VR fans are far too loud for general usage and even going outside of the room with the door shut behind me, they were still audible! Since the fans yielded the same performance at 1885 RPM, I wouldn’t recommend going any higher.
Conclusion
The Frio is an excellent cooler and so far I haven\’t really touched on its best aspect, its price. At around £40, it provides performance that\’s on par or slightly trailing the best air coolers out there, and considering the inclusion of the two fans, the Frio looks more of a bargain. The Thermalright Venomous X is priced similarly but lacks extra fans and other coolers, such as the Coolink Corator DS or the liquid cooler, need a supplementary fan to match the Frio. The Frio is reminiscent of the Coolermaster 212 plus – a budget cooler that features all the important tower cooler designs to compete with some of the best coolers on the market. Thermaltake have taken that ideology further to create a heatsink sporting five 8mm heatpipes a dense fin array for excellent heat transfer and dissipation. While it doesn\’t have the elaborate designs of some of the other heatsinks, the Frio proves that simplicity can pay off.

Furthermore, the fans aren\’t mere generic offerings but come with manual fan control using voltage regulators. Not only does it bring practicality but also an aesthetically pleasing finish. The plastic fan brackets are also very user friendly avoiding the need to fiddle with wire clips, with the added benefit that the rubber mounts prevent vibrations.
The Thermaltake Frio has a few drawbacks. Firstly, installation is awkward and not as intuitive as competing products. Secondly, the fan controls are always hidden inside the case so accessing them will be quite restricted should users want to change the fan speed. Noise could be considered an issue at maximum speed but that\’s easily resolved with the voltage regulators at no cost of performance.
Pros
+ Very well packaged
+ Includes two fans
+ Voltage regulators on both fans
+ Innovative fan mounting
+ Excellent performance
+ Price
Cons
– Installation
– No external fan control
The Thermaltake Frio thoroughly deserves the Vortez Hardware Gold Award.

