







An evolution of the HD PVR2 range designed for consoles, and now featuring fresh support for 5.1 audio; how suitable is it for budding Let’s Play creators?

Product on Review: HD PVR2 Gaming Edition Plus
Manufacturer: Hauppauge
Street Price: £139.99 (inc. V.A.T.)
If you’ve investigated the idea of watching TV through your PC in any real capacity in the last twenty years you would undoubtedly have come across the name Hauppauge. Specialising in TV solutions for the PC since 1992, eventually also incorporating external tuning devices with the advent of USB and other similar standards, Hauppauge are perhaps best known for the WinTV range of PCI, PCI-Express and USB TV Tuners. Over time the capabilities of the hardware and software have also greatly increased, incorporating new Digital TV standards and Personal Video Recording (PVR) capability. It’s no exaggeration to say that they’re pretty much the go-to brand for these sorts of solutions.
With the advent of the High Definition video era demand for dedicated PVR solutions, necessary for recording Cable TV, skyrocketed. Around that time a curious thing also occurred: recording gameplay footage almost overnight become in-demand functionality. And not just PC gameplay, but also for games consoles including the XBOX and Playstation 3. It’s in that burgeoning market that Hauppauge released the HD PVR designed specifically as an external interface between a source device (i.e. console etc.) and the PC for hardware-accelerated video capture. Rather than containing on-board storage it simply encoded HD video in an appropriate format and streamed to the PC over USB for recording to a HDD. Later Hauppauge released the HD PVR Gaming Edition which we reviewed in November 2011, a variant with the appropriate cabling and I/O options for connecting XBOX 360 and Playstation 3 consoles straight out of the box.
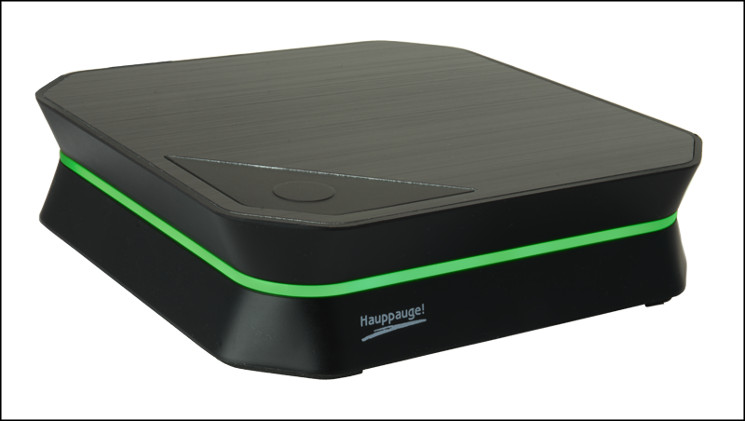
Since that time console and panel technology has evolved, with the HDMI connection becoming ubiquitous and 1080p a standard resolution for both video output and LCD TV resolution. This necessitated an update to the HD PVR, at which time they could also implement hardware advancements to the device to allow zero-delay passthrough of video and audio. At the same time the chassis was redesigned for clearer indicator LEDs and less extraneous features. The resulting product for gamers is the HD PVR 2 Gaming Edition Plus.
About the HD PVR2 GE+
Record PC or console game play in high definition on your laptop or desktop PC
HD PVR 2 GE Plus records HD video from a gaming PC or Sony® PlayStation®3 or Microsoft® Xbox® 360 onto your Windows laptop or desktop PC. Make video recordings of your best game play in HD in a high quality H.264 format. Upload your games to YouTube and share them with other gamers online. Or make a high definition movie of your game play to share with your friends or use it to discuss tactics with your clan members!
Record PC or console game play in high definition on your laptop or desktop PC
HD PVR 2 GE Plus records HD video from a gaming PC or Sony® PlayStation®3 or Microsoft® Xbox® 360 onto your Windows laptop or desktop PC. Make video recordings of your best game play in HD in a high quality H.264 format. Upload your games to YouTube and share them with other gamers online. Or make a high definition movie of your game play to share with your friends or use it to discuss tactics with your clan members!
Compared to the original HD PVR Gaming Edition the HD PVR2 GE+ most prominently adds HDMI input, output and 1080p recording capabilities, with this update from the non-Plus model also enabling capture of 5.1 audio over S/PDIF and Optical inputs. Unlike the non-gaming edition HD PVR2 it comes equipped with component capture cables for the XBOX360 and PS3 as well as a single HDMI cable, making it a good self-contained package for getting set up with HD recording.
At close to £140 it’s priced in line with the competition rather than posing a budget alternative. Gamers who routinely spend £45 the latest games may not baulk at this price, but it has a lot to prove to be taken seriously as an exploitable asset for self-promotion on the Internet.
Features and Technical Specifications
Features
Live streaming of your console game play
Stream your game play to your Twitch or Ustream channel with our Hauppauge SteamEez application. Create your own event and be watch by thousand followers!
Built-in Record button and Personal logos!
The built-in record button allows you to start and stop recordings right from the HD PVR 2. So you don’t need to go to your PC to record a game session. Plus the Personal Logo inserter allows you to “burn” a personalized logo right into your recordings! Brand all of your recordings with your own personalized logo!
HDMI and Component Video in plus no-delay HDMI video passthrough!
HD PVR 2 comes with HDMI in and out to make it easier to connect to your Xbox 360 and your HD TV set. And with our HDMI input, you get amazing 5 channel sound quality from your Xbox 360 game console. For the PS3, HD PVR 2 comes with a PS3 Component Video gaming cable and S/PDIF input plus uses HDMI out for no-delay passthrough to your HD TV set!
Full surround sound audio recordings and surround sound pass through
Make incredible recordings with full surround sound audio. HD PVR 2 GE Plus has an optical audio input so you can connect to game consoles with optical S/PDIF connections.
Amazing audio and video quality
HD PVR 2 GE Plus records using amazing H.264 compression at HD resolutions up to 1080p30 with digital audio. HD PVR 2’s H.264 recording format is used by Blu-ray disks and exceeds other compression standards in video quality.
Watch recordings of your best game play on your PC monitor or HD TV set
Play your game play recordings on your computer screen using the included ArcSoft ShowBiz application. You can also transfer the recordings over your home network to your PlayStation 3, Xbox 360, or other high definition media player.
Play while you record with our no-delay HDMI video passthrough!
HD PVR 2 GE Plus comes with real-time video pass through, so you can watch your game play on your HD TV while recording your game on your PCs disk drive. Simply connect HD PVR 2 in between your game console and your HD TV set (HDMI out plus Component Video cables included).
Upload your best games to YouTube and share with your friends
HD PVR 2 Gaming Eidition Plus comes with a one click upload to YouTube. Make HD recordings of your game play and upload your best videos to YouTube.
Stream your game play to your Twitch or Ustream channel with our Hauppauge SteamEez application. Create your own event and be watch by thousand followers!
Built-in Record button and Personal logos!
The built-in record button allows you to start and stop recordings right from the HD PVR 2. So you don’t need to go to your PC to record a game session. Plus the Personal Logo inserter allows you to “burn” a personalized logo right into your recordings! Brand all of your recordings with your own personalized logo!
HDMI and Component Video in plus no-delay HDMI video passthrough!
HD PVR 2 comes with HDMI in and out to make it easier to connect to your Xbox 360 and your HD TV set. And with our HDMI input, you get amazing 5 channel sound quality from your Xbox 360 game console. For the PS3, HD PVR 2 comes with a PS3 Component Video gaming cable and S/PDIF input plus uses HDMI out for no-delay passthrough to your HD TV set!
Full surround sound audio recordings and surround sound pass through
Make incredible recordings with full surround sound audio. HD PVR 2 GE Plus has an optical audio input so you can connect to game consoles with optical S/PDIF connections.
Amazing audio and video quality
HD PVR 2 GE Plus records using amazing H.264 compression at HD resolutions up to 1080p30 with digital audio. HD PVR 2’s H.264 recording format is used by Blu-ray disks and exceeds other compression standards in video quality.
Watch recordings of your best game play on your PC monitor or HD TV set
Play your game play recordings on your computer screen using the included ArcSoft ShowBiz application. You can also transfer the recordings over your home network to your PlayStation 3, Xbox 360, or other high definition media player.
Play while you record with our no-delay HDMI video passthrough!
HD PVR 2 GE Plus comes with real-time video pass through, so you can watch your game play on your HD TV while recording your game on your PCs disk drive. Simply connect HD PVR 2 in between your game console and your HD TV set (HDMI out plus Component Video cables included).
Upload your best games to YouTube and share with your friends
HD PVR 2 Gaming Eidition Plus comes with a one click upload to YouTube. Make HD recordings of your game play and upload your best videos to YouTube.
Technical Specifications
Hardware Encoder
* H.264 AVCHD high definition video encoder, with record resolution to 1080p30 from HDMI or
Component video
* No delay HDMI passthrough: Component video or HDMI in to HDMI out – up to 1080p
* Full 5 channel surround sound audio in your recordings, from HDMI or S/PDIF
* Recording datarate: from 1 to 13.5 Mbits/sec
* Recording formats: MP4, TS and M2TS
* Video down conversion – from 1080p to 720p
Input/output Connections
* HDMI in, from HDMI sources without HDCP such as Xbox 360. HDMI can include surround sound audio
* Component video in, with stereo audio
* Optical audio S/PDIF in, with surround sound pass through to HDMI out
* S-Video and composite video in, with stereo audio (needs optional cable)
* HDMI output
* Size: 6 in wide x 6 in deep x 1.5 in high (approx. 15cm x 15cm x 4cm)
* Power: 6V at 1.6 amps
* Weight: 0.75lb / 0.34 kg / 12 oz
* H.264 AVCHD high definition video encoder, with record resolution to 1080p30 from HDMI or
Component video
* No delay HDMI passthrough: Component video or HDMI in to HDMI out – up to 1080p
* Full 5 channel surround sound audio in your recordings, from HDMI or S/PDIF
* Recording datarate: from 1 to 13.5 Mbits/sec
* Recording formats: MP4, TS and M2TS
* Video down conversion – from 1080p to 720p
Input/output Connections
* HDMI in, from HDMI sources without HDCP such as Xbox 360. HDMI can include surround sound audio
* Component video in, with stereo audio
* Optical audio S/PDIF in, with surround sound pass through to HDMI out
* S-Video and composite video in, with stereo audio (needs optional cable)
* HDMI output
* Size: 6 in wide x 6 in deep x 1.5 in high (approx. 15cm x 15cm x 4cm)
* Power: 6V at 1.6 amps
* Weight: 0.75lb / 0.34 kg / 12 oz
System Requirements
* Laptop or desktop PC with 3.0 GHz single core or 2.0 GHz multi-core processor (or faster)
* Microsoft® Windows® 8, Windows 7, Windows Vista with 1 GB RAM or Windows XP Service Pack 3 with 512 MB RAM
* HD TV set with HDMI input
* Graphics card with 256 MB memory
* Sound card
* 220 MB free hard disk space
* (Optional) CD-ROM drive
* Mac requirements: Mac OSX 10.7 / 10.8, Intel 32/64bit only
* Microsoft® Windows® 8, Windows 7, Windows Vista with 1 GB RAM or Windows XP Service Pack 3 with 512 MB RAM
* HD TV set with HDMI input
* Graphics card with 256 MB memory
* Sound card
* 220 MB free hard disk space
* (Optional) CD-ROM drive
* Mac requirements: Mac OSX 10.7 / 10.8, Intel 32/64bit only
Packaging and First Look
The exterior packaging of the HD PVR2 GE+ is fairly busy compared to the current fad for minimalism, with more space than normal given over to features, technical specifications and other marketing tweaks. Hauppauge have chosen to have quite a small package footprint, thereby reducing shelf space requirements and packing costs for shipping. Given that their PVR devices are seen on the shelves of many specialists PC brick-and-mortar retailers this shouldn’t be that surprising.
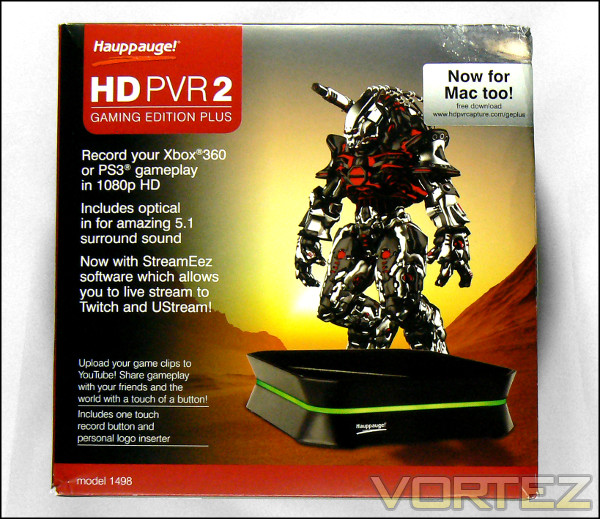
The front panel shows an exterior shot of the HD PVR2 GE+ with green recording/streaming LED enabled, although this is quite small compared to the jazzed-up gamer branding embodied by the robotic creature behind it. Obviously Hauppauge want it to pop out to gamers which is why it looks a little like a game title at first glance, but even so. Just in case the viewer wasn’t aware, the main function of the HD PVR2 GE+ is identified – game capture and streaming – whilst the latest platform updates are also outlined. In addition the Mac compatibility is highlighted prominently, which is perhaps a note more for the US market, where desktop Mac’s have greater market penetration.
Notice also the early shout-out to two of the most popular streaming platforms as well as Youtube. With streaming becoming so popular it pays to answer the important question of ‘can it do…’ early.
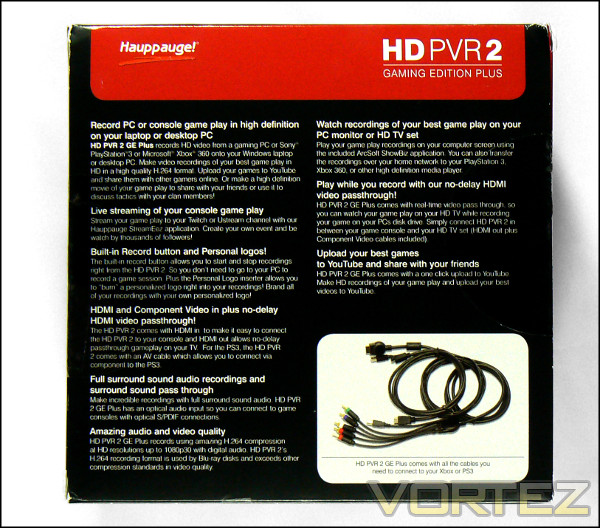
More detail is added to the rear of the packaging, where specific features are explained in more detail. The relatively priority of these features are interesting to note: Youtube upload and streaming are high, whereas the nuts and bolts capabilities such as no-delay passthrough are a little less prominence. The ArcSoft ShowBiz editing software gets only a passing mention, perhaps less noteworthy than personalised logo.
Nice to note are the images of the bundled cabling, allowing buyers to be aware in the unlikely event that additional are needed. Whilst not being the most exciting of panels, the rear does a comfortable job of relaying the most pertinent information and doesn’t overlook anything important.
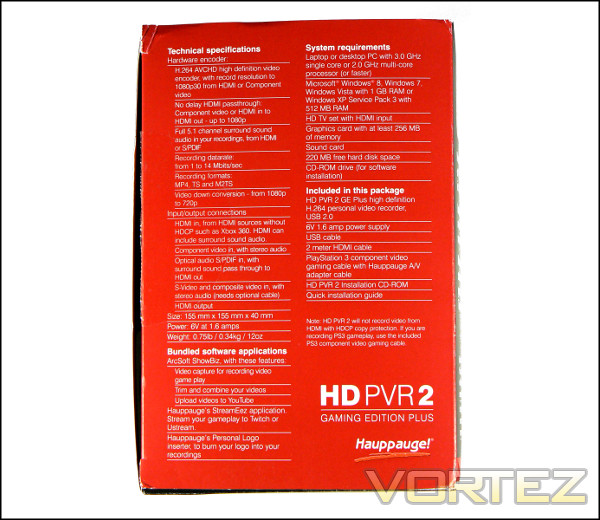
The left side is where you will find all of the technical specifications and system requirements, and Hauppauge are refreshing upfront with both. The hardware video encoders capabilities aren’t shied away from, nor are the input/output connections; both of these are often-times hidden by manufacturers who wish to conceal certain inadequacies. Mac OS and hardware requirements aren’t identified, but this is probably an oversight.
It’s also important to note that Hauppauge state the HD PVR 2 will not record video from HDMI HDCP copy-protected sources. Although it most affects PS3’s right now, it could have a large impact depending on the output specifications of next-generation consoles.
Package Contents
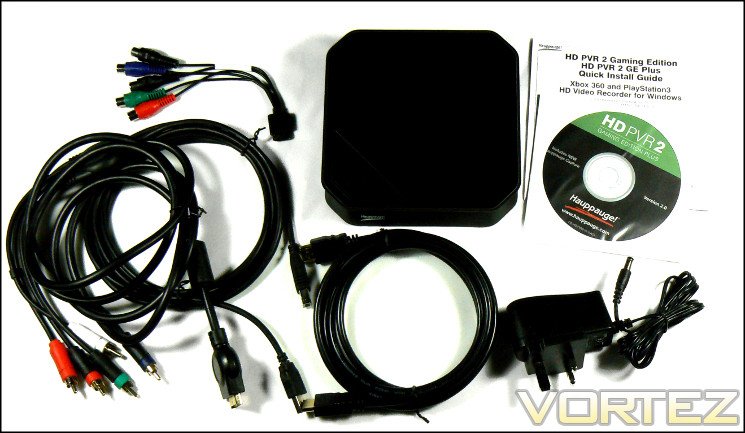
Hauppauge have packed the contents securely within a fold out cardboard insert, ensuring that even if the out box becomes a little blemished in shipping the contents should arrived unharmed. Although it doesn’t provide a great deal of cushioning the contents are lightweight and robust in the main.
Included in this package
* HD PVR 2 GE Plus high definition H.264 personal video recorder, USB 2.0
* 6V 1.6 amp power supply
* USB cable
* 2 meter HDMI cable
* PlayStation 3 component video gaming cable with Hauppauge A/V adapter cable
* HD PVR 2 Installation CD-ROM
* Quick installation guide
* HD PVR 2 GE Plus high definition H.264 personal video recorder, USB 2.0
* 6V 1.6 amp power supply
* USB cable
* 2 meter HDMI cable
* PlayStation 3 component video gaming cable with Hauppauge A/V adapter cable
* HD PVR 2 Installation CD-ROM
* Quick installation guide
Hauppuage have included an installation CD, but as with all good manufacturers Hauppauge also mirror the latest drivers and software on their website. The HD Capture software is updated regularly and so grabbing the latest version is generally the best idea; the ‘Prosumer’ class ArcSoft ShowBiz 3.5 video editing software relatively little behind the times as the software is now on its fifth major release.
So that’s out first look at the HD PVR 2 GE+ bundle, and it’s pretty impressive thus far. Plenty of cables for all your connectivity needs are provided out of the box, and the necessary software can be picked up from the official website. The ageing ArcSoft 3.5 editing software will be a disappointment to some, but given the retail value of the latest version is approaching $80 it’s perhaps not that surprising that a more up to date one isn’t made available.
A Closer Look
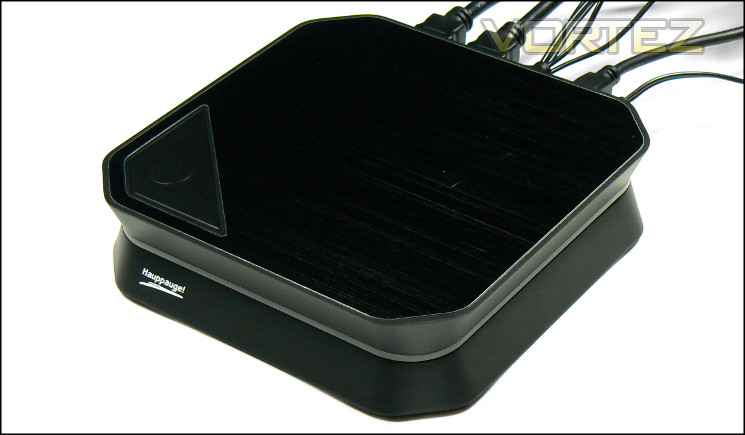
From the moment you pick up the HD PVR2 Gaming Edition Plus you’re struck by how little it weighs. At only 340g it gives the impression that much of the volume is for passive air flow to cool the internal components and provide I/O port real estate. Although we’re often worried that a device which feels light in comparison to is size lacks proper internal support we’re please to note that the HD PVR2 GE+ still doesn’t flex in the slightest.
Situated on the top and towards the front left is a large button. You’d be forgiven for thinking it’s an on/off switch when in fact the designated purpose is to quick-start recording or streaming. One press when set up on your PC will start the Hauppauge Capture software in the mode you prefer, allowing you to quickly begin recording without needing to refer back to your PC desktop. That’s a pretty neat idea given some of the potential configurations your hardware can be in if set-up for capture. Thankfully this button isn’t the slightest bit flimsy, and we’re confident it will operate well into the overall device’s projected life span.
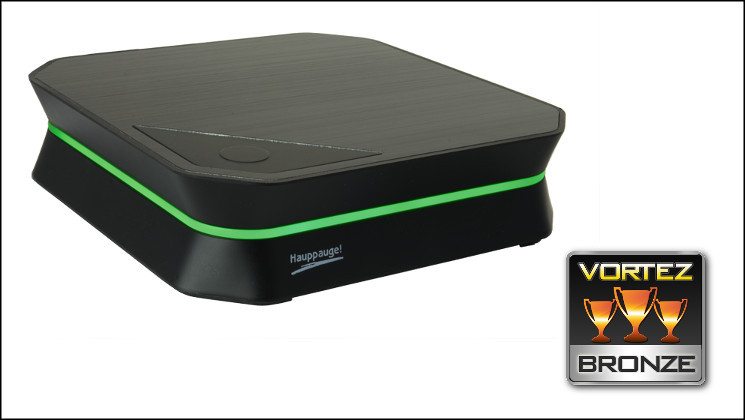
The sides excluding the rear are pinched in, making the GE+ quite narrow in appearance. A Hauppauge logo denotes the front of the unit, which not coincidentally is opposite the connector panel. The greyish portion around the centre is a lightbar that illuminates as a status indicator when powered. Aesthetics will always be a matter of taste, but even so this unit appears to still lack something despite the welcome redesign from the original HD PVR models. It may be the satin-ised sides, or the glossy top panel quite obviously aping brushed aluminium, but Hauppauge haven’t quite nailed premium mass-market appeal yet. Still, it’s relatively unobtrusive, which should be welcome for most front rooms.
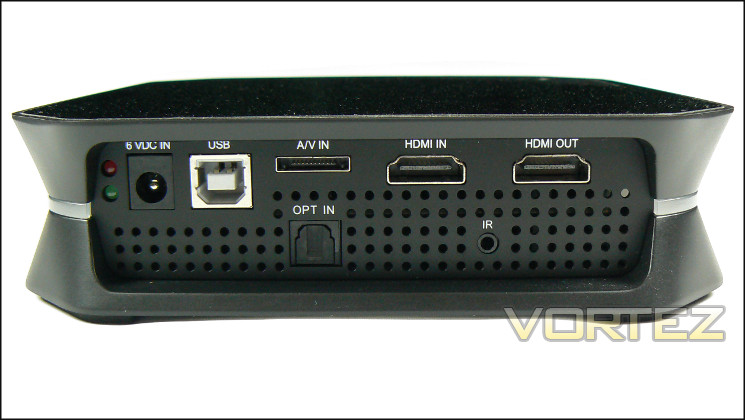
Multiple I/O connectors are found on the rear, which are from left-to-right:
6V DC IN – 6 Volt DC in
USB – USB 2.0 Socket (to PC)
A/V IN – Compact analog Audio/Video in for non-HDMI devices (see adaptor)
OPT IN – Optical In for S/PDIF audio
HDMI IN – Primary Video input via HDMI (to XBOX 360 etc.)
HDMI OUT – Primary Video output via HDMI (to TV)
IR – IR Blaster port*
USB – USB 2.0 Socket (to PC)
A/V IN – Compact analog Audio/Video in for non-HDMI devices (see adaptor)
OPT IN – Optical In for S/PDIF audio
HDMI IN – Primary Video input via HDMI (to XBOX 360 etc.)
HDMI OUT – Primary Video output via HDMI (to TV)
IR – IR Blaster port*
On the extreme left there are two LEDs, green and red representing good power status and an undocumented failure mode respectively. So long as it’s green you’re good to go.
The rear is also the primary means of heat dissipation via the perforated panel; although there is no active cooling within the GE+, passive cooling is sensible for extended capture sessions in any climate. Note that there is no hard power-off switch, it appears that there is simply a low-power mode active when the PC is turned off.
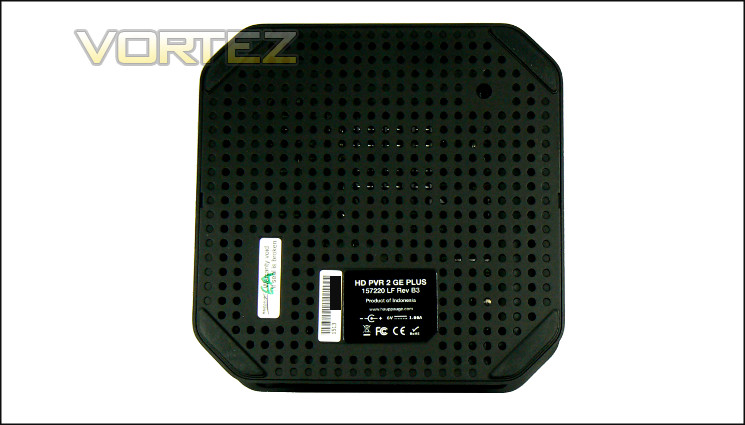
The floor is composed of another heavily perforated panel enabling air to be drawn in through the floor as necessary. Four rubberised feet hold the GE+ in place even under the weight of the heavy AV cables pulling on the back, as well as lifting the unit slightly off its resting surface in order to allow air to circulate. They would also serve to damp any vibrations from your console, making sure that adds no noise to the environment. Centrally located is the serial and model number for reference purposes.
Hauppauge’s HD PVR 2 GE+ is therefore a pretty compact device compared to the range of set-top boxes you may have sat underneath your TV, but presumably slightly larger than it needs to be for reasons of connectivity thermal limitations. For most front rooms the newer chassis design of the HD PVR2 range will be preferable to the older HD PVRs, but they still lack a certain something given that it costs £130+.
* the IR blaster port wasn’t discussed in the original documentation, but new guidance from the website indicates that it’s functional with a compatible IR Blaster module for wireless control.
Setup
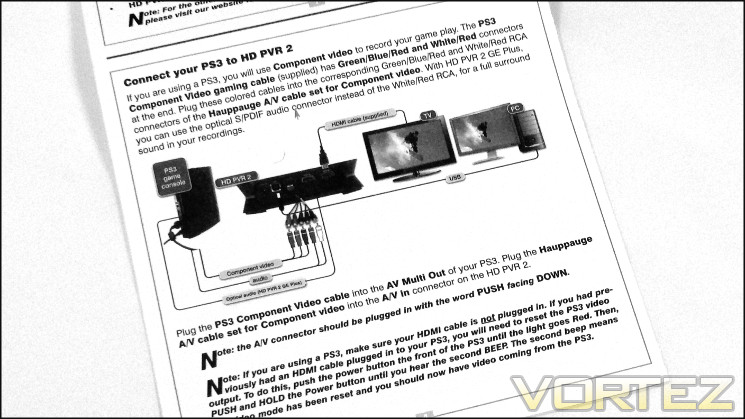
Once you’ve fully unpacked the HD PVR2 Gaming Edition the next step is set-up, and Hauppauge have performed due diligence by providing very good installations instructions on the provided user guide pamphlet. The latest HD PVR2 designs have also moved to an HDMI input/output system for video with the option for compact component, eliminating much of the cable clutter and opportunity to make a mistake with component inputs.
Test System
CPU:- Intel Core i5 2300 @ Stock
Motherboard:- MSI P67-chipset design
RAM:- 8GB GSkill DDR3 1600
HDD (OS):- 64GB SATAII Kingston V+200
HDD (Storage):- Western Digital 120GB in external caddy; USB 2.0 connection
Console:- XBOX 360 via HDMI
Motherboard:- MSI P67-chipset design
RAM:- 8GB GSkill DDR3 1600
HDD (OS):- 64GB SATAII Kingston V+200
HDD (Storage):- Western Digital 120GB in external caddy; USB 2.0 connection
Console:- XBOX 360 via HDMI
When setting up your largest concern will be one of cable length. The HD PVR2 unit needs to be connected to the TV via HDMI, console or PC via HDMI or component, and PC via USB. Although the cables you’re provided with are long – a 6ft HDMI cable and 9ft USB A-B cable are extremely generous – you may well need to rearrange your gaming setup to accommodate the requirements. Thankfully the unit doesn’t need to be connected to a PC in order to act as a passthrough, so if your system is lightweight enough you can just hook it up when necessary, but it’s something you should consider before buying.
Once the cabling is set up and unit is powered on you’ll be presented with a blinking yellow LED in the zone of the light-bar nearest the Hauppauge logo. This indicates that you need to install the PC sofware from the CD provided, although we would suggest downloading the latest updates to Hauppauge Capture from the official site first. At the time of review we were furnished with revision 31164, but the recently released version 31183 will add more features were we not able to take advantage of. The installation process will place the unit in a default state for settings designed to be optimal for most setups, but sometimes things can fall through the cracks.
The process was straightforward, even if the installer is a little crude by modern standards. Remember that many of the locations you will be specifying in the process will be default locations for captured video storage, so ensure that you point the app to the correct place. Thankfully both Hauppauge Capture and ArcSoft ShowBiz allow you to change these directories after the fact, although it’s a little more complex in the latter.
When installed the indicator LED should change to a solid blue. A simple sanity check then needs to occur to make sure that passthrough is operating by powering up the console and TV. On initial testing we failed to get audio passthrough, and found that troubleshooting this problem was difficult even with the power of Google; no feedback to the user was provided that an issue had occurred, and no hover-over hints are present anywhere through the UI. It turns out that the unit was trying to pass 5.1 AC3 audio which checking the Disable HDMI AC3 Support option in Advanced Setting -> Audio Properties solved, but from then on we were concerned about an overall lack of troubleshooting support. Thankfully, for those with this issue new software updates automatically check this option, which you will want to turn off if your TV supports 5.1 audio.
Even if your TV/Monitor panel isn’t responding at all you should still be able to view the console output on your PC through the Capture software. This would allow you to change any display settings on your console if necessary, just in case your TV doesn’t recognise the current mode.
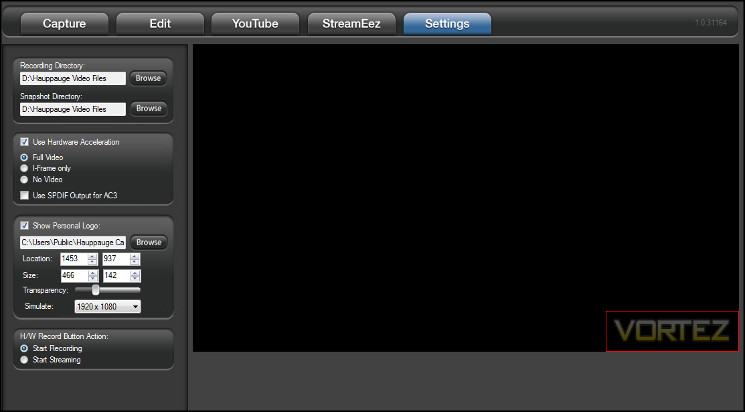
The final piece of housekeeping is setting up your watermarks for captured video. Hauppauge Personal Logo Inserter, the standalone program previously needed for this, has now been integrated into the main Hauppauge Capture application along with StreamEez. This utility allows you to select an image of any reasonable size and overlay it on the video frame in any position. Opacity is also adjustable, allowing you to obscure the footage as little as possible. This logo is then overlayed on both captured and streaming video, but we should note that video which has been scaled did not have the overlay scaled to the same degree, resulting in a larger watermark as the video is downscaled. It seems likely that this will also be fixed in an upcoming application release.
Once set-up you’re ready to get started.
Gameplay Capture And Streaming
Gameplay capture can be performed through either the Hauppauge Capture software or ArcSoft ShowBiz, and we found the former to be both more user-friendly and more stable than the latter. However ArcSoft ShowBiz will allow capture in .TS, MP4 or M2TS formats, whilst Hauppauge Capture software will only capture in .TS. Whatever the file format it can be converted to another later so it doesn’t matter a great deal, and for this reason we chose the Hauppauge Capture software for both footage capture and streaming.
Console Capture
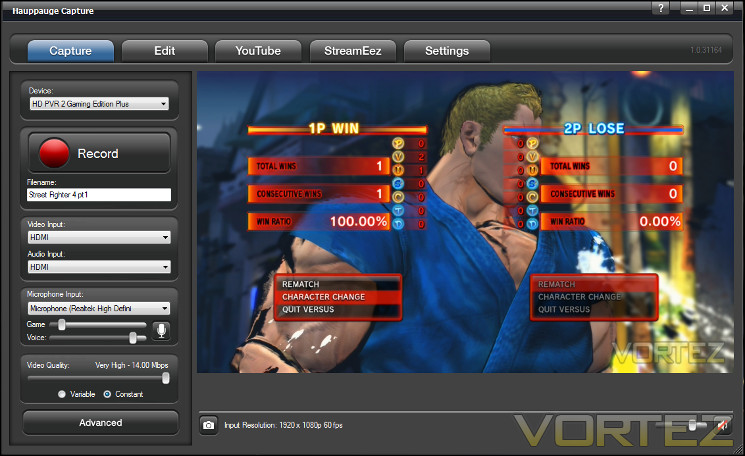
Once properly installed Hauppauge Capture presents the user with an application UI that is best summed up as streamline for basic functionality and approachability. From it you can select a PVR device and audio/video feeds and immediately begin capturing gameplay footage. Otherwise you can change additional settings to tune quality, sound levels and additional voiceover.
Note that the latest updates to the HD PVR2 range allow you to capture PC microphone audio and mix it into your captured video. Though great for commentary it isn’t ideal for in-game chat through a console as they use separate audio channels; if that’s something you want to capture Hauppauge address solutions in their FAQ (ref: “I use the HD PVR 2 Gaming Edition. I was wondering how do record my game chat with game audio?“).
When recording, PC mic audio is mixed in the captured video in a delay-free manner and cannot be extracted later, which should be noted if you expect to add post-production commentary. Thankfully there is plenty of free software out there to record your mic audio separately to be added later to video as an additional audio track, so the only thing you lose is no-fuss synching.
There are around five seconds lag between launching the Capture application and the device fully initialising, and between zero and three seconds lag between pressing the application record button and recoding beginning. If you instead press the quick-capture button on the top of the HD PVR2 unit the process is automated and takes between four and seven seconds to launch the application and begin recording. What you see and hear on your PC as opposed to your TV is delayed by approximately two seconds, which whilst not backbreaking will make gameplay from this specific feed deeply undesirable. Lucky therefore that Hauppauge implemented zero-delay passthrough to the TV, which is a pretty accurate description as far as we have been able to assess.
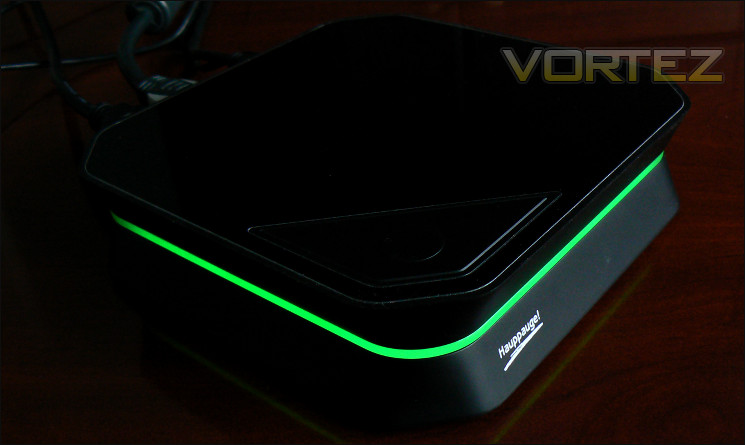
When capturing the HD PVR2 GE+ lightbar will change from a single yellow LED corner to a green ring around the unit as shown above. We did appreciate this as a visual indicator, especially when capturing external audio.
The experience, including delay from launching the application to recording actually beginning, encourages preparation rather than spontaneous recording of special moments. You can of course record and edit down your entire play session, but you will want to be a little careful of storage space as one hour long 14Mbps video will top well over 6GB. For that reason you will also want to ensure that your storage drive utilise NTFS rather than FAT32, the latter of which has a maximum file size of ~4GB.
There are a very wide selection of capture resolutions and downscaling options to suit your broadcast needs and internet upload speed. Presupposing no extreme limitation with either of these we see no reason not to record and upload all video in the maximum 14 Mbps bit rate, which is more than good enough for Twitch and Youtube from a pure standards perspective. A maximum of 14Mbps is not high per se, but generally good enough for games given the processing techniques video upload sites use. It will not set the world alight, but it’s generally good enough for amateur needs.
Choice between 1080p @ 30fps and 720p @ 30/60fps is going to be down to personal preference. Obviously if you only have a 720p TV recording in this resolution makes sense and will tend to exhibit fewer compression artefacts 1080p recordings at the same bit rate. However your viewing audience may prefer 1080p for their enjoyment. Either alternative should provide a decent end product.
The above video shows our 14Mbps recording at 1080p with watermark. There are a few compression artefacts and the image has a very slight soft focus than the raw footage, but and these is due to a mix of factors including Youtube’s own processing for HD. Colour range is good in general, although we found that other games with washed out colour pallets weren’t represented quite as well.
One issues we made note of during recording was gamma saturation. Some games, in our case Dishonoured but commonplace amongst stealth titles, ask you to adjust the output gamma so dark patches are viewable on your TV. The problem is that whilst suitable for the TV the captured video can be too bright, saturating the image and washing out the colours, and cannot be dealt with in post-production. Hence it is vitally important to check the brightness levels on a reasonable reference screen before recording to preserve as much video fidelity as possible, even if software updates later allow you to adjust brightness and contrast downwards.
PC Capture
The process of capturing PC gameplay is very similar to that of a console so long as you have an HDMI port on your graphics card, just ensure that you select the HDMI Audio as the default device in the Windows Sound Manager. In the unlikely event you only have DVI-out you will need a DVI->HDMI converter – which will deal with video signals – and to hook up your PC Line Out to the component Audio In on the HD PVR2 GE+ with the provided cables.
One potential niggle will crop up if you’re using a monitor with DVI or no-audio HDMI, in which case you won’t be able to hear any in-game audio which you’d normally want to record. The obvious answer would be to clone the audio stream and output to multiple sound devices, but that isn’t possible in Windows without third-party software. Curiously Hauppauge haven’t incorporated a separate zero-delay audio out for just this situation, but this may be a little complex to implement in hardware. You can still listen to the captured feed which is on an approximately two second delay, or attempt a more exotic solution with external audio splitters.
Because the system requirements are so low gaming and capturing video in the manner is relatively trouble-free all things considered. Whilst RAW footage would need to be stored to a high-speed HDD, one hour of h.264 encoded video will only take up 5GB, requiring a data rate so modest it can be stored on a USB2.0 external HDD. If possible, storing video data to a drive which isn’t being accessed frequently or heavily by the games during gameplay would be a sensible idea simply to reduce load. There’s a small chance you’ll need to turn down one or two CPU-intensive settings, but on a reasonable gaming machine with 8GB RAM and quad-core CPU you should have no difficultly multi-tasking.
Streaming
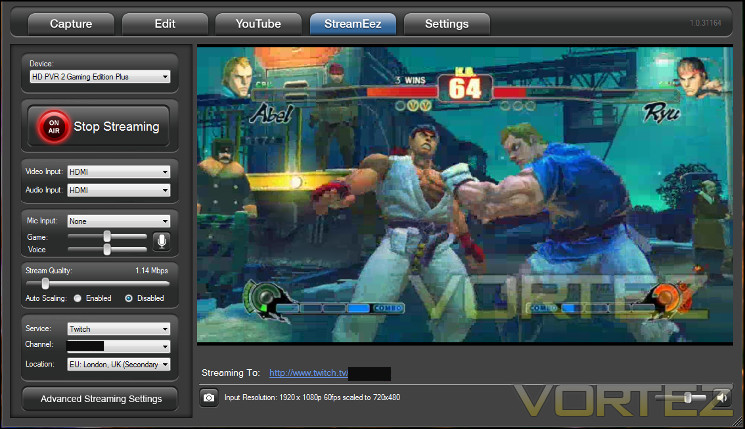
In the latest variant of Hauppauge’s Capture software they have rolled in the StreamEez protocols and added them into the UI for a simple one-stop application for most basic PVR hardware functionality. StreamEez is ridiculously easy to set up, requiring just Twitch.tv or Ustream account to set-up, although it did have some issues parsing complicated passwords with a character set beyond the simple alpha-numeric.
Streaming bandwidth can be set to between 0.5 Mbps and 6 Mbps, which considering network upload overheads is a fantastic range. In the UK a reliable 5 Mbps upload is very good indeed, with only FTTC plans breaching it reliably. Even then traffic shaping is a very real problem, and you should be aware of the needs of your game if playing an online title and budget your bandwidth accordingly.
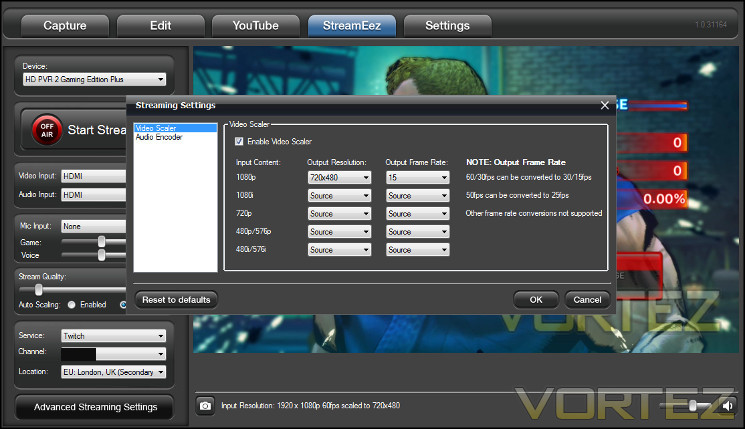
You can choose to automate the scaling of your streamed video or choose specific settings from a very extensive range through the advanced settings menu. Both methodologies downscale the resolution and framerate of the video to a level which balances resolution and visible signs of compression for the best quality.
One criticism is that the use of StreamEez or direct video capture is mutually exclusive, meaning that it’s quite difficult to stream gameplay and then edit the footage down for later publication. One alternative is to use XSplit to capture and stream video as the latest version can now hook into the Hauppauge HD PVR2 API. It should be stressed that this is far from an ideal solution as the system resource overhead would be significantly higher, but it would allow you far more flexibility with a variety of settings including the choice of ingest servers (which is currently opaque to the StreamEez user) or webcam footage.
Another criticism would be a lack of information and feedback to the user when something clearly wasn’t functioning properly. At one stage the software refused to log-in, and then later claimed to be streaming to the selected Twitch channel but clearly failing to do so. An uninstall and re-install fixed it, but given the potentially less than tech-savvy userbase for these sorts of products needing to resort to forums and no clear troubleshooting process isn’t really good enough.
Editing and Publication
Simple editing functionality such as file renaming, cropping and capture/stream watermarking can be controlled in Hauppauge Capture. More complex product tools for cropping, splicing, scene transitions and audio editing are available in the bundled editing suite ArcSoft ShowBiz, a tool also potentially used to capture footage, but as noted earlier Hauppauge Capture is preferable and generally more stable.
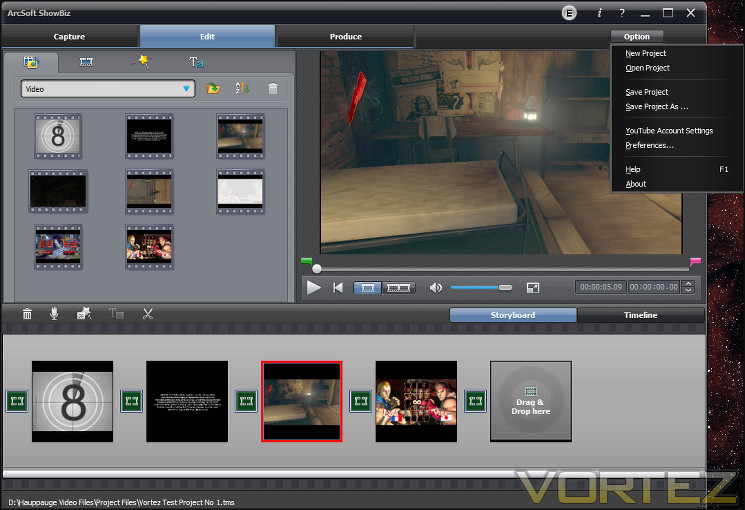
ArcSoft ShowBiz 3.5, the edition bundled with the HD PVR2 GE+, has a relatively straightforward editing template. We found that creating the project file was the most sensible first step, following which the correct source videos could be imported, sidestepping any issues that capturing footage through ShowBiz may cause. On creation a project is defined as having an aspect ratio of 4:3 or 16:9, it is essential that you choose the correct format as we couldn’t see an option to change it later. The same goes for Youtube video resolution.
Once the project is created you can import video, audio and still images which can then be incorporated in part or whole into the final video. To aid the logical construction process the software storyboards scenes and generates a timeline of video, audio and transitions. Scenes are added in the storyboarding process via drag-and-drop of larger media files and then selective trimming of the content down to smaller chunks using the scissors tool.
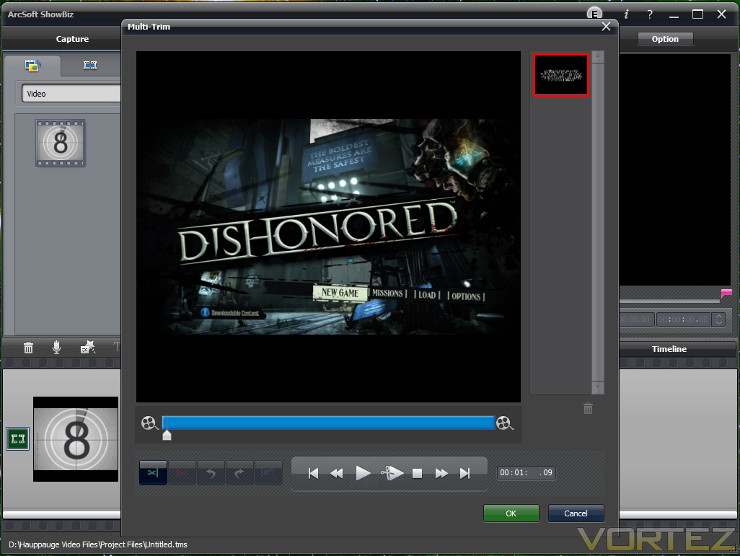
Trimming the video is a laborious process begun by pressing the ‘Multiple Trim’ tool, and would be greatly streamlined by a smaller live-preview window popping up when you hover over the timeline. If you’re recording long play sessions then consider writing notes of important timestamps as precise times can be input manually. Finally, the parts you extract from the video when shown in the storyboard use the first frame as a thumbnail, which can be somewhat confusing if you’re starting on a black screen.
The Transitions tab allows the selection of one of twenty three different animations allowing a smooth flow between scenes. Once selected they can be dragged into the storyboard or timeline where their impact on both the video and audio will be represented. Audio will also automatically fade in and out as necessary.
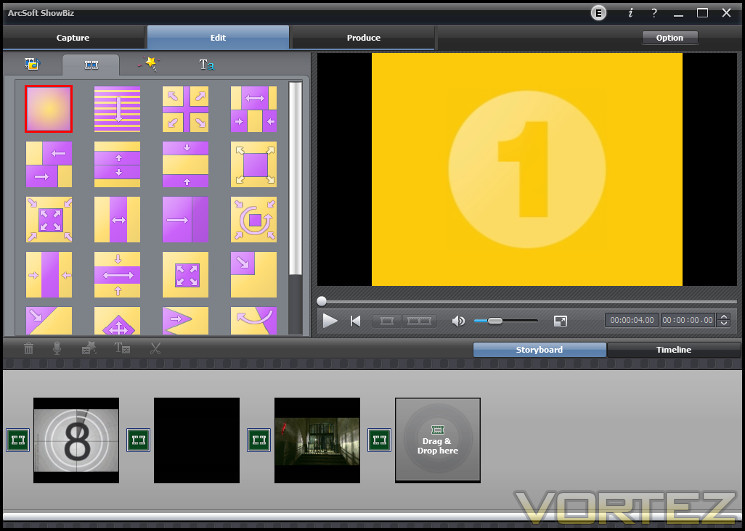
More complex edits including special effects and additional audio can be made in the Timeline view. Scenes are presented sequentially by the blocks of time they occupy, in addition to their audio track. Transitions are also included, represented as their thumbnail occupying a block of time equivalent to their duration. Two additional audio streams can be added, for commentary or other purposes. Special effects can be added through an editor similar to the scene trimmer, defining the effect and period of operation, but it’s a slow process with little indication when applied without playing that section.
Other neat options include a built-in audio recorder for capturing commentary after the project’s scenes have been laid out, allowing you to play the compiled footage and commentate as it happens. Text notes or watermarks can also be added to any point in the video through the text tool, and thankfully these are well identified in the timeline view. Two additional audio streams may also be added if desired whilst the main stream can have volume levels adjusted at any point in the timeline, although instructions on how to do this are again a little sparse.
This version of ArcSoft ShowBiz has no gamma correction capabilities, which was something of a frustration when we discovered that one hour of recorded footage was too bright despite it being ideal for our display panel. Be sure to check your capture feed for the suitable Gamma rather than rely on your TV as a guide, and if in doubt err on the side of darker video for a slightly better final product.
One thing we will certainly give ShowBiz credit for is that the entirety of the video can be played in realtime before it is rendered for publication, giving you a final check that the entire project is as you want it to be.
Publication
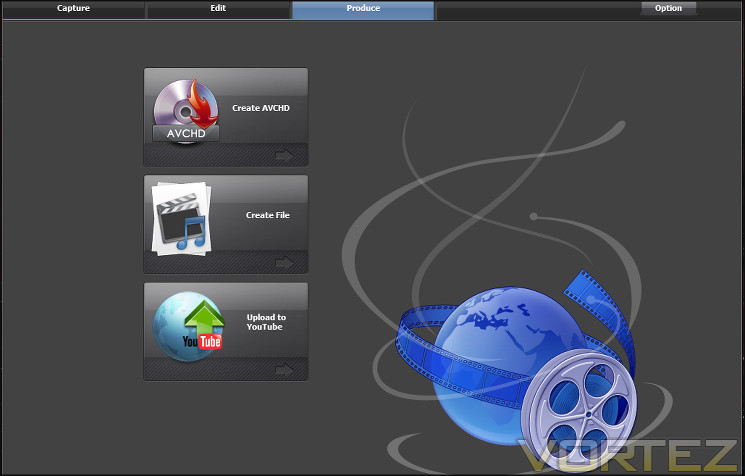
The HD PVR2 GE+ is capable of capturing footage in 1080p, but one distinct flaw in the package is that ArcSoft ShowBiz is a particularly unwieldy tool when it comes to uploading to Youtube. The automated upload process attempts to render video according to the preferences set in ‘Create File…’, cycling through the options if any render attempts fail at and point. However this process is not obvious, and in many cases will result in the file rendering in .WMV9 codec, an extremely lossy format as it turns out.
The correct option to select in ‘Create File’ is QTMOV, a QuickTime format which will render with an h.264 codec at a reasonable if not enterprise-standard bit rate. This file can then be directly uploaded to Yotube, rather than run the risk of your painstakingly crafted 14Mbits showreel being compressed down to as little as 2.5Mbits and leaving compression artefacts all over the screen. This is a good point of call for settings to use in the QTMOV category. Why the software doesn’t immediately prompt for a format on ‘Upload to Youtube’ is beyond us, but would explain many complaints of poor quality video others might have experienced.
In order to create the highest quality High Definition video for publication you will need to render the video through the AVCHD publication process, extract the relevant .ts files and upload manually. The primary purpose of the AVCHD option is to create DVD and Blue-Ray projects, and therefore incorporates high maximum quality settings and much higher bit rates. The software bolt-on allows you to add menus and chapters to the finished project, but if you publishing to Youtube you will instead want the core rendered .TS or .M2TS video file. After experimentation with this and other ShowBiz rendering tools by far the best clarity was rendered with this option across a range of resolutions.
Rendering will take time and system resources, far more than capturing footage. The rendering process will easily max out your CPU load and consume a 0.5GB RAM footprint, leaving your system sluggish until complete. A faster CPU will of course reduce the time taken, but unfortunately this isn’t a job for the HD PVR2 GE+’s hardware encoder.
720p footage of BioShock Infinite, edited and rendered with ArcSoft ShowBiz.
QTMOV container @30fps, h.264 codec.
If you’re happy with 720p as your maximum resolution ShowBiz’s upload tool will be more than suitable, but be sure to use the higher quality rendered video formats and not assume that the defaults will do. The ShowBiz H.264 QTMOV format 720p option is typically good enough, although arguably the audio quality is a little lacking at times. Those seeking best quality are far better off moving to the AVCHD option and then using the specific .M2TS file generated; even though the file sizes balloon the improvement is noticeable.
Overall it’s a tool for the beginner which really should be signposted better, and on the other hand may leave advanced users wanting far more from their software. Unfortunately comprehensive good video editing packages don’t generally come cheap, but not being able to easily render and upload HD video to Youtube without easily tripping yourself up does seem to be a glaring flaw.
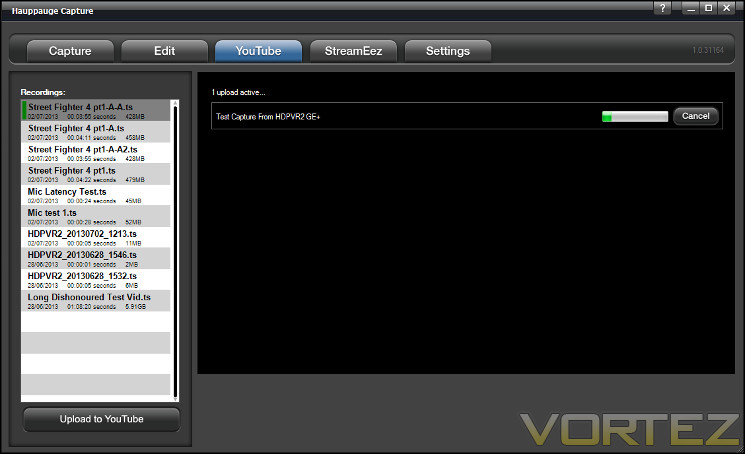
Those who want something a little more straightforward can upload 1080p video to Youtube from the Hauppauge Capture application, simultaneously taking advantage of the limited cropping tools. However it can never be as powerful an editor as it would need to be to satisfy any but the simplest requirements. Even a process as straightforward as converting from .TS to MP4 can be fraught with difficulty, as it would sometimes corrupt the MP4 video. There doesn’t appear to be much you could do about this apart from trying again, and it’s not clear exactly what causes it to occur. The moral is to check your converted files rather than assuming they will be fine.
Overall we would have to say that we were a little disappointed with the options available. Editing the footage was as difficult as capturing it was easy, and ArcSoft ShowBiz proved to be somewhat unstable when constructing and rendering projects, sometimes crashing or losing audio sync. That said, it is capable of 720/1080p rendering at sufficient bit rates to be worthwhile so long as you work out the idiosyncrasies of the software. If you’re willing to invest in more up-to-date software you potentially have quite a powerful tool on your hands, but otherwise more complicated creations will be a time-consuming exercise in frustration much of the time.
NOTE: The Publication section changed significantly in a few hours since the review went live, correcting an erroneous understanding of the ShowBiz Youtube Upload automated process.
Conclusion
It is no surprise that with the explosion of ‘Let’s Play’ video content, whether streamed or recorded and uploaded to sites such as Youtube, Hauppauge have stuck with the HD PVR formula. In so doing they have advanced their hardware significantly, to the point that zero-delay passthrough and capturing of 5.1 audio are now realities. This had to be a necessary development; minimising the impact on gameplay of your PVR activities is essential for the best possible playing and viewing experience.
From a beginners perspective the HD PVR2 GE+ turns out to be a very tempting proposition. Setup is exceptionally easy if you’re seeking to capture console video thanks to clear instructions and access to a PC of modest specification and a HDMI TV. Whilst the software installer is a little primitive, installation is a very simple matter, and storage locations can be changed after the fact. Perhaps most importantly you don’t need a high-end PC to operate the HD PVR2 GE+ at an optimum level; the resource footprint during capture is very small, with your main concern being a sufficiently large Hard Drive.
The most important area of advancement after zero-delay passthrough has been the improvements made to the software. Hauppauge have cut many of the corners off in this iteration, slimming down the interface so the users can get underway swiftly, although many of the tweaking features are will available through advanced menus. If you want to capture footage in a relatively unedited state and upload straight to Youtube you can certainly do so, although one imagines that you’ll swiftly want to add higher quality components to the footage you produce. The facility to add your own watermark to video you capture is a very nice touch.
It’s when you want to become more accomplished that the lustre on the HDPVR2 GE+ begins to fade. ArcSoft ShowBiz, although appearing a little more stable than the iteration Richard encountered in the review of the original HD PVR GE, was still fairly limited and indicated a maximum Youtube upload resolution of 720p. Whilst with some digging it turned out to indeed be capable of rendering 1080p video, confusion and mixed messages were really par for the course. When seeking to get more out of your recording new editing software will likely be the first port of call, but in the mean-time expect plentiful missteps costing many hours of work.
The maximum data rate the device is capable of peaks at 14Mbps, which a cursory glance around the market reveals is some way below that of many competitors. That said, this data rate is generally sufficient for Youtube just as the 6Mbps limitation is suitable for amateur streaming as home internet connections are more of a limitation. More complicated streaming tools are now available with XSplit, which is now also compatible with Hauppauge PVR video streams, but other video capture solutions such as FRAPS will remain the first port of call for high-end PC systems capturing uncompressed High Definition gameplay.
Although it is certainly possible to use the HD PVR2 GE+ for capturing PC gaming we would not recommend it unless you have access to and are comfortable playing through a monitor/TV with HDMI audio capability. Without this you will hear no lag-free sound during gameplay unless you purchase specialised software or additional hardware to split or clone an audio stream. It’s a shame that Hauppauge didn’t outfit the device with a separate delay-free audio-out, as the lag of captured audio isn’t really suitable for any high-end or competitive gameplay.
There is a further cloud hanging over the HD PVR2 GE+ as a long-term proposition: the outputs of the next-generation consoles. The HD PVR2 GE+ can’t capture HDMI video that is HDCP-protected, which is the primary reason why the PlayStation 3 requires component video for capture. If the PS4 and Xbox One ship with HDCP-enabled HDMI-out only, as with the recently released Ouya android console, capture will be impossible. It’s therefore unwise to purchase the GE+ with an expectation of use into the next upgrade cycle.
Overall the Hauppauge HD PVR2 Gaming Edition Plus is suitable for most console gamers who have invested in their gaming library over a high-end PC, so long as expectations are modest and they’re comfortable starting with limited editing software. At £139.99 it’s not a cheap solution, but it does at least include all the cables and software needed to get on, making it a genuine and relatively powerful starter kit with no additional outlay required. In isolation it seems powerful and with an adequate software suite, but we’re cognisant that this is one data point in a wide and thriving market with which we have little hands-on experience thus far. For this reason we give it a Bronze Award, primarily for users just starting out on their Youtube or Streaming career.
Pros
+ Up To 1080p Capture and Streaming
+ Up To 5.1 Audio Capture
+ Hardware h.264 encoding with small resultant footprint on system resources
+ Delay free passthrough of video and audio to HDMI
+ Easy Setup
+ Simple Streaming setup via bundled StreamEez software
+ Passively cooled
+ Regular first party software updates
Cons
+ Unproven build quality
+ Recording and streaming lag
+ Delay between activating device and beginning capture
+ Improved, but weak software
+ 14Mbps max data rate
+ No non-HDMI audio out for PC gaming capture
+ Up To 1080p Capture and Streaming
+ Up To 5.1 Audio Capture
+ Hardware h.264 encoding with small resultant footprint on system resources
+ Delay free passthrough of video and audio to HDMI
+ Easy Setup
+ Simple Streaming setup via bundled StreamEez software
+ Passively cooled
+ Regular first party software updates
Cons
+ Unproven build quality
+ Recording and streaming lag
+ Delay between activating device and beginning capture
+ Improved, but weak software
+ 14Mbps max data rate
+ No non-HDMI audio out for PC gaming capture

Click here for an explanation of our awards at Vortez.net. Our thanks go to Hauppauge for providing this review sample.


