







The X58 version of the GIGABYTE UD5 was an enthusiasts favourite. Can the X79 variant continue that trend? Find out in our latest X79 motherboard review.
Product on Review: GIGABYTE GA-X79-UD5Manufacturer: GIGABYTE

Street Price: £230 inc. VAT
The GIGABYTE UD5 was perhaps my all-round favourite motherboard based on the X58 chipset. It offered the best of both worlds. It could serve as an excellent, everyday mainstream motherboard yet it was also a very accomplished overclocker. It looked great, had plenty of accessories, supported SLI and Crossfire and best of all had a competitive price point. Sure, there may have been better motherboards but those cost quite a lot more, much the same as GIGABYTE’s UD7 and UD9 flagship motherboards. The UD5 then has always represented value for money but sacrificed little in terms of performance.
Fast-forward three years and with the introduction of the X79 chipset, we see that GIGABYTE are keen to follow on from its phenomenal X58 success with the release of the X79-UD5.
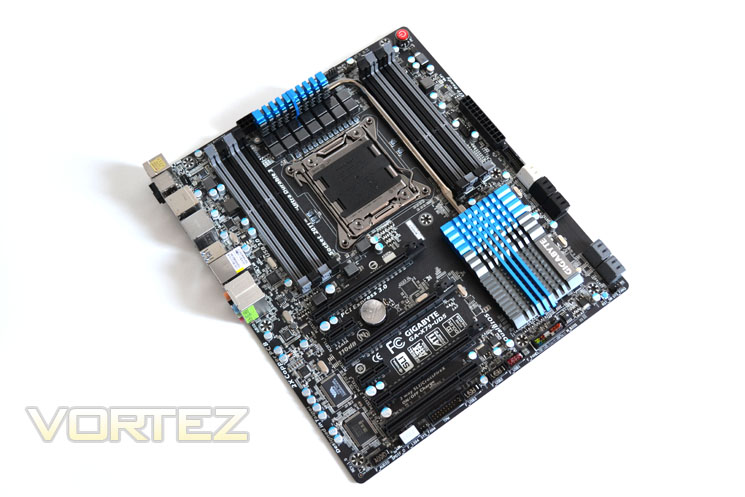
The X79-UD5 has all the new features of the X79 chipset as you would expect, quad channel support, PCIe Gen3, SATA 6GB/s along with USB 3.0. Much like the MSI X79 GD65 motherboard we are comparing it to today, it too has 8 DIMMS capable of hosting 128GB. It boasts on-board switches, Ultra Durable power components and SLI/Crossfire support. So on the face of it these two boards are pretty evenly matched and appear to be perfect solutions for those looking for a mid-high end foundation of Intel’s Sandy Bridge-E processor range. Which is best? Well, you’ll have to carry on reading but I would advise you not to skip straight to the conclusion and there are many small differences between the two combatants in today’s review.
We’ve already seen what the new Intel Processor and chipset are capable of so with the experience GIGABYTE have of making quality components we hope to be in for quite a ride. GIGABYTE after all is in the Premier League of component manufacturers making anything from motherboards to graphics cards, keyboards to mice. Let’s hear what GIGABYTE had to say about their latest motherboard offering:
GIGABYTE X79 series motherboards are designed to unite unrivalled desktop PC performance with a new level of flexibility and hardware control. Based on the latest Intel® X79 Express Chipset, supporting the new LGA 2011 Intel® Core™ i7 processors, GIGABYTE X79 series motherboards bring DIY builders to a new area of performance-oriented computing.
Let’s take a look at the products features and specification…
Specification & Features
Specifications
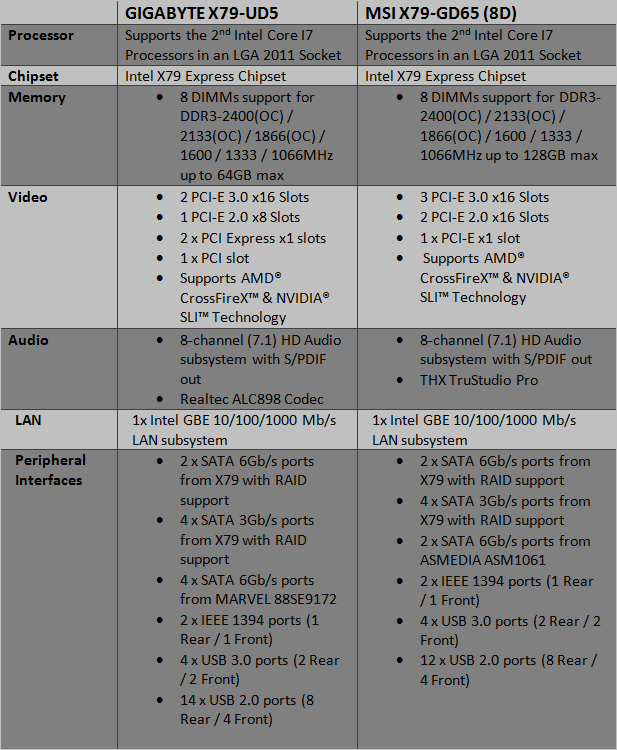
The specifications of the GIGABYTE X79-UD5 stack up quite well against the MSI motherboard. It has 2 less 16x PCIe slots but makes up for this by adding an additional PCIe x1 and legacy PCI slots. The GIGABYTE also has two more SATA ports and also two more USB ports if you count the USB/e-SATA combo ports. Other than that both boards are ATX, both support the 2nd Gen Intel Core i7 Processors and both have PCIe Gen3 support. The two big companies have recently been in a media war over the inclusion of PCIe 3.0 by GIGABYTE on their Z68 boards and while that battle still rages on, I see no reason why PCIe Gen3 wouldn’t be supported on the X79 motherboards with a suitable processor. So with the two boards lined up head to head, let’s take a look at what features GIGABYTE have to offer:
Features
GIGABYTE 3D Power
GIGABYTE X79 series motherboards are the first to take advantage of the exclusive GIGABYTE 3D Power, an all new hardware and software-based Digital Power Engine for both the PWM and Memory that delivers unprecedented power delivery control.
All New Digital Power Control for the CPU and Memory
Utilizing a brand new Digital PWM controller, GIGABYTE’s 3D Power features precise Auto Voltage Compensation to deliver a steady flow of power to the CPU and memory no matter the loading. This all new, all digital power system provides enthusiast users with exceptional control over the overclocking potential of their GIGABYTE X79 motherboard.
GIGABYTE 3D BIOS
The revolutionary GIGABYTE 3D BIOS application is based on our new GIGABYTE UEFI DualBIOS™ technology and is available to consumers in two new exclusive modes of interaction never before seen in a BIOS environment. GIGABYTE has re-drawn the traditional BIOS experience providing mainstream and enthusiast users with a choice of unique and powerful graphical interfaces.
4 Channel Memory on 8 slots
With a potential data bandwidth of up to 25GB/Sec and 256 Bits memory addressing, the Intel® X79 platform offers unrivalled memory performance. Supporting up to 64GB of DDR3 1600 memory (X79-UD5 only), GIGABYTE X79 series motherboards give you the ultimate performance for today’s memory-intensive applications.
PCI Express Gen.3 Support
The GIGABYTE motherboard is fully configured to provide gamers with the latest Gen.3 PCI Express technology, delivering maximum data bandwidth for forthcoming discrete graphics cards.
* PCIe Gen. 3 is dependent on CPU and expansion card compatibility.
3-way CrossFireX™ and 3-way SLI™ Support
he GIGABYTE X79-UD5 is equipped to help extreme gamers see the enemy from distance, regardless of how bloody the battlefield, offering the utmost graphics flexibility and upgradeability with multiple GPU support, that includes three PCI Express slots for both AMD CrossFire™ X and Nvidia SLI™ technologies in 3-way discrete card configurations.
OC-DualBIOS
OC-Dual BIOS features a unique back-panel BIOS switcher and LED indicator, allowing users to select one BIOS for normal use, and another for specifically designated for overclocking. This means that if your overclocking configuration suffers from instability, you can easily revert to your stable settings if needed. With OC-Dual BIOS, users can also easily compare two different BIOS versions, a very useful feature when users want to update to a new BIOS, but don’t want to lose their original settings.
GIGABYTE Bluetooth 4.0 and WiFi Card
With 2 kinds data transfer mode, GIGABYTE Bluetooth 4.0 and WiFi Card providing spec 300 Mbps transfer rates, 802.11n supports the latest WiFi specifications for better signal coverage, and featuring the newest Bluetooth 4.0, you will not suffer from signal loss like before.
GIGABYTE Ultra Durable™ 3
GIGABYTE X79 motherboards are equipped with the highest quality components that guarantee lower system temperatures, improved energy efficiency and enhanced stability for overclocking. GIGABYTE Ultra Durable™ 3 design features 2 ounces of copper for both the power and ground layers which dramatically lower system temperature. GIGABYTE’s Ultra Durable™ 3 also features Japanese made solid capacitors, PowerPAK MOSFETs and Ferrite Chokes which combine to offer lower motherboard temperatures, less wasted power and extended product longevity.
Packaging & Accessories
Box Front
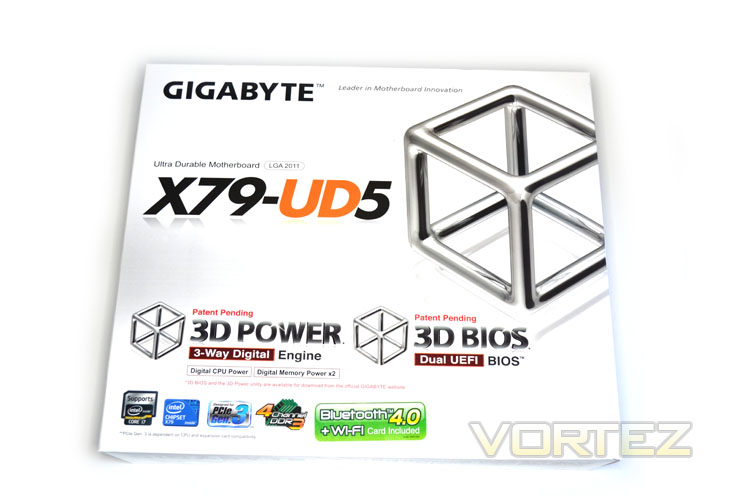
The front of the box has a very fresh clean design. GIGABYTE appear very keen to push their new ‘3D’ features – 3D Power and 3D Power. Beneath this title set are a few more features the UD5 comprises.
Box Rear
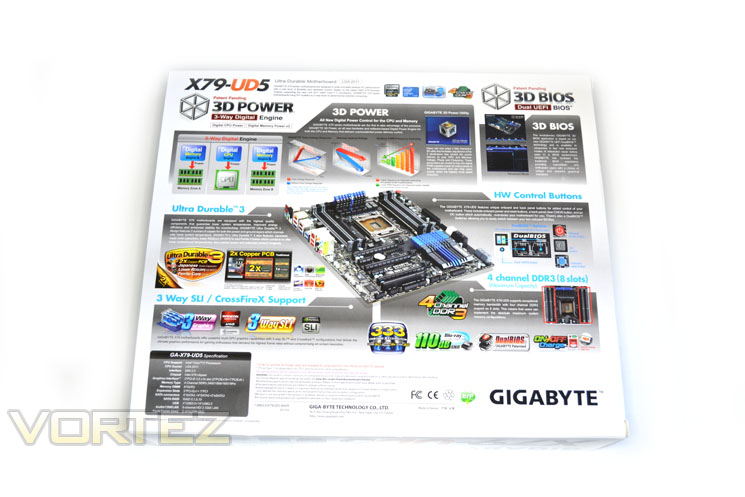
The rear of the box goes into huge amounts of detail, once again the 3D features being the stars of the show. Ultra Durable 3 makes another showing with the same features seen on previous incarnations. Other features on display are the HW buttons, 4 Channel (8slots) DDR3 and 3way SLI/Crossfire support.
The exterior package is very attractive and certainly makes a refreshing change from the dark, menacing packages we so often see.
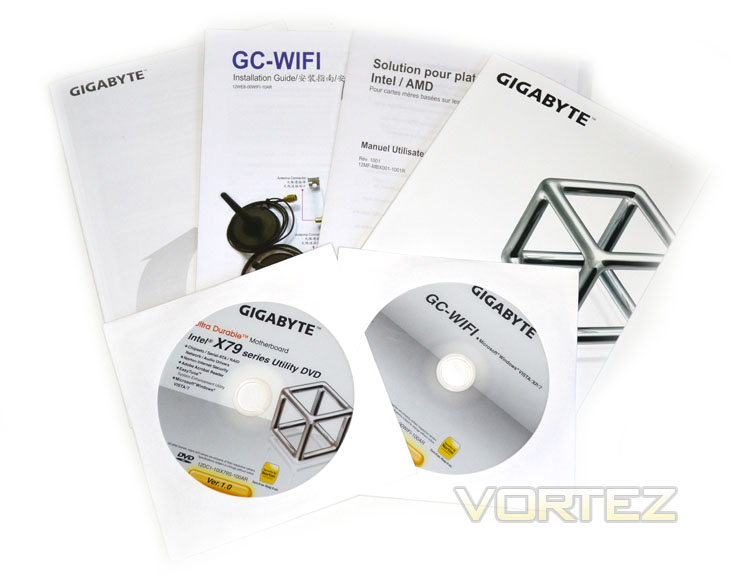
Motherboard Manuals
After removing the outer sleeve and opening the stiff, white cardboard box we are greeted with a further two boxes inside; one containing the mainboard and the other a compartmentalised tray holding the accessories in place. GIGABYTE have left no stone unturned and have provided a multilingual installation guide, a well written motherboard manual along with a Wi-Fi/Bluetooth setup guide. Also included were a motherboard utility/driver CD and additional Wi-Fi driver CD.
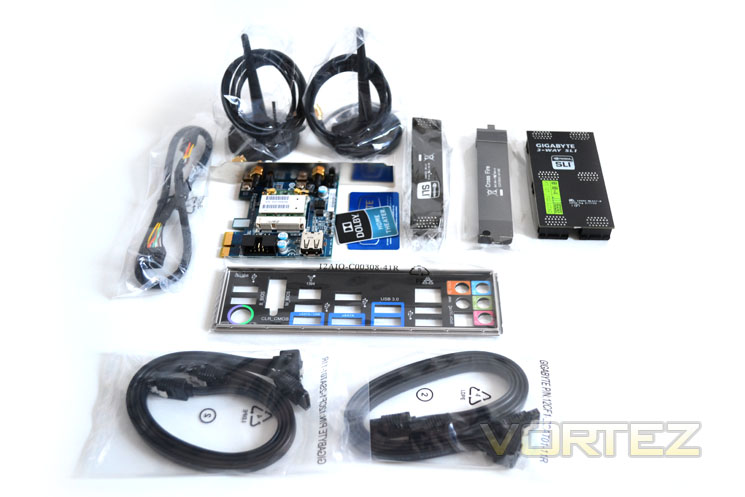
Main Accessories
Here we see the usual plethora of accessories including: 4x SATA cables, I/O shield, 2+3 way SLI bridge, 2 way Crossfire bridge and a 3.5″ USB 3.0/2.0 front panel. The obligatory GIGABYTE and Dolby case stickers are also included.
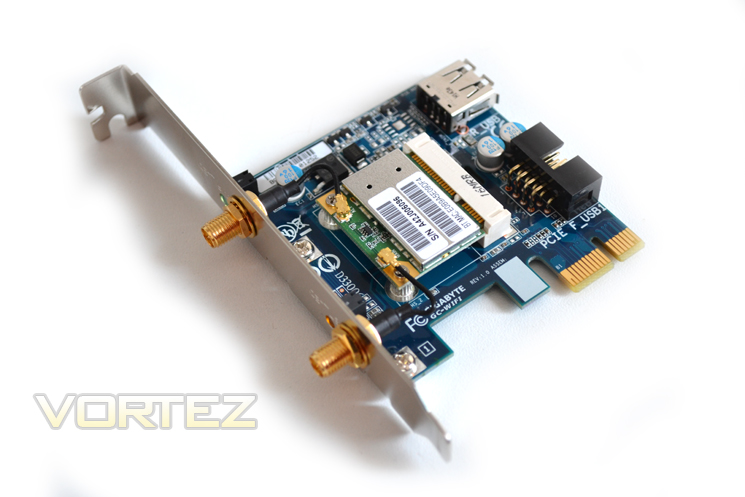
Wi-Fi Card
GIGABYTE are never ones to skimp on accessories and I’m happy to report this product is no different. Most striking of all was the inclusion of a Wi-Fi/Bluetooth riser card complete with dual antennas. Sadly the card itself does not match the black mainboard, instead being the more traditional GIGABYTE blue PCB.
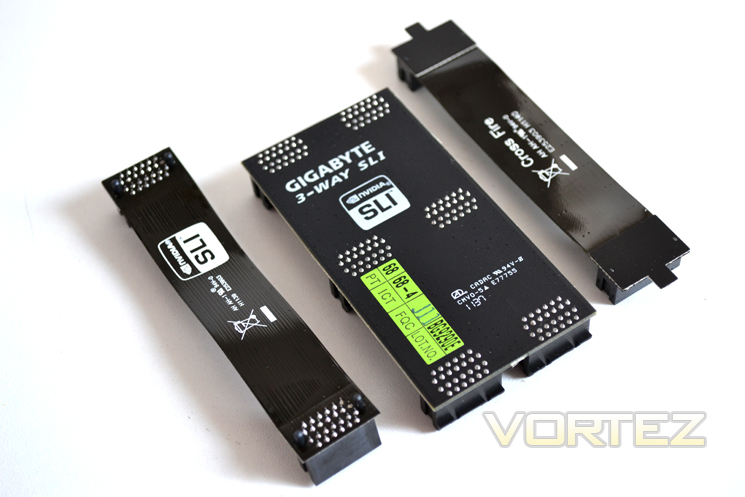
SLI/Crossfire Bridges
It was nice to see GIGABYTE making the effort to colour code their SLI/Crossfire bridges to black rather than the blue (see Wi-Fi card above).
Overall the package is well presented, well packed and well stocked. There is little more I would wish to see from a packaging point of view save for perhaps a flip up lid but that is being picky of for what is for all intents and purpose and excellent product package.
Closer Look
Motherboard Front
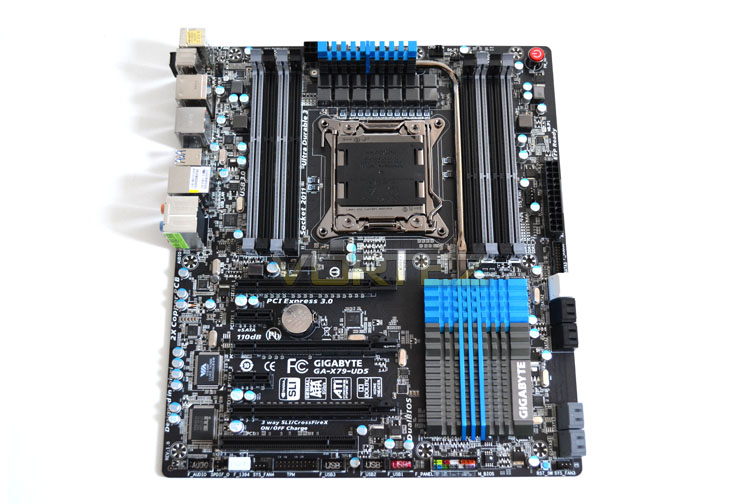
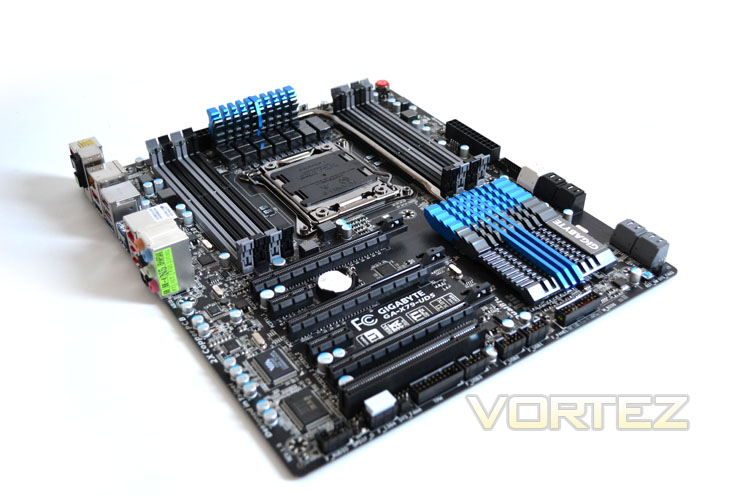
GIGABYTE have certainly come a long way since the motherboards that resembled the contents of a bag of MnM’s. The X79-UD5 couldn’t be further from the rainbow boards of old with it’s very descreet, sombre colour scheme of black and grey. The highlights of laser blue contrast really well with the matt black PCB to make a very smart, aesthetically pleasing mainboard.
Motherboard Rear
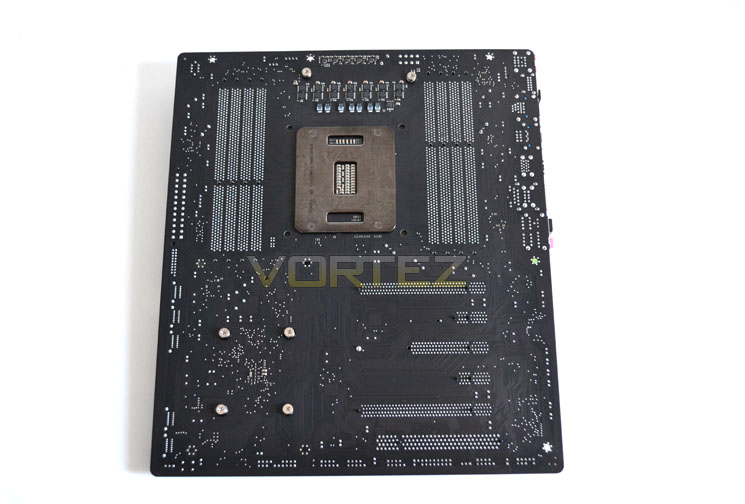
The rear of the board, as you would expect looks sparse in comparison with just the huge socket backplate dominating its appearance above which sit a group of POS caps and MOSFETs, surprisingly without a heatsink.
Socket Area
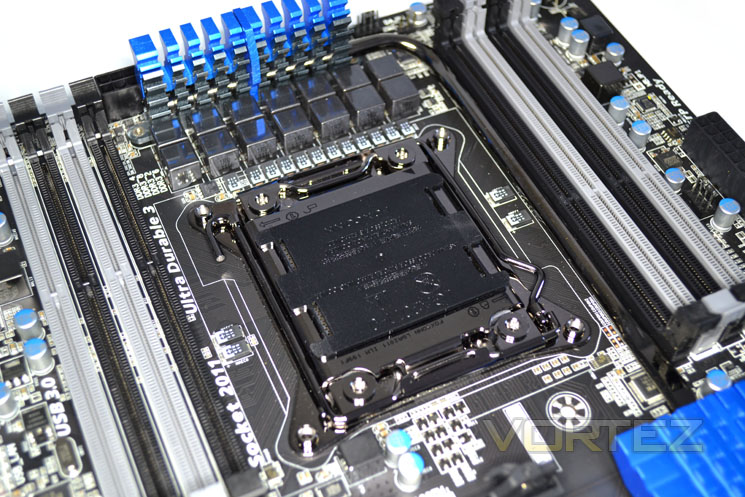
The use of POS caps ensure the socket area is left relatively clean from Solid caps. Only the mirrored finish of the fourteen Solid chokes stand proud of an area that’s framed by eight DDR3 DIMM slots, themselves capable of housing 64GB according to the GIGABYTE spec sheet. Strange then that other motherboards which have 8 DIMM slots can support 128GB, maybe a typo on GIGABYTE’s behalf?
PCIe Area
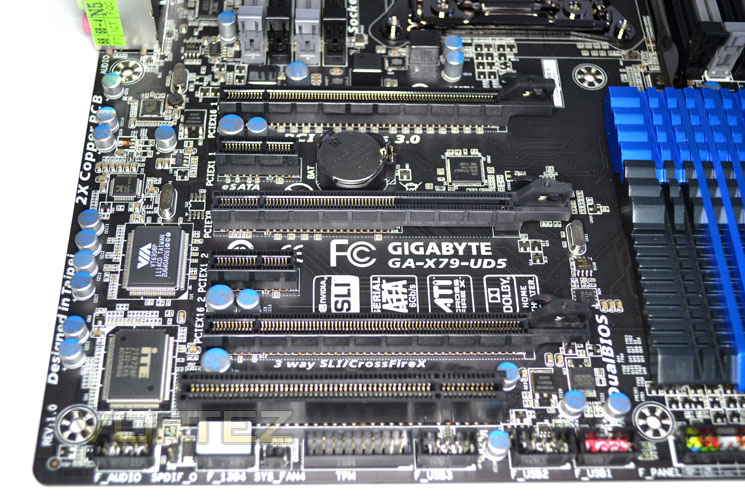
The PCIe area is well spaced affording 2x PCIe 16x, 1x PCIe 8x and 2x PCIe 1x. The upper and low full size slots are 16x with the mid table slot being 8x. Rounding off the area is a single PCI 33MHz slot for those who have not yet made the leap to PCIe. I would have perhaps liked to have seen the PCI slot being positioned above the bottom 16x PCIe in place of the 1x PCIe but nevertheless it seems to be a rarity that PCI is included on the latest boards so we should be grateful.
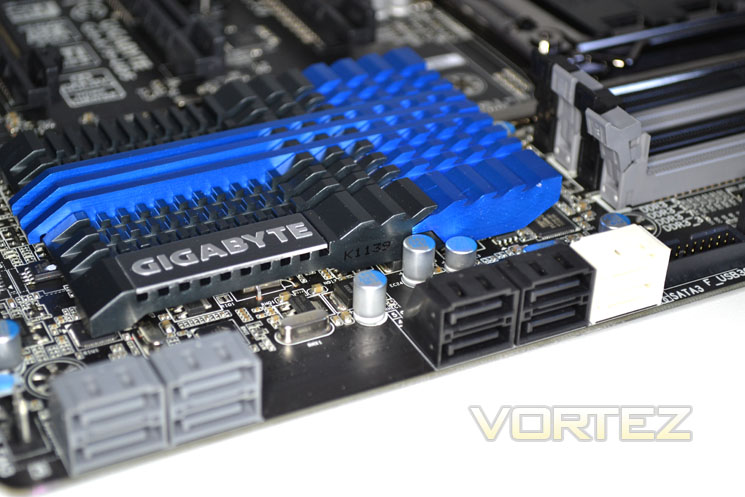
SATA Ports
There are 10 SATA ports consisting of 6xSATA 6GB/s and 4xSATA 3GB/s. The two white ports are 6GB/s courtesy of the X79 chipset, the black of 3GB/s on the X79 chipset and the remaining four grey ports are all 6GB/s but are controlled by the Marvel 88SE8172 chip. 10x SATA ports should be enough for anyone, considering 2TB drives are very common place these days.
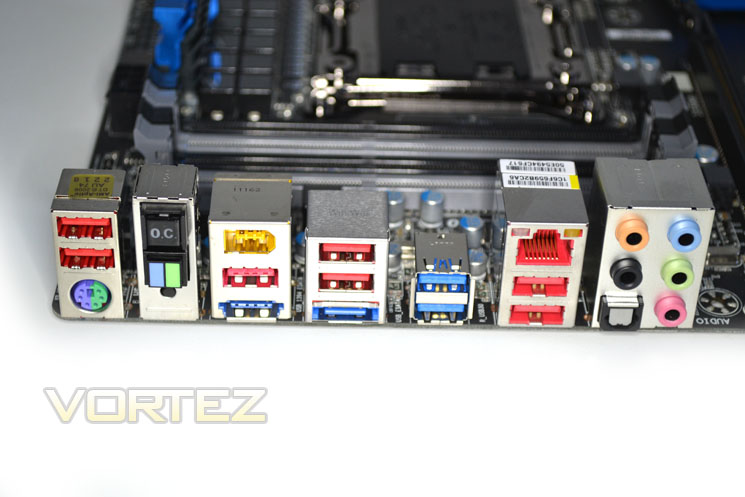
I/O Connectivity
The I/O area is packed with connectivity featuring 7x USB 2.0/1.1 ports (red), a duo of USB 3.0 ports (blue), PS2 Keyboard/Mouse socket, Overclock and DUALBIOS selector, CMOS reset switch, e-SATA/USB combo port, e-SATA 6GB/s port, RJ-45 LAN port, and a IEEE 1394a Firewire port. Rounding of the I/O area are the audio ports which are strangely missing the grey 3.5mm port. Feat not though because the mic /subwoofer ports can be configured via software to perform the side speaker task.. Last of all there is an optical S/PDIF out port.
Aside from missing the grey output (side speaker out) my one major criticism is the ridiculously small CMOS clear button hidden beneath the OC and DUALBIOS buttons. Not only is this hard to find when fumbling in the dark around the back of a PC case due to it neither a)being lit or b)easy to see, even when you know where it is, getting to the button can be troublesome when the I/O area is full of cables. Please change this GIGABYTE!
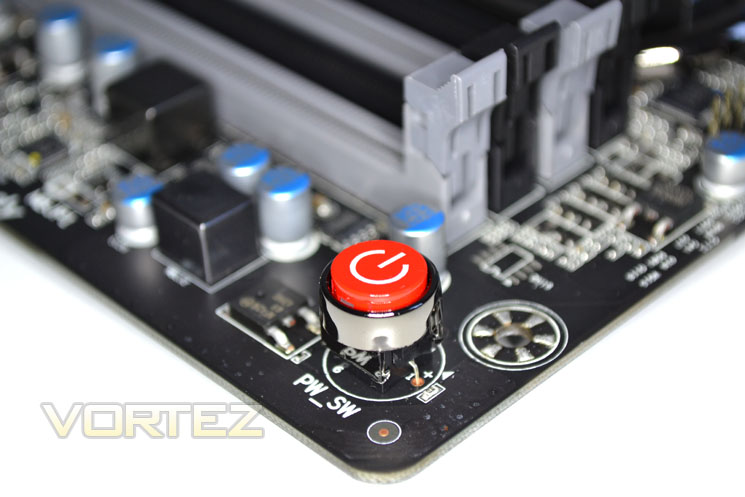
Power Button
This is more like it, a big fat red power button, easy to reach, easy to see, easy to operate. So why then have GIGABYTE in their ultimate wisdom decided to place a small reset button at the opposite end (bottom) of the motherboard, squeezed between a Solid cap and spiky fan header?
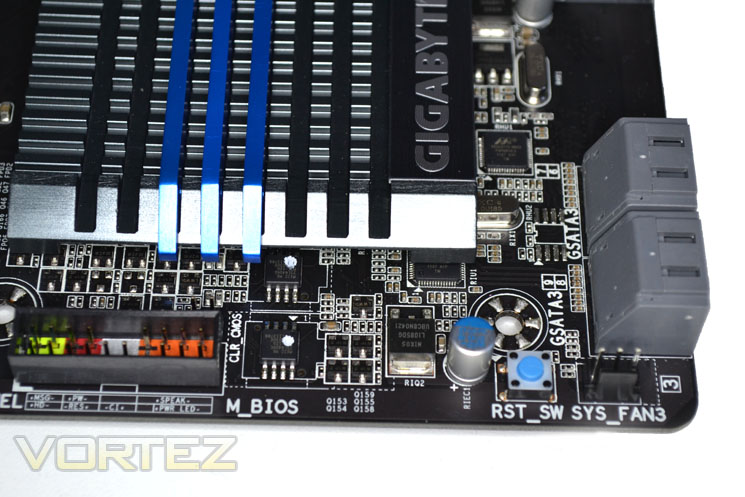
Reset Button
Maybe I am being harsh but GIGABYTE boards in the past have been so neat, concise and yet user friendly that a lot of the ‘features’ on this motherboard seem to be more of an afterthought rather than a result of detailed planning. Sure it’s far from a deal breaker and if you have this motherboard stored away inside a PC enclosure then this certainly won’t trouble you. Nevertheless this is an example of features over form I’m afraid.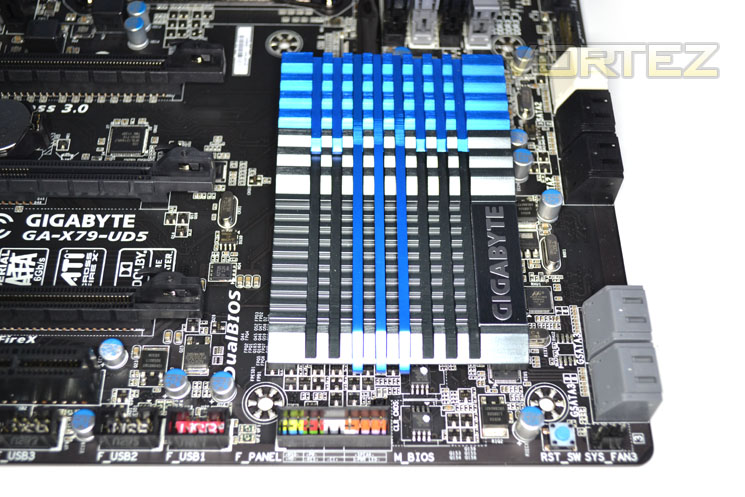
X79 Heatsink
Continuing on from the X58A-OC we see a return of the heatsink that resembles a flag somewhat. The ridged, rectangular lump of aluminium looks very nice with the blue highlights and thankfully does not appear to need the active cooling we have seen on some previewed motherboards.
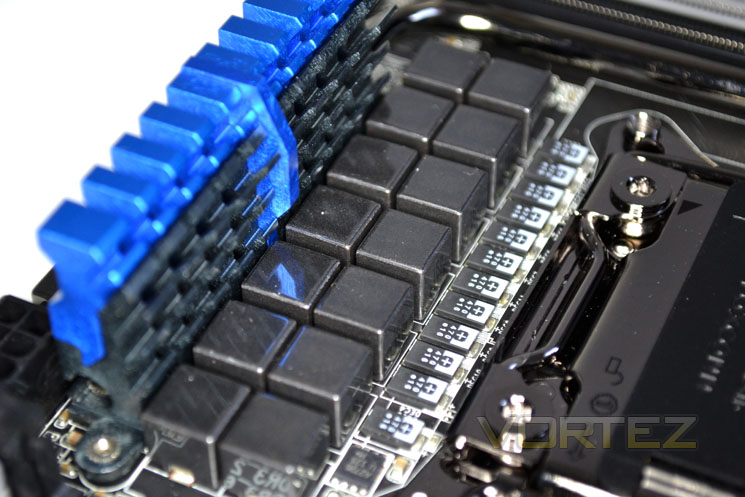
VRM Heatsink
Connected to the large X79 chipset heatsink is the VRM heatsink. While this is much smaller I do have worries regarding its cooling ability considering this motherboard has a 14 phase power design. No doubt this is the reason why this small heatsink has a physical connection to the much larger X79 heatsink which will aid heat dissipation.
Let’s take a closer look at some of the on-board components…
Closer Look Pt.2
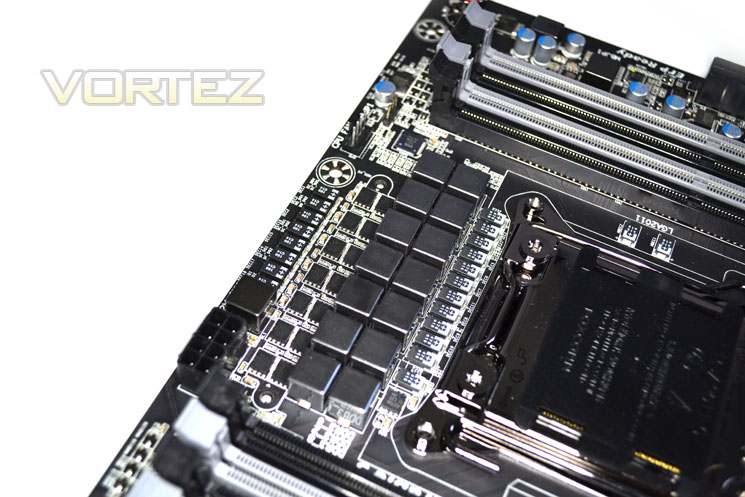
Voltage Regulation Module
A key feature of any modern GIGABYTE motherboard is their Ultra Durable 3 which consists of, you guess it, 3 components that are….Ultra Durable! Making up the 14 phase design are a set of Japanese solid capacitors, PowerPAK MOSFETs and Ferrite Chokes which makes for an efficient, cool running yet powerful VRM.
GIGABYTE are making a lot of noise about there 3D Power Feature which is a brand new Digital PWM controller. GIGABYTE is the first in the industry to utilize digital memory controllers for not only the Memory, but VTT and VSA, for real-time monitoring and adjusting. Users can also set OVP (Over Voltage Protection) to safeguard your memory, adjust memory Load-line Calibration to fix memory vdrooping for a quicker response time and adjust memory PWM frequency on-the-fly.
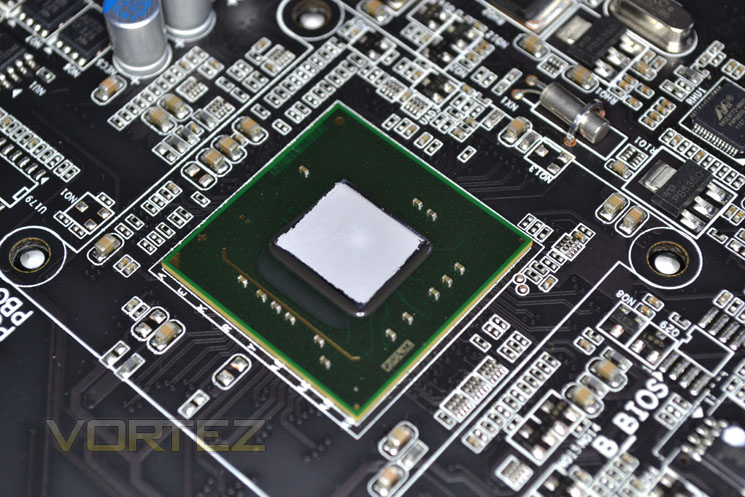
X79 Chipset
Here we see that little sliver of silicon that’s caused such a buzz, the X79 Chipset. In this instance the GIGABYTE heatsink made perfect contact with the chipset itself so there should be little need for replacing the TIM. This motherboard allows many voltage inputs for the x79 chipset including loadline calibration! In testing however, we found little benefit by increasing the chipset voltage when going for the maximum overclock.
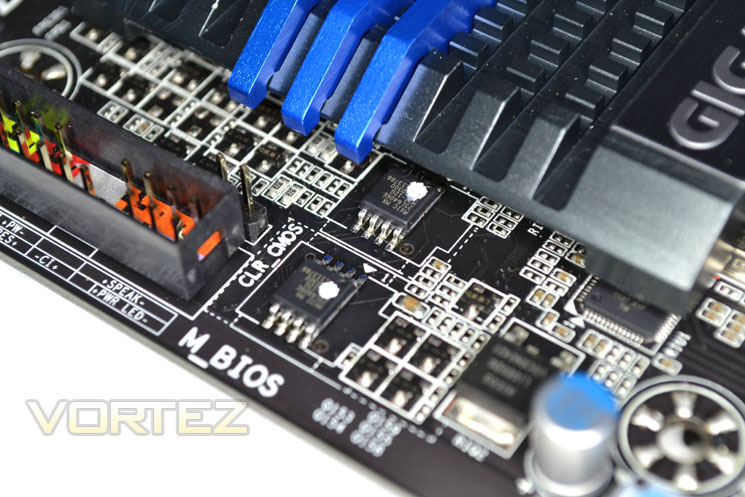
DUAL BIOS
The GIGABYTE X79 carries GIGABYTE’s excellent DUALBIOS feature we first saw over ten years ago. Having a back-up BIOS on board can get you out of trouble should you have a dodgy BIOS Flash or indeed you wish to quickly switch between different BIOS versions. Each BIOS carries 5 profile slots allowing you to backup your favourite settings.
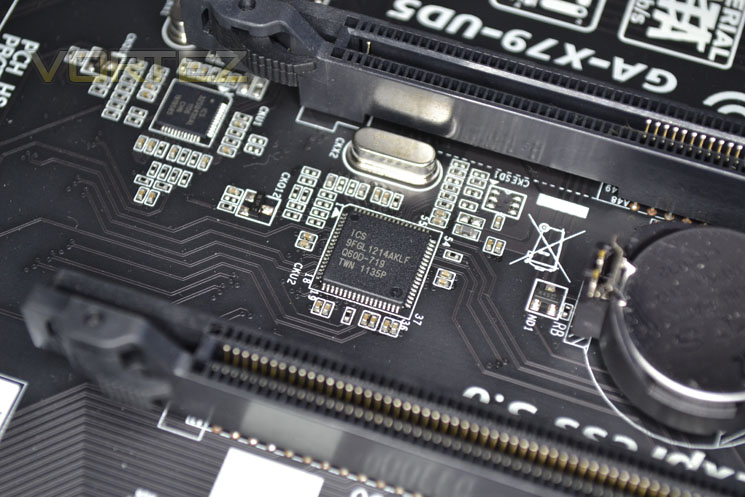
ICS Clock Gen
Here we see one of the few ICS clock gen chips on the X79-UD5. Unfortunately the model number failed to bring up any meaningful stats at the time of writing but I suspect it is the PCIe 3.0 clockgen.
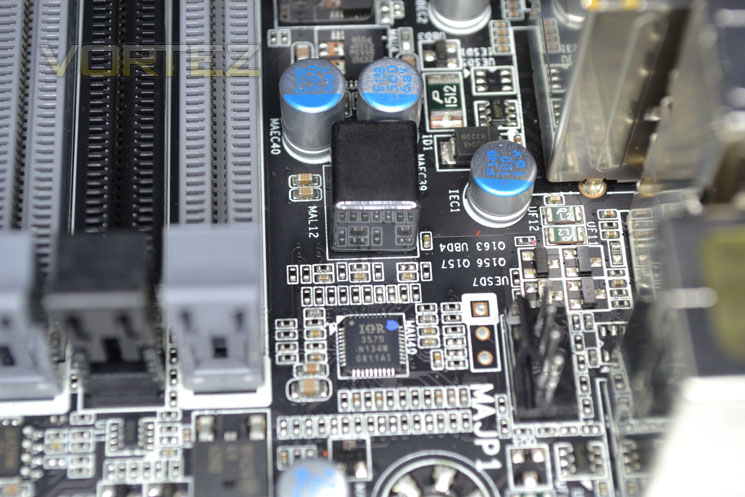
Power Management
Scattered around the motherboard are several power management chips courtesy of International Rectifier.
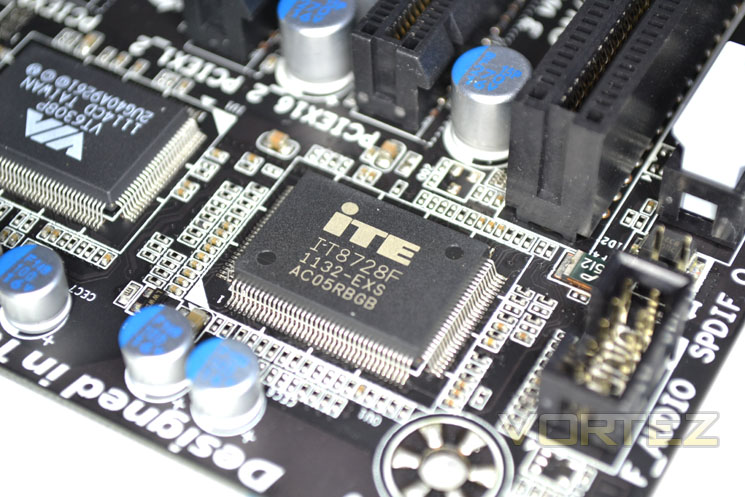
SuperIO
Super IO is controlled by the common ITE IT8728F chip. Speedfan, CPUID etc are all fed by this little chip.
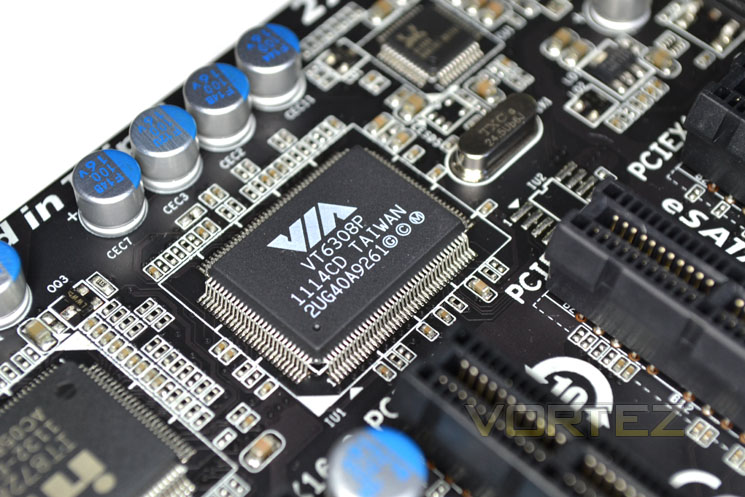
VIA Firewire controller
With an integrated physical and link layer, the VIA VT6308P is equipped with 32-bit PCI bus interface that features advanced power management, and card bus support. On-board chip logic performs bus initialization and arbitration functions allowing for easy plug-and-play connections and a DMA engine supports high performance data transfer for media disk drives.
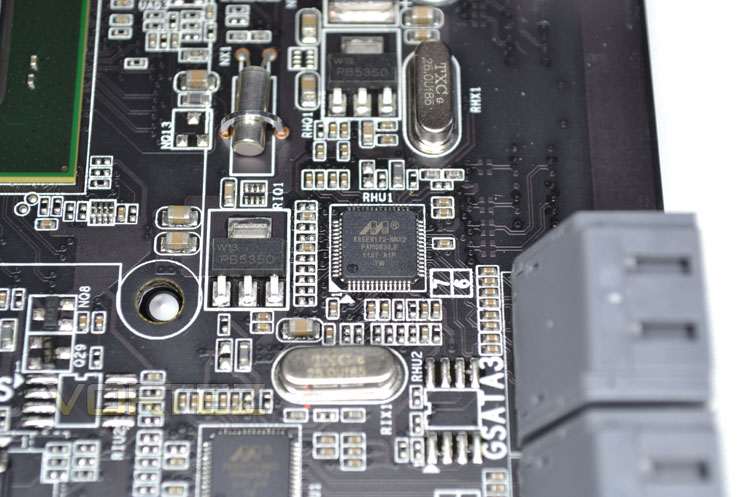
MARVEL SATA controller
Controlling the additional 4x SATA 6GB/s ports is the MARVEL 88SE9172 processor seen on Z68 models from GIGABYTE.
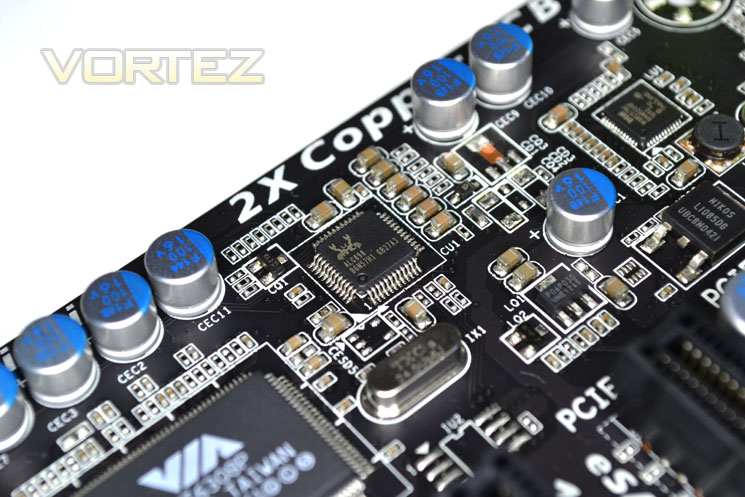
Realtek Audio Codec
Lastly, we arrive the the on-board audio controller. This is the Realtek ALC898 codec which allows high definition audio, support for Dolby Home theatre and 2/4/5.1 and 7.1 channels.
Let’s move on to the test setup we will be using in today’s review…
Test Setup
When we decided to put the test bench together for X79 we wanted a system that would not only perform well but also last the test of time given that X58 has been around for some 3 years now so we saw no reason to believe that its successor, X79 would not be able to do the same.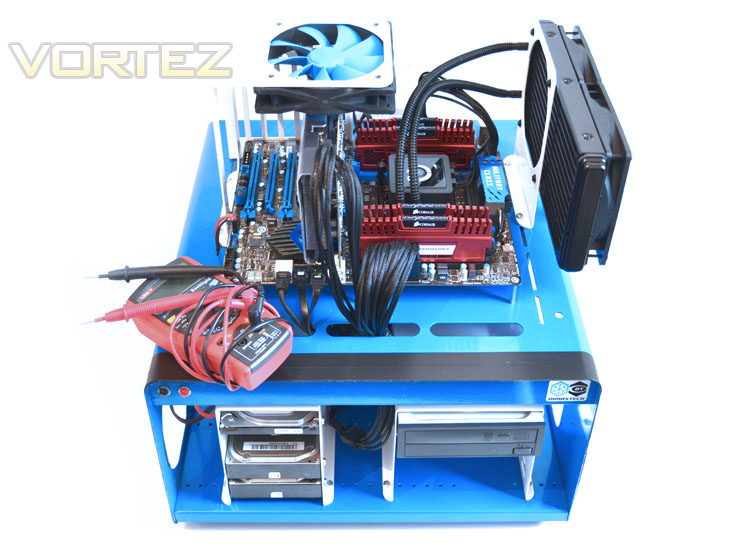
Some of the components for our test bench were kindly donated by CORSAIR who provided the majority of components without whom we would not have been able to bring you this review so a big thanks to them. Thanks also go to MSI who donated their NVIDIA GTX560Ti.
Motherboards on test:
GIGABYTE X79-UD5
MSI X79A-GD65(8d)
X79 Test Setup
Intel Core i7-3960X Extreme Edition
Graphics Card: NVIDIA GTX560Ti
RAM – 16GB (4x4GB) Corsair Vengeance (Red) DDR3 @ 1866MHz 9-10-9-27
Power Supply – Corsair TX750M 750W
Hard Drive – Hitachi SATA II 250GB
Samsung F3 1TB
Cooler – Corsair H100
Intel Core i7-3960X Extreme Edition
Graphics Card: NVIDIA GTX560Ti
RAM – 16GB (4x4GB) Corsair Vengeance (Red) DDR3 @ 1866MHz 9-10-9-27
Power Supply – Corsair TX750M 750W
Hard Drive – Hitachi SATA II 250GB
Samsung F3 1TB
Cooler – Corsair H100
Benchmarks
Cinebench 11.5 – CPU Score
x264 HD 4.0 – 1st and 2nd pass encoding
SiSoftware SANDRA 2011 – CPU benchmarks
AIDA64 – CPU benchmarks
CyberLink MediaEspresso 6.5 – Convert 145MB MP4 to avi
PCMark 7 – System Benchmark
3DMark 11 – Performance and Extreme preset Overall and Physics Score
Games – Crysis 2, DiRT3, Metro 2033
Other Software
Core Temp 0.99.5
LinX stress Test
CPUID HWMonitor
Overclocking & BIOS configuration
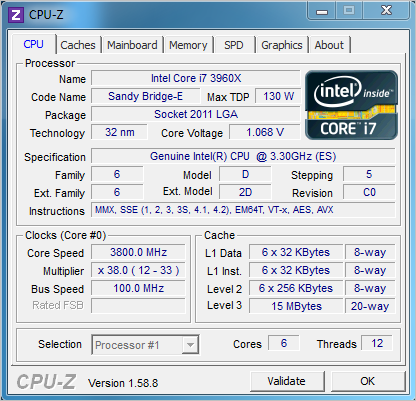
Stock Settings
Above we can see the ‘stock’ settings when idle. The Core i7-3960X has a 3.3GHZ (100×33) stock clockspeed but this can rise to 39 on some cores, 36 on others with EIST enabled so to ensure consistency throughout testing, we disabled Intel Turboboost 2.0 and all power saving features to give us a ‘stock loaded clockspeed of 3.3GHz which will be used for our run of benchmarks. The only settings we changed were manually inputting the memory timings and frequency.
We had very high hopes that the GIGABYTE X79-UD5 would break the 5GHz barrier as its X58 older brother was certainly no slouch out of the blocks. So we entered into the shiny new UEFI 3D BIOS and began tinkering with the multitude of settings available.
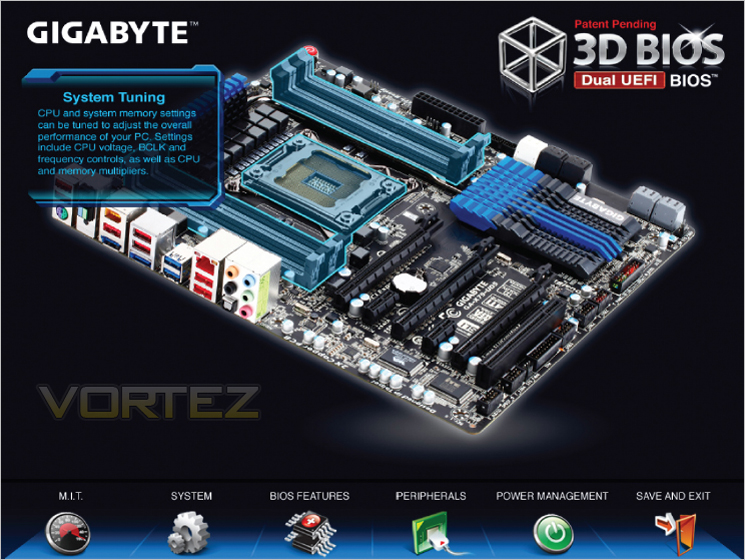
3D BIOS
The 3D BIOS is unique in that it caters for both the novice and expert. I initially had trouble with my mouse (SteelSeries SENSEI) as it wouldn’t work on the y-axis so navigating had to be done using the traditional arrow, tab, +/- keys until I plugged in a replacement rodent. Once I had full control the BIOS was relatively easy to navigate. All of the options are where you would expect to find them if you are familiar with GIGABYTE BIOS controls.
The advanced voltage and frequency settings will be enough to satisfy even the most ardent overclocker and yet the settings most commonly used are also easily found by the novice. The intuitive GUI based BIOS is leaps ahead of the old 8-bit screens most will be familiar with, so much so that it’s easy to forget you are in the BIOS and not in windows. I did however find it a little cumbersome at times and certainly not as quick to navigate as the older BIOS types due to the shiny new interface. Personally, I thought the picture of a motherboard highlighting the component on-board and linking it to which settings control what a little insulting but I guess those new to the dark arts will find it very comforting they are not mixing up their Vcore with their Vdimm.
Speaking of Vcore. The current version of CPU-Z (1.58.8) and AIDA64 will misreport the Vcore settings. Instead they appear to be reporting CPU Vtt. GIGABYTE and CPU-Z are aware of issue and are working closely together to resolve but it would be very easy to assume that there was massive Vdrop in Windows had I not double checked with GIGABYTE’s Easytune6 which correctly reported the voltages set.
Overall the BIOS clearly needs some work doing to it. I appreciate it is new technology and not everything is going to work straight away as is usually the case with new motherboards, especially ones based on a new chipset. However, as always I am left with a bitter taste in my mouth that manufacturers seem fit to release products that do not feel ‘complete’. If you bought a TV set you would be disgusted if you found that the volume up button actually controlled the TV channel or the menu on your new HD Plasma appeared unfinished and glitchy. GIGABYTE are not the only ones guilty of this. In fact the vast majority of manufacturers appear to be in that much of a rush to release a product by the release date set that quite often the end user feels more like a guinea-pig rather than an overclocker with a quality product which is a great shame but par for the course these days. No doubt GIGABYTE will resolve these issues with future BIOS releases as they do have a great record for updating their products but my reservations remain on what feels like an incomplete (BIOS Revision F3) BIOS at this time.
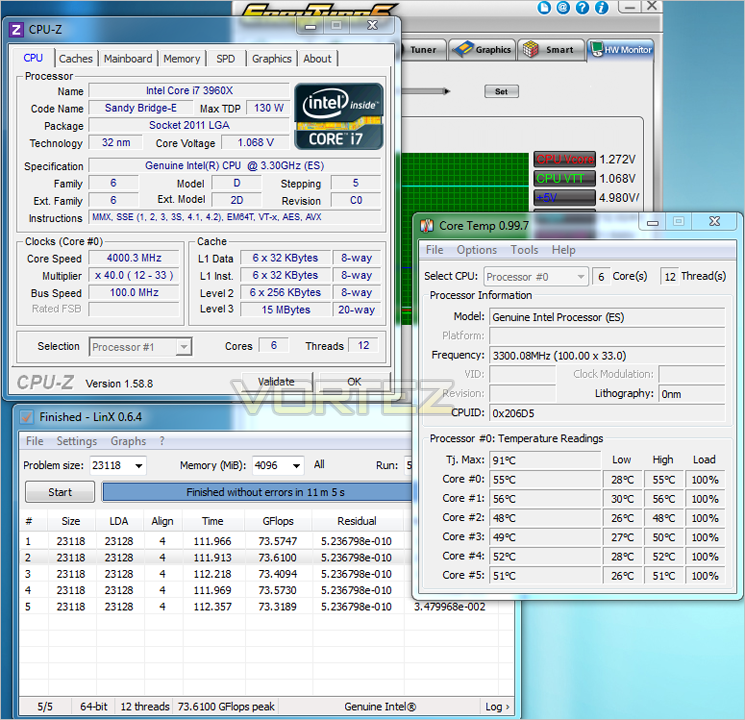
GIGABYTE OC
We mentioned earlier in the review that this board had an auto overclocking button on the I/O area. Pressing this button when the setup is turned off will load in pre-configured settings which will enable the setup to boot at 4GHz. (100×40 @1.272 Vcore under load). A nice little feature and while the overclock is nothing too dramatic, it will serve as a free boost to processing power for those not familiar with overclocking.
The GIGABYTE X79-UD5 will also allow baseclock ratio adjustments. While the MSI also had this feature (along with all other X79 motherboards) the MSI board would not boot with anything other than 1.00 set. The GIGABYTE X79-UD5 however was quite happy to run at both 1.25 and 1.66 frequencies so long as the memory divider was adjusted to take the frequency increase into account. Unfortunately the GIGABYTE board suffered the same fate as the MSI as any manual increase in baseclock frequency once again saw a no-post scenario. With Intel claiming baseclock overclocking has returned on the X79 platform I have yet to see evidence of this as the best way of getting the absolute maximum from the motherboard is still by means of the CPU multiplier and/or with the baseclock ratio.
Being the optimistic type I set the CPU multi to 50x and dialled in 1.45v on the CPU Vcore. The MSI hit a maximum 48x multi in conjunction with a 100MHz baseclock on those settings so I was keen to see if that could be beaten or not.
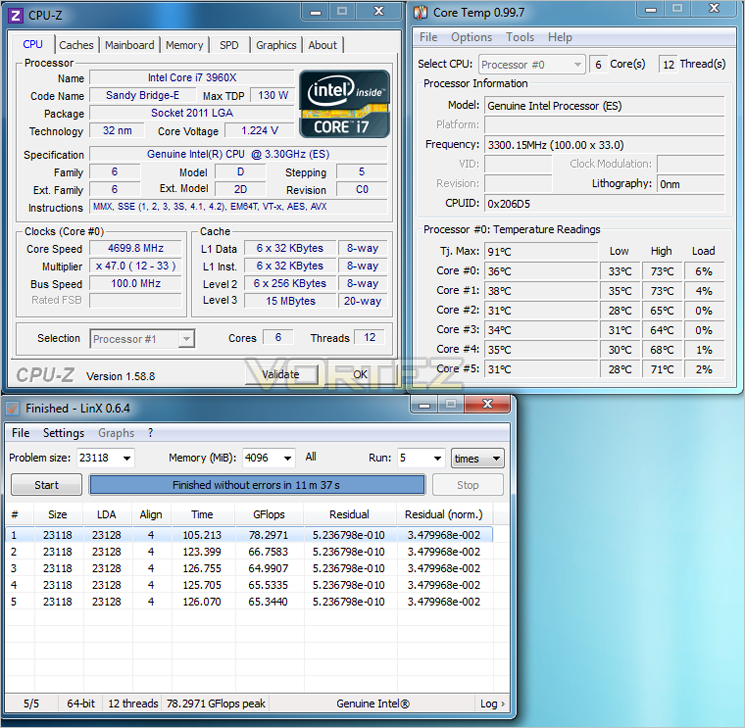
Maximum Stable overclock
Sadly, I have to report that not only did the GIGABYTE X79-UD5 fail to reach the 4.8GHz mark with any degree of stability (save for a 1M SuperPI run which crashed halfway through) it required almost 1.5v to reach just 4.7GHz. I was very hesitant to use 1.5v as we intend using this CPU for the majority of our X79 motherboard reviews however after seeing the massive Vdroop (up to 0.1v), I felt much more comfortable knowing it was only receiving 1.4-1.45v under load. The Vdroop value on both the CPU and Vtt can be adjusted in the BIOS but in our testing this had little impact. After a full, frustrating day overclocking the UD5, I decided to settle for 4.7GHz which was very stable.
Hopefully future BIOS revisions will solve the problems reported here today and maybe, just maybe the X79-UD5 will be able to live up to its predecessor in terms of overclocking prowess. We will be sure to update this section as new revisions are tested.
Power Consumption
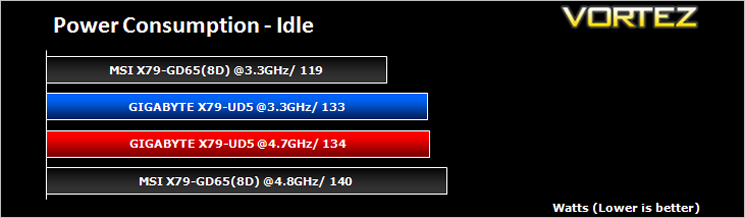
The GIGABYTE X79-UD5 was not as good as the MSI at keeping power consumption to a minimum in stock form yet surprisingly it was superior to the MSI when overclocked. Consuming a very low 133/134W full system draw (from the wall) is a great effort though and testament to the combination of GIGABYTE’s Ultra Durable 3 along with Intel’s new power efficient processors.
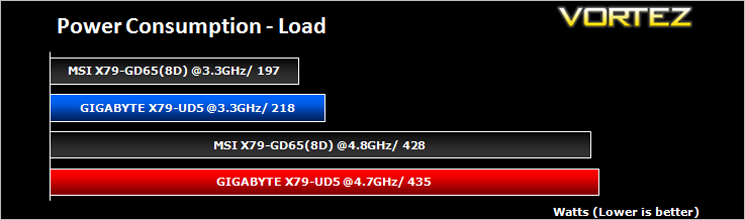
When placed under load both clockspeeds sapped a lot more power than the maximum stable overclocks gobbling up electricity. The MSI motherboard won this round though so while the GIGABYTE may well be good at idle, the tables are turned under load conditions, albeit slight.
Let’s move on to our suite of artificial performance benchmarks…
SiSoftware Sandra
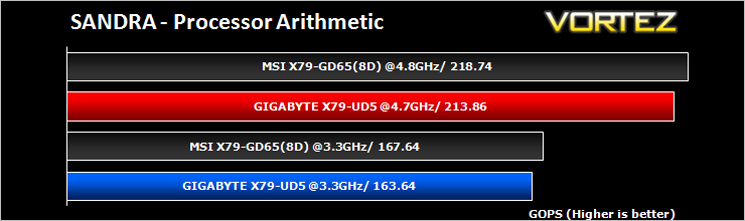
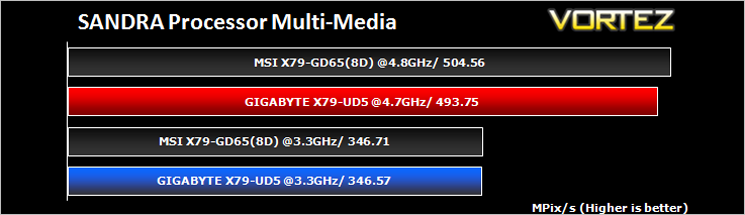
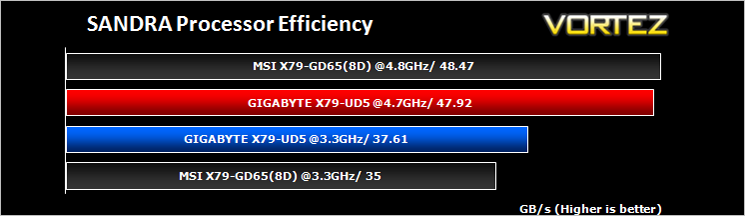
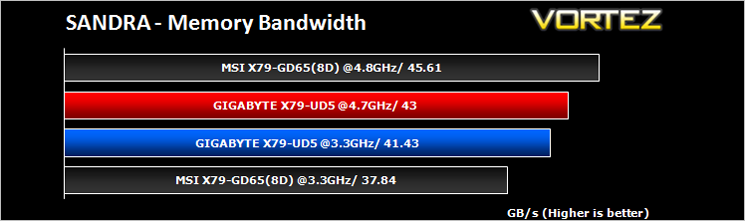
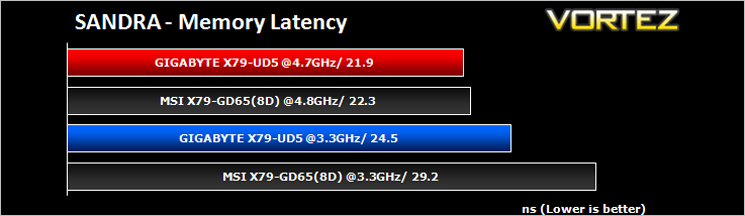
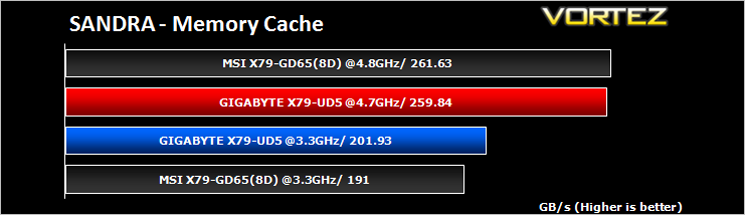
SANDRA isn’t always a benchmark that is included in hardware reviews but I believe it shouldn’t be ignored. SANDRA provides a vigorous package that tests your system in a rather large array of benchmarks. There are many aspects of benchmark that can be executed. We will be considering – CPU and memory tests.
AIDA64
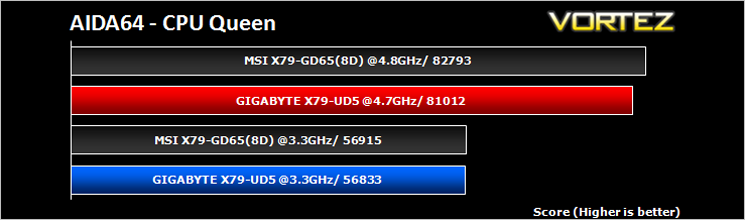
This simple integer benchmark focuses on the branch prediction capabilities and the misprediction penalties of the CPU. It finds the solutions for the classic “Queens problem” on a 10 by 10 sized chessboard. At the same clock speed theoretically the processor with the shorter pipeline and smaller misprediction penalties will attain higher benchmark scores. For example — with HyperThreading disabled — the Intel Northwood core processors get higher scores than the Intel Prescott core based ones due to the 20-step vs 31-step long pipeline. CPU Queen test uses integer MMX, SSE2 and SSSE3 optimizations.
x264 HD
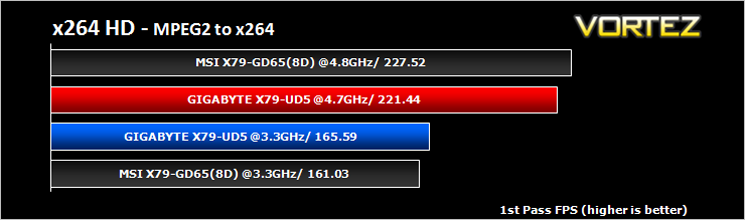
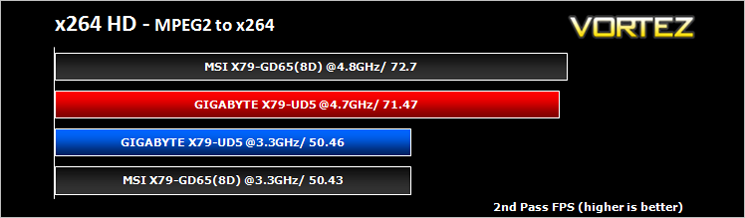
Simply put, this test measures how fast your machine can encode a short, DVD quality MPEG-2 video clip into a high-quality x264 video clip. What’s x264, you ask? It’s more or less the next-generation Xvid/DivX codec. I think it’s ideal for a benchmark because the application (x264.exe) reports fairly accurate compression results (in frames per second) for each pass of the video encoding process, and it uses multi-core processors very efficiently. The test uses multiple cores efficiently to give a good representation of real world performance.
Cinebench 11.5
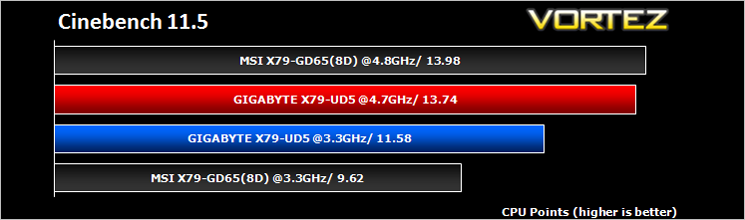
Based on the MAXON animation software CINEMA 4D, Cinebench is a test suite that uses the system’s processing power to render a photorealistic 3D scene. This makes it an excellent benchmark to measure CPU and motherboard performances.
CINEBENCH can measure systems with up to 64 processor threads. This test scene contains approximately 2,000 objects which in turn contain more than 300,000 polygons in total, and uses sharp and blurred reflections, area lights, shadows, procedural shaders, antialiasing, and much more. The result is displayed in points (pts). The higher the number, the faster your processor.
CINEBENCH can measure systems with up to 64 processor threads. This test scene contains approximately 2,000 objects which in turn contain more than 300,000 polygons in total, and uses sharp and blurred reflections, area lights, shadows, procedural shaders, antialiasing, and much more. The result is displayed in points (pts). The higher the number, the faster your processor.
Futuremark PCMark 7
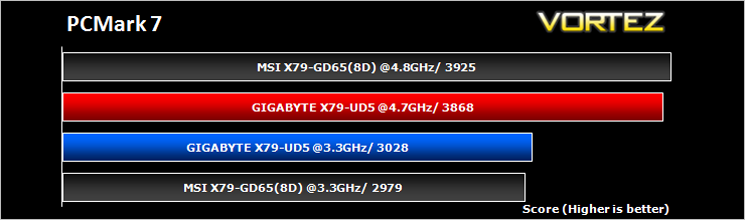
PCMark 7 is a tool provided by FutureMark that tests the PCs ability in general office and everyday use. It produces a number that reflects the all-round performance of the PC and is useful to compare between differing setups. For more information, visit the FutureMark website.
Futuremark 3DMark 2011
Designed to measure your PC’s gaming performance 3DMark 11 makes extensive use of all the new features in DirectX 11 including tessellation, compute shaders and multi-threading. Trusted by gamers worldwide to give accurate and unbiased results, 3DMark 11 is the best way to consistently and reliably test DirectX 11 under game-like loads.
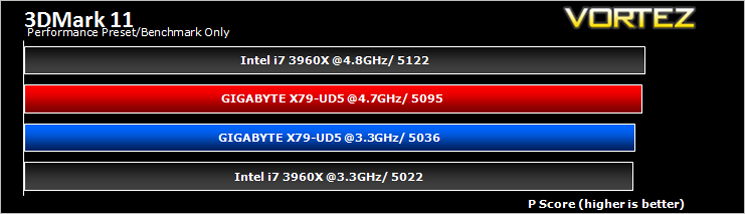
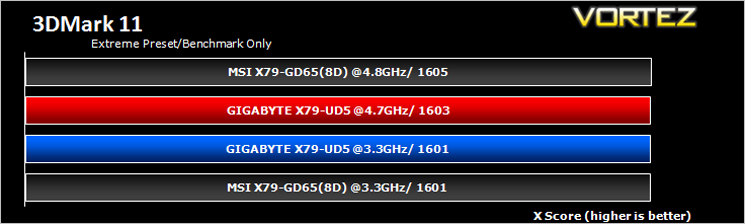
Gaming Benchmarks
Crysis 2
Crytek took an internet beating from its loyal fans due to the fact that they pandered to the console masses and dumbed down the graphics to DirectX 9. Fortunately, fans of the PC version of Crysis managed to force Cryteks hand and they have since developed a DX11 patch and have also enhanced the textures with added tesselation. It is for this reason that we have decided to include it in our suite of benchmarks.
Crytek took an internet beating from its loyal fans due to the fact that they pandered to the console masses and dumbed down the graphics to DirectX 9. Fortunately, fans of the PC version of Crysis managed to force Cryteks hand and they have since developed a DX11 patch and have also enhanced the textures with added tesselation. It is for this reason that we have decided to include it in our suite of benchmarks.
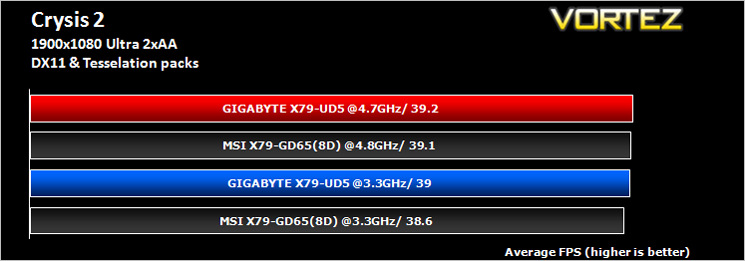
DiRT3
As players race to elevate their global standing, DiRT 3 is back delivering mud, sweat and gears world over: from the intense weather-beaten rally stages of Europe, Africa and the US, to executing performance driving showcases and career challenges where car control is pushed to spectacular limits.
As players race to elevate their global standing, DiRT 3 is back delivering mud, sweat and gears world over: from the intense weather-beaten rally stages of Europe, Africa and the US, to executing performance driving showcases and career challenges where car control is pushed to spectacular limits.
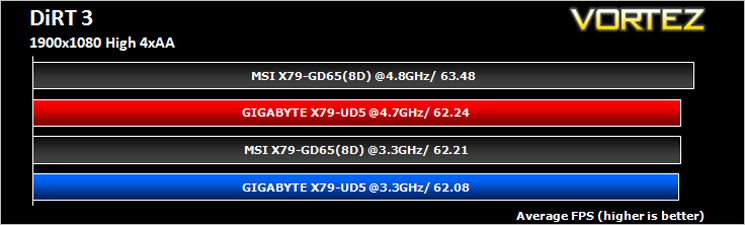
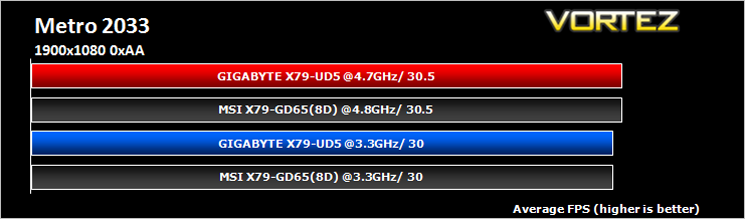
Metro 2033
Based on the novel by the same name, Metro 2033 is a first person shooter with elements of survival horror. As Artyom, you trawl through the mutant infested metro systems of post-apocalyptic Moscow. The game delivers presents a grim ambience that reflects on the overall atmosphere of the underground setting. Metro 2033 uses the setting as a back drop to showcase some of the best visuals of any games out now, making it the ideal benchmark for those looking for the best graphics card.
Based on the novel by the same name, Metro 2033 is a first person shooter with elements of survival horror. As Artyom, you trawl through the mutant infested metro systems of post-apocalyptic Moscow. The game delivers presents a grim ambience that reflects on the overall atmosphere of the underground setting. Metro 2033 uses the setting as a back drop to showcase some of the best visuals of any games out now, making it the ideal benchmark for those looking for the best graphics card.
Conclusion
As we previously stated in the introduction, I was a big fan of the X58-UD5 and longed for the X79-UD5 to give similar satisfaction. While there is no doubting it is a good motherboard, it’s not quite got the same appeal.
Take for example the overclocking. While 4.7GHz is a great achievement in anyone’s regard, it is not just the end result but the trouble it takes to get there. The GIGABYTE X79-UD5 was a very stubborn motherboard and also, at times, awkward and frustrating to use. BIOS recovery needs some work as a failed overclock will continue to cycle until you pull the power rather than resetting to default settings automatically. Cue the CMOS clear switch which is hidden away on the I/O panel which is both small and very difficult to gain access to should a number of USB peripherals be attached in that area. The CMOS clear switch will also automatically power on the motherboard upon releasing the button which is less than ideal.
Questions also need to be raised regarding the placement of the on-board power and reset switches. While I have no issues with the power button, the reset switch, which will most likely be used more often than the power on button is hidden away at the bottom end of the motherboard, opposite end to the power-on button. Not only that but it is simply a micro switch with no illumination or a button per say, unlike the power button. Therefore the rest switch, along with the CMOS clear switch appear to be more of an afterthought than a product of design.
The 3D UEFI BIOS I’m sure will appeal to those who are daunted by the feel of the old school BIOS however it still has some bugs that need ironing out. We are currently in talks with GIGABYTE who have assured us that future BIOS releases are in the pipeline which will rectify some of the issues we found. With a little luck, hopefully new BIOS revisions will also allow us to increase our overclock further and because GIGABYTE are very good at keeping updating their BIOS revisions, I will keep you posted on developments with edits to this review. As it stands though, the X79-UD5 clearly has some more work needed if it is going to battle with the best like its older brother based on the X58 chipset. I am perhaps being a little unfair though as the X79-UD5 is not the premium overclocking board; the X79-UD7 is where that game is played best.
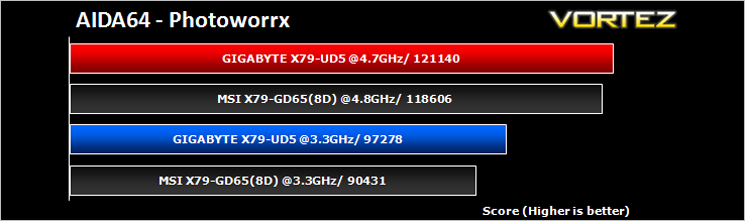
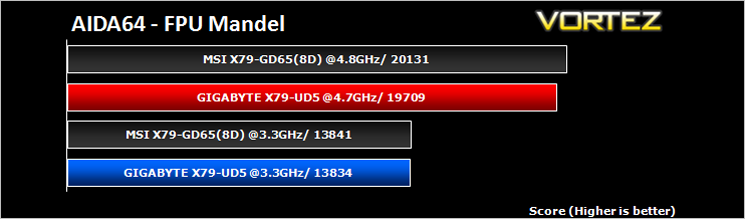
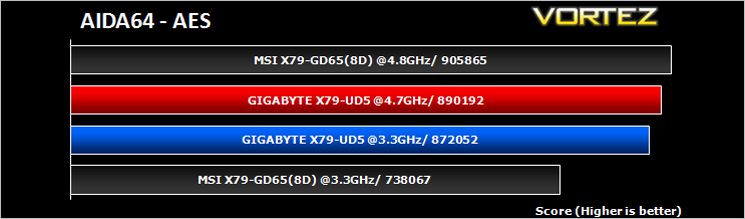
The packaging of the product was very good and I really liked the inclusion of a Wi-Fi/Bluetooth module which is a rarity among motherboards. The aesthetics of the board, while slightly different from the previews we have seen, are still very good and a far cry from the horrid multi-coloured GIGABYTE motherboards of old. Performance wise, the GIGABYTE was ever so slightly behind on CPU performance, matched GPU performance and excelled at memory performance so it was a mixed bag of results in truth. Overall, if I was pushed to choose the GIGABYTE or the MSI, as much as I like the GIGABYTE, the current issues and poor button layout would make me edge toward the MSI. However, if you plan on keeping your motherboard inside an enclosure then the two boards are fairly evenly matched. The MSI just pipped the GIGABYTE but I suspect that once GIGABYTE sort their BIOS issues out, the two boards will once again stand toe to toe in this department as well.
Overall then, the GIGABYTE X79-UD5 will make a good foundation to a new LGA2011 build. It has everything a mainstream user could want, masses of connectivity, PCIe Gen3, SATA 6GB/s and USB 3.0 along with wireless capability. It does have a few issues though and while some of these will be resolved in the future, presently the motherboard just misses out on Silver and has to settle for the Vortez Bronze award.
Pros:
+Ultra Durable 3 components
+Very good (passive) cooling
+Very quiet operation (fan less)
+Wireless capability
+Good packaging/Accessories
+8 Memory expansion slots
Cons:
-BIOS Issues
-Poorly positioned CMOS and reset buttons
-Auto Overclock recovery poor
-No LED Debug
-Audio ports may be an issue for some
+Ultra Durable 3 components
+Very good (passive) cooling
+Very quiet operation (fan less)
+Wireless capability
+Good packaging/Accessories
+8 Memory expansion slots
Cons:
-BIOS Issues
-Poorly positioned CMOS and reset buttons
-Auto Overclock recovery poor
-No LED Debug
-Audio ports may be an issue for some


Click here for an explanation of our awards at Vortez.net. Thanks to GIGABYTE for providing today’s review sample.


