







We have been itching to release details of the Intel X79 chipset and now we can with our first LGA2011 motherboard review, the MSI X79A-GD65(8D).
Product on Review: MSI X79A-GD65(8D)

Manufacturer: MSI
Street Price: £251 inc. VAT (Bundle deal available)
It’s been a long time coming but the successor to X58 is here. Welcome to X79, in particular our first review based on Intel’s LGA2011, the MSI X79A-GD65 (8D). If you are looking for information on Intel’s latest CPU (indeed their top of the range CPU) then we can also satisfy your need by visiting HERE where we explore the benefits and potential pitfalls of the new CPU, codenamed (but widely recognised) Sandybridge-E processor.
If you are here for a first look on the new motherboard from MSI or perhaps a preview then it’s perhaps you best go look elsewhere because we don’t do things in half measures here at Vortez. If however you want to know all there is to know about the MSI X79A-GD65 (8D), want an honest, unbiased appraisal of the ‘next big thing’ then put the kettle on, sit back and relax as we take a thorough an in-depth review of our first taste of the new flagship motherboard to be wheeled out of MSI’s laboratories.
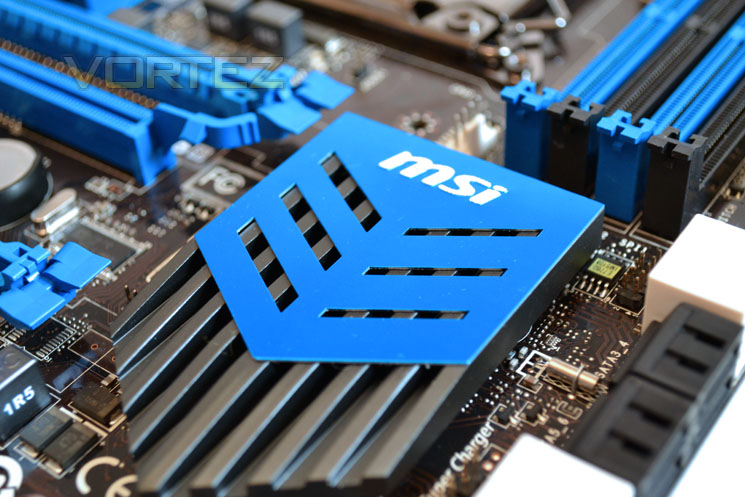
The MSI MSI X79A-GD65 (8D) at first glance looks to be simply an evolution of their previous motherboards with the added appeal of Intel’s X79 features. Not that that’s a bad thing of course because MSI’s previous family of motherboards have been exceptional and have won many awards here at Vortez. This motherboard though is so much more than an evolution, it’s more a revolution!
SATA 6Gb/s ports, USB 3.0 ports along with 8 DIMMs supporting up to 128GB at 2400MHz should be enough to get your taste buds tingling but if not then how about PCiE 3.0 support? This of course is coupled with MSI’s usual plethora of features which themselves have received some significant updates including enhanced Military Class III components, UEFI BIOS configuration, Click BIOS II, OC Genie II, 3-way NVIDIA SLI and 4-way AMD Crossfire support.
About MSI
Since its founding in 1986, MSI has been demonstrating continued success in digital age. To achieve the best user experience, every component is essential. In the past 25 years, MSI always strives to provide digital products based on its core values –“Innovation” and “Style”. The results are products with superior performance, trusted reliability, excellent user experience and expressive style. MSI has won the world-renowned product design awards and nearly 8,000 award recognitions from 350 media in 50 countries worldwide. With the brand slogan of “Innovation with Style”, MSI will continue to pioneer in global market as a principal brand in digital era, as well as lead the world in innovation in the field of global fashion technology with the needs of consumers at its core.
Specifications & Features
Despite numerous previews of this motherboard being touted around by the media, there was no official word on the exact specification. As the NDA has now passed we can now reveal the official spec sheet and put an end to the speculation:
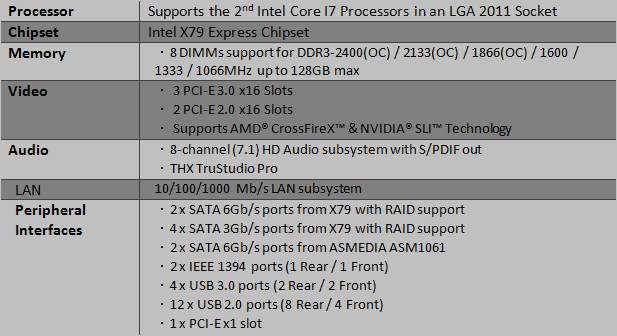
One of the main attractions to the X79 chipset will be the huge bandwidth available courtesy of 8 DIMM slots capable of delivering up to 128GB. Couple this with PCIe Gen 3, 6Gb/s SATA and USB 3.0 along with the usual array of multimedia connectivity and X79 becomes a very complete proposition.
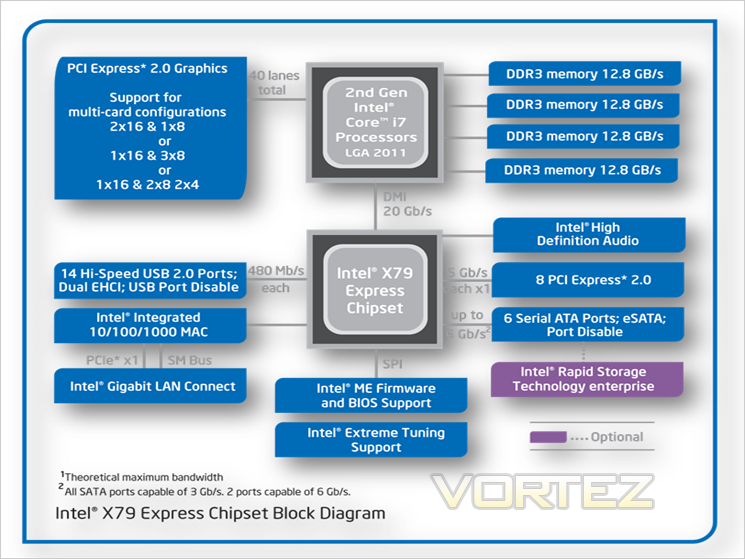
Intel X79 Express Chipset Block Diagram
PCI Express Gen 3
PCIe 3.0 affords twice the bandwidth of PCIe 2.0 (up to 32GB/s). MSI claim this to be the world’s 1st true PCIe Gen 3 mainboard.
Military III Class Components
The MSI X79A-GD65 (8D) features the third incarnation of the Military Class series which features Solid Capacitors throughout, Super Ferrite Core chokes, Hi-C CAP, DrMOS II all tested, as the name suggests, the military standards receiving MIL-STD-810G Certification.
DrMOS II Thermal Protection
A handy LED will light up on the motherboard when the MOSFETs are approaching a critical temperature. IF you don’t see the LED then a pop-up message will be displayed (via Control Center II). Should the temperature exceed the high temperature point, the system will automatically shutdown.
Click BIOS II
Another claim by MSI is the world’s first Unified UEFI GUI based interface. Rather than the old 8bit BIOS display we are all used to, the new UEFI setup allows the end user to adjust settings with the use of a mouse. The Click BIOS II module in windows works exactly the same way although a reboot is required for the settings to take effect.
THX TruStudio Pro
A Hollywood-grade high-fidelity sound reproduction standard which accurately reproduces the fullest audio experience of movie, music and game soundtracks for PC platforms
Multi-BIOS II
Multi-BIOS II provides the convenience to switch to the backup BIOS for system failure protection.
Control Center II
This utility allows realtime monitoring of system devices and also allows system performance tuning of the CPU Baseclock, ratios, voltages and memory frequencies.
Super Charger
Rather than using a standard USB port, the Super Charger allows users to make use of 3x faster charging courtesy of 1.5A being pumped through the on-board USB port.
U3/S6
USB 3.0 and SATA 6GB/s are built in as standard allowing upto 5GBps bandwidth for USB devices and 6Gb/s on the SATA III devices.
Packaging & Contents
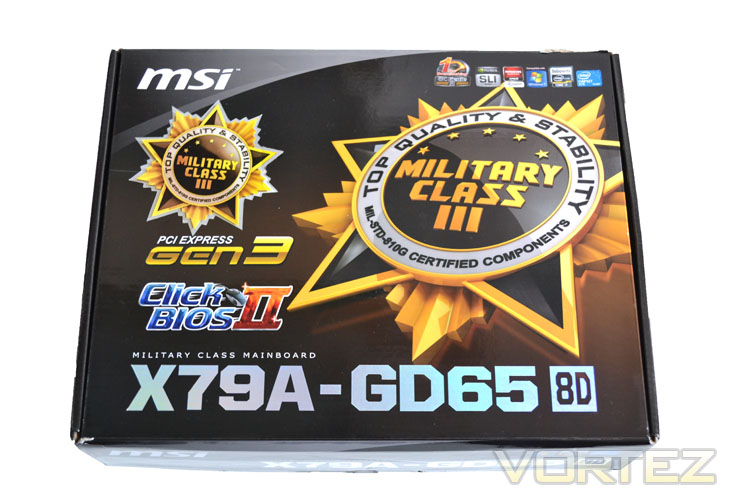
Box Front
The box is presented in a very swish dark brown and gold box. Rather than opt for an outer sleeve like most manufacturers, MSI instead have printed their product directly to the sturdy packaging making a big point of their Military Class III feature, PCIe Gen3 and Click-BIOS II.
Box Rear
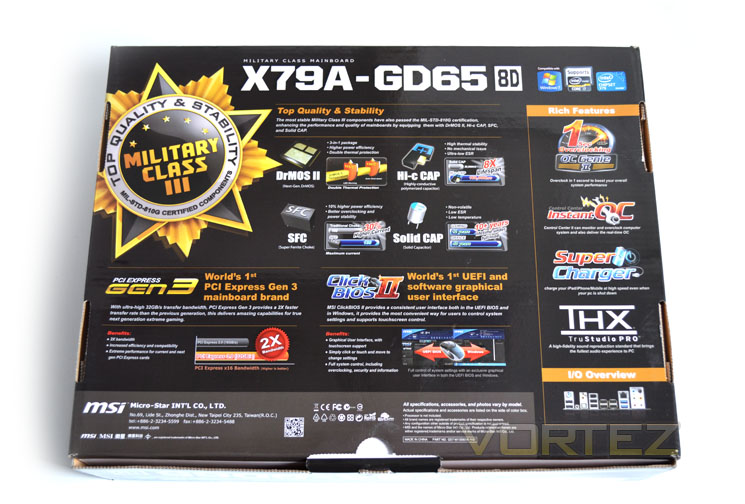
Flipping the box over we get a detailed rundown of the products features with each Military Class III component detailed. Further product features include OC Genie II, Instant OC, Super Charger and THX TruStudio PRO.
Box Open
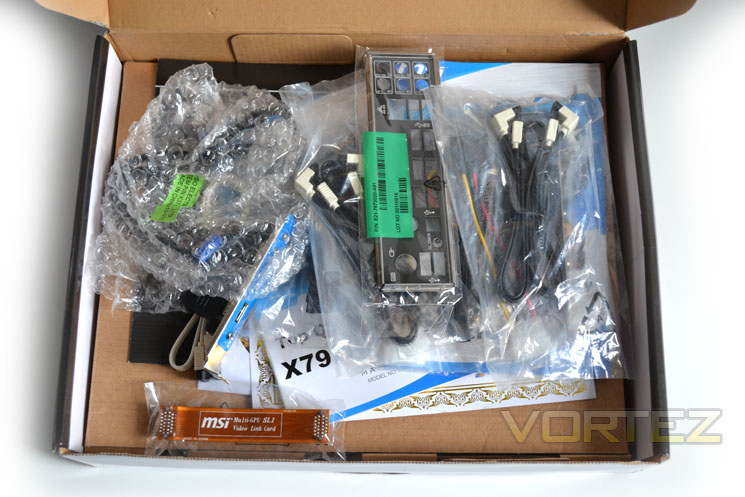
Opening the lid of the box we are presented with a huge array of accessories. Unfortunately these are not compartmentalised and held in place, rather they are simply bundled on top of a cardboard tray, itself protecting the mainboard hidden beneath.
Accessories
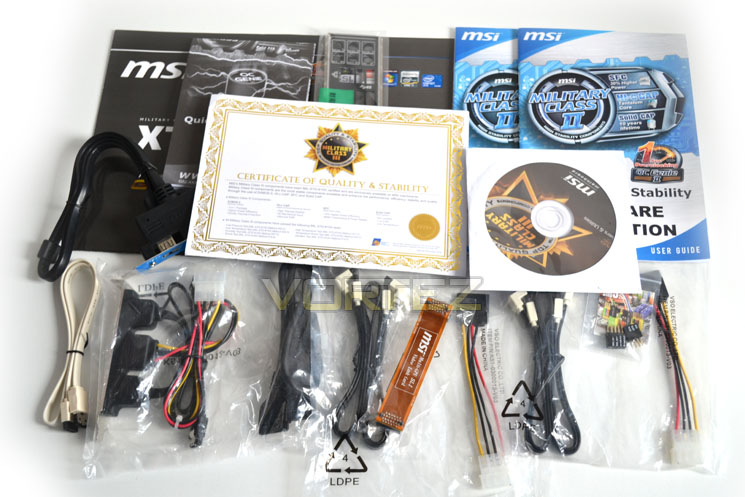
Here we see the included accessories. Aside from the various manuals, guides and Military Class III certificate, we get a Super Charger bracket, E-SATA cable, E-SATA bracket, printed I/O shield, 2x MOLEX-SATA power adapters, M-Connectors, SLI and Crossfire bridges along with 4x SATA data cables.
Mainboard
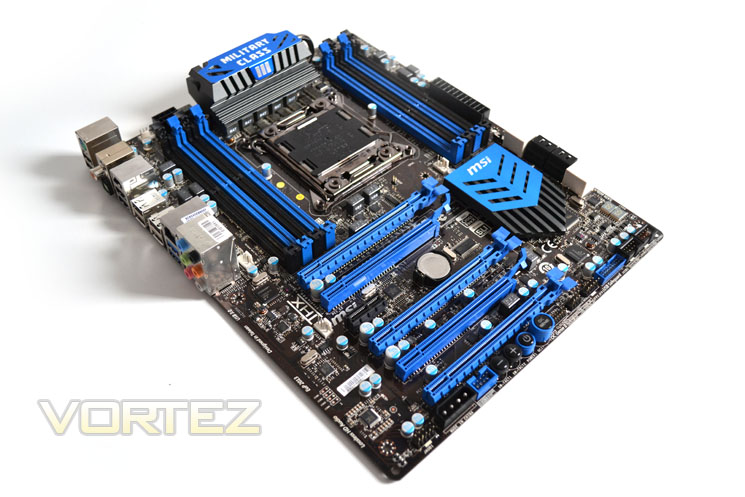
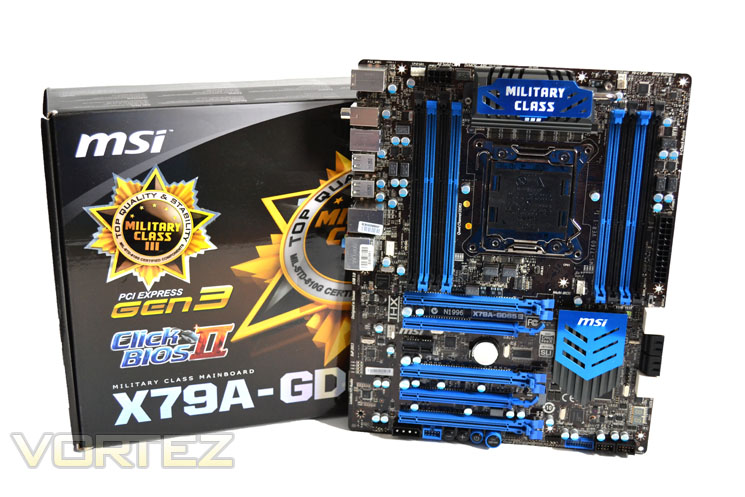
Finally we arrive at the star of the show, the MSI X79A-GD65(8D) which is protected by a thick anti-static bag. At first glance it’s hard not to be impressed by the aesthetics. The black and blue now synonymous with MSI mainboards is both striking and very smart. I do have some reservations regarding the silk screening process but I’ll come to that later.
Overall the product packaging is very good. I would perhaps like to have seen a better method of holding the accessories in place rather than just bunged in a tray on top of the motherboard. Other manufacturers take a little more care in this area, often having a separate box for them so in this area MSI are slowly being left behind by the competition. I appreciate cost is an issue but it is a shame MSI have gone to great lengths providing a plethora of reading material and accessories only for them to be presented so carelessly.
Closer Look Pt.1
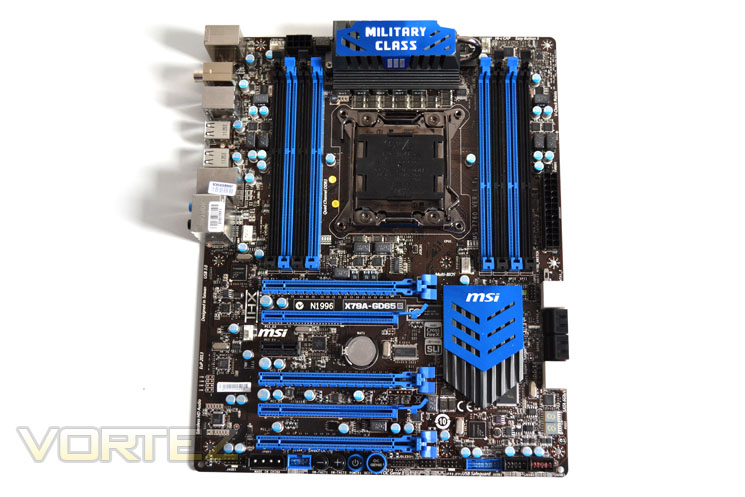
Board Front
As I’m sure many have you have already seen in the previews, the most striking aspect of the X79 mainboards is the symmetrical DDR3 slots situated either side of the CPU socket. As the name suggests, the MSI GD65(8D) has 8 DIMM slots supporting up to 128GB of DDR3! Obviously at preset we don’t have 16GB modules readily available but it is good to know the option is there should we need it in future.
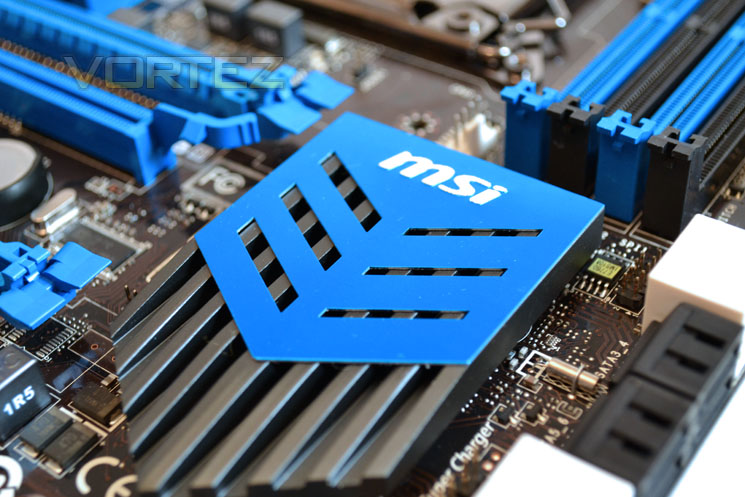
Perhaps the notable missing feature is the old NB/QPI heatsink which is now effectively on the CPU die itself which leaves plenty of room for other mainboard components, most notably the X79 chipset, protected by a heatsink ironically shaped as a shield.
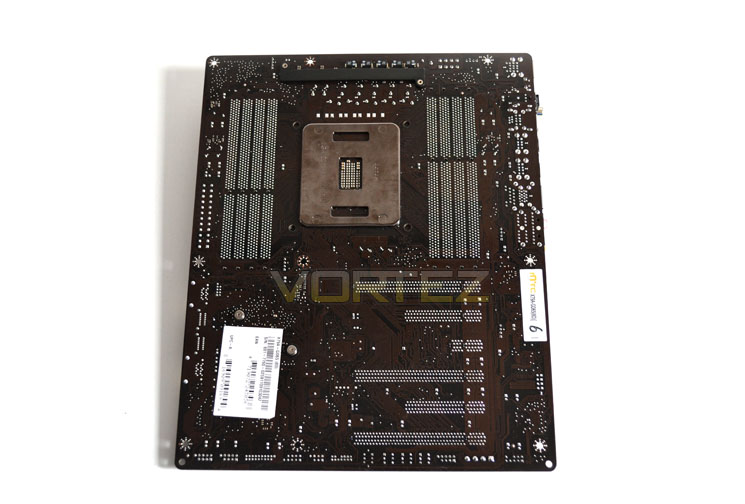
Board Rear
Flipping the board over we see the large backplate to the CPU socket. Unlike former CPU sockets, the LGA2011 accepts cooling retention screws through the front of the socket itself rather than simply through mainboard. This will alleviate the need for backplates somewhat however I suspect we will still some form of backplates being introduced as while the CPU socket seems strong enough, I wouldn’t feel comfortable having a massive cooler like a Silver Arrow or Noctua being held in place by the socket alone.
The other little feature is the backplate to the VRM module, itself assisting in cooling the DrMOS II chips.
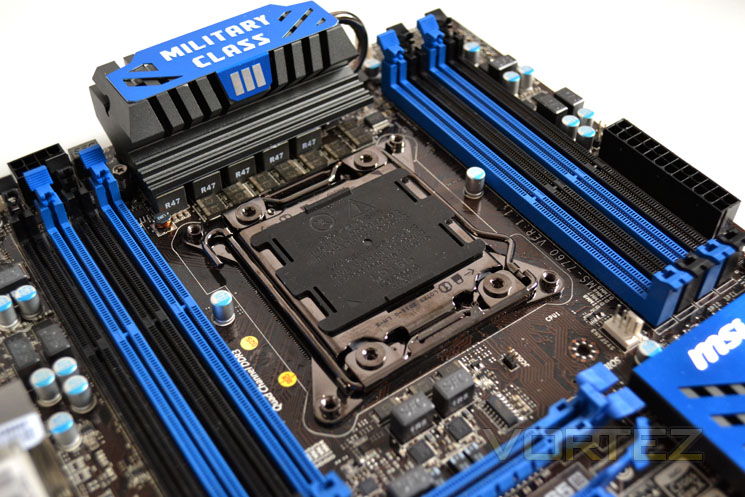
Socket area
The CPU socket area is relatively clean which will please those wishing to use extreme cooling. MSI have opted to use Hi-C CAP which are much easier to insulate rather than the Solid capacitors.
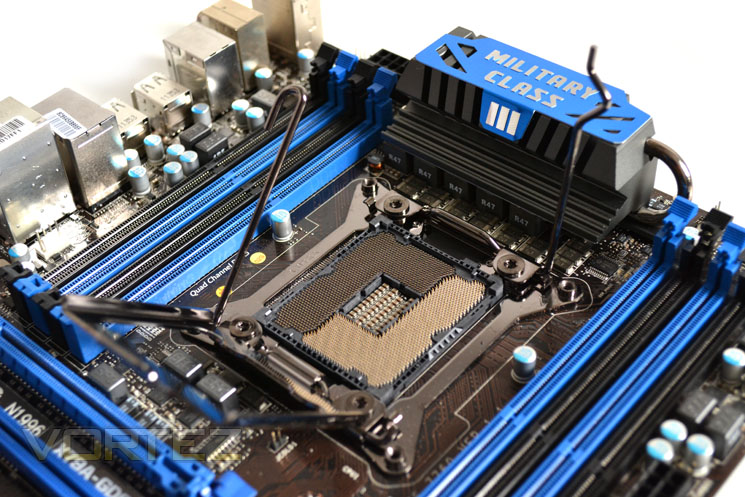
Socket retention
The LOTES socket is a little different on X79, having two retention bars rather than one found on X58. The new process can be a little fiddly to operate at first but soon becomes easier once you realise that the second bar needs to be pulled away from the socket to be released and then lifted.
LGA 2011
As the name suggests, there are 2011 pins, 645 more than the socket it replaces and a further 210 more than the Sandybridge-E’s sibling based on the skt1156 P67/Z68 chipset. With so many more pins it goes without saying extreme care should be used when fitting the CPU as with a larger surface area, bent pins will be more common place I feel.
CPU fitted
For this review we will be using the current flagship processor, the Intel Core i7-3960X Extreme Edition. Fitting the CPU was relatively easy with the triangular markers still in place. The socket and CPU have an additional two notches cut from the PCB to further assist in correct CPU orientation.
DIMM Slots
MSI have incorporated a memory installation process we first saw on ASUS motherboards which makes the process easier as only one end of the DIMM slot has a retention clip therefore installation and removal will be much easier when a GPU is in the primary (top most) PCIe slot which can often restrict removal of memory modules.
PCIe slots
It’s PCI Express all the way for the MSI X79A-GD65 (8D) with no legacy PCI capability on-board. The motherboard has 3x PCIe x16 3.0 slots which are backward compatible along with a further 2x PCIe x16 2.0 slots. Making up the configuration is PCIe x4 port. The positioning of the ports is very good and well thought out as dual slot graphics cards will have plenty of breathing space and thanks to the spacing Tri-SLI is a possibility along with CrossfireX, both of which are supported by the X79 chipset.
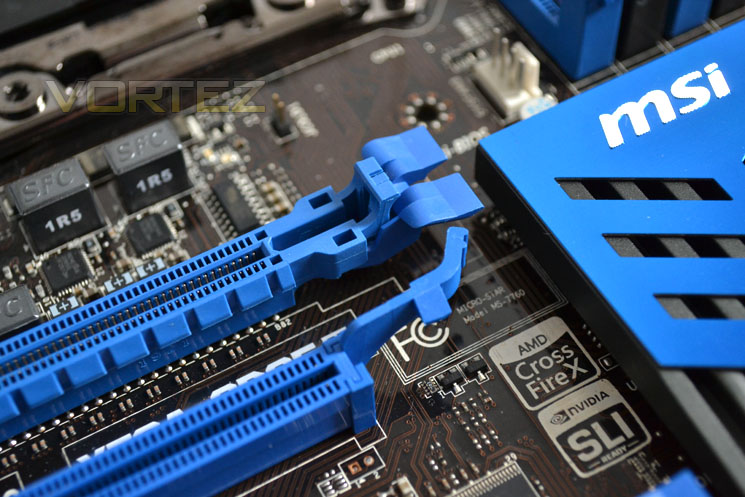
PCIe Retention
Distinguishing between the PCIe Gen 3 and Gen 2 slots is very simple due to the easily identifiable slot retention mechanisms. The clip type are PCIe 3.0 with the spring latch type being PCIe 2.0. The new X79 chipset allows up to 40 lanes in the following combinations: 2×16+1×8, 1×16+3×8 or1x16 + 2×8 + 2×4 so theoretically, 5 GPU’s can be coupled together should they have low profile cooling.
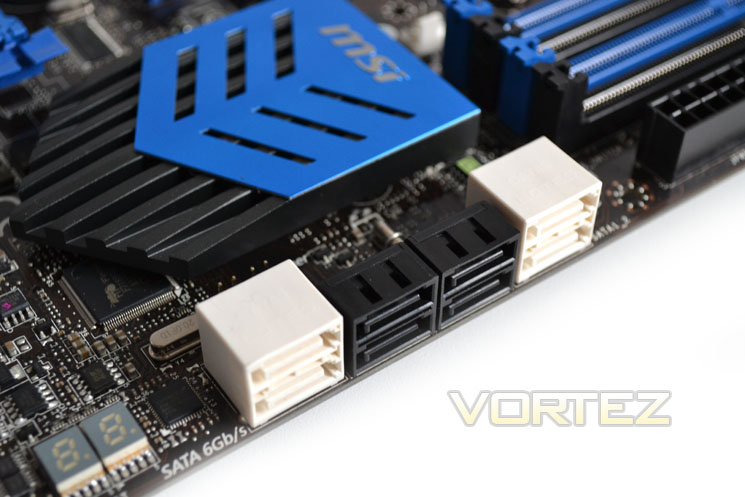
SATA Ports
There are 8 SATA ports available on the GD65(8D) not including e-SATA. The configuration of the ports is a little confusing however. The four white ports are 6GB/s capable, themselves split between the Intel X79 and ASMEDIA ASM1061 Chipsets (2 on each). The black ports are SATA II ports offering up a maximum 3GB/s transfer bandwidth, again split between the two controllers.
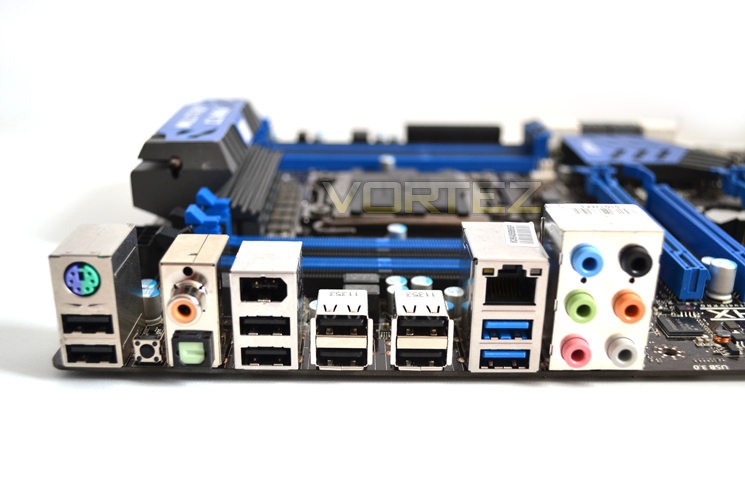
I/O Area
The I/O area has a multitude of connectivity featuring 2x USB 3.0 ports, 8x USB 2.0 ports, an IEEE 1394 port, GIGABIT Ethernet port, 7.1 audio ports courtesy of 3.5mm jacks, Coaxial and optical SPDIF-out ports and legacy PS2 mouse/keyboard socket. Hidden between this array is a small CMOS clear button which could perhaps be a little larger however its diminutive size will prevent accidental resets.
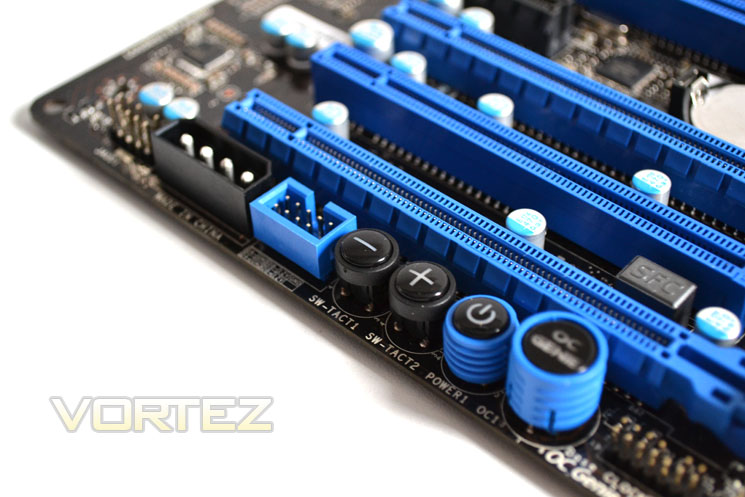
OC Buttons
At the base of the motherboard we see four main buttons, the OC Genie, power and base clock adjustment +/- buttons. These buttons are illuminated and will be of great use to those who will use this board outside of an enclosure. MSI have also included a MOLEX power port which will give additional power to the PCIe bus, ideal for those looking to push their graphics cards to the absolute maximum.
Closer Look Pt.2
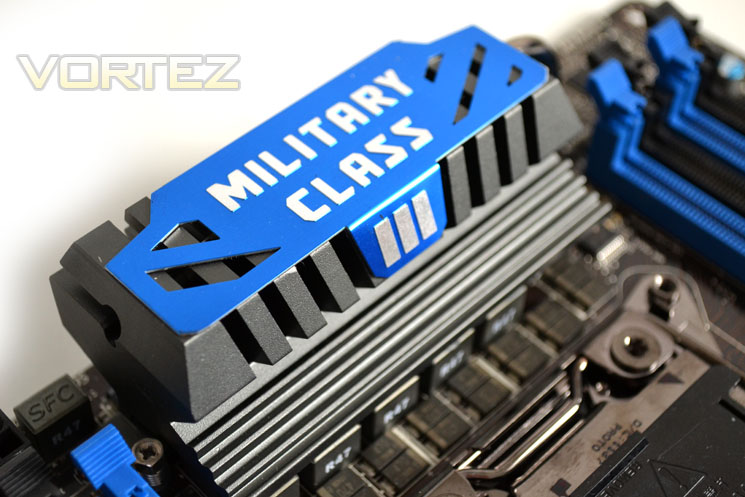
VRM Heatsink
Interestingly, MSI have opted not to spread the heat between the VRM module and the X79 chipset by means of a heatpipe. Instead both areas are cooled independently by their own heatsink. The VRM heatsink is quite tall and is manufactured from aluminium. I appreciate that manufacturers need to make them look attractive but adding additional plates to the heatsink, such as the one above, will serve nothing other than to trap heat.
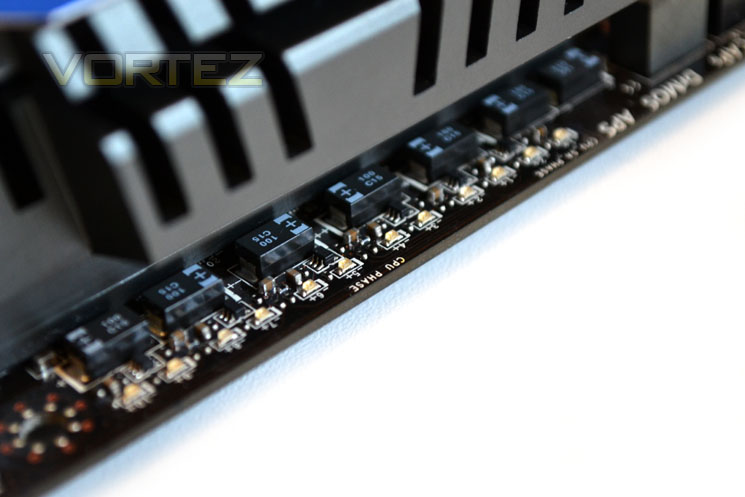
LED Phase indication
There are 12 LED’s which indicate the current Phase usage of the mainboard. The LED’s light up bright blue but are thankfully partially hidden behind the VRM heatsink and thus gives off a glow rather than burning out your retinas!
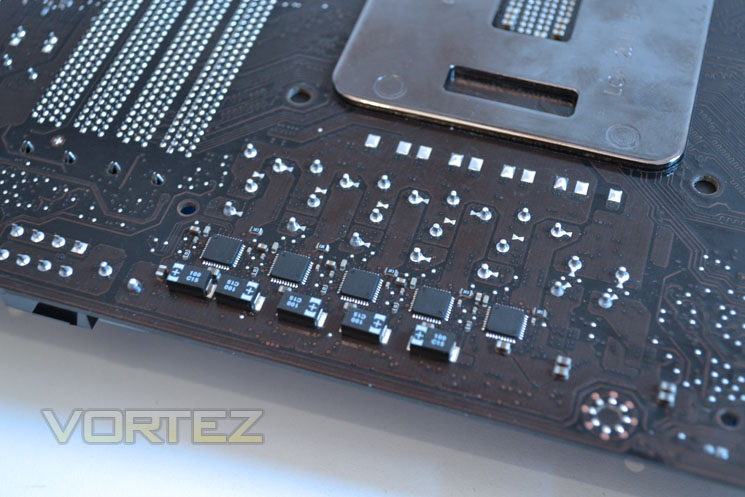
Phase Control
The MSI X79A-GD65(8D) features a phase design incorporating 12 DrMOS II chips. The next-gen DrMOS components feature both top and bottom MOSFETs along with the driver IC resulting in a lower low-side RDS(on) value, 2.3mOhms, delivering higher power efficiency. The IC also features thermal protection which will both illuminate on-board LED’s and give an on-screen warning at 115c and then shutdown at 130c.
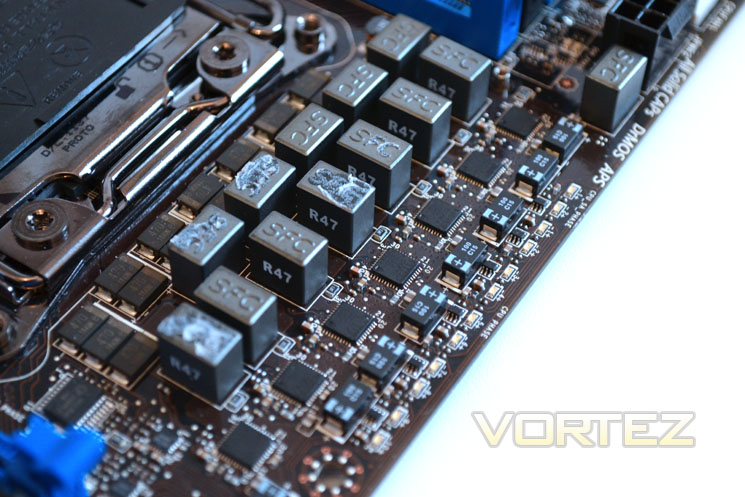
The DrMOS II modules are coupled with Super Ferrite Core chokes which offer 30% higher current capacity and 10% better efficiency which in Layman’s terms equates to better overclocking stability.
Making up the remainder of the VRM are Tantalum core Hi-C Caps. These components follow on the Military Class III component theme offering higher thermal stability and having 8x the lifespan of traditional Solid caps.
X79 Heatsink
The heatsink covering the X79 chipset is shaped like a shield and unlike many X79 boards we have previewed, does not have active cooling. During stress testing I noted the chipset did get quite warm but not overly so and thus far I fail to see the need for active cooling so it’s great to see MSI keeping noise levels to a minimum by omitting a fan.
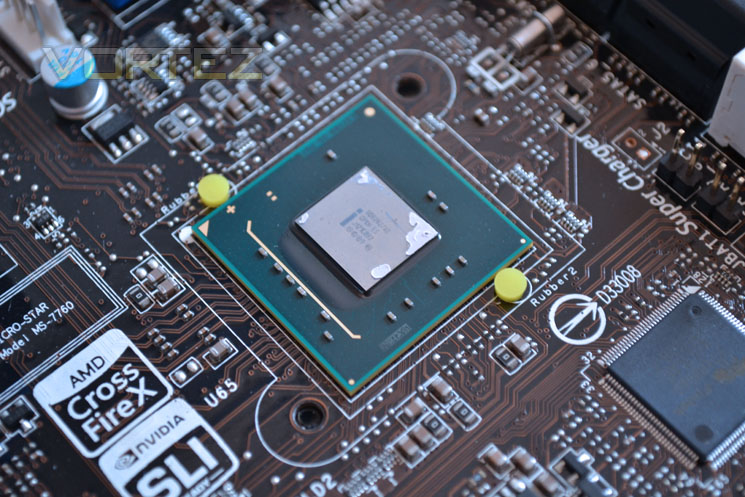
Intel X79 Chipset
Here we get to see the X79 Chipset ‘in the flesh’ so to speak. It communicates with the i7 processor (DMI) at 20Gb/s and is responsible for communicating with the USB ports (480Mb/s), LAN, SATA (6Gb/s) and up to 8 PCI Express 2.0 ports (5GB/s each).
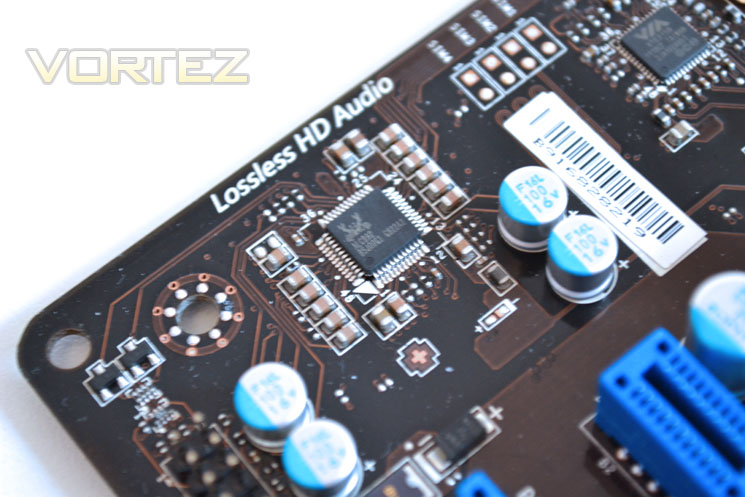
Audio
Audio comes courtesy of Realteks high-performance multi-channel High Definition Audio Codec with Realtek proprietary lossless content protection technology. MSI are making big noises about their THX TruStudio PRO high-fidelity sound reproduction on this motherboard so they clearly have faith in this codec which sports 8-channel (7.1) HD Audio reproduction.
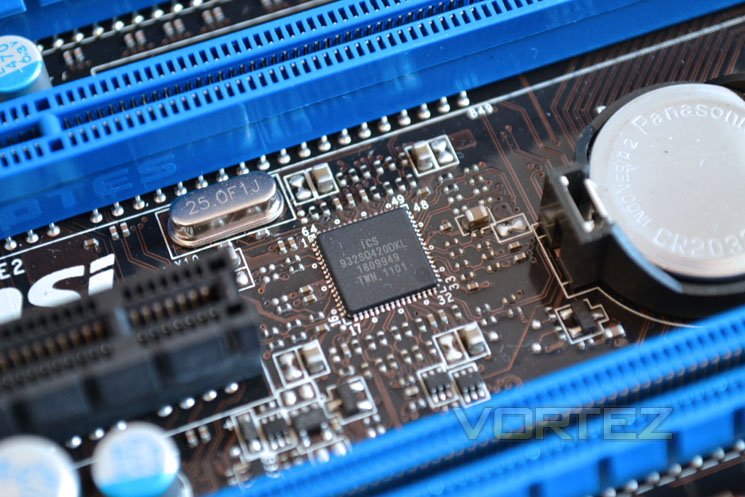
On-board IC’s
Taking control of PCIe Gen 3 are the ICS 932SQ420DKL Clock Gen SRC output driver chips which offer zero-delay buffer support while also being backward compatible to PCIe Gen2 and Gen1. Effectively this combination of chips attenuate jitter on the input clock, have selectable PLL bandwidth which maximizes performance regardless of whether the system has spread spectrum clocking or not.
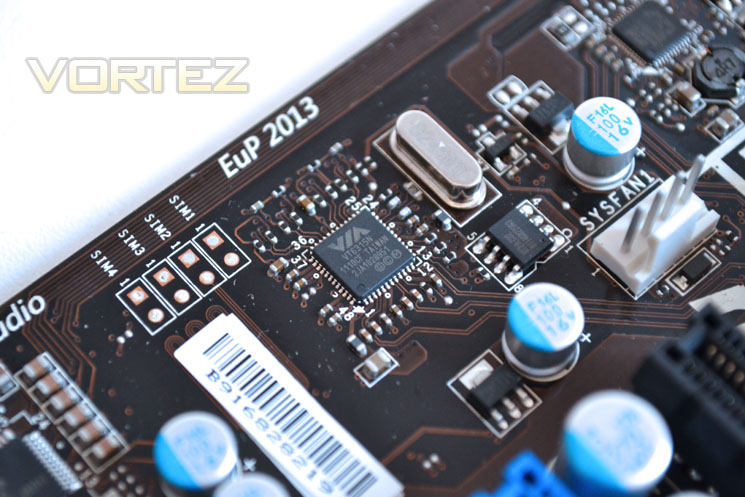
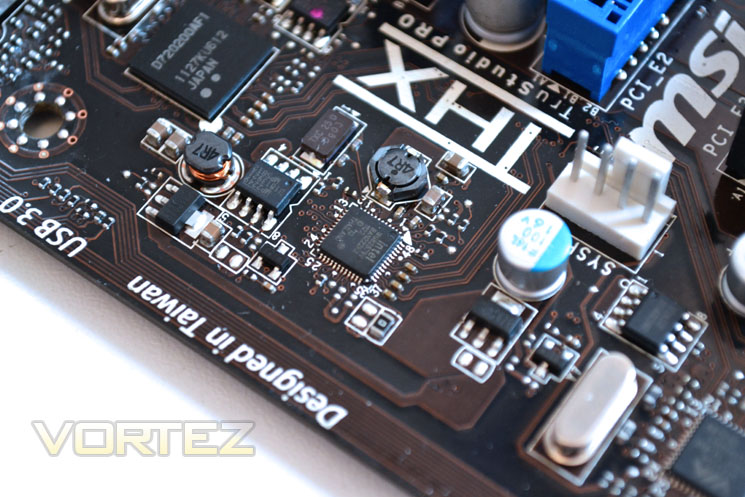
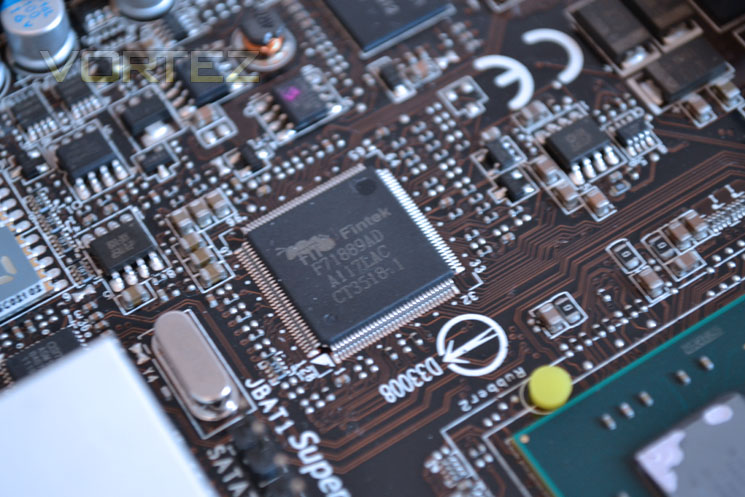
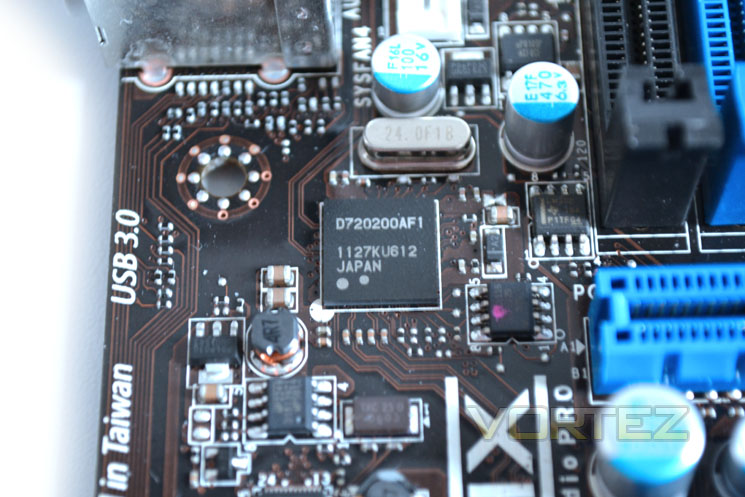
On-board IC’s
Firewire is provided by the VIA VT6315N chip. Ethernet comes courtesy of the Intel WG82579 chip with Fintek supporting the SuperIO connectivity. Rounding of the onboard IC’s is the NEC D720200AF1 chip which takes care of USB 3.0.
Test Setup
When we decided to put the test bench together for X79 we wanted a system that would not only perform well but also last the test of time given that X58 has been around for some 3 years now so we saw no reason to believe that its successor, X79 would not be able to do the same.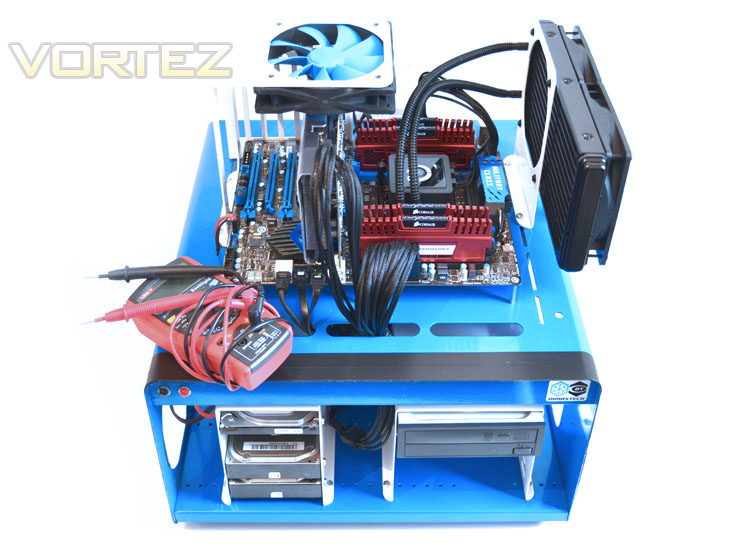
Our test bench was kindly sponsored by CORSAIR who provided the majority of components without whom we would not have been able to bring you this review so a big thanks to them. Thanks also go to MSI who donated their NVIDIA GTX560Ti.
Unfortunately because this is our first X79 review, there is little to compare against so we decided as it is the first of a new breed why not compare it against the current crop of typical setups, both low and high end based on alternative chipsets? Thus we have included results from four other popular enthusiast systems as follows:
X79 Setup
Motherboard –
Intel Core i7-3960X Extreme Edition
Graphics Card: MSI GTX560Ti 2GB Twin Frozr II Edition @
RAM – 16GB (4x4GB) Corsair Vengeance (Red) DDR3 @ 1866MHz 9-10-9-27
Power Supply – Corsair TX750M 750W
Hard Drive – Hitachi SATA II 250GB
Samsung F3 1TB
Cooler – Corsair H100
Motherboard –
MSI X79A GD65 (8D)
Intel Core i7-3960X Extreme Edition
Graphics Card: MSI GTX560Ti 2GB Twin Frozr II Edition @
RAM – 16GB (4x4GB) Corsair Vengeance (Red) DDR3 @ 1866MHz 9-10-9-27
Power Supply – Corsair TX750M 750W
Hard Drive – Hitachi SATA II 250GB
Samsung F3 1TB
Cooler – Corsair H100
X58 Setup Mainstream
Intel Core i7 920 @ 2.66GHz
Graphics Card: Inno3D GTX570 1GB @ 800/4000MHz – ForceWare 275.33
RAM – 6GB (3x2GB) OCZ Platinum DDR3 1333MHz
Motherboard – ASUS Rampage III Extreme
Power Supply – Enermax Revolution 85+ 850W
Hard Drive – OCZ Vertex 2E 120GB
Samsung F3 1TB
Samsung F1 320GB
Cooler – Phanteks PH-TC14PE
Intel Core i7 920 @ 2.66GHz
Graphics Card: Inno3D GTX570 1GB @ 800/4000MHz – ForceWare 275.33
RAM – 6GB (3x2GB) OCZ Platinum DDR3 1333MHz
Motherboard – ASUS Rampage III Extreme
Power Supply – Enermax Revolution 85+ 850W
Hard Drive – OCZ Vertex 2E 120GB
Samsung F3 1TB
Samsung F1 320GB
Cooler – Phanteks PH-TC14PE
X58 Setup Extreme
Intel Core i7 990X @ 3.46GHz
Graphics Card: Inno3D GTX570 1GB @ 800/4000MHz – ForceWare 275.33
RAM – 6GB (3x2GB) OCZ Platinum DDR3 1333MHz
Motherboard – ASUS Rampage III Extreme
Power Supply – Enermax Revolution 85+ 850W
Hard Drive – OCZ Vertex 2E 120GB
Samsung F3 1TB
Samsung F1 320GB
Cooler – Phanteks PH-TC14PE
Intel Core i7 990X @ 3.46GHz
Graphics Card: Inno3D GTX570 1GB @ 800/4000MHz – ForceWare 275.33
RAM – 6GB (3x2GB) OCZ Platinum DDR3 1333MHz
Motherboard – ASUS Rampage III Extreme
Power Supply – Enermax Revolution 85+ 850W
Hard Drive – OCZ Vertex 2E 120GB
Samsung F3 1TB
Samsung F1 320GB
Cooler – Phanteks PH-TC14PE
Z68 Setup
Intel Core i5 @ 3.3GHz
Graphics Card – Zotac GTX460 1GB
RAM – 4GB (2x2GB) Kingston Genesis DDR3 1600MHz
Motherboard – ASRock Extreme4 Gen3
Power Supply – OCZ Fatal1ty 750W
Cooler – Noctua NH-D14
Intel Core i5 @ 3.3GHz
Graphics Card – Zotac GTX460 1GB
RAM – 4GB (2x2GB) Kingston Genesis DDR3 1600MHz
Motherboard – ASRock Extreme4 Gen3
Power Supply – OCZ Fatal1ty 750W
Cooler – Noctua NH-D14
AMD Setup
AMD A8-3850 @ 2.9GHz
Motherboard – GIGABYTE GA-A75M-UD2H
RAM – Team Xtreem PC3 12800 DDR3 1600 7-7-7-21
HDD – Western Digital Caviar Blue 500GB 7200RPM SATAIII
Power Supply – OCZ StealthXtream 2 600W
Cooler – CoolerMaster Hyper 212+
AMD A8-3850 @ 2.9GHz
Motherboard – GIGABYTE GA-A75M-UD2H
RAM – Team Xtreem PC3 12800 DDR3 1600 7-7-7-21
HDD – Western Digital Caviar Blue 500GB 7200RPM SATAIII
Power Supply – OCZ StealthXtream 2 600W
Cooler – CoolerMaster Hyper 212+
Benchmarks
Cinebench 11.5 – CPU Score
x264 HD 4.0 – 1st and 2nd pass encoding
SiSoftware SANDRA 2011 – CPU benchmarks
AIDA64 – CPU benchmarks
CyberLink MediaEspresso 6.5 – Convert 145MB MP4 to avi
PCMark 7 – System Benchmark
3DMark 11 – Performance and Extreme preset Overall and Physics Score
Games – Crysis 2, DiRT3, Metro 2033
Other Software
Core Temp 0.99.5
LinX stress Test
CPUID HWMonitor
Overclocking
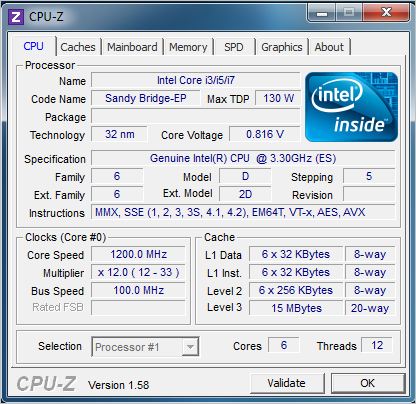
Stock
Above you can see that at stock (SpeedStep enabled) the CPU sits at 100×12 (1200MHz) and runs on just 0.816 Vcore. Temperatures were excellent hitting mid to high 20’s which is not too bad for a room that is set to 23c, just an average delta of 5.5c! Stressing the stock settings saw the CPU multi rise to 36 (33+3) thanks to Intel Turbo Boost technology 2.0. This equated to an immediate increase in clockspeed to 3.6GHz.
Obviously we were never going to be satisfied with a ‘mediocre’, automatic overclock so we entered the very good Click BIOS and began fiddling with the settings.
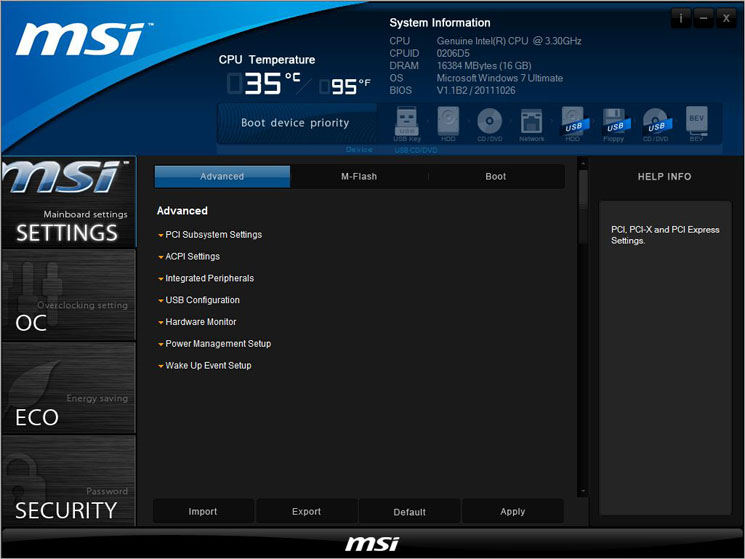
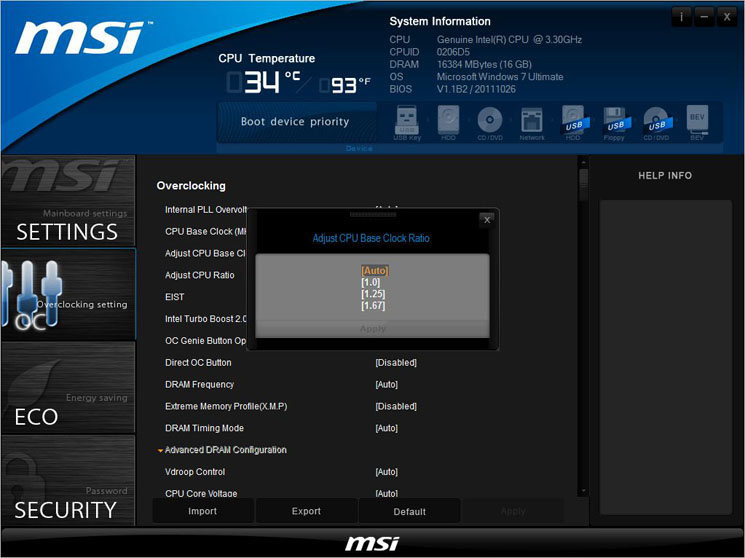
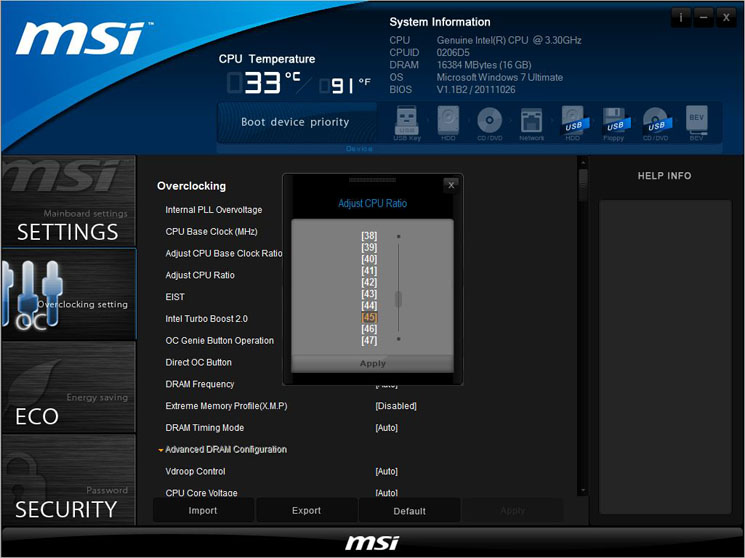
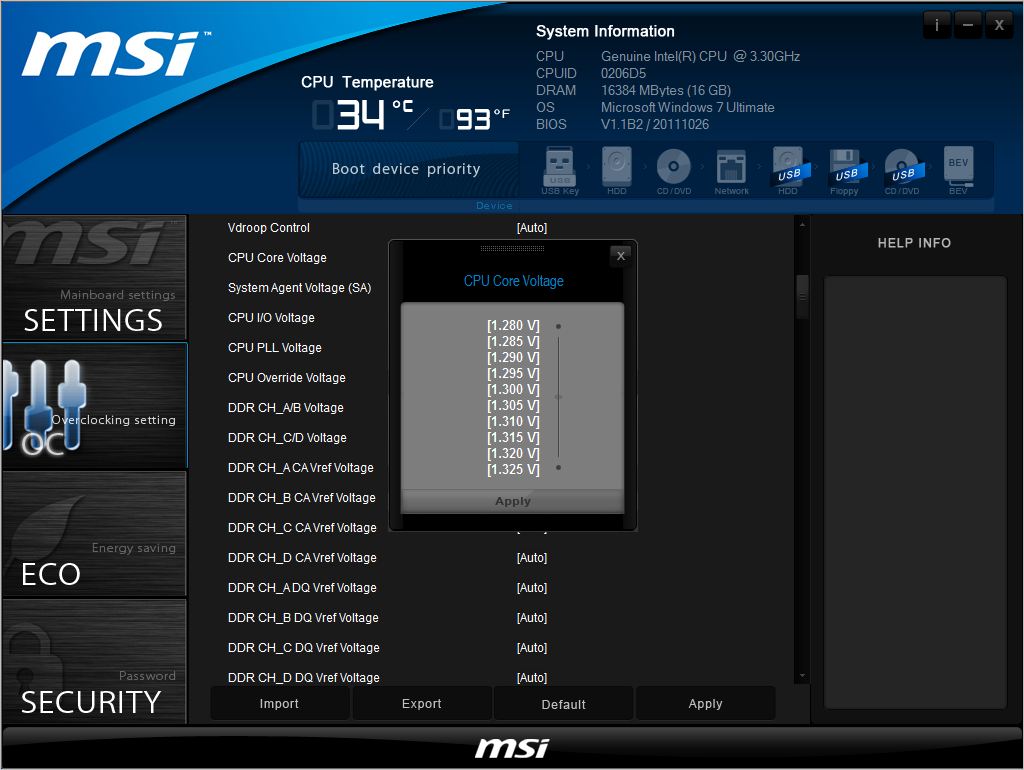
You have a variety of ways to adjust the settings in the BIOS, a short sample of which can be seen above. You can either use the UEFI based BIOS, the Click-BIOS II utility or MSI Control Center. The Click BIOS II utility is pretty much identical to the UEFI BIOS interface and uses the same input method of navigation keys or point and click mouse control which is much faster than the old method of scrolling through pages of settings using the direction and TAB keys. Perhaps the only difference between the Click BIOS II and UEFI BIOS is that the UEFI BIOS has three overclock section, ECO, Standard and OC Genie allowing you to set the parameters of them individually along with a multitude of profiles under each section. These profiles can not only be backed up to the BIOS itself but can be exported to a file or even a USB stick allowing you to share your settings with other enthusiasts around the world. All of the necessary controls are in place including the new Base Clock Ratio setting which affords greater control over base clock overclocking on the X79 chipset.
Other than the ram ratio and voltage adjustments, the three main settings for overclocking are: CPU Ratio, CPU Core Ratio and CPU Base Clock. As with skt1156 Sandybridge processors, the CPU ratio yields the biggest bulk of the overclocking as this multiplies the bus speed so for example 40x CPU ratio x 100 bus speed would result in a clockspeed of 4000MHz. The bus speed is in essence the Baseclock and thus this can be fine tuned to extract the maximum amount from the CPU. Couple the base clock with the CPU core ratios of 1.00, 1.33 and 1.67MHz and you can (hopefully) extract the absolute maximum. MSI recommend a maximum +/-10% overclock on the base clock at each ratio so it will be interesting to see exactly how this affects our overclock.Unfortunately we didn’t have much (any)success with any of the ratios as any change in the base clock resulted in windows failing to load.
The same can be said of the OC buttons on the motherboard itself. While Intel claim that baseclock overclocking has returned, I could not get any joy out of increasing the baseclock whatsoever with any adjustment resulting in either huge stability issues or non-boot scenarios. Whether this is a fault of the BIOS itself, user error or the chipset remains to be seen but I’ll be sure to report back on this as we test more motherboards in the near future.
As previously stated, overclocking on the X79 platform is a little different from previous generations in that the CPU base clock is determined by DMI Clock x Base Clock Ratio. Some motherboard manufacturers will inevitably create a clock generator that will do this calculation for you thus making the process a little easier (as with our test bench motherboard, the MSI X79A GD65(8D). Memory overclocking has been expanded with the addition of another ratio, theoretically allowing the X79 platform to overclock memory to DDR3 2400 at a ram ratio of x9. Unfortunately our memory could not clock upto the next divider though, despite slackening timings.
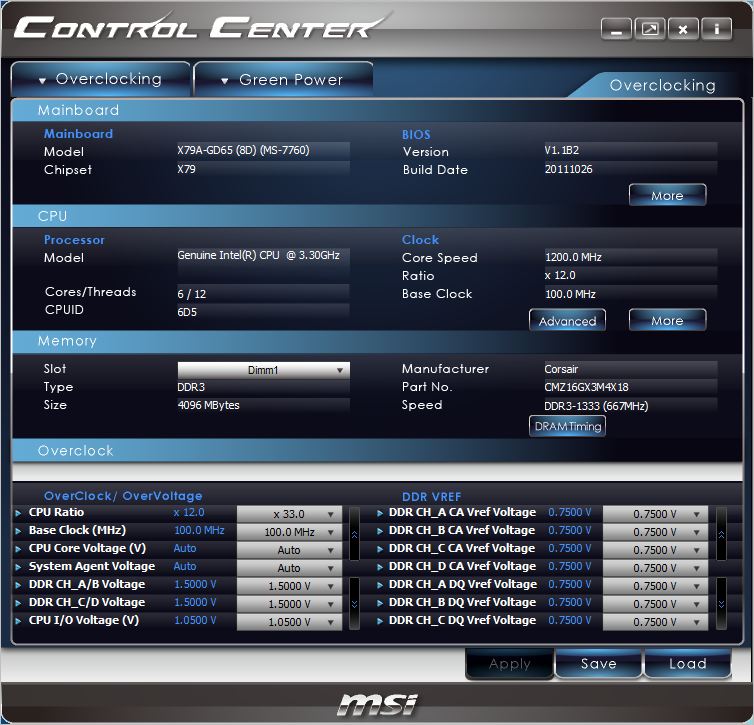
The Control Center is essentially a cut down version of the Click-BIOS essentially having all of the settings you would require to overclock your CPU. The question has to be asked why bother with this along with Click BIOS when one or the other would be perfectly adequate.
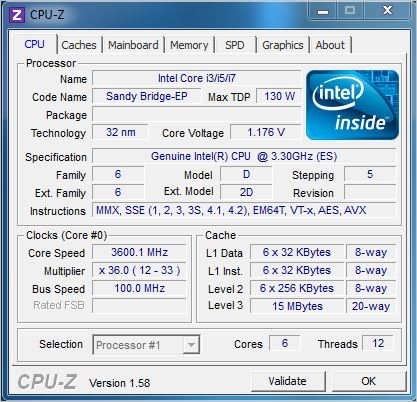
Here we see the CPU in its stock format with Turbo Boost II enabled and thus a resulting speed weighs in at 3.6GHz. This clockspeed can theoretically rise up to 3.9GHz on this processor on individual cores when placed under stress or drop to 1200MHz when idle with the CPU features enabled. When overclocking, especially when attempting to find a stable overclock it is best to disable such settings though as this can affect stability at the highest point. Therefore we did just that and set about achieving our highest STABLE overclock.
Initially we simply could not get the CPU to overclock at all. I feared that the multiplier was locked as despite setting the core multiplier anything higher than 33 failed to latch and despite altering a variety of settings in the UEFI BIOS, nothing would allow us to break the 33X barrier. Ultimately a BIOS update was required and while this BIOS was also a little buggy, it did allow us to adjust the multiplier AND get it to stick. Unfortunately, the same could not be said for the baseclock which refused to go anything above 100MHz.
Voltage was another hurdle to traverse as being a totally new processor, I was not sure how far I could push things. Couple this with the astronomical price point of £900 and fear of destroying the chip before the NDA had passed perhaps made me err on the side of caution. I initially settled for a maximum 1.4v Vcore to achieve the maximum overclock but due to the Vdroop (despite the load line calibration level set to maximum) I nudged a little passed this mark to ensure the 1.4v was attained for the duration of the stress testing.
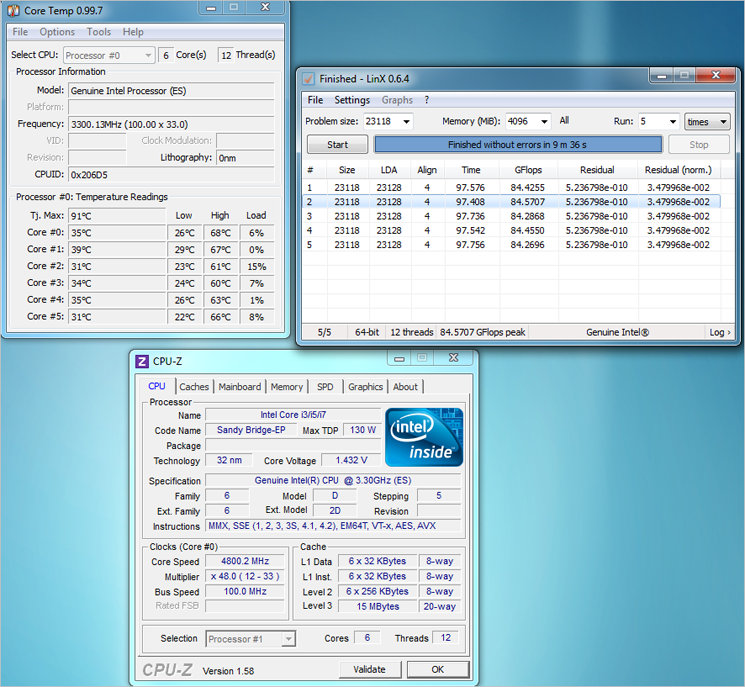
After many hours, lots of head scratching and numerous experimental settings, I eventually hit a brick wall at 4.8GHZ. While this is a fantastic achievement, especially considering all 6 cores (along with hyperthreading) were enabled, failing to reach the ‘golden’ 5GHz mark was frustrating. It is never easy overclocking on a new platform, especially when there is so little concrete information available so getting this far was a victory and testament to the ease of use of the MSI BIOS. This overclock was rock solid stable however nudging the CPU ratio one notch higher to x49 resulted in stability issues, often being unable to boot. With other motherboard issues plaguing my attempts to push the envelope further, 4.8GHz was the figure I settled for on this occasion but I have no doubts at all with a more mature BIOS, higher results can and will be attained. As with all overclocking, each result is dependent on the components used so while we achieved this result, there are no guarantees this will be the case with an identical setup.
Let’s see how this overclock affects system performance…
Temperature & Power Consumption
Temperatures
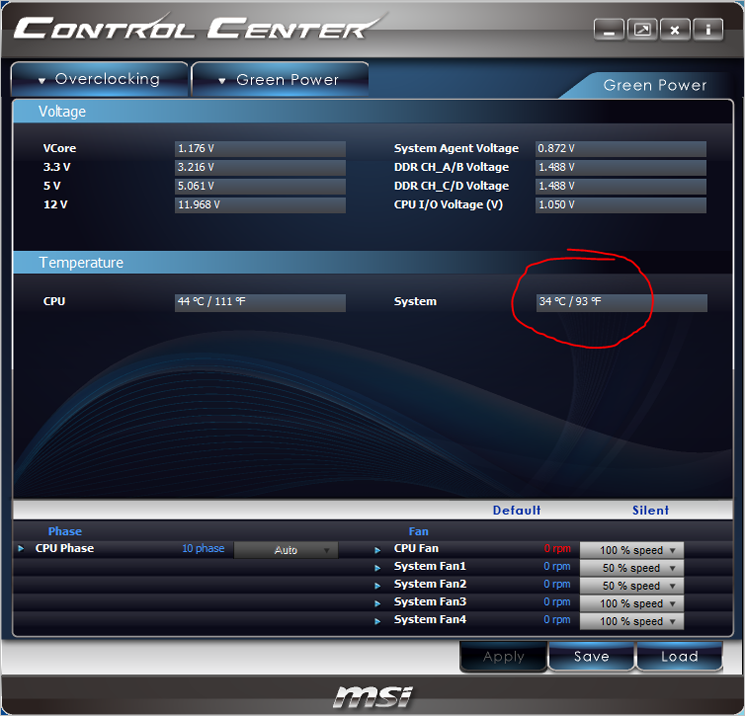
System Temperature
The system temp never rose above 35c throughout testing both at stock and overclocked levels so I fail to see why some manufacturers feel the need to have massive X79 heatsinks with active cooling. I guess that is a conversation for another time. Nevertheless, this is great performance from MSI.
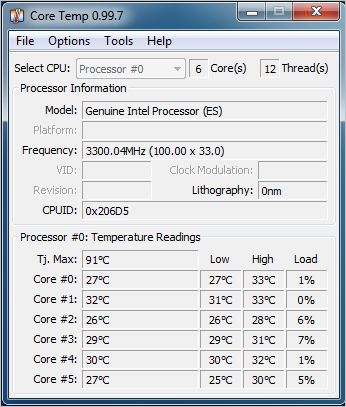
The CPU temperature as stock is excellent, hitting an average 28.5 across all six cores, just 5.5c above ambient (23c) temperature. Obviously, temps should be good at the very low voltage of just 0.816v.
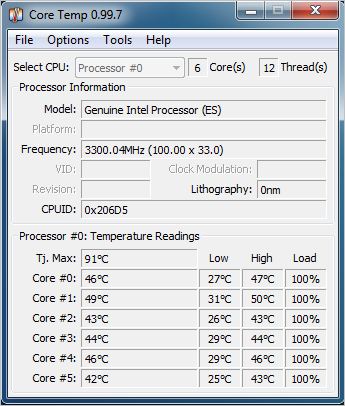
Placing the CPU under stress using Intel LinX software we see a maximum temp of 45.5c which again is very good considering the clockspeed had risen to 3.6GHz.
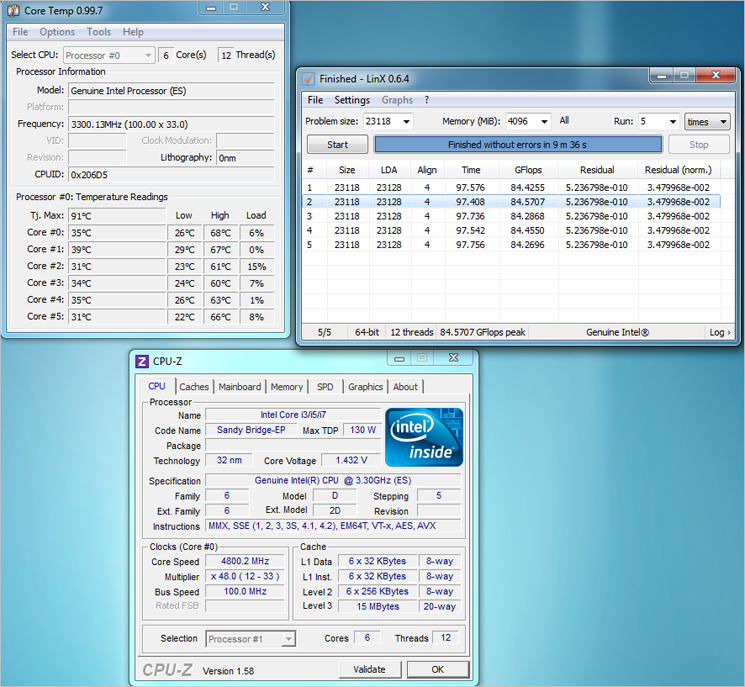
Upon maximum overclock and with the Corsair H100 set to medium setting, the temp rose dramatically, peaking at an average 64c. Still well within the comfort zone though and with a clockspeed set to 4.8GHz along with a Vcore of just above 1.4v this is fantastic achievement.
Power Consumption
Despite being Ultra high end I had hopes that the test setup would consume less power than our old i7 Core i7 test setup. I did not however expect the results to be so fantastic.
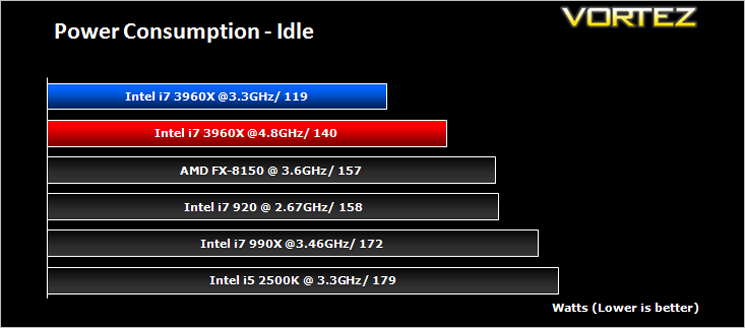
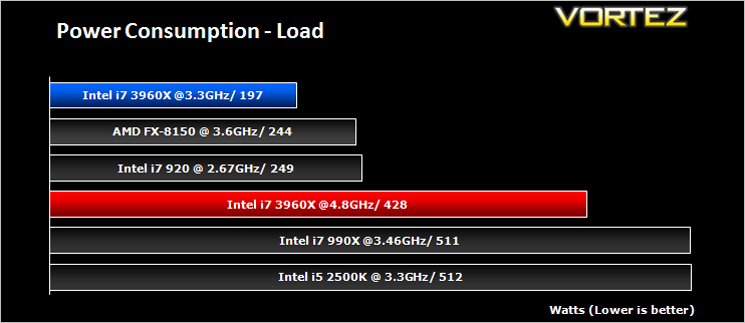
When idle (and with MSI eco settings enabled) the whole setup consumed just 119W. This value rose slightly when clocked to 4.8GHz but was still well below the copetition whose clockspeeds were much lower. The good news continued as we put the system under stress with the stock clocked i7-3960X consuming the least amount of power out of all the setups tested. Obviously running such a high overclock will consume a much larger amount of power but this was still less than the stock clocked i7 990X and i5 2500K setups. Consideration however should be given to the fact that each setup has varying hardware and thus the power readings are an indication only as it is impossible to truly give a like for like power usage comparison as to the best of our knowledge an Intel i7 3960X will not fit in an AMD motherboard and vice-versa! Nonetheless, this is a fantastic achievement from Intel and jointly MSI.
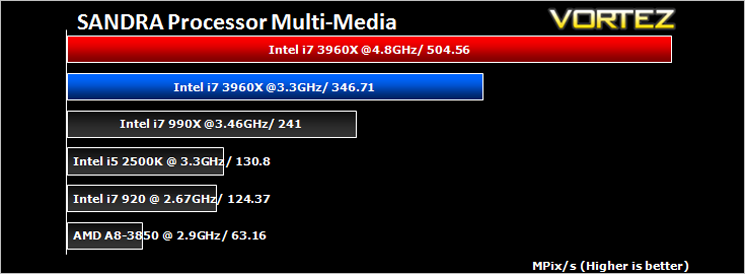
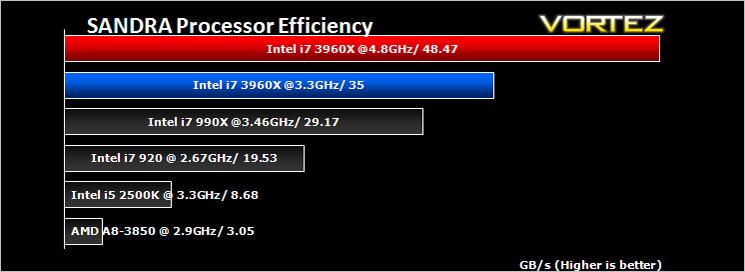
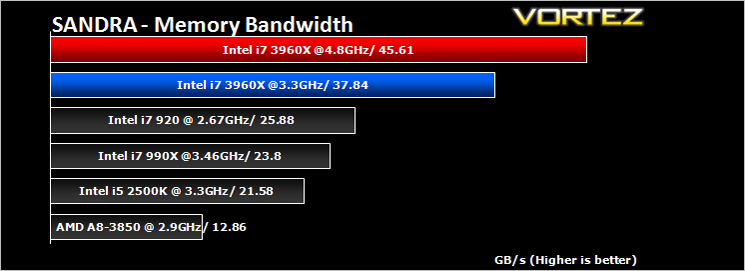
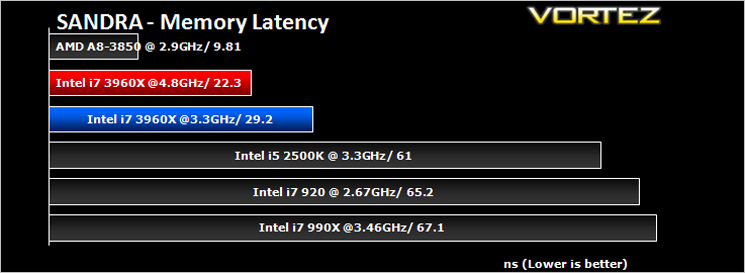
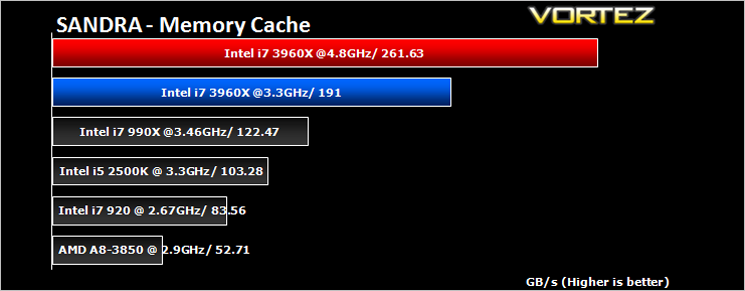
SiSoftware Sandra
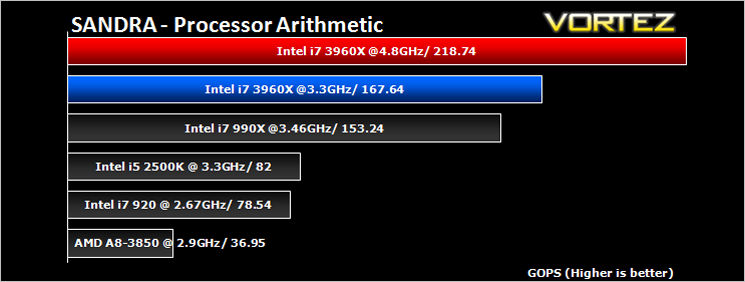
SANDRA isn’t always a benchmark that is included in hardware reviews but I believe it shouldn’t be ignored. SANDRA provides a vigorous package that tests your system in a rather large array of benchmarks. There are many aspects of benchmark that can be executed. We will be considering – CPU and memory tests.
AIDA64
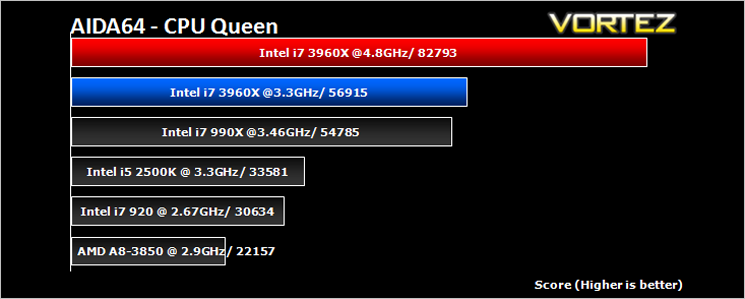
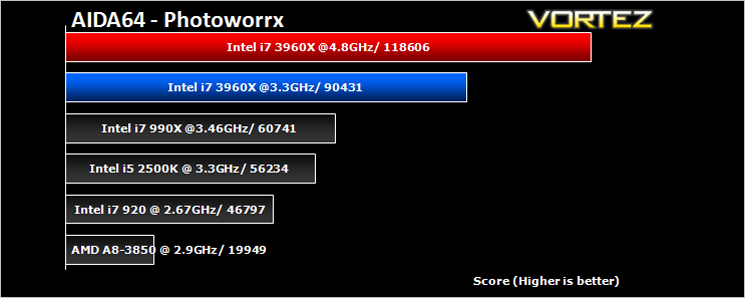
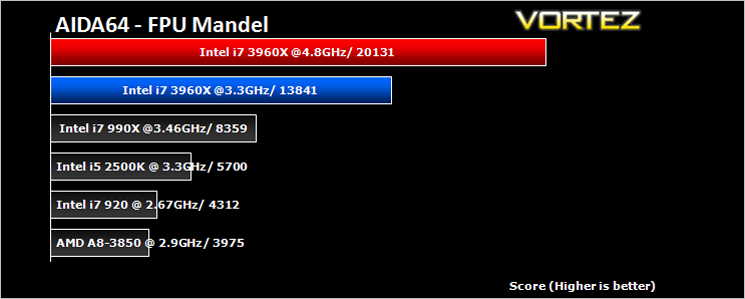
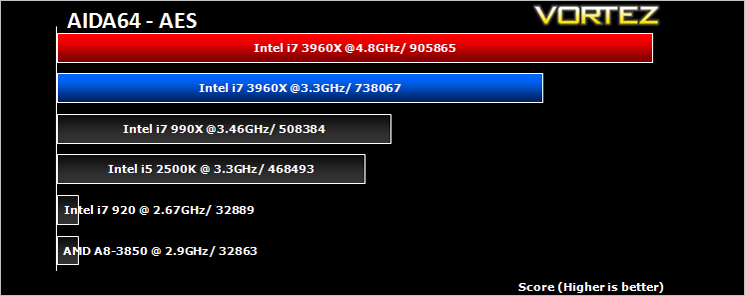
This simple integer benchmark focuses on the branch prediction capabilities and the misprediction penalties of the CPU. It finds the solutions for the classic “Queens problem” on a 10 by 10 sized chessboard. At the same clock speed theoretically the processor with the shorter pipeline and smaller misprediction penalties will attain higher benchmark scores. For example — with HyperThreading disabled — the Intel Northwood core processors get higher scores than the Intel Prescott core based ones due to the 20-step vs 31-step long pipeline. CPU Queen test uses integer MMX, SSE2 and SSSE3 optimizations.
x264 HD V4.0
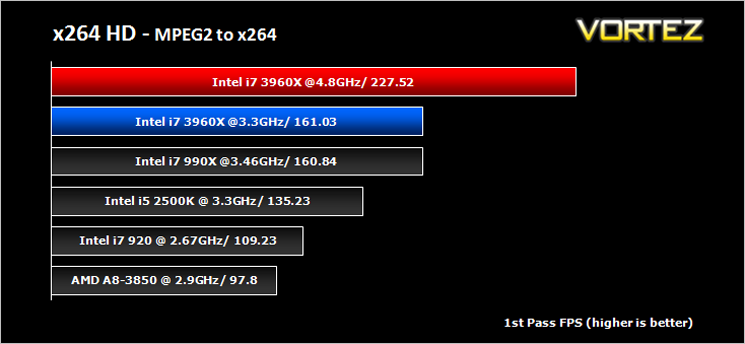
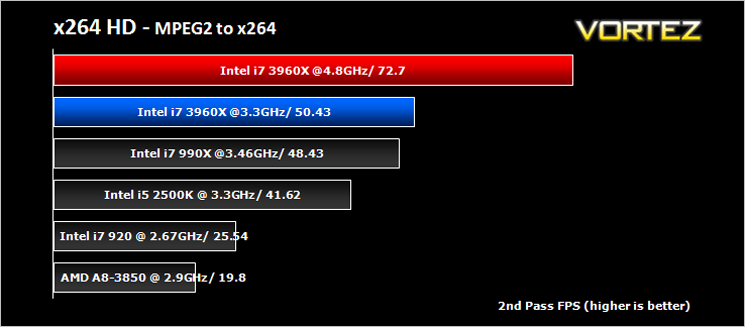
Simply put, this test measures how fast your machine can encode a short, DVD quality MPEG-2 video clip into a high-quality x264 video clip. What’s x264, you ask? It’s more or less the next-generation Xvid/DivX codec. I think it’s ideal for a benchmark because the application (x264.exe) reports fairly accurate compression results (in frames per second) for each pass of the video encoding process, and it uses multi-core processors very efficiently. The test uses multiple cores efficiently to give a good representation of real world performance.
Cinebench 11.5
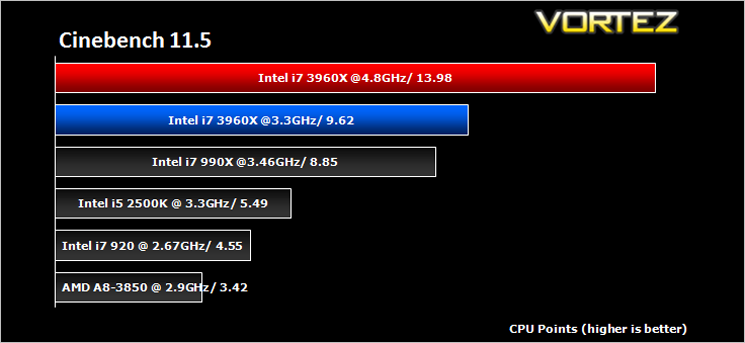
Based on the MAXON animation software CINEMA 4D, Cinebench is a test suite that uses the system’s processing power to render a photorealistic 3D scene. This makes it an excellent benchmark to measure CPU and motherboard performances.
CINEBENCH can measure systems with up to 64 processor threads. This test scene contains approximately 2,000 objects which in turn contain more than 300,000 polygons in total, and uses sharp and blurred reflections, area lights, shadows, procedural shaders, antialiasing, and much more. The result is displayed in points (pts). The higher the number, the faster your processor.
CINEBENCH can measure systems with up to 64 processor threads. This test scene contains approximately 2,000 objects which in turn contain more than 300,000 polygons in total, and uses sharp and blurred reflections, area lights, shadows, procedural shaders, antialiasing, and much more. The result is displayed in points (pts). The higher the number, the faster your processor.
Futuremark PCMark 7 & 3DMark 11
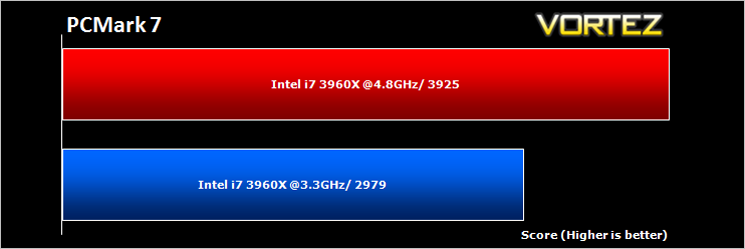
PCMark 7 is a tool provided by FutureMark that tests the PCs ability in general office and everyday use. It produces a number that reflects the all-round performance of the PC and is useful to compare between differing setups. For more information, visit the FutureMark website.
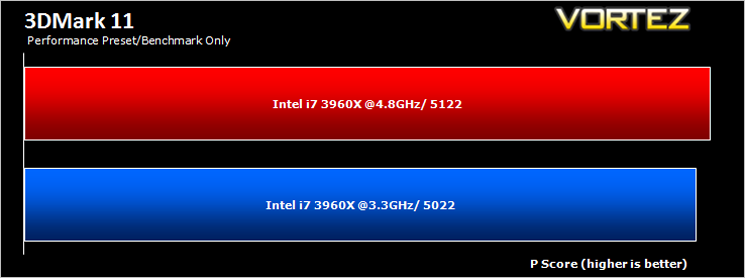
Designed to measure your PC’s gaming performance 3DMark 11 makes extensive use of all the new features in DirectX 11 including tessellation, compute shaders and multi-threading. Trusted by gamers worldwide to give accurate and unbiased results, 3DMark 11 is the best way to consistently and reliably test DirectX 11 under game-like loads.
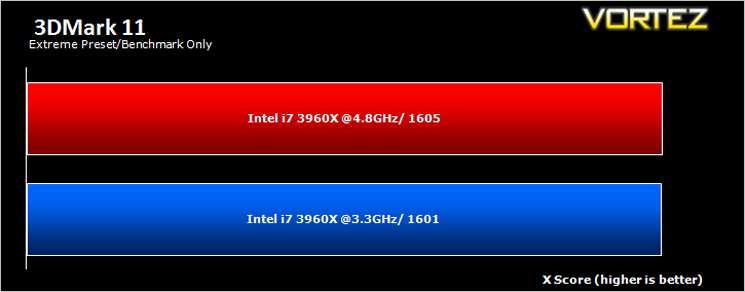
*Note* Other systems were omitted due to varying GPU’s being used which would have had an adverse affect on the results.
Gaming Benchmarks
Crysis 2
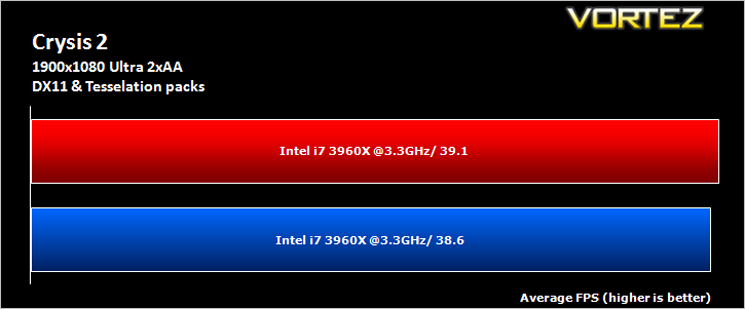
Crytek took an internet beating from its loyal fans due to the fact that they pandered to the console masses and dumbed down the graphics to DirectX 9. Fortunately, fans of the PC version of Crysis managed to force Cryteks hand and they have since developed a DX11 patch and have also enhanced the textures with added tesselation. It is for this reason that we have decided to include it in our suite of benchmarks.
Crytek took an internet beating from its loyal fans due to the fact that they pandered to the console masses and dumbed down the graphics to DirectX 9. Fortunately, fans of the PC version of Crysis managed to force Cryteks hand and they have since developed a DX11 patch and have also enhanced the textures with added tesselation. It is for this reason that we have decided to include it in our suite of benchmarks.
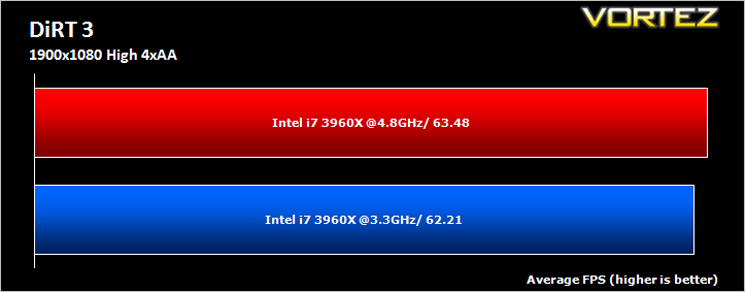
DiRT3
As players race to elevate their global standing, DiRT 3 is back delivering mud, sweat and gears world over: from the intense weather-beaten rally stages of Europe, Africa and the US, to executing performance driving showcases and career challenges where car control is pushed to spectacular limits.
As players race to elevate their global standing, DiRT 3 is back delivering mud, sweat and gears world over: from the intense weather-beaten rally stages of Europe, Africa and the US, to executing performance driving showcases and career challenges where car control is pushed to spectacular limits.
Metro 2033
Based on the novel by the same name, Metro 2033 is a first person shooter with elements of survival horror. As Artyom, you trawl through the mutant infested metro systems of post-apocalyptic Moscow. The game delivers presents a grim ambience that reflects on the overall atmosphere of the underground setting. Metro 2033 uses the setting as a back drop to showcase some of the best visuals of any games out now, making it the ideal benchmark for those looking for the best graphics card.
Based on the novel by the same name, Metro 2033 is a first person shooter with elements of survival horror. As Artyom, you trawl through the mutant infested metro systems of post-apocalyptic Moscow. The game delivers presents a grim ambience that reflects on the overall atmosphere of the underground setting. Metro 2033 uses the setting as a back drop to showcase some of the best visuals of any games out now, making it the ideal benchmark for those looking for the best graphics card.
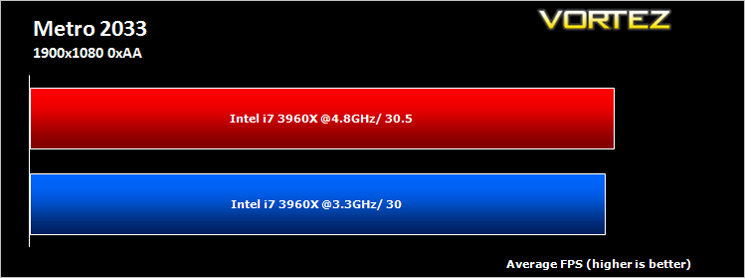
*Note* Other systems were omitted due to varying GPU’s being used which would have had an adverse affect on the results.
Conclusion
When I first cast eye on the MSI X79A-GD65(8D) I was impressed with the aesthetics. Sticking with the black and blue theme of previous generations of boards will no doubt serve MSI well as blue seems to be the new red which was all the rage with X58. I do however take issue with the silk screening methods employed by MSI as while the board may be blue, the copper traces show through the black print as brown giving the board an overall glossy dark brown effect which lessons the motherboards visual appeal somewhat. Once in a case it is doubtful anyone would notice but out in the open it is clearly identifiable.What the board may lack in visual appeal though it makes up for with features. The board has a multitude of attractive features, none more so than PCIe Gen 3 and Quad Channel support with 8 DIMMS. Coupled with SATA 6GB/s and USB 3.0 along with MSI’s Military Class III power components and you have a motherboard that is equipped to take on the best there is.
The MSI X79A-GD65(8D) was always going to be a difficult review due to it being new technology with a new CPU, new chipset, new features meant having little basis for comparison. With this is mind I am hesitant to award anything at present as it could be amazing compared to other motherboards or indeed it could just be a run-of-the-mill offering. However getting a 1.5GHz overclock from stock speed is no mean feat and is testament to an excellent show of power and overclocking ability. Sure there were issues however I feel this is more likely down to an immature BIOS that will be ironed out in future releases more than an inherent fault with the mainboard. Nobody said overclocking was going to be easy but the UEFI BIOS makes the process easier on the eye and easier to navigate thanks to the intuitive control methods available. The motherboard is feature rich and has plenty of scope for expansion. So what do I award?
Clearly the board or rather the BIOS needs to mature a little and the packaging could do with a little improvement but I feel these are minor issues. The GD65(8D) is the top drawer mainstream motherboard from MSI so while it is feature rich, the ultimate offering from MSI will be the MSI X79 Big Bang XPower II. For this reason alone it misses the Platinum award, taking into consideration the minor issues mentioned above I feel the most fitting award would be Silver or bronze however, I have faith the BIOS issue will be resolved so for that reason I’m happy to award the MSI X79a-GD65(8D) the Vortez Silver and recommended awards.
Pros:
+Solid Performer
+Very good (passive) cooling
+Very quiet operation (fan less)
+On-board switches, buttons, LED’s and jumpers
+Military Class III components
+Excellent, informative documentation
+8 Memory expansion slots
Cons:
-BIOS Issues
-Black/Brown PCB
-Basic Packaging
+Solid Performer
+Very good (passive) cooling
+Very quiet operation (fan less)
+On-board switches, buttons, LED’s and jumpers
+Military Class III components
+Excellent, informative documentation
+8 Memory expansion slots
Cons:
-BIOS Issues
-Black/Brown PCB
-Basic Packaging



Click here for an explanation of our awards at Vortez.net. Thanks to MSI for providing today’s review sample.


