







Gaming computer chassis advocates Aerocool send over their mid tower XPredator X1 in Devil Red Edition. Will it be the predator or prey?

Product on Review: XPredator X1 Devil Red
Manufacturer and Sponsor: Aerocool
Street Price: £60 (At time of review)
Aerocool remain a passionate force behind their gaming products, since 2001 they have been supplying the market with innovation in gaming peripherals, PSUs, cases and cooling products. In the computer case division Aerocool have been bringing to market some very affordable solutions for those on a tight budget and today we will be taking a look at one such offering.
In the spotlight today is Aerocool’s XPredator X1 Devil Red Edition; a mid-tower gaming chassis equipped with USB 3.0, fan controller and what promises to be a spacious internal layout for those seeking a case to house their system whilst keeping the cost to a minimum.
We’ve seen quite a few computer cases aimed at the low-mid range over the past 12 months and have been impressed; can Aerocool steal some of the lime light?
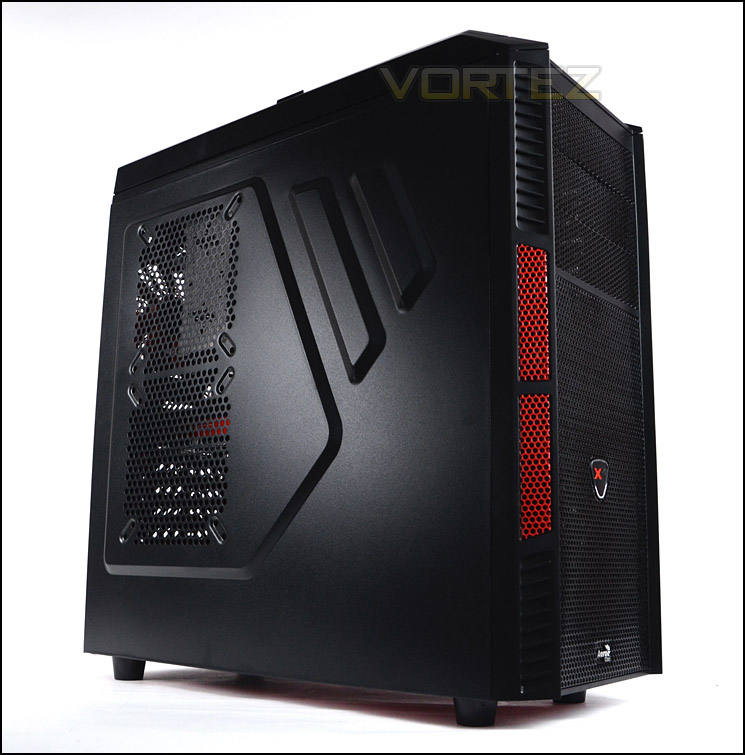
Aerocool on XPredator X1
For those who have dreamed of owning an XPredator case but never end up getting one due to its sheer chassis size, now here is the good news: Aerocool has introduced the new XPredator X1. The XPredator X1 is a standard midi case that comes in four colors which are Black Edition, Evil Black Edition, Devil Red Edition and White Edition. While the chassis is generally smaller and thinner than the X3 and the original XPredators, it is surprisingly capable of supporting long high-end graphic cards up to 400mm. It also has a fan controller knob on the top panel that can support up to 25W.
Technical Specifications
Case Type
Mid Tower
Material
SPCC 0.5mm
Motherboards
Micro ATX/ATX
Chassis Dimensions
482mm (H) x 190mm (W) x 475mm (D)
Drive Bays
3x 5.25″ (Exposed) / 6x 3.5″ HDD or 2.5″ HDD (internal)
Expansion Slots
7
Max length space available for PCI slots
400mm
I/O Ports
2 x USB 3.0 / Audio+Mic
Fan Controller
Support to 25W
Height limit for CPU coolers
( Without side fan ) 158mm
Cooling
1. Front – can install 1~3 12cm fans – (w/Fan adaptor) (1 x 12cm Red LED fan included)
2. Rear – 1 x 12cm Red fan (included)
3. Left Side – 2 x 12 or 14cm fans (Optional)
4. Top – 2 x 12cm fans (Optional)
5. Bottom – 1 x 12cm fan (Optional)
6. Inner front – can install 1~3 12cm fans – (w/Fan adaptor) (Optional)
Mid Tower
Material
SPCC 0.5mm
Motherboards
Micro ATX/ATX
Chassis Dimensions
482mm (H) x 190mm (W) x 475mm (D)
Drive Bays
3x 5.25″ (Exposed) / 6x 3.5″ HDD or 2.5″ HDD (internal)
Expansion Slots
7
Max length space available for PCI slots
400mm
I/O Ports
2 x USB 3.0 / Audio+Mic
Fan Controller
Support to 25W
Height limit for CPU coolers
( Without side fan ) 158mm
Cooling
1. Front – can install 1~3 12cm fans – (w/Fan adaptor) (1 x 12cm Red LED fan included)
2. Rear – 1 x 12cm Red fan (included)
3. Left Side – 2 x 12 or 14cm fans (Optional)
4. Top – 2 x 12cm fans (Optional)
5. Bottom – 1 x 12cm fan (Optional)
6. Inner front – can install 1~3 12cm fans – (w/Fan adaptor) (Optional)
Packaging & First Look
XPredator X1 is presented in a large eco-friendly box which can be recycled. The front shows an illustration of the case with a large silhouette of a spider. The other side is exactly the same, only the sides have some information showing the technical specifications.
Inside, the case is covered in a clear plastic sheet and held in place via dual polystyrene pillars.
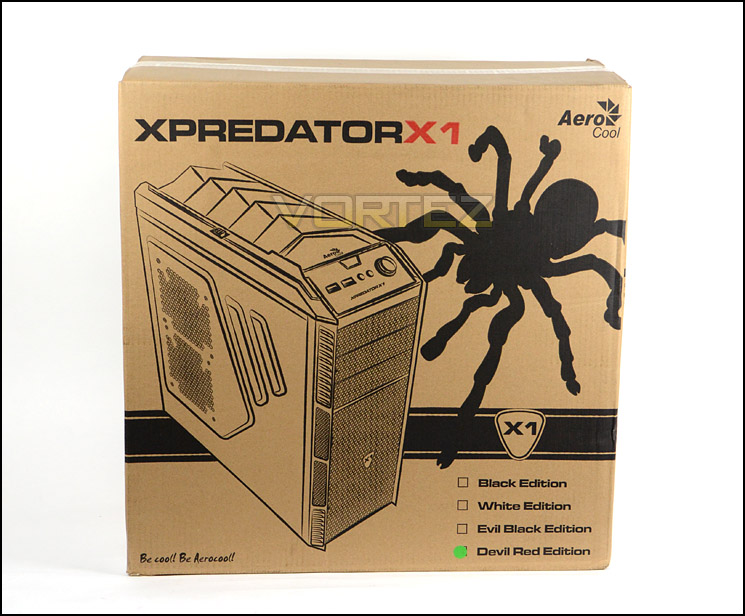
Packaging for XPredator X1
With XPredator X1 out of its packaging we can gage initial impressions. Our case is certainly targeted at the gamer due to its gaudy styling and design. It is due to this design that some may be divided on its visual appearance. There are various editions of XPredator X1 available; we are looking at Devil Red today which is predominately red and black.
On the prominent side there is a large perforated section which can host dual 120/140mm side cooling fans. This region is also slightly convex to assist with CPU cooler clearance. On the alternate side there is a likeness in the design except the mesh area only offers ventilation.
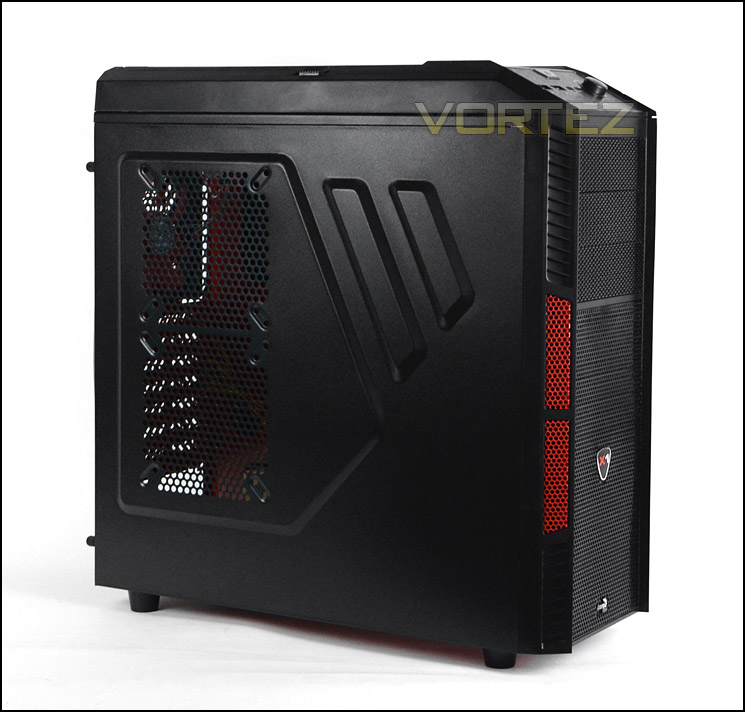
The prominent side with optional fan mounts
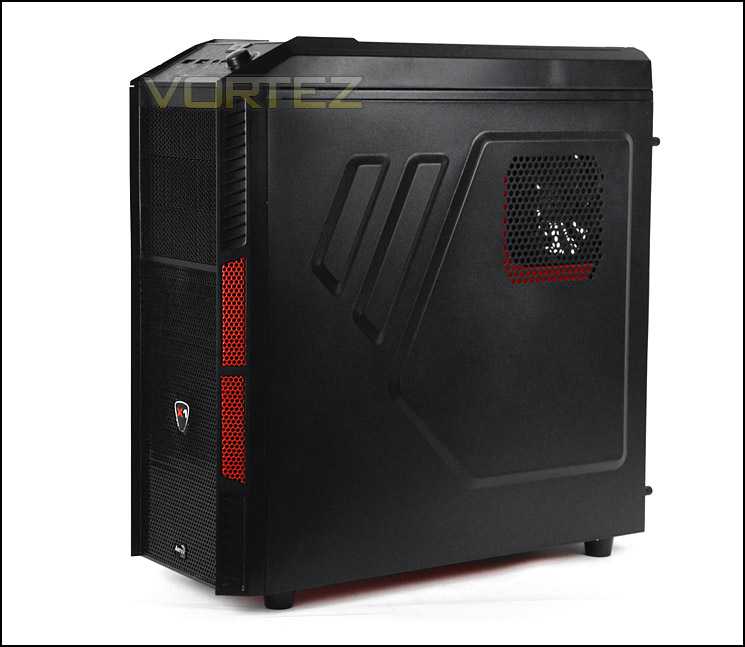
Styling and design that befits the gamer
Exterior
The front of XPredator X1 is largely mesh to work in correspondence with cooling fans at the front. There is 1x 120 LED fan included at the front and up to three slots in total. Above this mesh are the 5.25.” bays, there are three covers which, again have the mesh design as below.
Around the back the fundamentals for the chassis has been coated red. At the bottom there is a space for mounting the PSU whilst at above there are a series of 7x PCI expansion slot covers – all of the covers are disposable (once removed cannot be used again) except for the top cover. This is something which we have a gripe with because if a cover is removed for device installation and that device needs to be relocated elsewhere, gaping hole appears that cannot be covered and can encourage dust build-up. To the side of these PCI covers is a large plastic cover which covers the area where the screw will attach to the PCI device – an odd design concept. Further up there is a 120mm rear exhaust fan and dual circular rubber grommets.
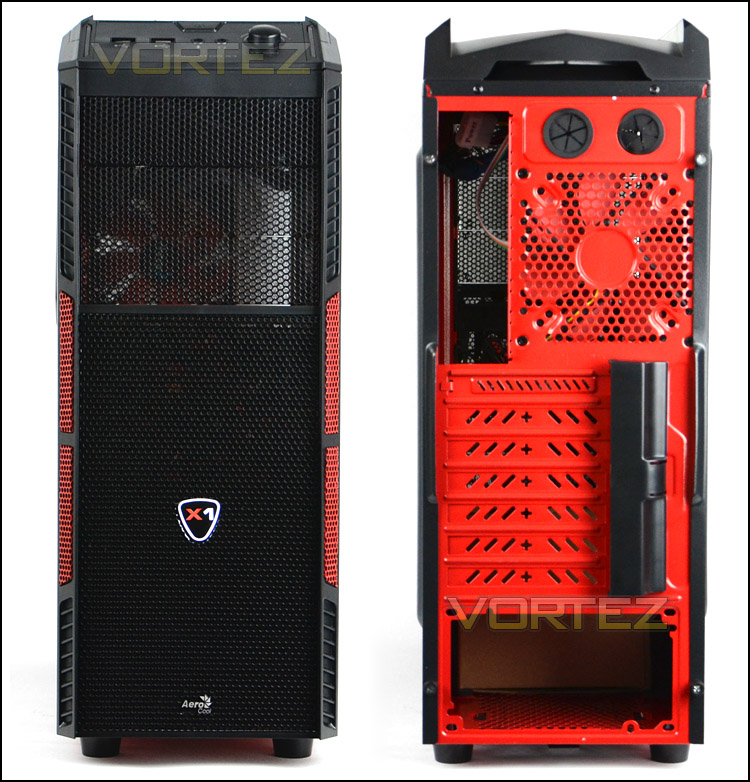
The front and back of XPredator X1
Up at the top of XPredator X1 are the front panel controls which consist of the following:
• 2x USB 3.0 ports (Via internal motherboard header)
• Headphone/Microphone jacks
• Fan controller nob
• Power button
Behind these ports is a small shelf furnished with a non-slip rubber mat for storing items such as keys, USB dongles etc.
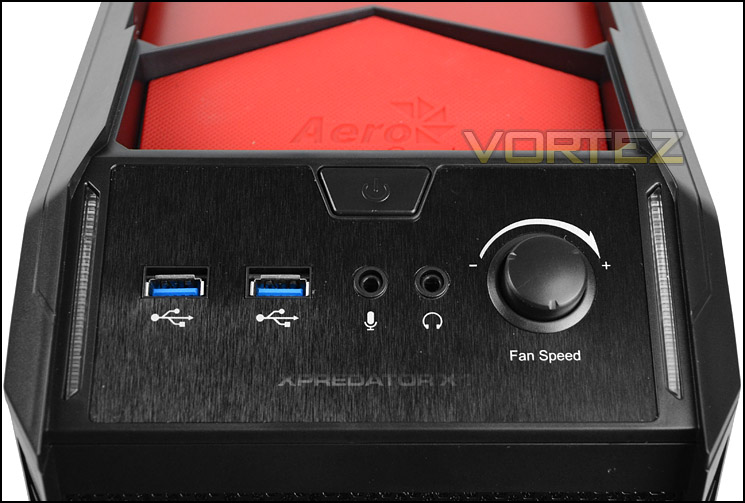
Front panel controls include USB 3.0 and fan control
Further back from these ports is the top section of XPredator X1, by now we can see key similarities to that of Rosewill THOR V2. The fin ventilation configuration can move into two states via the button slider; open and closed. It has to be said, these fins look great in red against the black top fascia.
On the underside of these fins dual 120mm cooling fans can be installed for additional cooling (not included).
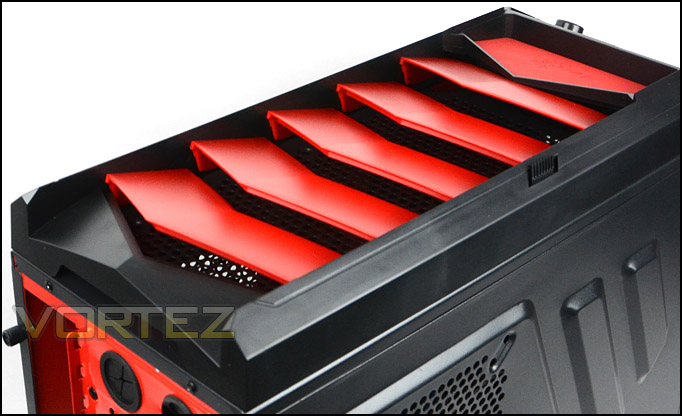
The top with ventilation fins
The underside of XPredator X1 has been coated red too and has four rubber feet to give the underneath clearance and prevent slipping on smooth surfaces. The underside here also has mounting for a 120mm fan inside, and a dust filter sits over the area where the PSU sits. This can be removed from the outside of the case and without having to turn it on its side.
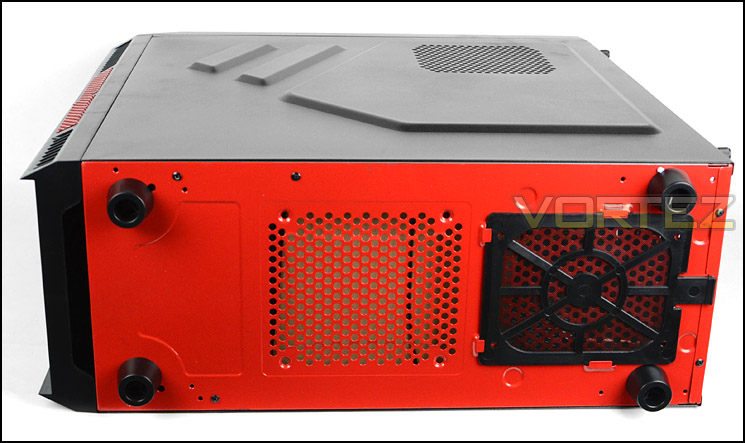
The underside of XPredator X1
Interior
After removing two thumbscrews from either side panel we can delve inside for a good look at the internal layout and features. Continuing the red styling, the motherboard tray and other parts have been given a coat of red – this contrasts really well against the black.
There are numerous cable management grommets running vertically across the ATX/MATX compatible motherboard tray but sadly no cut-outs or grommets across the top, signifying that the CPU power will have to trail across the motherboard as will the cable for the fan should the user want to hook it up to the fan controller. The clearance behind the motherboard tray appears to be very tight.
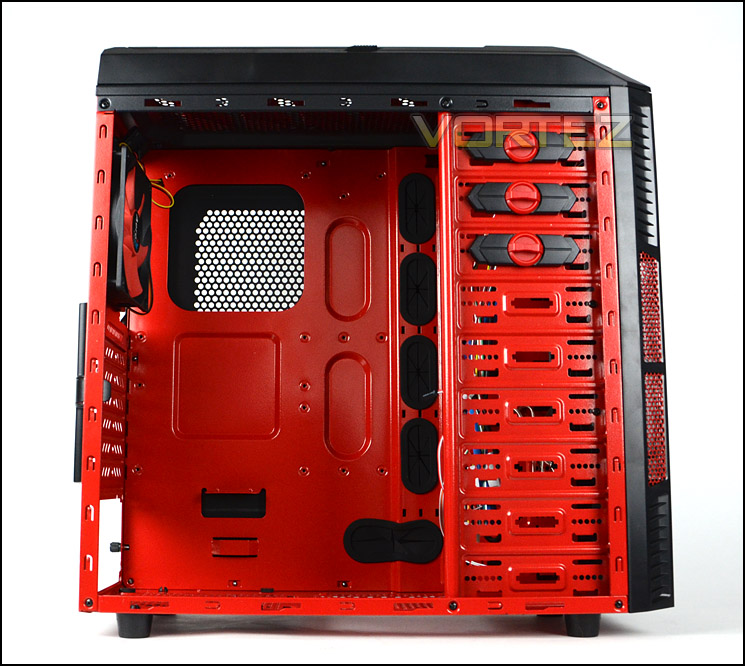
A look at the internal layout
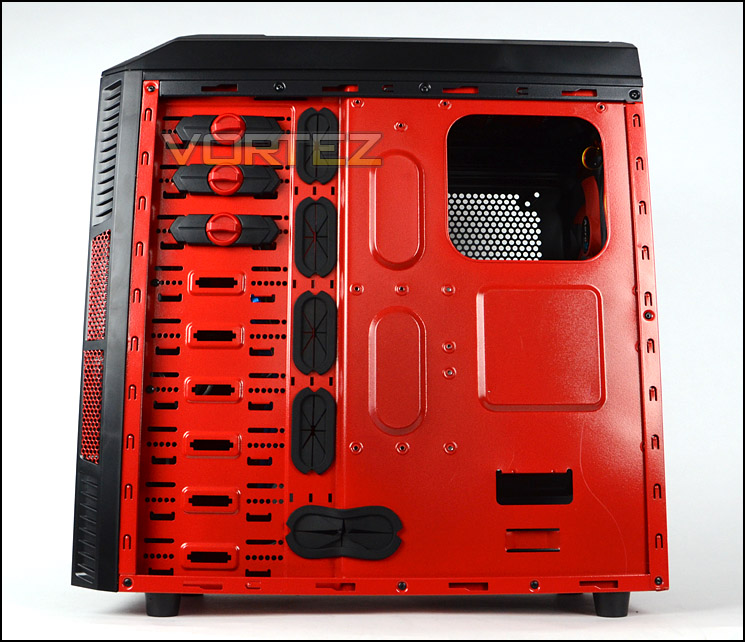
Behind the motherboard tray
As we move in for a closer look, we’ll start with the PSU area. This has been given anti-vibration rubber which is great to see. There is also a dust filter which is removable by sliding away from the case. Next to the PSU area is a mesh area which has mounting holes for attaching a 120mm fan should additional cooling be required.
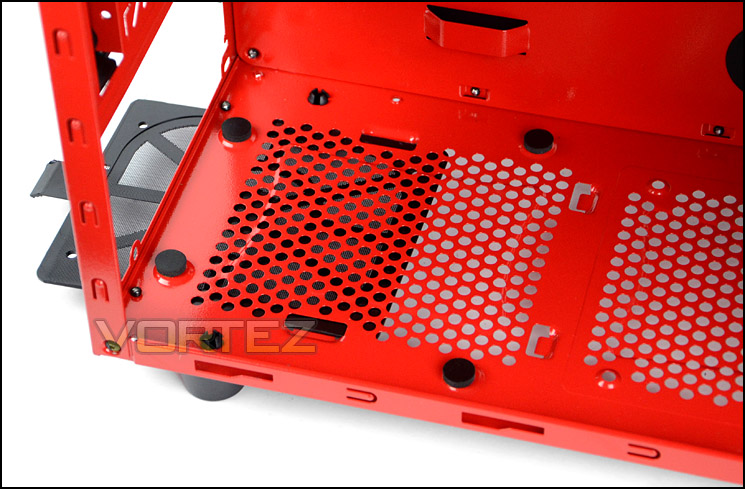
Anti-vibration pads and dust filter for PSU
There are 7x PCI expansion slot covers, whilst one is reusable the others are sadly not and have to be pried away from the chassis in order to make sure of the space there. Disposable PCI covers are a bad idea, even for a budget-orientated case.
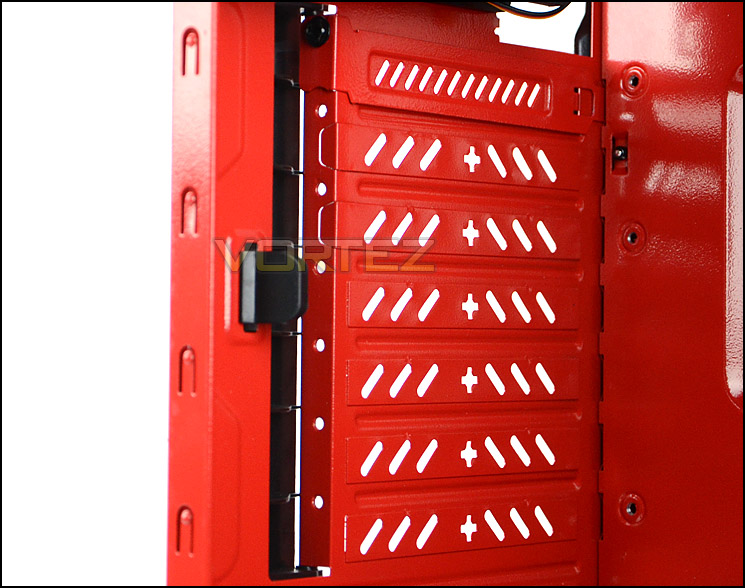
7x PCI expansion slot covers
Interior (Continued)
Continuing on, above this is a 120mm rear exhaust fan (1200RPM) and has both motherboard header and molex for connecting to the fan controller. At the top there is sufficient mounting holes for attaching dual 120mm fans for additional cooling.
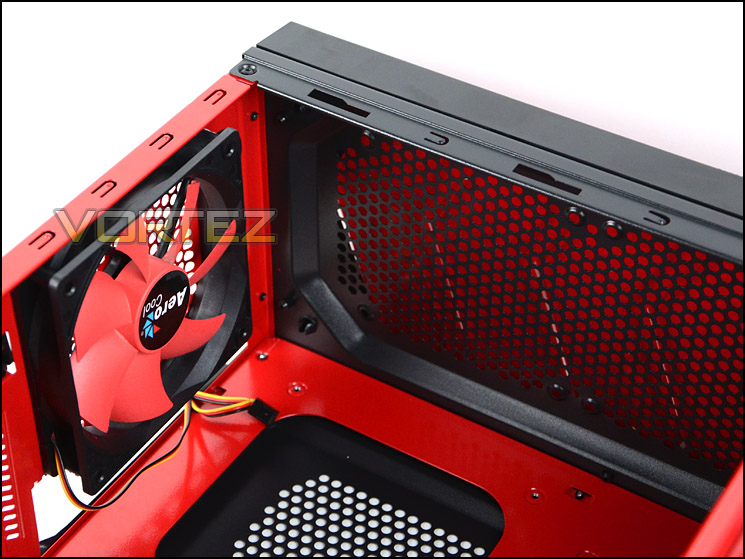
120mm rear exhaust and space at top for dual 120mm fans
Over on the other side there are 3x 5.25” drive bays – each have their respective tool-less design adapter for securely fixing into place. The red latch simply needs turning to open/close.
Beneath this area is a section of 6x HDD slots for accommodating both 2.5” and 3.5” drives. In order to install these, one of the provided trays must be installed – we will cover this in the next section. Towards the front of the case sits a 120mm intake cooling fan which has red LEDs to coordinate with XPredator X1 when it is powered up.
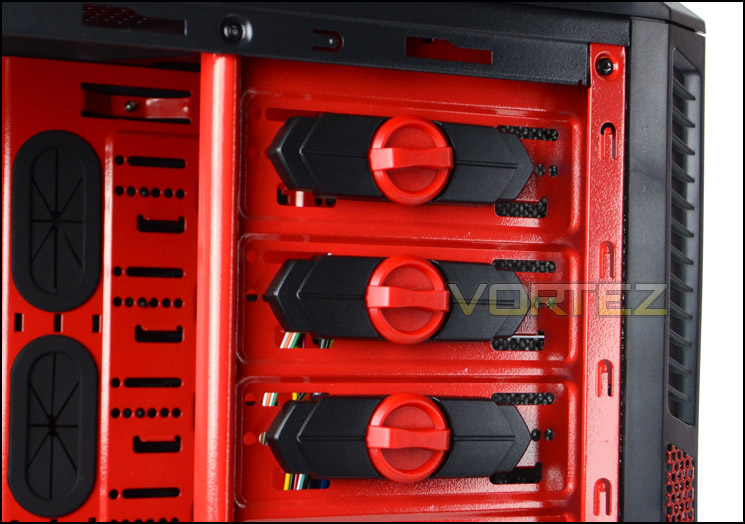
The optical drive section with tool-less design
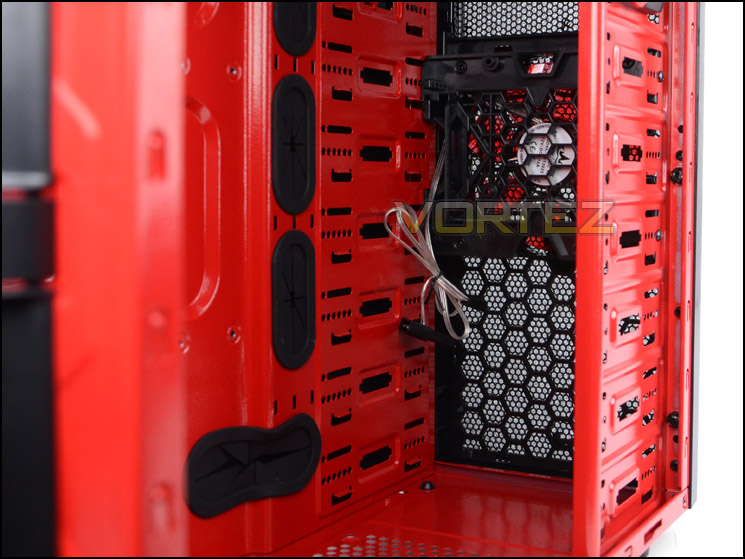
HDD section with 120mm intake LED fan
Installation
Getting your kit into XPredator X1 isn’t as straight forward as with other computer chassis. The inside of the system isn’t as tidy as it usually is for our system builds because some of the cables have to trail across the motherboard and there are limited areas to store redundant cables.
Clearance behind the motherboard tray is minimal and therefore cable management suffers somewhat. Plus it’s hard to comfortably fit the alternate side panel on if you do have the cables routed over onto this side. We’ll look into this closer in the next section.
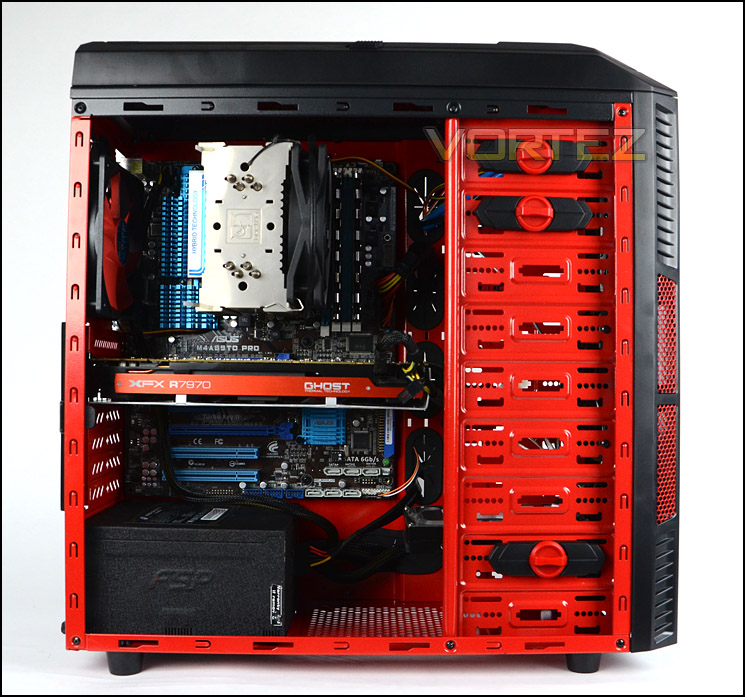
Installation complete – finished system
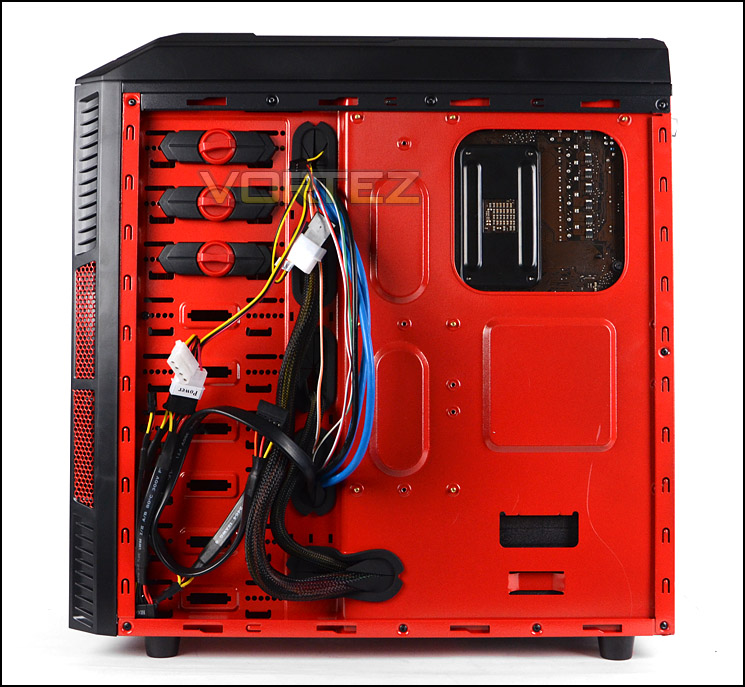
Behind the motherboard tray
Installing a HDD is a little different compared to traditional computer cases. The HDD has to be installed onto a tray which then has to be placed into the HDD rack and an optical drive tool-less mechanism is used to securely fix the tray in its place. The trays provided can host both 2.5” and 3.5” drives.
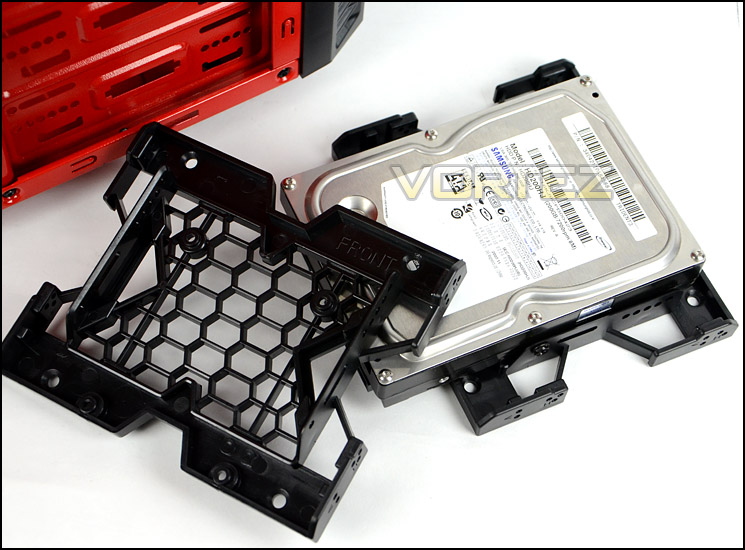
HDD is attached to a tray
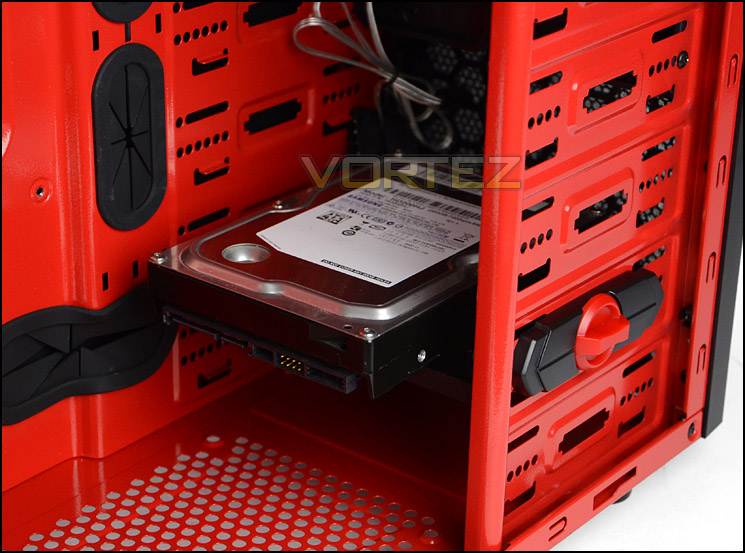
Tray fits into cage and secures via tool-less mechanism
Clearance – CPU Cooler, GPU, Cable Management
Clearance is an important aspect of case design for the enthusiast as it establishes whether certain hardware will be compatible with a chassis or not.
Looking at the CPU cooler first, this is extremely tight on space. Installed is the Noctua NH-U12P which is 158mm in height, Aerocool actually specify that the maximum height for CPU coolers inside XPredator X1 is 158mm so we can just about get away with the test system being inside here – otherwise the side panel would struggle to fit. Bigger coolers such as Noctua NH-D14 will unfortunately struggle to fit inside the chassis.
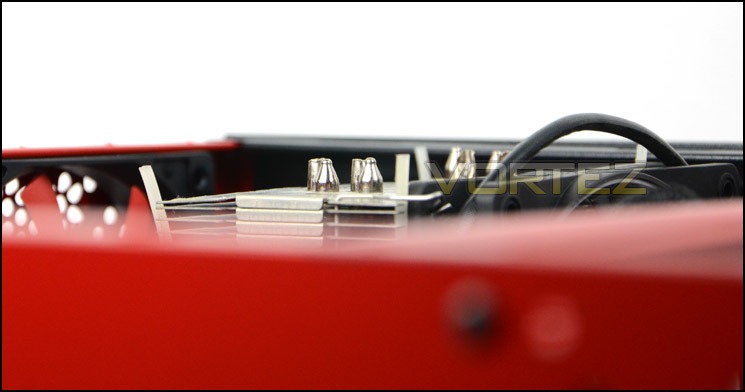
Tight on clearance for CPU cooler
The graphics card clearance is generous and unlimited thanks to the fact that it slots into the HDD cage.
Moving onto the cable management, behind the motherboard tray itself there is no clearance whatsoever so we will be measuring the other side of the HDD cage, near the front of the chassis. Even here there is very little clearance between it and the side panel – 1.3cm. With limited space here this presents some constraints for the cable management, having redundant cables routed behind and out of the way is a normal practise yet trying to get the side panel on is troublesome because the cables take up the space. This issue is made worse by the need for Molex cabling from the PSU for the fan controller.
Rosewill THOR V2 uses a similar, if not the same OEM yet there is more than enough room inside the chassis to manage cables. Aerocool should have made better use of space with their design.
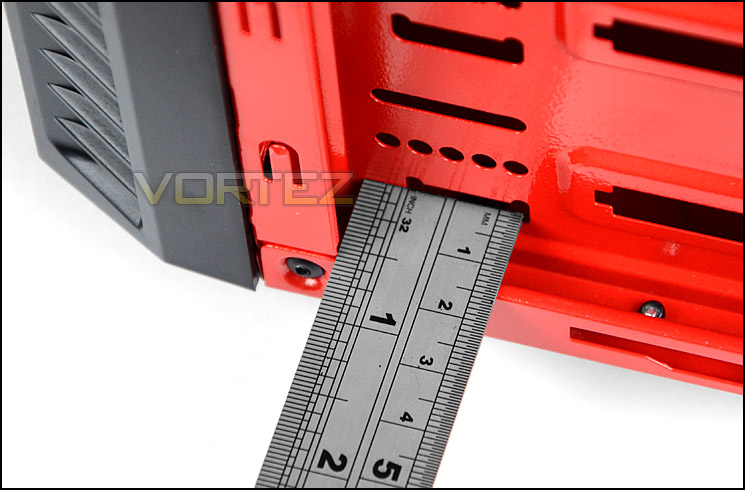
Clearance behind HDD cage is limited, behind motherboard tray non-existent
Thermal Performance Testing
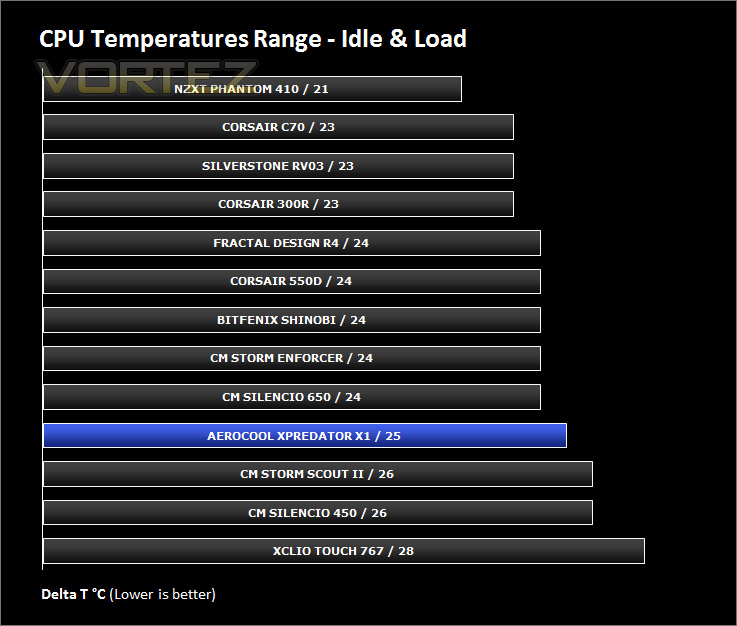
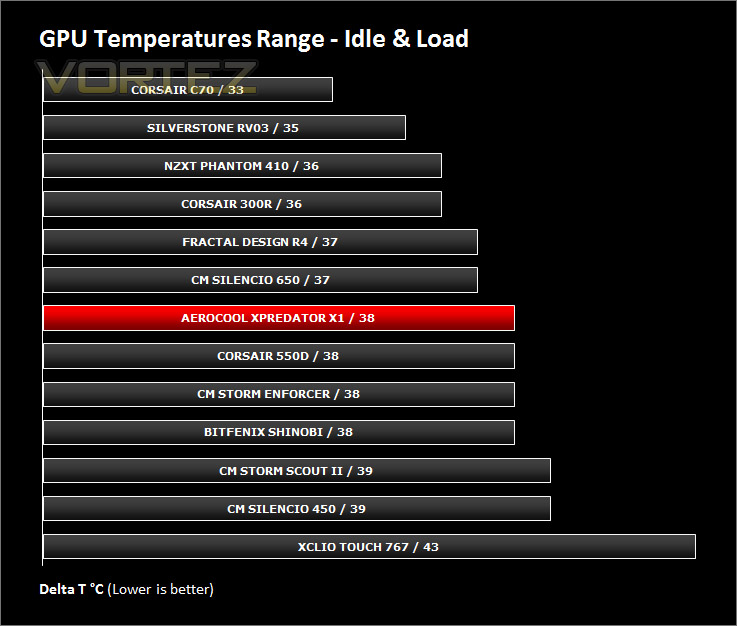
Placed inside XPredator X1 are two 120mm cooling fans, one as a front intake whilst the other as a rear exhaust. This follows a traditional airflow methodology and should yield good results.
To discover the thermal performance of the XPredator X1 I will record idle temperatures after 20 minutes from a cold boot. I will then stress the system and temperatures will again be monitored after 30 minutes have elapsed. Fan controller will be set to highest setting.
For the purpose of accurate analysis the idle and load temperatures for CPU and GPU will be recorded and the range between idle and load will be calculated to determine how efficient cooling is.
NOTE: Ambient temperature is 20C
System Components
CPU AMD Phenom II X6 1055T 2.8GHz
Motherboard ASUS M4A89TD PRO
Graphics NVIDIA GTX 480 (Different from card pictured)
Memory 4GB Mushkin EM3-10666 DDR3
HDD Samsung Spinpoint 500GB SATA-II
PSU FSP AURUM GOLD 650M
Motherboard ASUS M4A89TD PRO
Graphics NVIDIA GTX 480 (Different from card pictured)
Memory 4GB Mushkin EM3-10666 DDR3
HDD Samsung Spinpoint 500GB SATA-II
PSU FSP AURUM GOLD 650M
Noise
XPredator X1 has a fan controller, allowing the speed of the cooling fans to be adjusted. With the fans set to low the noise levels are whisper quiet and unnoticeable, cranking up to the high setting changes the speed but noise levels hardly even alter; the cooling fans inside our chassis are very quiet indeed.
Conclusion
We’ve reached the end of the review and by now if you have read up to this point you will realise that XPredator X1 brings a mixed bag of results.
Like it or not the visual appearance is aimed at the gamer, so its styling and design is tailored towards this market. We like the two-tone red and black which the Devil Red Edition makes use of – it really stands out.
Inside, there are some strange implementations which significantly affect XPredator X1’s ability to be deemed a good chassis. There are no cable management cut-outs at the top of the motherboard tray and as a result CPU power/cooling fan cables must trail across the motherboard – something which we thought all designers had moved away from, obviously not. Furthermore, if the cut-outs were there, the clearance behind the motherboard is non existent. The only possible space to store cables is on the reverse of the HDD cage which only offers minimal space to keep redundant cables tucked away.
Other annoyances are consolidated as the CPU cooler clearance is very tight for mid-high end coolers and PCI expansion slot covers, once removed must be discarded.

It isn’t all bad news though, the cooling fans within XPredator X1 aren’t only quiet at low speed but also full speed. Their noise levels are such that they present no disturbance when used in either mode. One other aspect which is good is the graphics card clearance – because cards seat directly into the HDD cage, there is a huge amount of clearance available (provided they aren’t occupied by HDDs).
Priced at just £60 the XPredator X1 is a low-mid range chassis which unfortunately has a plethora of rivals which are already well-established and frankly do a better job. BitFenix Shinobi, NZXT Tempest 410, Fractal Design Core 3000 are all priced accordingly and yet offer better quality and overall features. Rosewill THOR V2 uses the same OEM and yet they have brought to market a superior product.
Clearance and cable management are fundamental to case design and Aerocool need to carefully observe mistakes that have been made if they want to compete with their popular rivals.
Pros
+ Quiet cooling fans
+ Two-tone colour works well
+ Support for long graphics cards
Cons
– Poor cable management
– Poor clearance for mid-high end CPU coolers
– Most PCI covers are disposable
+ Quiet cooling fans
+ Two-tone colour works well
+ Support for long graphics cards
Cons
– Poor cable management
– Poor clearance for mid-high end CPU coolers
– Most PCI covers are disposable


