







AMD’s new Llano APU arrives along with GIGABYTE’s GA-A75M-UD2H MATX motherboard. Follow the link to see how this pairing does!
Product on Review: Gigabyte A75M-UD2H and A3850 APU
Manufacturer and Sponsor: Gigabyte and AMD
Motherboard RRP: Around £90
E3850 RRP: £100-£105
Manufacturer and Sponsor: Gigabyte and AMD
Motherboard RRP: Around £90
E3850 RRP: £100-£105

The Llano APU (the desktop variety on test here is codenamed ‘Lynx’) contains the CPU, GPU and northbridge. As a consequence production costs and physical power costs are reduced greatly meaning cost to the consumer is lowered and a competitive performance level is maintained while providing a convenient and streamlined solution.
The E3850 on test today is the higher performing model in AMD’s initial release. It contains a quad core central processor that runs at a useful 2.9GHz. It’s based on the K10.5 architecture used in its current quad core models and while it lacks the L3 cache of the Phenom II it does contain twice the L2 cache of the Athlon II – there are also additional tweaks to the architecture to further improve performance and helps position it just between these two classes of CPU.
Also present is the integrated GPU. This is where the AMD solution beats current Intel offerings. Rather than a cut down graphics processor the Llano’s HD6550D design incorporates a core based on the 5670 ‘Redwood’. It should compete well with some affordable graphics cards and even manage to provide sufficient performance for relatively modern games at reasonable settings.
Harnessing this power is Gigabytes A75M-UD2H. A MATX design that is probably the preferred form factor for the majority of HTPC and ‘compact’ PC builds. Being a Gigabyte design it will no doubt be a solid and dependable item using premium components and sport genuinely innovative design touches.
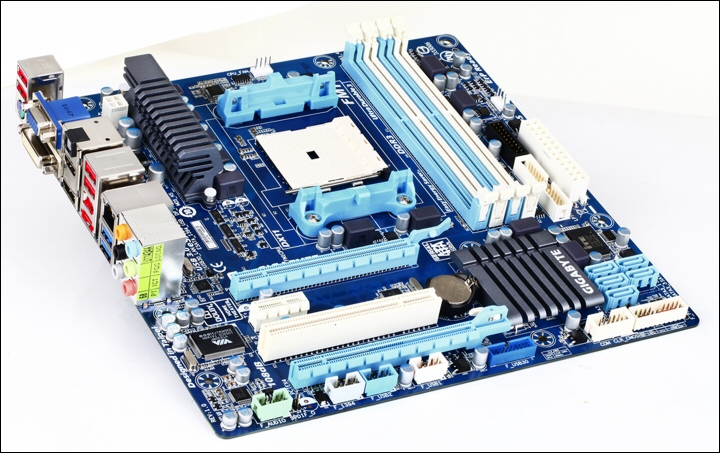
E3850 Specifications
At the heart of the system is the Llano A3850. It’s an impressive item with quad core capability and that full fat GPU in the form of the HD6550D with its 400 stream processors, decent clock speed and UD3 capability.
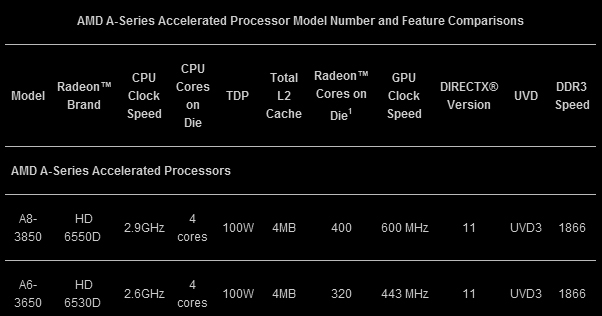
I found this descriptive image of the Llano core. All that computing power squashed into a chip no larger than the previous generation of pure 45nm AMD quad core CPU’s. Very impressive!
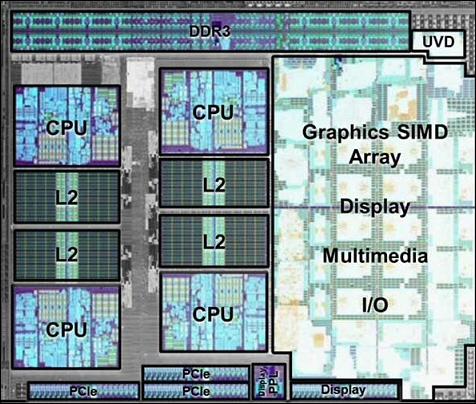
GA-A75M-UD2H Specification
The Gigabyte is similarly impressive (as most boards from the manufacturer tend to be) with a great feature set, all solid cap design and 2x copper PCB for enhanced thermal properties. The full specification run down is below:
Motherboard packaging and extras
The packaging is standard Gigabyte fare. Brightly coloured in a clear and attractive design the main features offered by the board are listed.
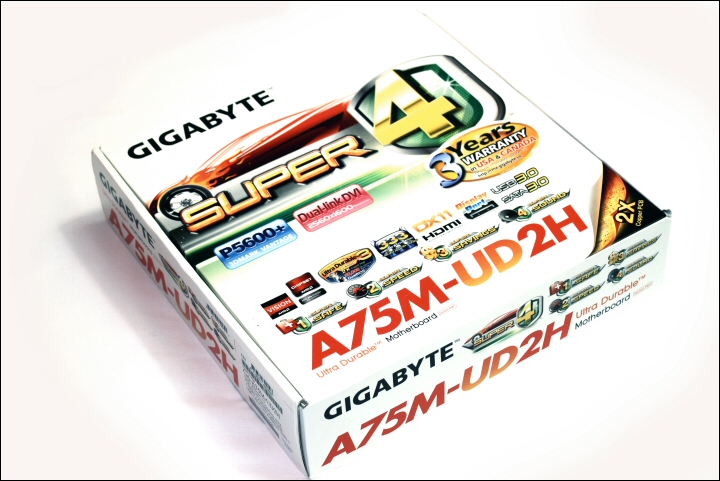
Box front.
The rear contains more specific details and specifications and highlights the important/special features of the board.
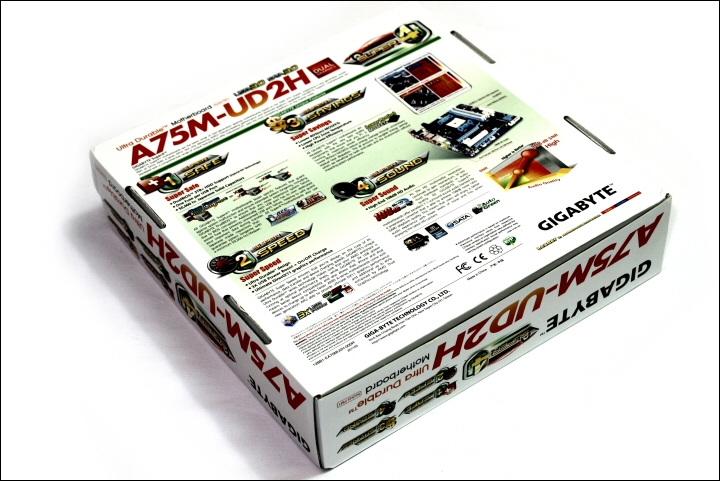
Box rear.
Within the box you are presented with a selection of accessories including manual, installation guide, driver and utility DVD, dolby case sticker, I/O plate and four SATA leads.
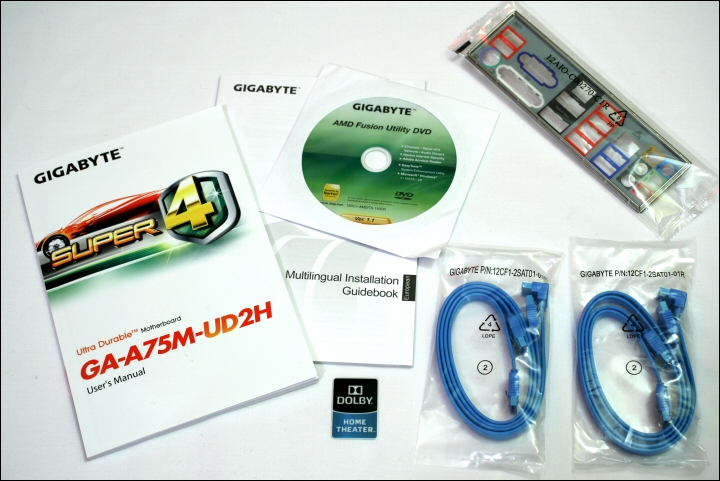
Manual, install guide and other extras.
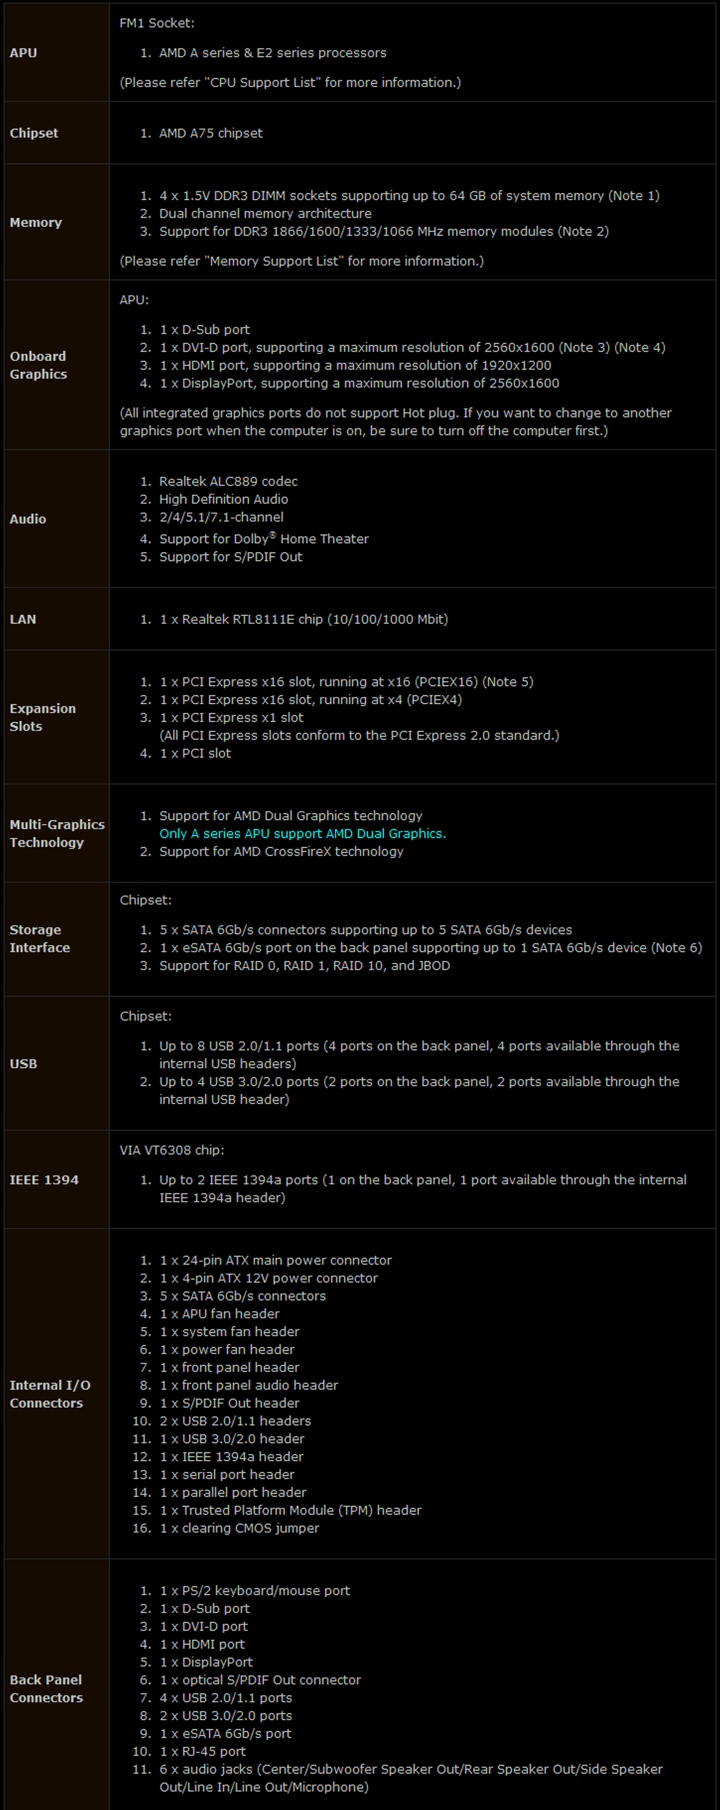
The board itself is a very simple and tidy looking affair. Gone are the ‘Lego’ style colours replaced instead by a cleaner white and blue design. Gun metal coloured heatsinks adorn the boards chipset and the power section of the board. It’s a fanless board design which is a big fat tick in my book!
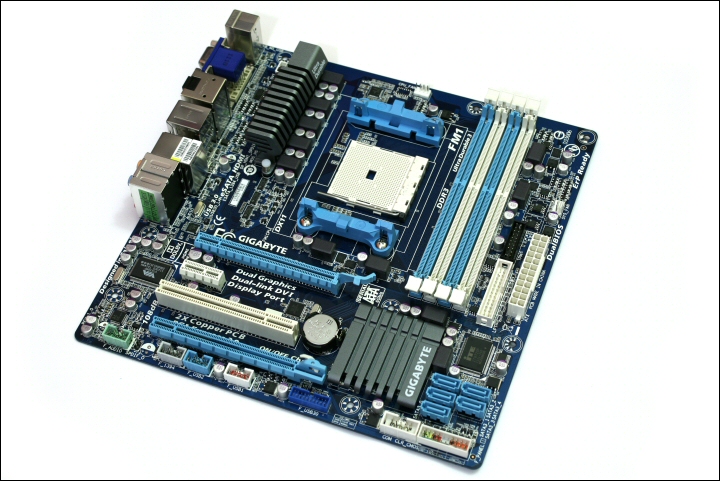
The GA A75M UD2H.
Board closer look
Beginning at the top of the board we see the FM1 socket. This is the home of the Llano Lynx APU. The 32nm design of the Llano chip has meant that the combined CPU and GPU barely take up any more room than the previous generation of 45nm ‘CPU only’ designs. As a result of that the basic chip size (including heatspreader) is similar enough to be able to use original AM3 socket compatible designs with the FM1 socket.
For users with valuable aftermarket coolers this will come as good news since they won’t need to buy replacement retention kits… or in the worst case a whole new heatsink.
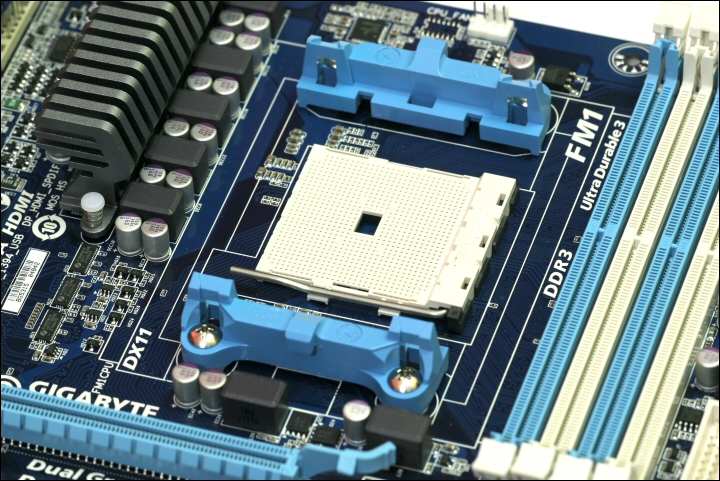
FM1 socket.
To the left of the socket is the mosfet heatsink. A passive design it should work well to deal with the heat put out by the power section of the board. The E3850’s TDP of 100w is very similar to the average Athlon/Phenom quad core so I have no concerns regarding its ability to cope.
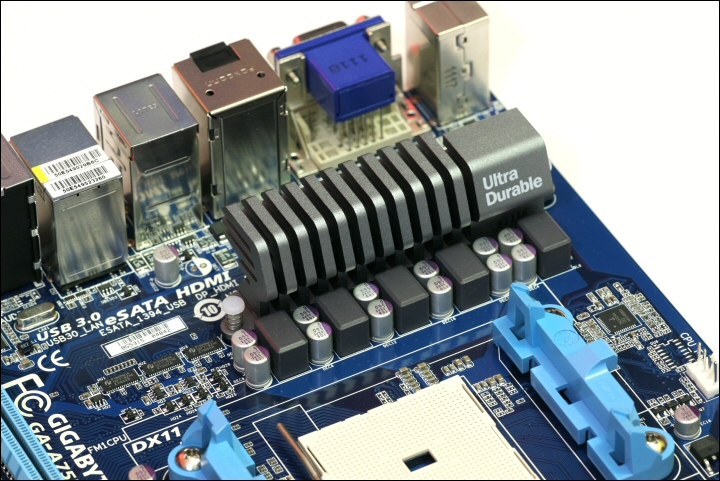
Mosfet sink.
On the right of the socket are the four DDR3 DIMM slots. These are rated to cope with 1866MHz DIMMS when only two slots are populated and 1600MHz with all four populated.
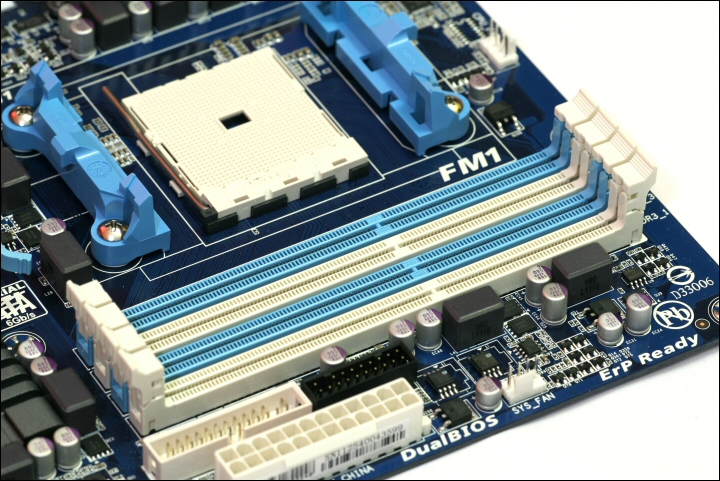
DIMM slots.
Next to the DIMMS we have a parallel port connector (LPT), the 24-pin ATX power connector, trusted platform modular header (TPM) and system fan header.
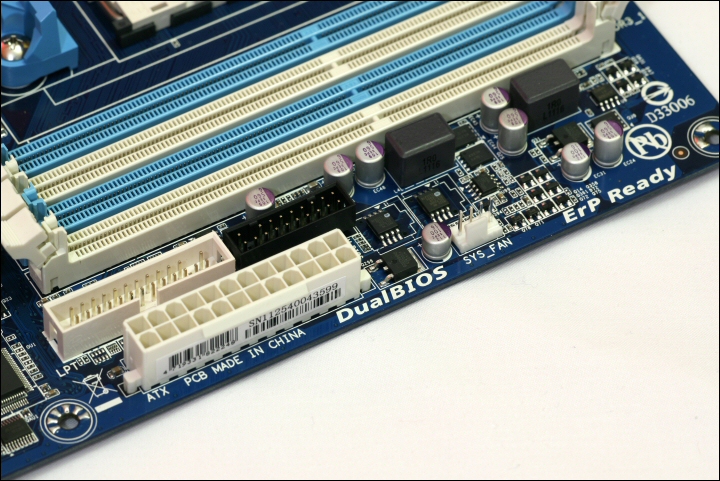
24-pin ATX and extras.
Moving towards the base of the board we can see the BIOS battery and the blue USB 3.0 socket which can be used in conjunction with an optional 3.5″ front panel. There’s a COM port and front panel connector assembly for activity lights, power/reset functionality, etc. Also in view are the five SATA 6.0Gbps sockets and the boards passive chipset heatsink.
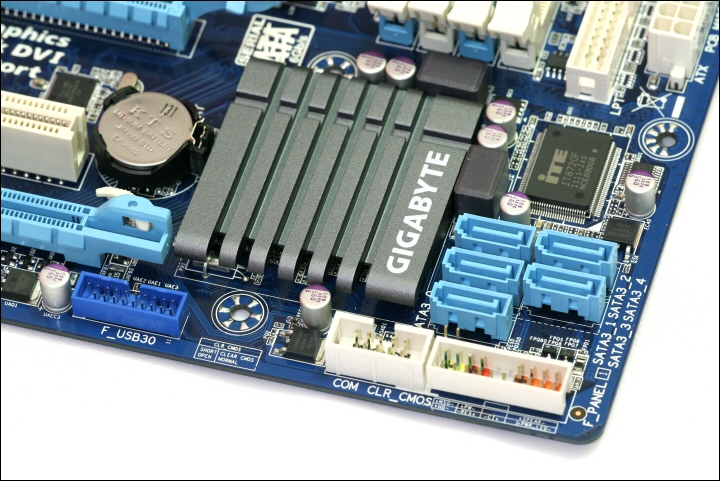
Chipset sink and SATA sockets dominate.
Board continued and E3850
The expansion slots provide a decent level of flexibility. The upper most PCIe full length slots is a full x16 speed socket so if an external GPU is to be used this is the slot to populate. The other is only a x4 speed part despite being a full length slot. The other two slots are a PCIe x1 and PCI respectively. Below these are the two USB expansion ports, a firewire expansion port, SPDIF header and (half out of shot) the boards audio breakout socket.
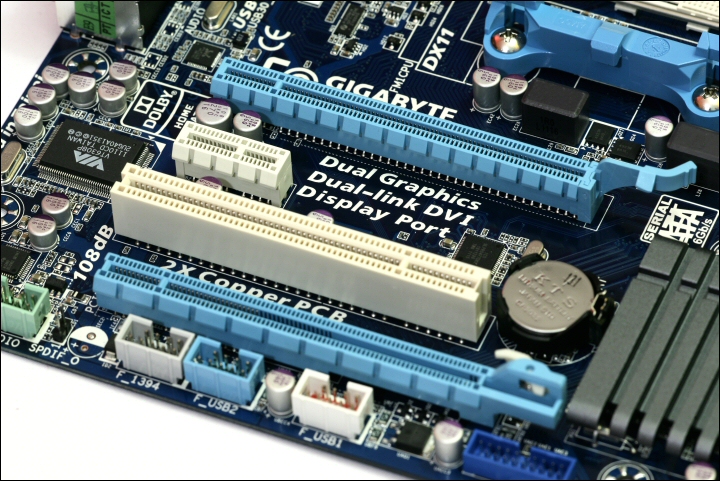
Expansion slots and USB headers.
The last feature of the board is the I/O plate. Here there are a wealth of connectors including six USB connectors (the two blue ones are USB 3.0 capable), a PS2 connector, a variety of video connectors (VGA, DVI, HDMI and Displayport), an optical digital audio connector, firewire socket, eSATA socket, gigabit LAN port and six audio sockets (part of the onboard 7.1 audio system).
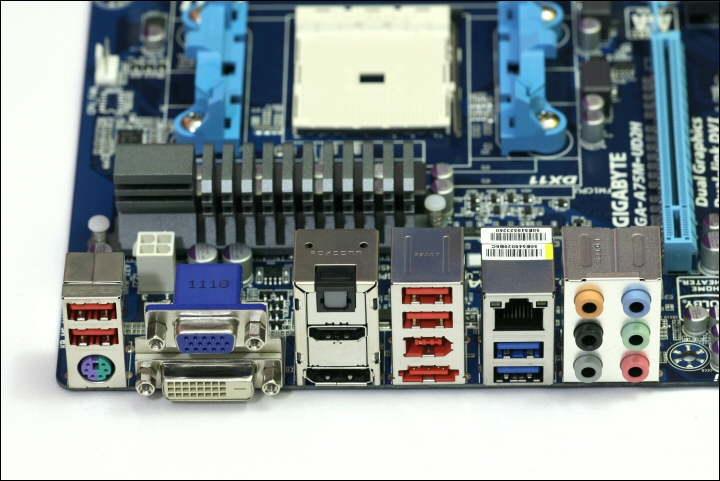
I/O plate.
Next we come to the 905-pin Llano based AMD E3850 chip. This is the business end of the chip ready for install – as you can see with the reduction in pin numbers from normal AMD fare a little gap has appeared in the centre of the chip.
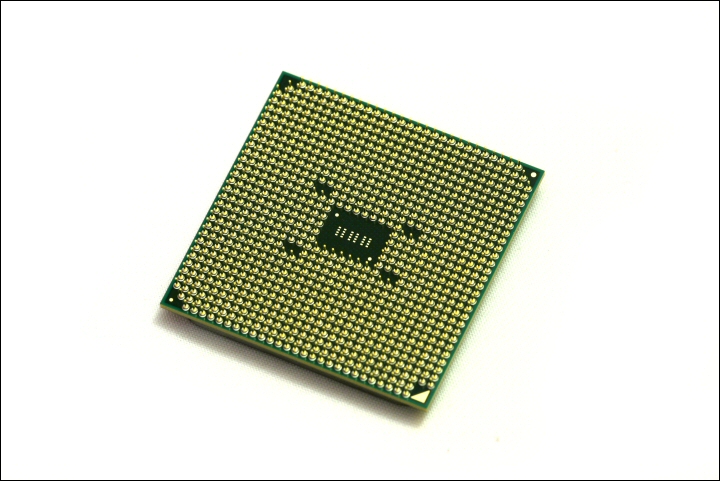
Llano pins.
Installed and ready for use. The design is virtually identical to the AM2/AM3 designs we’ve seen over the years and as a result our trusty old Cooler Master Hyper TX3 heatsink will be used for testing.
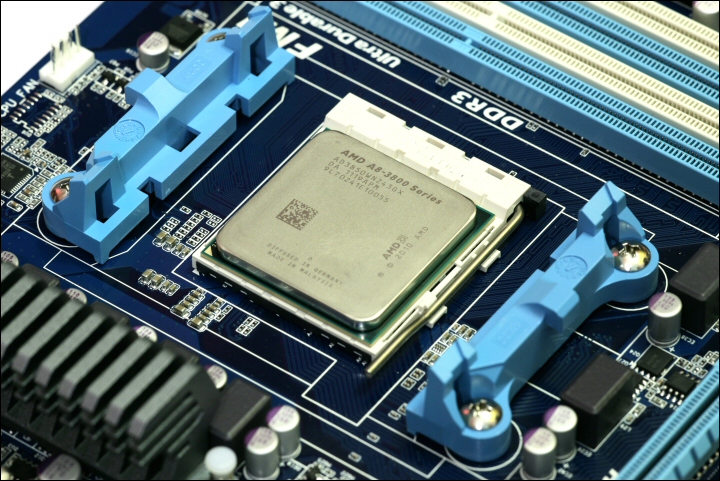
E3850 in place.
Software utility disk
The A75M-UD2H is bundled with a selection of programs and utilities all contained within the driver and utility DVD supplied in the box.
Fire the disk up and you’re able to install all the required drivers in a matter of minutes and all with the single push of the ‘Install All’ button. A couple of restarts and a quarter of an hour later and the drivers are there.
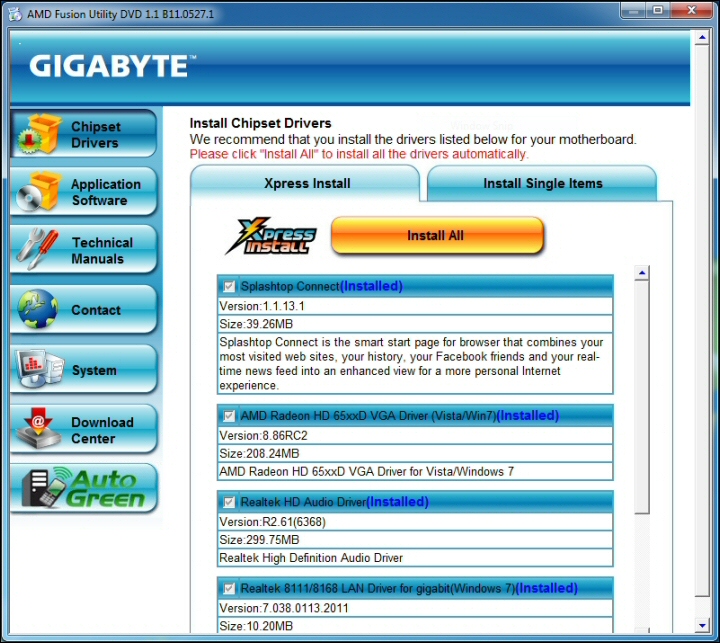
Install All.
Utility wise you get a selection of Gigabyte classics like Easy Tune and @BIOS. Additionally there are some new programs including Q-Share for data sharing across networks, Cloud OC which allows overclocking of the PC from virtually any internet connected device and Face Wizard an application that lets you change the splash screen to whatever you like!
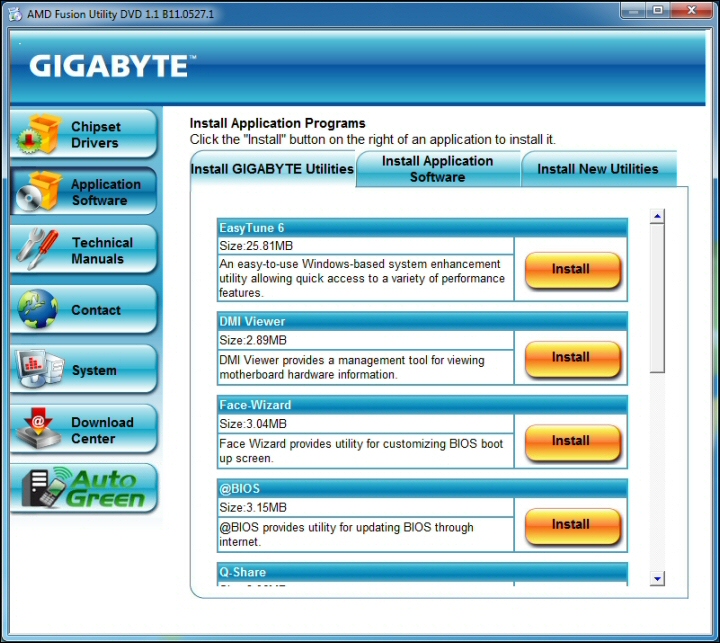
Gigabyte Utilities.
Additional software includes Norton Internet Security, Trend Micro PC-Cillin and Kaspersky Internet Security 2011 – so virus and spyware protection is covered!
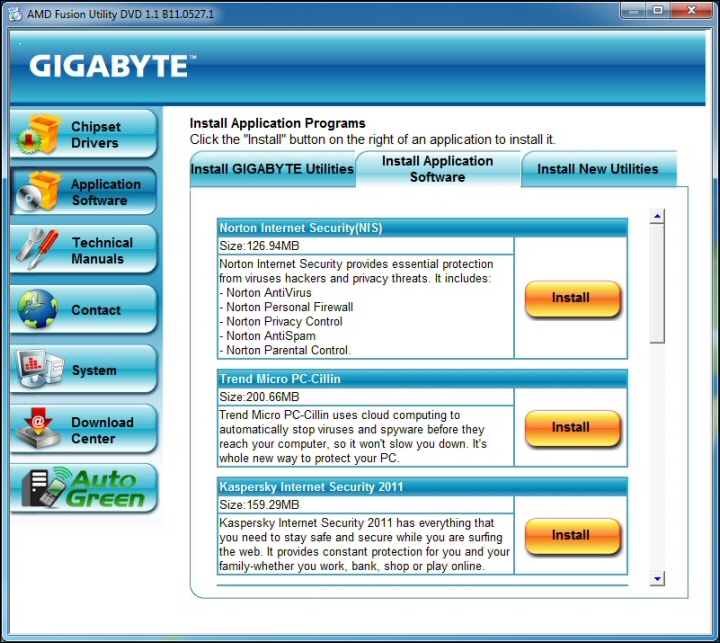
Additional Utilities.
New Gigabyte utilities are also included in the final tab of the application section. 3TB+ Unlock allows users of 32bit operating systems normally constrained to only 2TB drive compatibility to utilise the full capacity of 3TB drives and larger. Certainly useful if you do intend to use a 32bit system. Auto Green is another remote access and control application to allow energy saving control from a suitable Bluetooth enabled device.
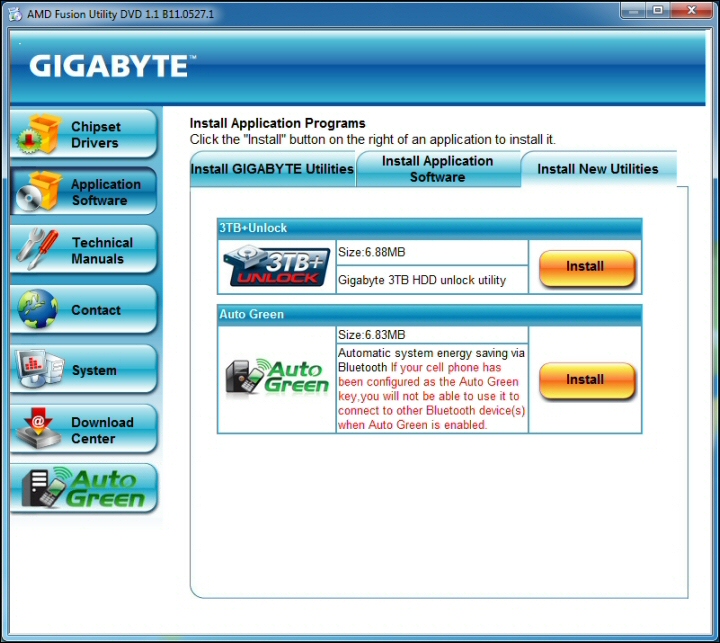
New Utilities.
A selection of technical manuals are available for each of the main programs contained on the DVD. Other features within the utility install include contact details for Gigabyte support, system configuration details, the very useful download center which connects over the internet to check for updated current drives.
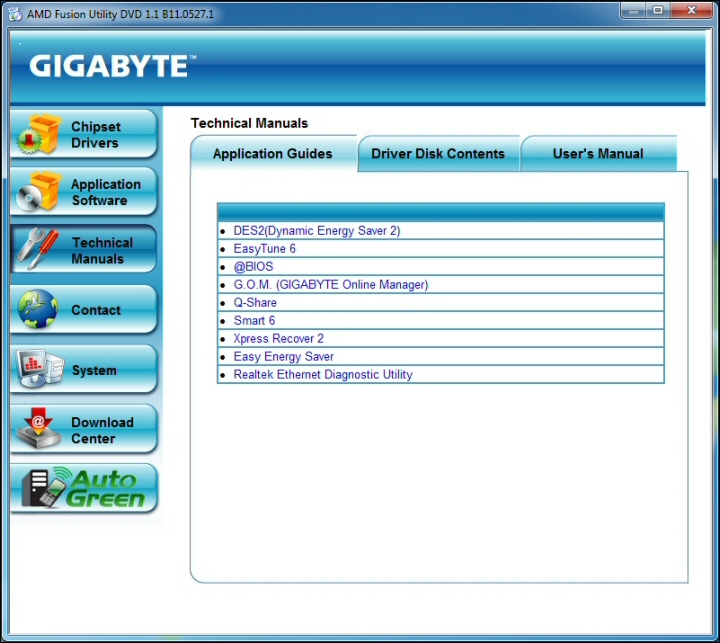
Manuals.
Utilities
In my opinion the most integrated and useful program bundled with the motherboard is Easy Tune 6. All aspects of the board are monitored – from installed hardware specifications to clock speeds and temperatures.
The CPU section presents information in a similar fashion to CPU-Z. CPU model, speed, multi and cache levels are all there. The memory section similarly shows information specific to the DIMMS installed.
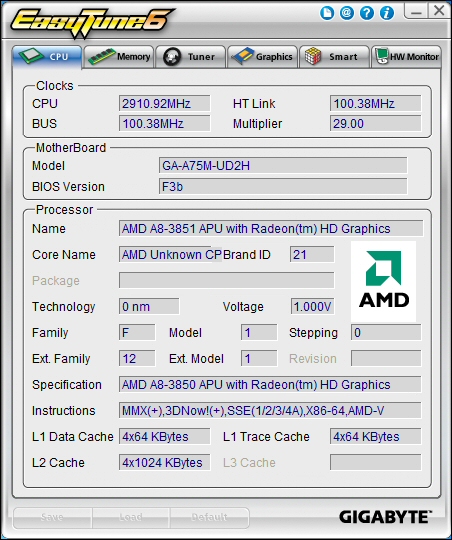
CPU information.
The Tuner section allows both simple and more complex clocking. The ‘Easy’ mode only allows FSB increases whilst ‘Advance’ allows additional memory and PCIe clocking.
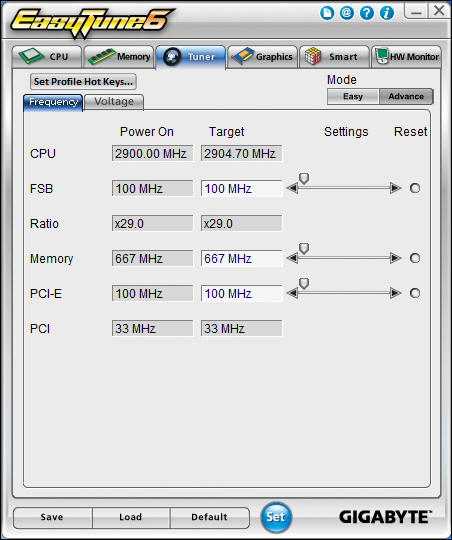
Tuner section.
Another particularly useful and effective portion of the program is Smart Fan. As the name suggests this controls fan speed at given temperatures. Auto adjusting fans can be very effective but some motherboards do have clunkily implemented solutions sometimes meaning that a chance to manually adjust fan speed ranges at given temperatures is very useful.
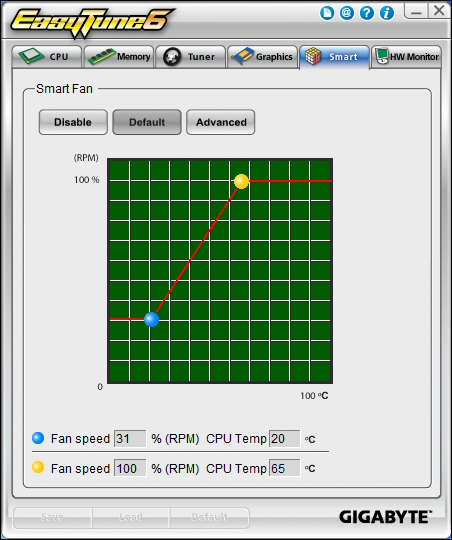
Smart Fan.
The final portion of the program includes hardware monitoring courtesy of ‘HW Monitor’. The first section focuses on system voltages and displays it in graph form with coloured traces for each monitored voltage.
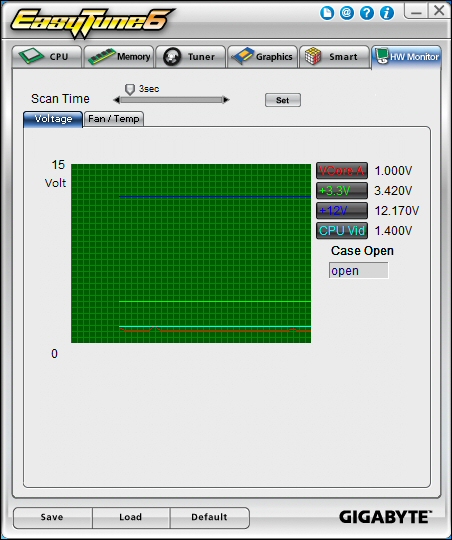
Voltages.
Fan speed and system temperature exist on the next page – here the user can see present system state and also place warning levels to alert them to any unwanted shifts in temperature or fan speed.
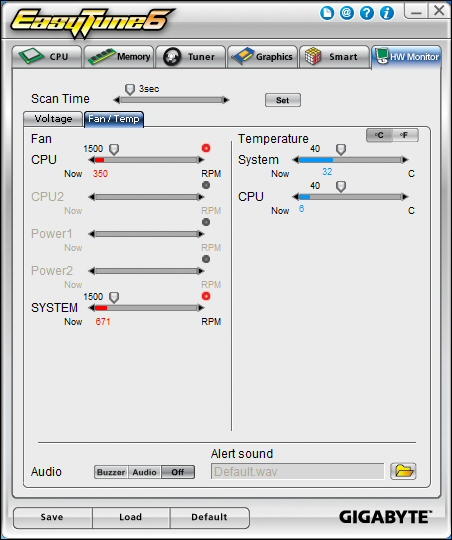
Temps and fan speeds.
Also included on the disk is Splashtop. Splashtop Connect (http://www.splashtop.com/connect) is an extension of your browser to display your favourite web pages in an attractive and simple to use layout. There’s also a Facebook newsfeed column down the left side of the screen to keep up to date with your friends.
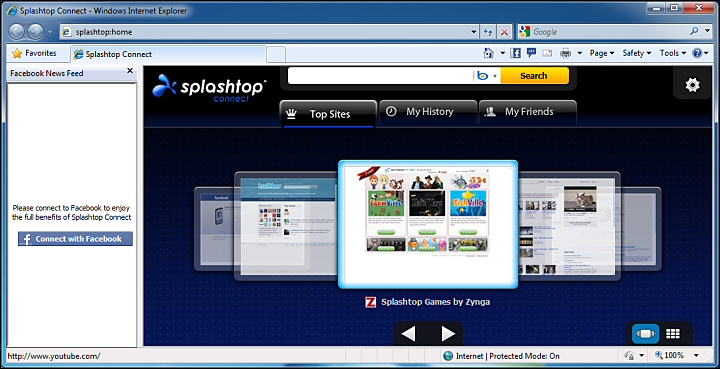
Splashtop Connect.
Also bundled alongside that is splashtop games – a selection of simple and free games.

Splashtop games.
Test Setup
APU: AMD E3850 – Quad core @ 2.9GHz and HD6550D @ 600MHz
RAM: 4gb OCZ DDR3 1333mhz
HDD: 160gb WD 7200rpm SATA HDD
Optical drive: HP DVDRW and Liteon Bluray/HDDVD combi drive
CPU cooler: Cooler Master Hyper TX3
PSU: Nexus RX8500 850w (120w pico PSU when installed in Hoojum case)
Case: DimasTech Bench/Test Table Easy V2.5
RAM: 4gb OCZ DDR3 1333mhz
HDD: 160gb WD 7200rpm SATA HDD
Optical drive: HP DVDRW and Liteon Bluray/HDDVD combi drive
CPU cooler: Cooler Master Hyper TX3
PSU: Nexus RX8500 850w (120w pico PSU when installed in Hoojum case)
Case: DimasTech Bench/Test Table Easy V2.5
Installation
Installation onto the Bench table was typically a simple affair due to the integration of the CPU and GPU on the APU. Install the board, pop the APU in place and install your AM3 heatsink. Besides popping the DDR3 DIMMS in place and plugging the drives in there’s not much else to do.
Socket placement for power and data have been well thought out and exist right at the edge of the PCB. With a suitably cable managed case a very tidy install would be on the cards!
Overclocking
Overclocking was fairly eventful. Initially I simply could not overclock beyond stock. I first believed I had a DDR3 issue as there were suggestions on the web that different types of memory could cause problems. I swapped out three different varieties of DDR3 from two different manufacturers with no change and certainly no success.
Due to the boards low power draw it turns out that high power PSU’s acually don’t work terribly well at anything other than stock. The installed Nexus 850W PSU is a very high quality unit that I’ve had no issues with whilst benching over many many setups.
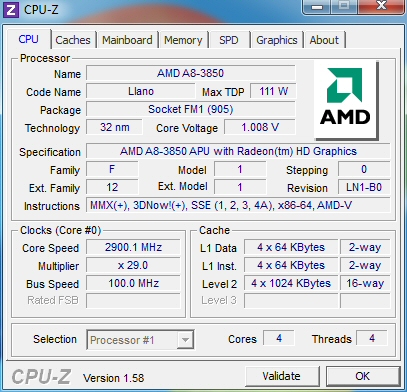
Stock clock.
Then I came across another possible cause… due to the boards low power draw it turns out that high power PSU’s acually don’t work terribly well when clocking. I had no issues with the supply at stock speeds but at anything other than stock it would continuously restart and reset. The installed Nexus 850W PSU is a very high quality unit that I’ve had no issues with whilst benching over many many setups so initially it was a surprise to discover this odd issue – however, having thought about it, a high power PSU isn’t really expecting a low level load so being tailored to work at that level is not a priority.
A change of PSU later to a lower power Hyper 580W unit made the system completely managable. I was able to clock the system with no restarts or resets. An adjustment of the FB from 100MHz to 133MHz and with the multi reduced to 25x cave me a 400MHz+ overclock to 3.33GHz.
All that was required was a slight CPU voltage bump of 0.075v (taking it to 1.475v) and an adjustment of the DDR3 voltage to 1.65v whilst slackening the timings to counter the additional stress from the overclock.
Stability testing was completed without issue so I went ahead and benched with that 15% clock boost.
Sound
Fan control is as good as you’ll find these days. The fan speed ramps up gradually as temperatures rise but is never a distraction. The passive nature of the board components means in a simple and streamlined system only the CPU will have active cooling making it potentially very quiet.
Temps
Temperatures for the APU were perfectly acceptable under the TX3. The mosfet heatsink only ever runs luke warm which is excellent. It’s a good size and its proximity to an installed cooler on the APU means it should benefit from a little airflow. The chipset sink is very low profile and doesn’t have that many fins to aid cooling. As a result it does get quite warm but with a little bit of case airflow there should be no issues. I experienced no stability problems during testing.
There was one odity – the CPU temerature began very low. Obviously well below ambient so must be untrue. I believe the loaded temperature is closer to accurate though so perhaps it’s a small hardware/software bug that can be resolved in future BIOS and/or program updates.
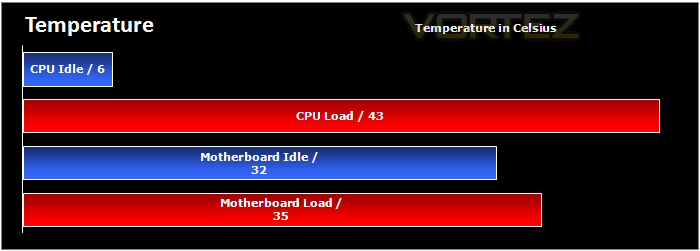
Board and CPU temperature.
Results – AIDA64
I tested desktop and encoding performance initially using AIDA64’s CPU testing routines, Futuremark’s PCMark05, SuperPi, Cinebench and the x264 HD benchmark.
I also primarily tried the board as an HD video source and used a Liteon Bluray/HDDVD combi drive for testing. After installing the relevant PowerDVD suite that came with the drive I tested a couple of disks from my collection. Playback was smooth and stutter free. I also tested a few HD video clips off the web with very similar results… seems (as with the last AMD APU tested) like UVD3 is working well again!
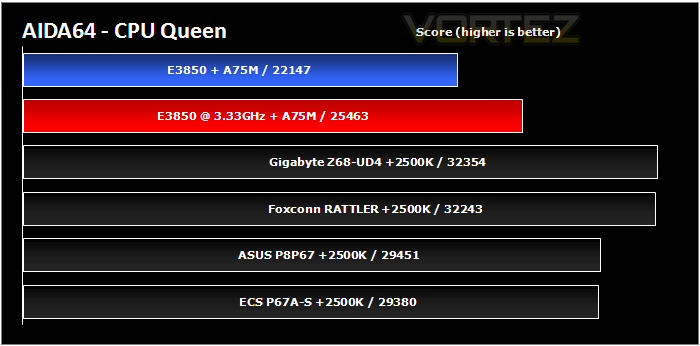
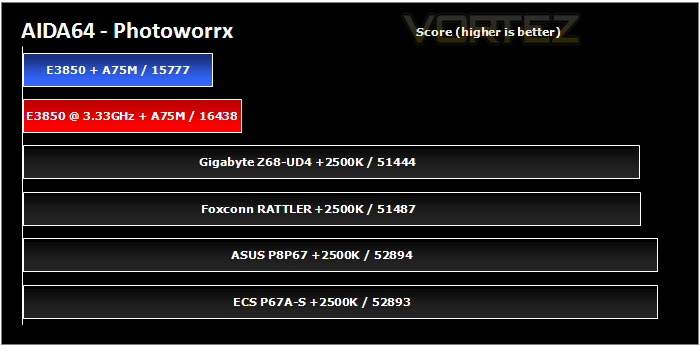
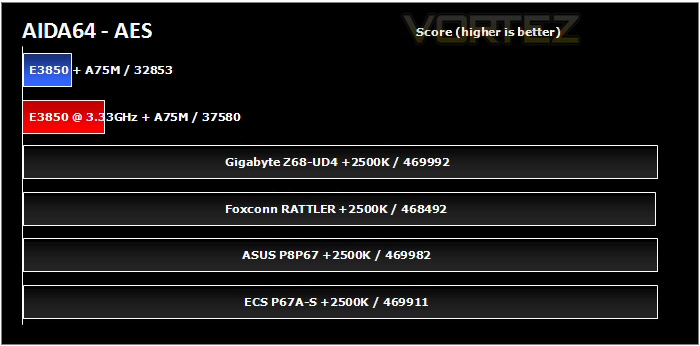
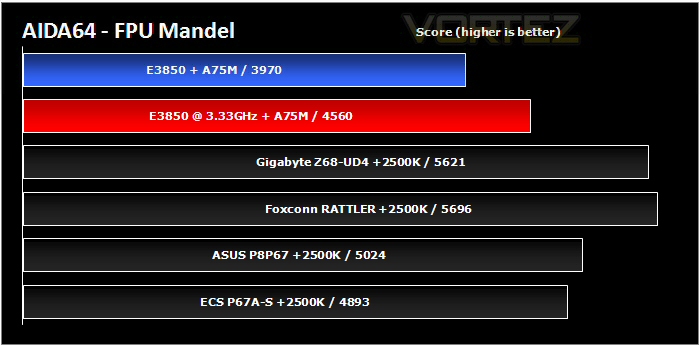
Now onto the benchmarks. Up first is AIDA64. I’ve not tested with it before so some of the comparison results come from Dave’s testing – HERE
Of course it’s computational ability won’t match Intel’s current offerings but it’s by no means a slouch. Intels archtecture is notoriously good at this type of benchmark so the results are largely as expected – although the E3850 did well in the CPU Queen and Mandel tests!
Results – PCMark05 and Superpi
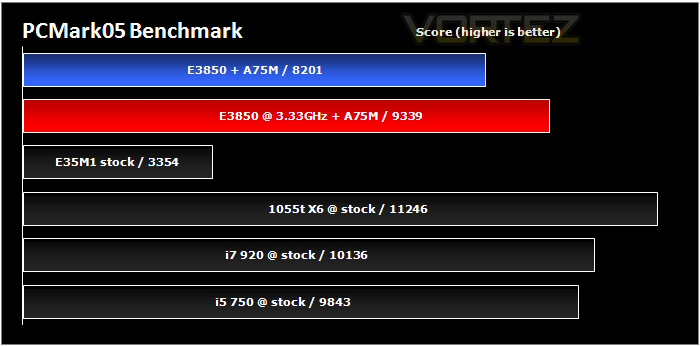
PCMark05 is a mixed test of general desktop duties to give a general overview of office style performance.
It appears at around the level I’d expect given it’s architecture and clock speed.
PCMark05.
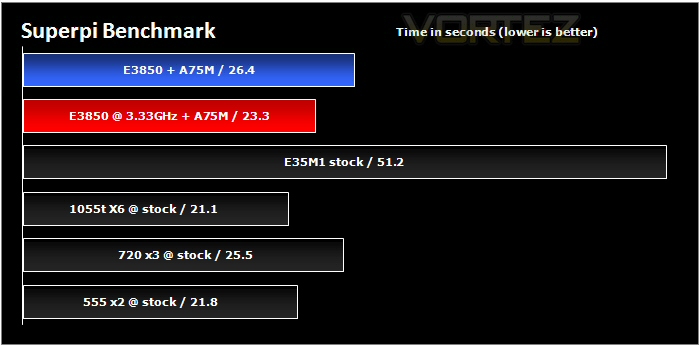
SuperPi was next. This program offers a good impression of how raw clockspeed increases effect performance.
The performance here is not amazing but it’s certainly at the slower end of the range I’d expect for this chip.
SuperPi.
Results – Cinebench and x264HD
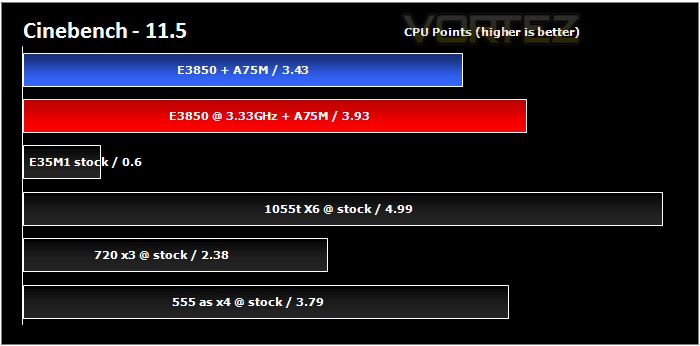
The Cinebench testing suite followed. Rendering a 3D image is quite a difficult task so this is a good test of raw performance. It’s multithreaded too so will fully utilise all the cores available to render the 300,000 polygons across around 2,000 objects in the scene.
Another decent score here. Not a million miles away from the 555 Phenom II unlocked to a full quad core. Considering the lack of L3 cache and being 300MHz slower per core the score is perfectly acceptable.
Cinebench.
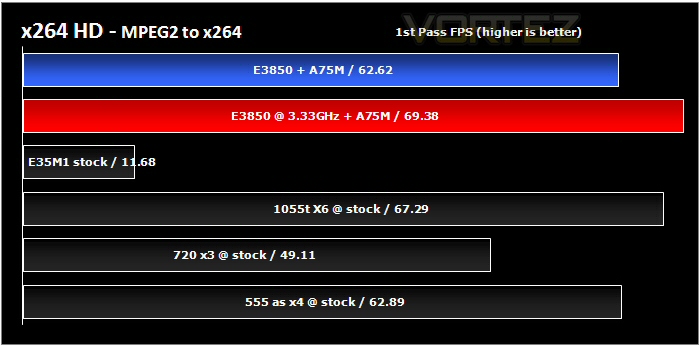
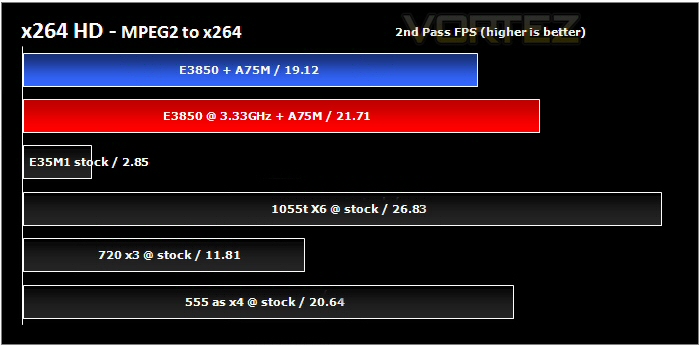
The final desktop test was the x264 HD benchmark. This ‘real time’ video encoding test makes four passes over two different files to convert a DVD quality MPEG-2 video into an x264 video file. I took the average of each of the four results from the two groups to generate the final result.
Very similar performance to the full quad core 555. I also checked the OpenGL performance of the E3850 APU’s onboard GPU and it returned a number that wasn’t a million miles away from a similar quad core and GTX260. Very very impressed!
Pass 1.
Pass 2.
Results – 3DMark06 and Vantage
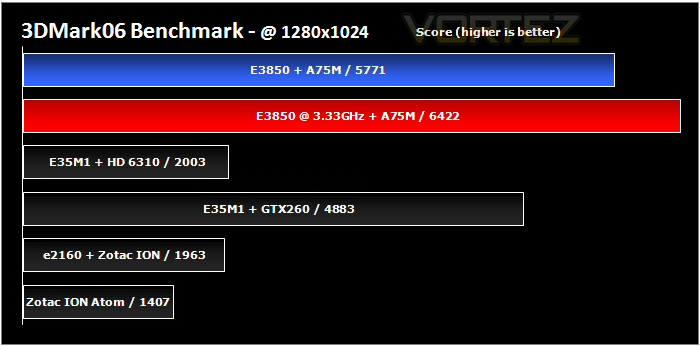
Up first is Futuremark’s 3DMark06 benchmark program.
That’s really very impressive and goes further to prove that the integrated GPU within the Llano APU happily matches a reasonable discrete GPU.
3DMark06.
Next is Futuremark’s newer 3DMark Vantage benchmark program.
Once again there’s no competition from the Fusion setup.
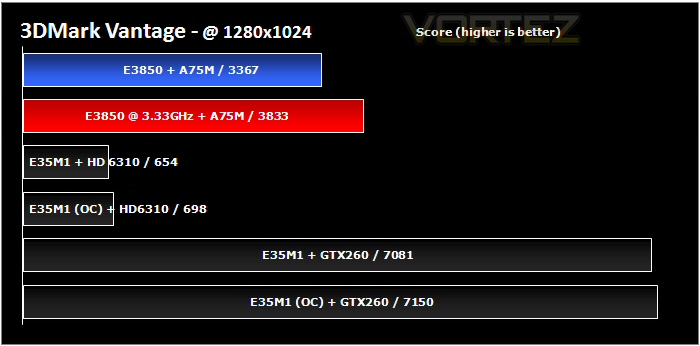
3DMark Vantage.
Results – Blacksite
Moving onto actual games – our results here represent the average frame rate produced by the system.
Black Site up first – a well programmed game that looks great and is a good test of hardware. All settings were at their highest and only resolution was adjusted. All the alternate systems in the listing used a Gainward GTX260.
This was choppy at anything other than 1280×1024 but it is truly astonishing to consider that a machine pulling no more than 120w could happily play this at all – especially with all the settings set to high as they were.
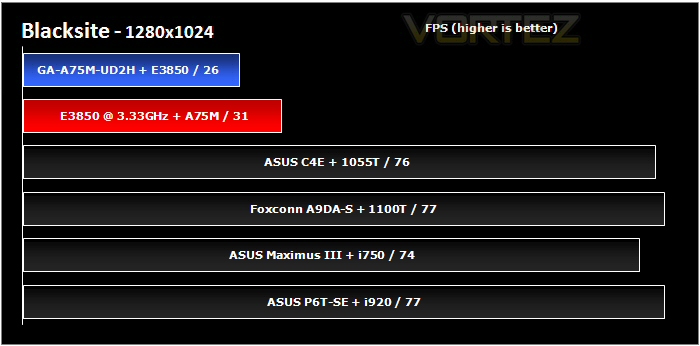
1280×1024.
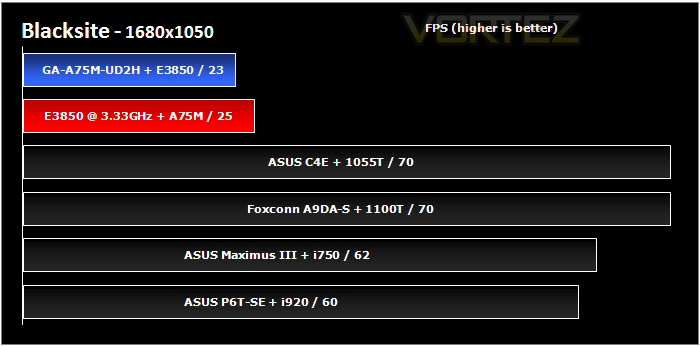
1680×1050.
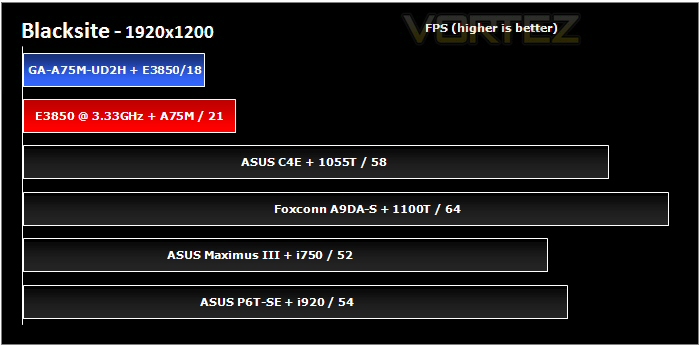
1920×1200.
Results – Unreal Tournament III
The other game on test is Unreal Tournament III. This is a game that scales well with improvements in hardware and system speed. It was run at highest settings and only the resolution was adjusted. All the alternate systems in the listing used a Gainward GTX260.
The onboard GPU provided completely smooth playback despite the high settings. It looked great and I was genuinely astonished at how well it played back… even at a mighty 1920×1200 resolution! At 1280 and 1680 resolution it even betters and then matches the E35M1 with the GTX260 installed. In fact @ 1920 it isn’t a million miles away!!
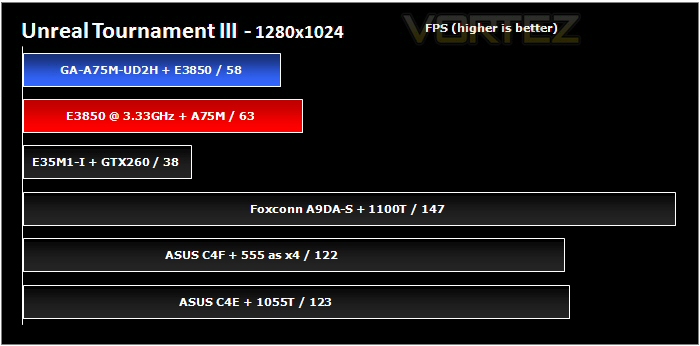
1280×1024.
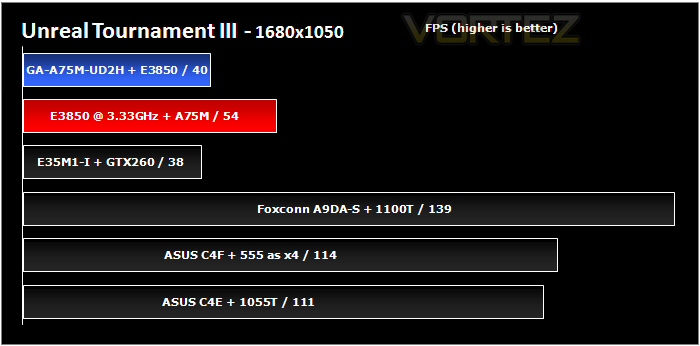
1680×1050.
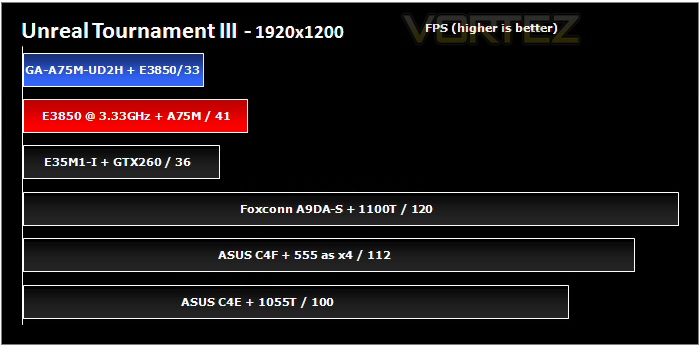
1920×1200.
Conclusion
It’s been a good couple of months for AMD. Their Brazos platform was genuinely impressive but I honestly feel that it is overshadowed by the Llano APU and their Lynx platform. The capability of this little APU is astonishing. The ability to run modern games at moderate settings and resolutions (and occasionally higher too!) is a true leap.
Of course raw computational power is useful (I’m looking at you Intel!) but without the graphical performance to match some aspects of functionality are rendered useless and the absolute perceived value of the product is reduced. With the E3850 you get an excellent balance of both which results in a massively satisfying experience without the need to add anything.
Price wise you are able to pick up this particular APU and board for just under £200 which seems perfectly reasonable to me. Ultimately the end user benefits from the simpler install and set up (thanks to the single APU chip and no need for a discrete GPU), they also benefit from more frugal power usage and benefit through that reasonable price which is certainly not much more than a similar motherboard, CPU and GPU bundle.
The excellent E3850 sat in the equally impressive Gigabyte GA-A75M-UD2H.
I’ve been immensely impressed by the features provided by both the APU and Gigabyte’s excellent GA-A75M-UD2H. It is another great leap in home computing performance and convenience and hopefully paves the way for similar and better solutions in the future!
As a result of this excellent experience the Gigabyte GA-A75M-UD2H and AMD E3850 have successfully worked together to gain a Gold Award from Vortez!
Pros
+ Very impressive specification and performance
+ Quad core CPU
+ USB 3.0 and SATA 6.0Gbps support
+ Lower power usage compared to similar setup with discrete GPU
+ Inbuilt HD6550D GPU within APU
+ Fanless board design
+ Excellent board layout
+ Attractive design
+ Useful utilities
+ HDMI, Displayport and optical digital outputs
+ 3 Year Warranty for both board and APU
+ Reasonable cost
Cons
– Southbridge heatsink could perhaps be slightly more effective
+ Very impressive specification and performance
+ Quad core CPU
+ USB 3.0 and SATA 6.0Gbps support
+ Lower power usage compared to similar setup with discrete GPU
+ Inbuilt HD6550D GPU within APU
+ Fanless board design
+ Excellent board layout
+ Attractive design
+ Useful utilities
+ HDMI, Displayport and optical digital outputs
+ 3 Year Warranty for both board and APU
+ Reasonable cost
Cons
– Southbridge heatsink could perhaps be slightly more effective


