







A gargantuan tower-style CPU cooler is on the test bench from cooling experts Deepcool (GamerStorm). Can it effectively cool Intel’s demanding Sandy Bridge-E?

Product on Review: Lucifer CPU Cooler
Manufacturer: GamerStorm
Street Price: £35 / 40 EUR / $60 USD
GamerStorm is a relatively new brand which was developed by cooling stalwarts Deepcool. Deepcool are responsible for bringing to market some rather noteworthy and aggressive cooling products for almost two decades and today we are to look at a high-end solution which comes under the GamerStorm umbrella.
Lucifer is a burly tower-style CPU cooler which takes advantage of six nickel-plated copper heatpipes. GamerStorm have given Lucifer an array of aluminium fins and 140mm PWM cooling fan help to alleviate temperatures but the real question is, can this new offering handle the might of Intel Core i7-3930K with a substantial overclock? Let’s find out!
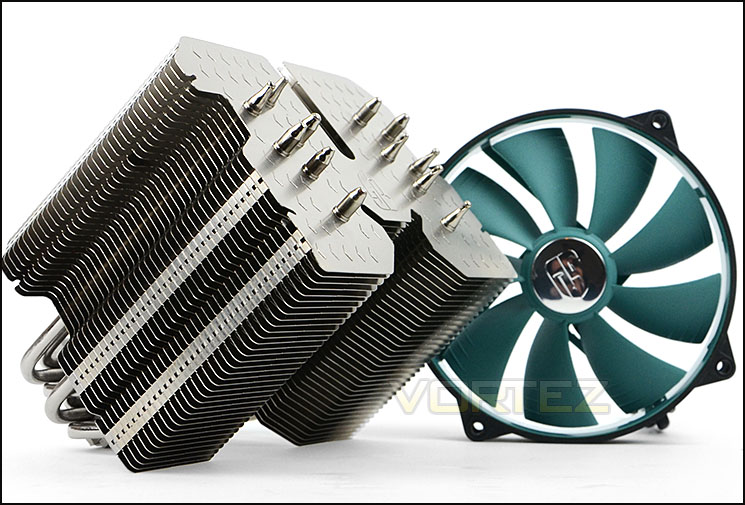
GamerStorm on their Lucifer
Lucifer CPU cooler is designed to cool the mainstream processors in fanless mode to create a totally silent system; meanwhile, Lucifer is capable of cooling high-end processors with the help of good airflow inside the case
Technical Specifications
Overall Dimension (Without Fan)
140X110X163mm
Overall Dimension (With Fan)
140X136X168mm
Net Weight
1079g (With Fan)
Heatpipe
6X6mm Heatpipe
Fin Material
Aluminum
Base Material
Full-copper base
Fan Dimension
Φ140X26mm
Fan Weight
143g
Fan Speed
700±200~1400±10%RPM
Rated Current
0.17±10%A(MAX)
Power Input
2.04W
Max. Air Flow
81.33CFM
Noise
17.8~31.1dB(A)
Rated Voltage
12VDC
Operating Voltage
10.8~13.2VDC
Starting Voltage
7VDC
Bearing Type
Hydro Bearing
140X110X163mm
Overall Dimension (With Fan)
140X136X168mm
Net Weight
1079g (With Fan)
Heatpipe
6X6mm Heatpipe
Fin Material
Aluminum
Base Material
Full-copper base
Fan Dimension
Φ140X26mm
Fan Weight
143g
Fan Speed
700±200~1400±10%RPM
Rated Current
0.17±10%A(MAX)
Power Input
2.04W
Max. Air Flow
81.33CFM
Noise
17.8~31.1dB(A)
Rated Voltage
12VDC
Operating Voltage
10.8~13.2VDC
Starting Voltage
7VDC
Bearing Type
Hydro Bearing
Packaging, Bundle & Fan
Lucifer arrives in a small non-descript box which simply has the branding on each face and the side contains technical specifications regarding the cooler itself.
Inside, the different components are sectioned off into another box and covered in clear plastic sheets.
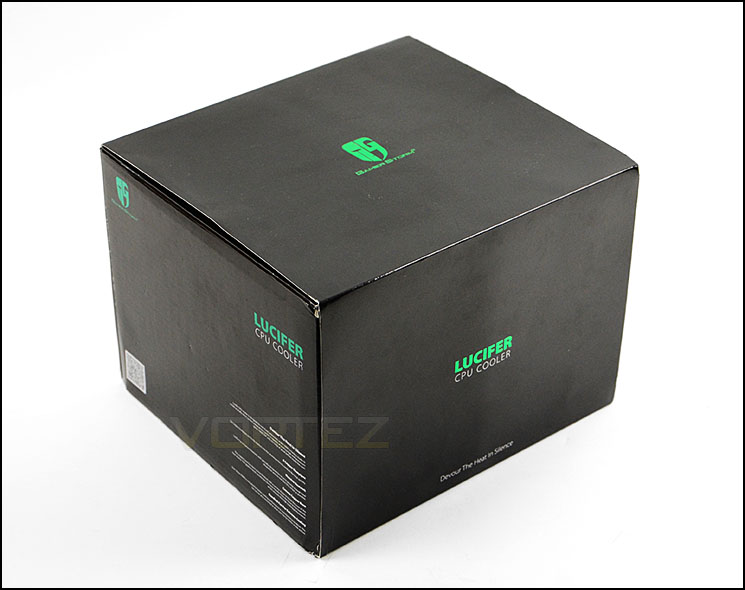
Packaging is quite plain
Opening this packaging up, there are a selection of packets containing different components for the mounting kit and a handy instructions manual to guide you through the installation process. Lucifer is designed to work on an assortment of different CPU sockets which include the following:
Intel Socket
LGA2011/LGA1366/LGA1156/LGA1155/LGA1150/LGA775 130W
Core i7/i5/i3
Core 2 Extreme
Core 2 Quad
Core 2 Duo
Pentium/Pentiume G
Pentium D/Pentium 4
Celeron Dual-Core
Celeron/Celeron D
AMD Socket
FM2/FM1/AM3+/AM3/AM2+/AM2 125W
FX X8/X6/X4
A10/A8/A6/A4
Phenom II X6/X4/X3/X2
Phenom X4/X3
Athlon II X4/X3/X2
Athlon X2
Athlon /Athlon FX
Business Class
Sempron
LGA2011/LGA1366/LGA1156/LGA1155/LGA1150/LGA775 130W
Core i7/i5/i3
Core 2 Extreme
Core 2 Quad
Core 2 Duo
Pentium/Pentiume G
Pentium D/Pentium 4
Celeron Dual-Core
Celeron/Celeron D
AMD Socket
FM2/FM1/AM3+/AM3/AM2+/AM2 125W
FX X8/X6/X4
A10/A8/A6/A4
Phenom II X6/X4/X3/X2
Phenom X4/X3
Athlon II X4/X3/X2
Athlon X2
Athlon /Athlon FX
Business Class
Sempron
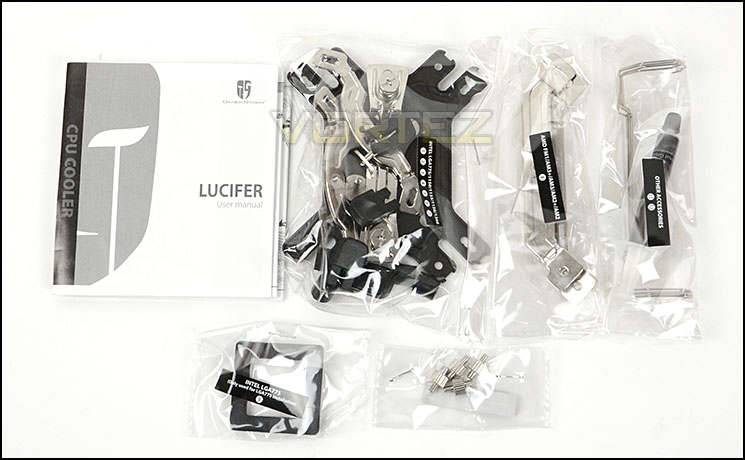
Accessories bundle with different mounting kits
Although GamerStorm tout this cooler as being great for passive usage they have also included a 140mm cooling fan to work in conjunction with the cooler. This fan comes in a rather distinct mint green colour, has a total of nine blades and has a rubberised frame.
Our 140mm cooling fan makes use of a Hydro Bearing and can operate up to 1500RPM with 81.33CFM and 31.1dB.
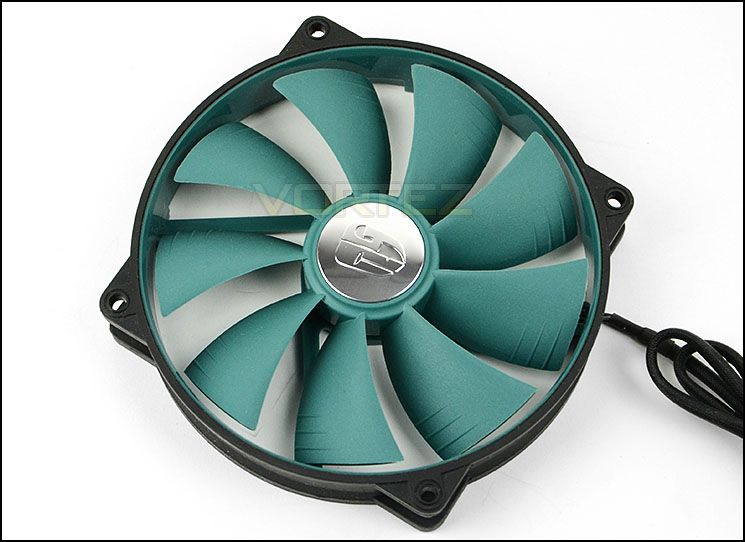
Distinct 140mm cooling fan
Closer Look
Unveiling the Lucifer cooler from the packaging we are greeted by a burly heatsink. If any word characterises this product, it has to be ‘substantial’. The overall dimensions are 140X110X163mm and Lucifer will weigh1079g with the fan attached to the heatsink.
GamerStorm have given Lucifer a symmetrical design but the top and tail sides are vastly different, following an alternate contour/shape. The fins are aluminium and follow a condensed layout.
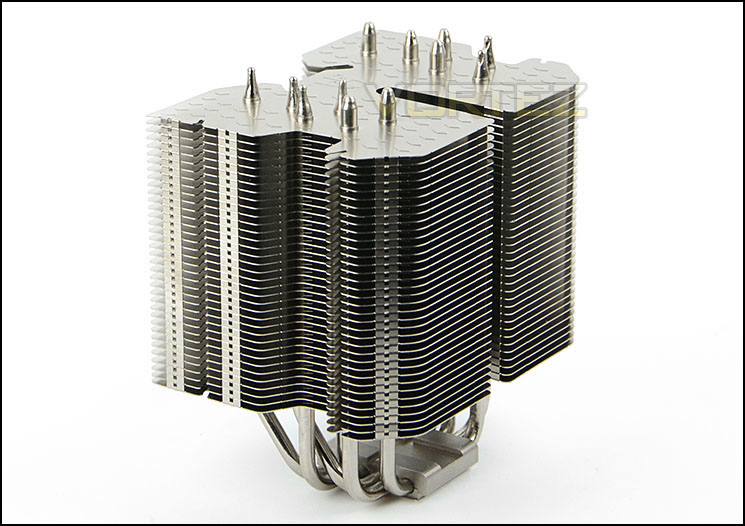
Lucifer is a monolith of a cooler
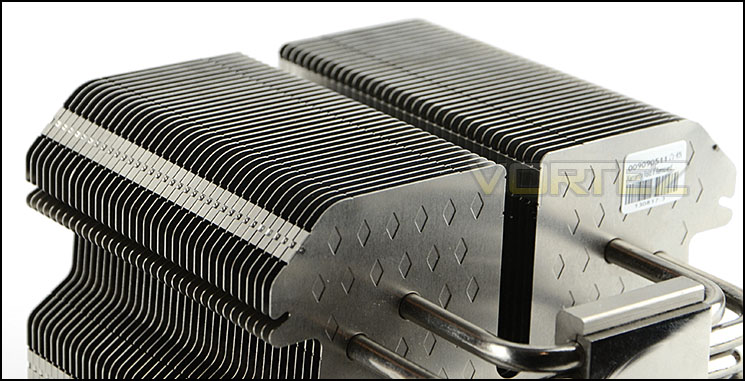
The profile of Lucifer
From an aerial viewpoint we can see that Lucifer adopts a six heatpipe design. These heatpipes are actually 6mm in thickness and all pass through the copper baseplate at the bottom of the cooler.
This baseplate is polished to have a mirror finish and has no indentations.
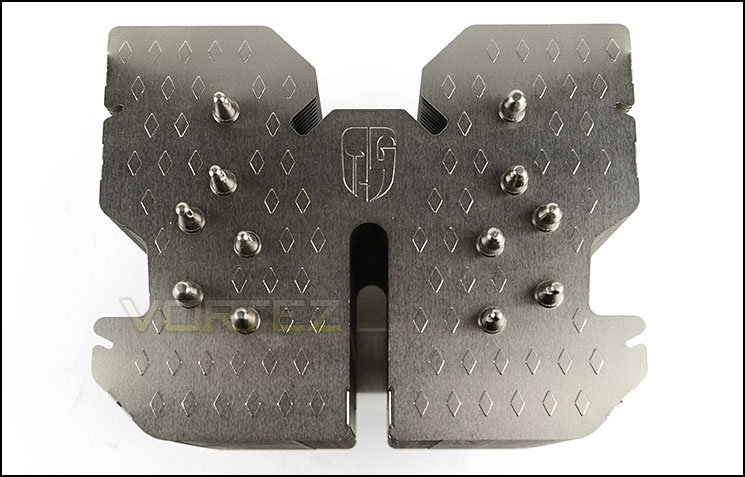
The top of Lucifer
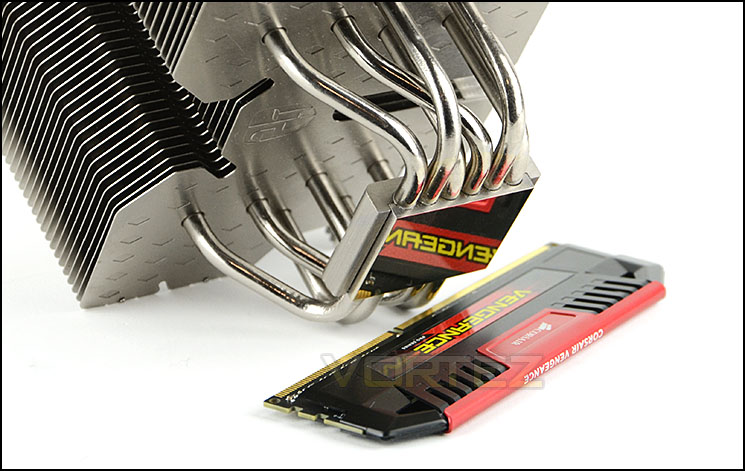
Copper baseplate with mirror finish
GamerStorm provide four fan clips to assist with attaching 140mm cooling fans to the heatsink. These clips can be tricky to use due to the fitment being awkward. The fan clip can only fit a certain way and slots directly into a channel which has been specifically provided. We recommend fitting the fan to the cooler prior to the motherboard being placed into the computer chassis.
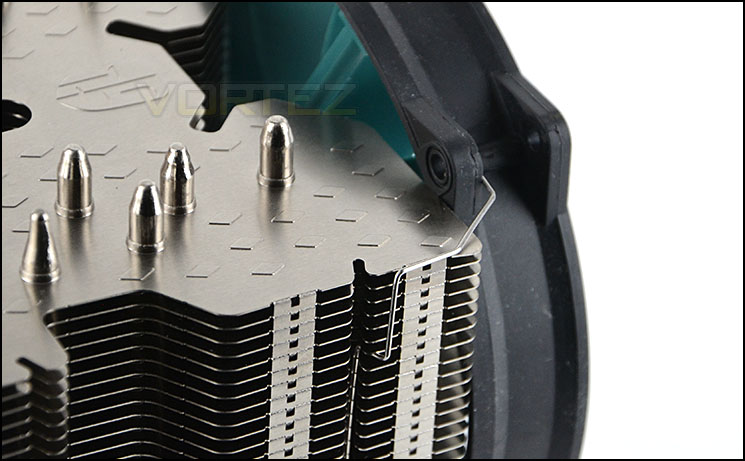
Fan clip for attaching 140mm cooling fan
Installation Process
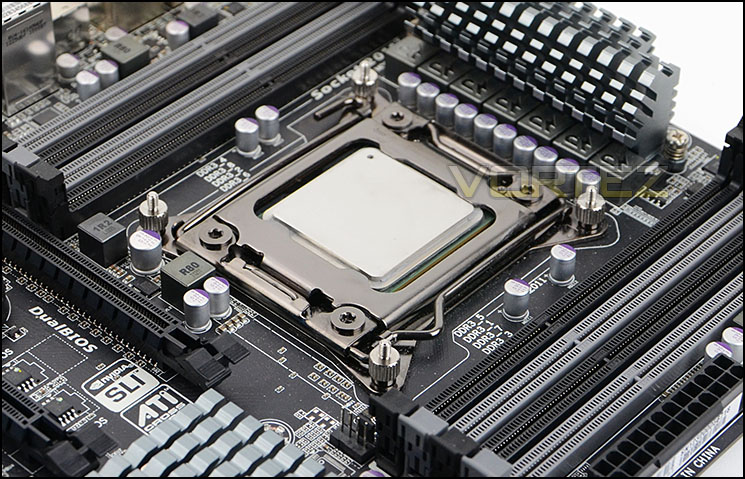
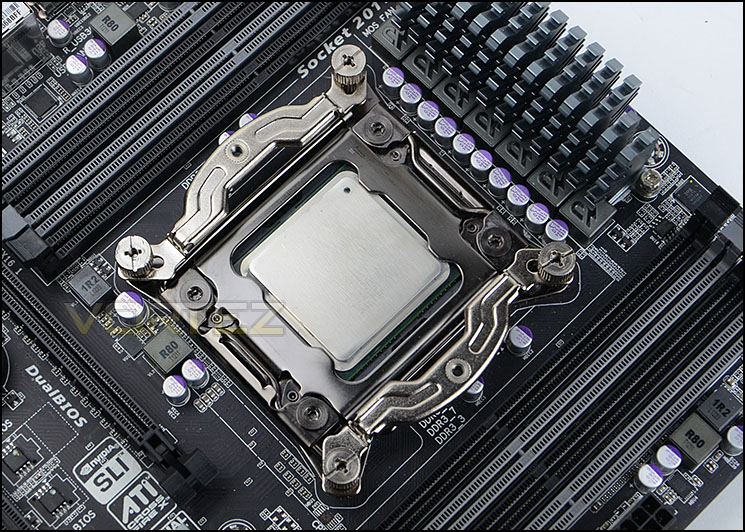
In order to demonstrate the installation process for Lucifer we are installing the cooler on the Intel LGA2011 socket.
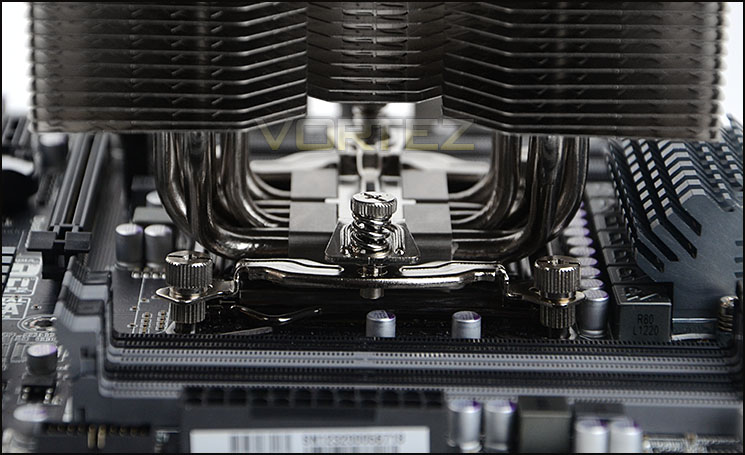
The first stage (as with many other coolers on this platform) is to apply four stand-off screws to the four corners of the socket plate, these screws are tightened by your thumb. Next, the support brackets are placed over the stand-offs. The orientation of these brackets is important, if you want the cooling fan to face the rear exhaust in the computer chassis then mount them as per below – vertically aligned. Thumbscrews are then applied to these brackets – there are markings on the top of these thumbscrews in order to use a screwdriver for the last turn. The last stage is to simply apply thermal paste to the CPU, place the CPU cooler over the CPU and place the crossbar attachment over the baseplate as pictured below. In this last stage, it is essential to avoid screwing one side down entirely in one step. Each screw needs one turn and then the other screw another turn and so on.
Overall we are very impressed with the quality and method of installing Lucifer onto our test system motherboard. The instructions manual is also useful should you get stuck at any stage.
Installed – Memory Clearance
Memory clearance is something which many system builders and enthusiasts are eager to discover since this will ascertain whether a memory kit will be compatible with the CPU cooler or not. To demonstrate this, a low profile memory kit is used.
Overall Dimension (With Fan)
140X136X168mm
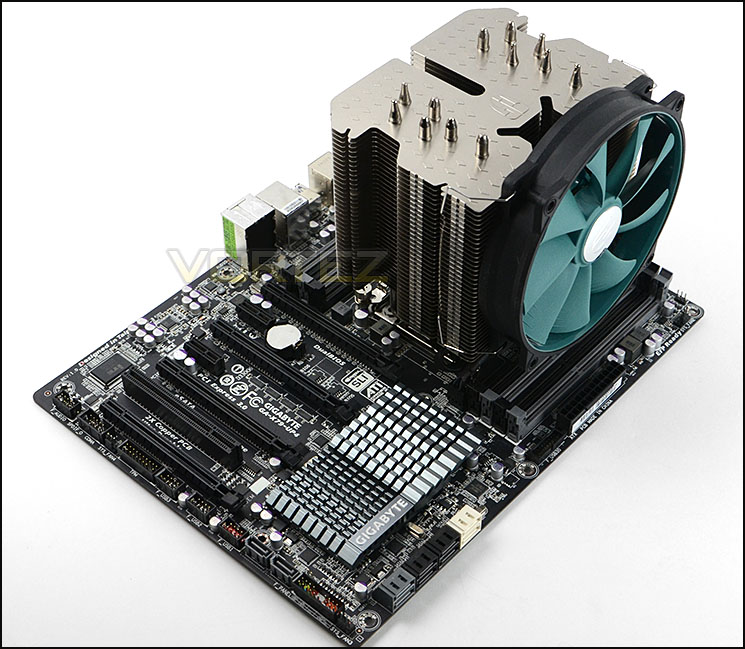
Installed and ready for action!
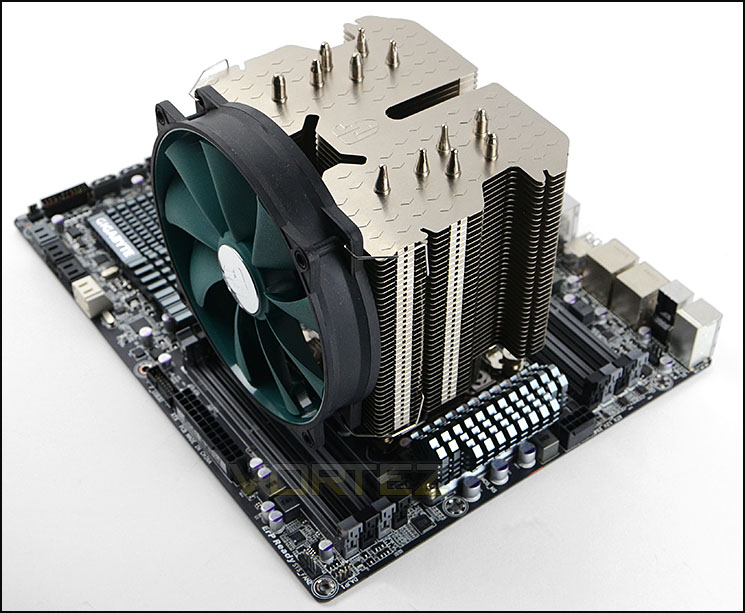
Covering most of the motherboard
Lucifer has one side which will overhang the memory slots whilst the other will have no obstruction – without a fan installed.
There is approximately 4.5cm of clearance for memory modules before the heatsink is touched but the fan will overhang so this needs to be taken into account too. Thankfully the mounting system for the cooling fans is designed in such a way to allow them to move up and down which will help somewhat.
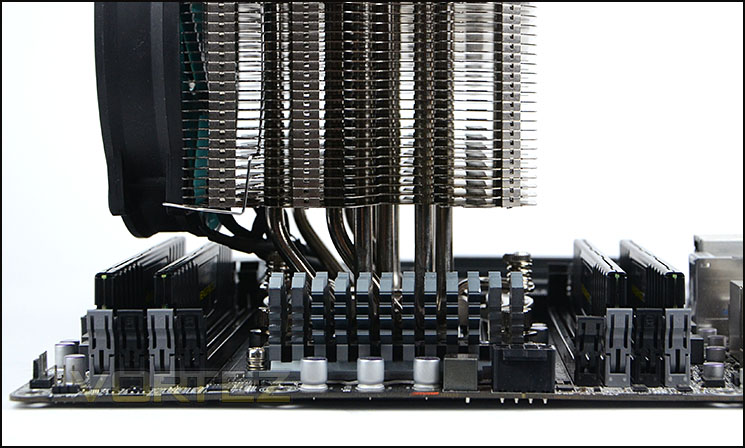
Overhang on just the one side
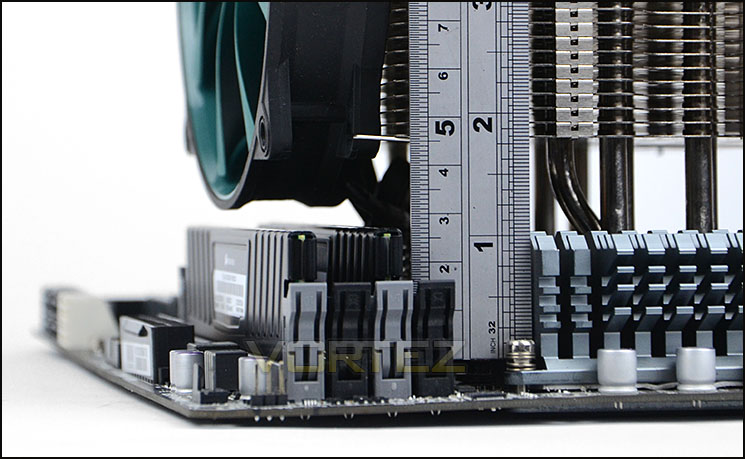
Memory clearance is reasonable
Test Setup & Methodology
Test System
CPU – Intel Core i7-3930K (3.6GHz)
Motherboard – GIGABYTE X79-UP4
Memory – 8GB Corsair Vengeance LP 1600MHz CL9
Graphics – Sapphire Radeon HD 6850 1GB
PSU – NZXT Hale90 650W
Hard Drive – Kingston HyperX 240GB SATA III SSD
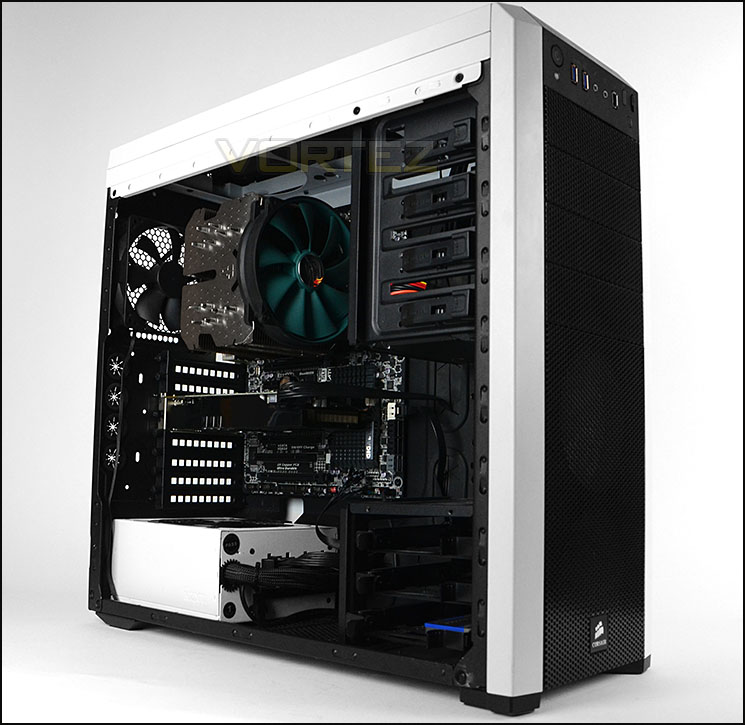
Case – Corsair Carbide 500R White
Motherboard – GIGABYTE X79-UP4
Memory – 8GB Corsair Vengeance LP 1600MHz CL9
Graphics – Sapphire Radeon HD 6850 1GB
PSU – NZXT Hale90 650W
Hard Drive – Kingston HyperX 240GB SATA III SSD
Case – Corsair Carbide 500R White
CPU Coolers
Alpenföhn Matterhorn Pure(120mm Wingboost: 300-1200RPM)
Alpenföhn K2 (120mm Wingboost: 500-1500RPM, 140mm Wingboost: 300-1100RPM)
Alpenföhn Gotthard (140mm Wingboost: 300-1100RPM)
Noctua NH-D14 (120mm NF-P12 PWM + 140mm NF-P14 PWM: up to 1200RPM)
Thermalright SilverArrow SB-E Extreme (Dual TY-143 fans – 600-2500RPM)
Corsair Hydro H100 (Dual 120mm fans – low: 1300RPM, mid: 2000RPM, high: 2600RPM Push Config)
SilverStone HE01 (140mm PWM fan – 500RPM-1200RPM – 500RPM-2000RPM)
be quiet! Dark Rock Pro 2 (135mm + 120mm PWM Fans – up to 1500RPM and 1700RPM)
Thermaltake Water 2.0 Pro (Dual 120mm PWM fans – up to 2000RPM)
Corsair Hydro Series H100i (Dual 120mm fans – up to 2700RPM Push Config)
Be Quiet! Shadow Rock TopFlow(1x 135mm PWM fan – up to 1500RPM)
SilverStone HE02 (Passive – optional fan used: Noctua NF-F12 120mm PWM)
Corsair H55 (Single 120mm fan – 1700RPM Exhaust Push)
Cooler Master Seidon 120M (Single 120mm fan – Up to 2500RPM Exhaust Push)
Zalman CNPS11X Extreme (Single 120mm fan – Up to 1950RPM)
Phanteks PH-TC12DX (Dual 120mm fans – 600-1800RPM)
Noctua NH-U14S (Single 140mm cooling fan – 300-1500RPM)
SilverStone TD03 (Dual 120mm fans – 1500-2500RPM)
Thermaltake]Thermaltake NiC C5 (Dual 120mm fans – 1000RPM – 2000RPM)
Raijintek EreBoss (Single 140mm fan – 1100RPM – 1600RPM)
GamerStorm Lucifer (Single 140mm fan – 800-1500RPM)
Program Suite
Real Temp – Maximum temperature analysis
LinX 0.6.4 – Applies thorough stress test to CPU
CPU-Z – Confirmation of CPU frequency/voltage
AIDA64 Extreme Edition – Confirmation of temperatures/fan speeds
Testing methodology
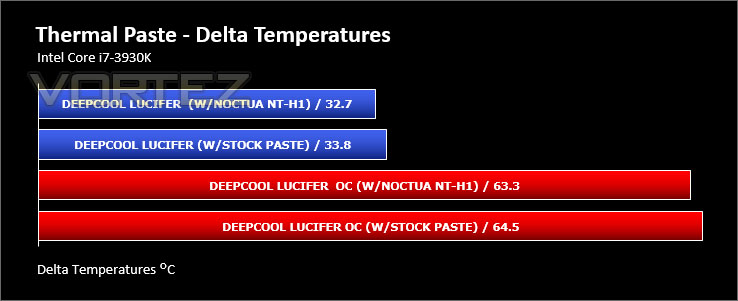
Testing will be based on temperatures recorded by Real Temp after 20 passes of LinX stress test. The maximum absolute temperatures will be recorded after the test and averaged over the 6 cores. The delta is then calculated by subtracting the ambient temperature recorded near the intake fans from the average temperature calculated. Tests are conducted with the Intel i7 3930K at its default 3.6GHz stock speed and overclocked to 4.6GHz @ 1.42V. The tests are done inside the Corsair Carbide 500R chassis to simulate real world conditions. To keep the tests standardised we are using Noctua’s NT-H1 thermal paste on all coolers.
CPU coolers are reviewed as they come out of the box – with their factory cooling fans, as the manufacturer intended and as the consumer expects.
Additional tests include a passive test where the cooling fans are taken away from the heatsink and a comparison between the cooler used with stock thermal paste against our Noctua NT-H1 paste.
A kind thank you to Noctua for supplying us with NT-H1 thermal compound.
Results – Stock Performance
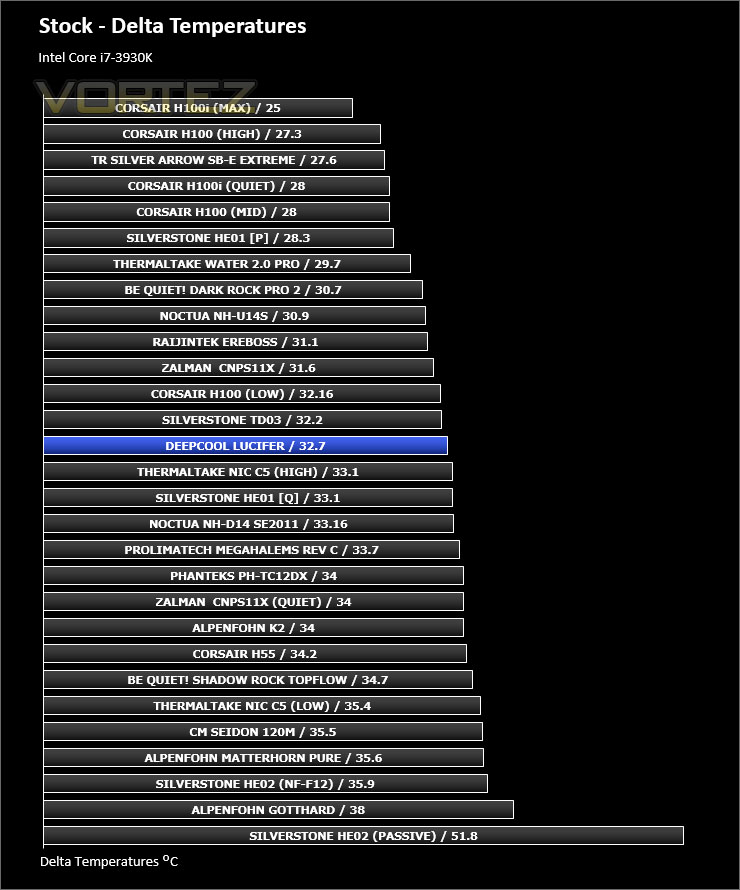
Lucifer does an admirable job at stock settings by keeping the SB-E chip in a similar region to that of other flagship CPU coolers. Furthermore it achieves this by using just a single 140mm cooling fan and the noise levels at around 1000-1200RPM aren’t disturbing by any means.
Fan speed – @1168RPM during load at stock settings.
Results – Overclocked Performance
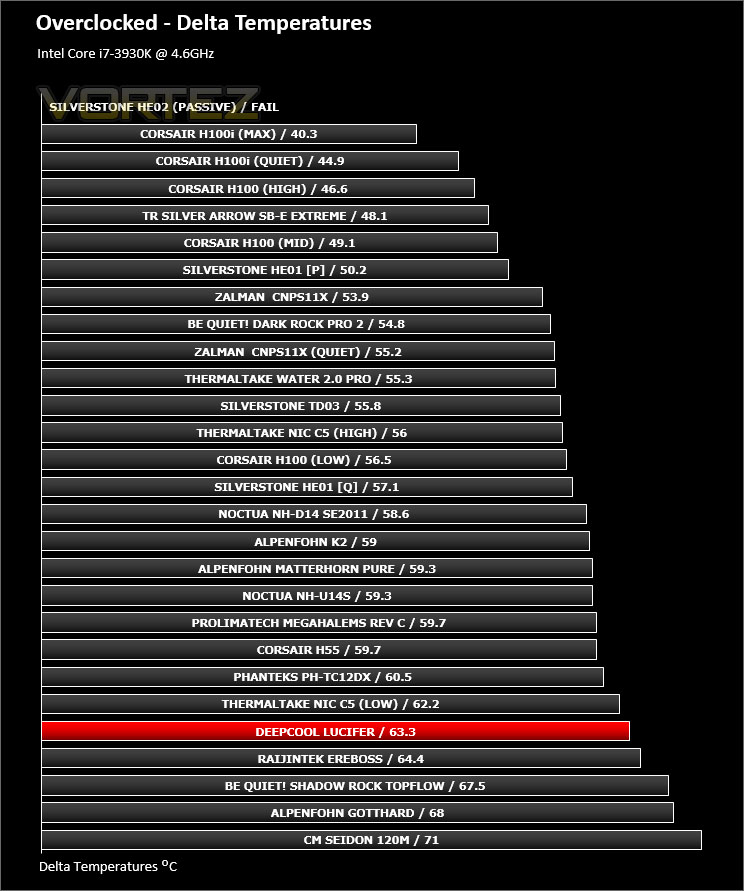
Pushing the chip to a substantial overclock causes Lucifer to fall behind and other CPU coolers appear to cool the chip better under these conditions. With the addition of another cooling fan we’re confident Lucifer would be placed in the middle of our chart. Noise levels at 1500RPM begin to be quite noticeable.
Fan Speed – @ 1452RPM during load at overclock settings.
Results – Passive Performance
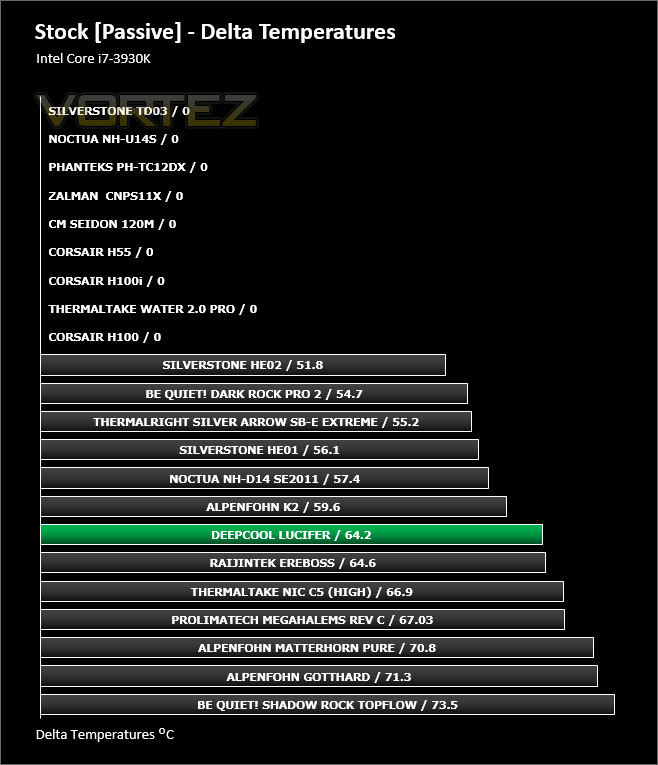
Touted as a passive solution we expected Lucifer to demonstrate better results than we discovered.
Results – Thermal Paste Comparison
Most CPU coolers come accompanied with thermal paste provided by the manufacturer. For our CPU cooling tests we use Noctua’s NT-H1, so to offer up some interesting analysis we test the thermal paste given with Lucifer against NT-H1 to see which gives the best results during stock and overclocked performance and the results really aren’t that much different, the Noctua is noticeably better.
Conclusion
So we’ve reached the end of the review and it’s time to deliver the verdict. What do we think of Lucifer?
Lucifer is vast – its physical dimensions mean a majority of the motherboard will be covered up. Regardless of whether this is a good or bad thing, we’re pleased that the aesthetics on the heatsink are very good. GamerStorm have taken care with both the build quality and visual appearance on this product and this spans even so far as the mounting kit too. We found the mounting kit to be easy to use and it ensures a robust and reliable solution for attaching to the motherboard.
On the performance front, Lucifer did an admirable job cooling our Intel Core i7-3930K but it did fall behind slightly when a significant overclock was applied. Detaching the fan and using the heatsink passively – just as GamerStorm intend Lucifer to be used, gave reasonable results but we have to admit, expected better results.
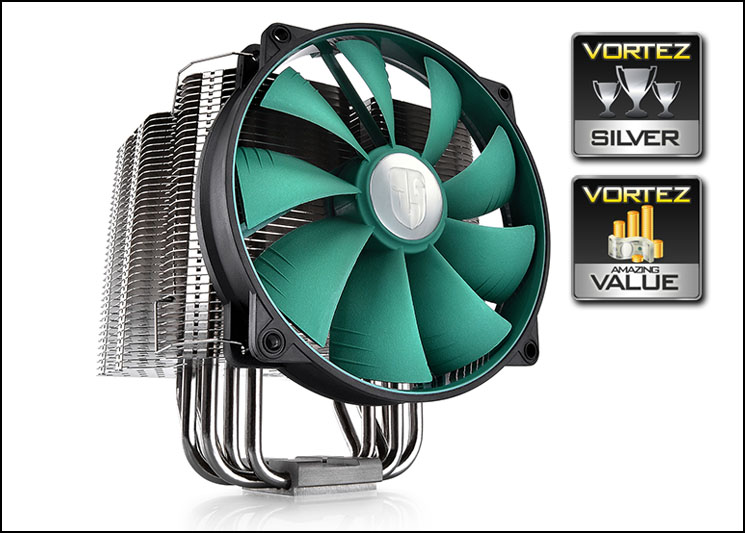
Although Lucifer is currently unavailable in UK/EU we have spoken to GamerStorm and have been told Lucifer will be available to buy very soon at a cost of around £35 / 40 EUR / $60 USD. At this price, this CPU cooler is positioned very competitively and the end user can enjoy a great value for money offering.
Lucifer is a juggernaut of a CPU cooler which utilises great build quality and a robust mounting system. Stock results are encouraging but you might want to add an additional fan if you are intending to overclock.
Pros
+ Nice aesthetics
+ Low-noise cooling fan
+ Reliable and easy to use mounting kit
+ Great build quality
+ Very affordable
Cons
– Passive/Overclock results aren’t great
– Almost 170mm in height with fan attached
+ Nice aesthetics
+ Low-noise cooling fan
+ Reliable and easy to use mounting kit
+ Great build quality
+ Very affordable
Cons
– Passive/Overclock results aren’t great
– Almost 170mm in height with fan attached

Click here for an explanation of our awards at Vortez.net.


