







ASUS are back with their Republic of Gamers Maximus IV Extreme motherboard. How will it match up to other P67 boards?
Product on Review: Maximus IV Extreme
Manufacturer: ASUS
Street Price: £280 inc. VAT

The motherboard contains a lot of features that we have previously covered in great depth – the Maximus sports 4 PCIe x16 slots, 2 PCIe x1 slots and 1 PCIe x4 slot. Brand new ROG features that we can expect on the Maximus IV Extreme are GPU TweakIt, GPU/ DIMM post, ROG iDirect and ROG BIOS Print. Those who have read previous ROG motherboard reviews will know that they sport an extra USB port at the back for ROG Connect. By simply connecting the bundled cable from the port to a Windows based laptop, the RC TweakIt software can be used to remotely overclock or monitor the motherboard. ASUS have now expanded on its functionality by adding GPU support so users can overvolt/overclock their GPUs remotely as long as they are on the supported vendor’s list. Fan control functionality will come over time. Another method of overclocking is of course by running RC TweakIt on a compatible phone via Bluetooth. The advantage of the Bluetooth module over the dongle solution is that it passes through the iROG microprocessor, thereby not creating a load on the CPU itself when overclocking. This is ideal in extreme benchmarking sessions where a small load spike can cause instability. One complaint on release was the lack of iPhone support… but brace yourselves because it’s finally coming! And because iPhone owners are inherently “special”, the feature had to be given its own name, ROG iDirect. If that wasn’t enough, the iPad will be fully supported as well. The previous lack of support is because Apple limited Bluetooth control on their hardware so extra software was needed to tackle the problem. The disadvantage compared to using other phones is that running RC TweakIt will create a 1% load on the CPU. The utility will be available through the App store.
So with the introduction over, lets begin our analysis of the ASUS Maximus IV Extreme.
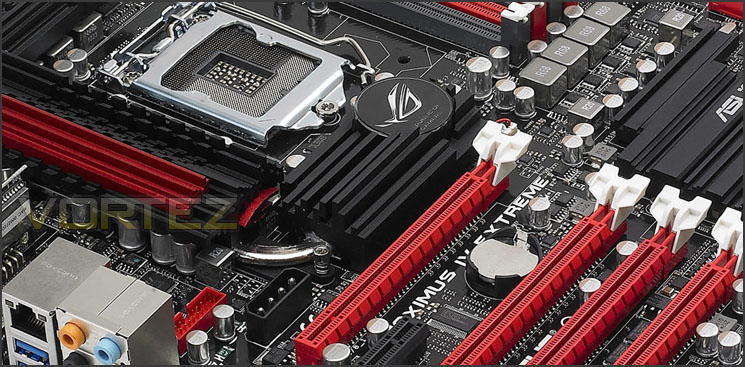
ASUS take on Maximus IV Extreme:
Featuring the new Intel® P67 chipset, the Maximus IV Extreme is equipped with the latest transfer technologies. Ten USB 3.0 and four SATA6Gb/s ports and support for three-way NVIDIA® SLI™ or AMD CrossFireX™ graphics cards ensure that there are plenty of spots for future upgrades. Also on board are dual Gigabit Intel® Ethernet ports and dual-channel DDR3 2400(O.C.) RAM. All this makes the Maximus IV Extreme the world’s most refined motherboard for overclocking, ready to tackle anything power users throw at it!
Full Specifications
Features
iROG
Intelligent multiple control at hand
The iROG is a special IC which enables several ROG highlighted functions that gives users full disposal of the motherboard at any stage! This design allows advanced user control and management to be processed purely at a hardware level. iROG greatly increases fun during overclocking for PC enthusiasts and it offers system maintenance and management with more control and efficiency.
USB BIOS Flashback
No worry of BIOS crash anytime!
USB BIOS Flashback must be the most convenient way to flash BIOS ever! It allows overclockers to try their BIOS with the simplest way one can imagine. No need to enter the BIOS or the operating system, just plug the thumb drive into the ROG Connect port & push the ROG Connect button for 2 seconds, BIOS would be automatically flashed under standby power. It´s no doubt that USB BIOS Flashback gives overclockers the ultimate convenience.
Voltiminder LED
Friendly reminder on Voltage Settings
In the pursuit of extreme performance, overvoltage adjustment is critical but risky. Acting as the “red zone” of a tachometer, the Voltiminder LED displays the voltage status for CPU, PCH, and Memory in a intuitive colour-coded fashion. The voltiminder LED allows quick voltage monitoring for overclockers.
Probelt
Get all hands-on with hardware-based overclocking
ProbeIt takes the guesswork out of locating the motherboard´s measurement points, identifying them clearly in the form of 5 sets of detection points so you´ll know exactly where to get quick yet accurate readings using a multimeter.
Extreme Engine Digi+
The implementation of Extreme Engine Digi+ was designed to enable overclockers to push the new generation of CPUs to the limit. The next-generation dynamic multi-phase power management system equipped with high performance ML Caps that ensure a stable power supply during overvoltage by lowering ESR (Equivalent Series Resistance), which successfully delivers the advantage of both analog and digital VRM all in one go, keeping mission-critical components such as the processor, system memory and the Northbridge reliable while maintaining high power efficiency.
– 8-phase CPU power
– 3-phase QPI/DRAM p0wer
– 3-phase NB power
– 3-phase Memory power
– ML caps on CPU, memory and QPI respectively
EZPlug
More power for the power hungry monsters
The Rampage III Extreme comes with two sets of E-ATX 12V, and two sets of 4-pin Molex plugs, delivering enough power for power hungry monster rigs when conducting extreme overclocking.
LN2 Mode
Cold-boot bug is a barrier which overclockers often need to face when conducting subzero overclocking with LN2 (Liquid Nitrogen). When the cold-boot bug occurs, the CPU will no longer POST till it has been warmed up again. The LN2 Mode exclusively supported by Rampage III Extreme enables users to remedy this limitation, delivering non-stop smooth extreme overclocking capability, which makes Rampage III Extreme the perfect choice for all overclockers under LGA1366 platform.
RC Bluetooth
Overwhelm your acknowledgement with wireless overclocking experience!
System Debug and keyboard-free overclocking have evolved a long way in the past years. However, regardless of any existing design, users still cannot gain the full control the system without either opening up the chassis, or simply getting back to the good old trusty keyboard. Thank to the Forth generation Asus TweakIt technology via the iROG processor, users can now gain the full control of the keyboard-free overclocking and debug tools wirelessly via their very own Bluetooth device anytime, anywhere.
Q Reset
ROG Connect
Plug and Overclock – Tweak it the hardcore way!
MemOK!
Bios Flashback
Two BIOS ROM. Two BIOS settings. Twice the overclocking flexibility.
CPU Level Up
A Simple click for instant upgrade
Extreme Tweaker
One stop performance tuning shop
COP Ex
Maximum OC with confidence with burn proof protection to chipsets and GPU!
Loadline Calibration
Optimal power boost for extreme CPU overclocking!
Onboard Switch
No more shorting pins or moving jumpers
ASUS Q-Connector
Make connections quick and accurate
Q-Fan Plus
Optimized quietness and cooling for more devices!
Intelligent multiple control at hand
The iROG is a special IC which enables several ROG highlighted functions that gives users full disposal of the motherboard at any stage! This design allows advanced user control and management to be processed purely at a hardware level. iROG greatly increases fun during overclocking for PC enthusiasts and it offers system maintenance and management with more control and efficiency.
USB BIOS Flashback
No worry of BIOS crash anytime!
USB BIOS Flashback must be the most convenient way to flash BIOS ever! It allows overclockers to try their BIOS with the simplest way one can imagine. No need to enter the BIOS or the operating system, just plug the thumb drive into the ROG Connect port & push the ROG Connect button for 2 seconds, BIOS would be automatically flashed under standby power. It´s no doubt that USB BIOS Flashback gives overclockers the ultimate convenience.
Voltiminder LED
Friendly reminder on Voltage Settings
In the pursuit of extreme performance, overvoltage adjustment is critical but risky. Acting as the “red zone” of a tachometer, the Voltiminder LED displays the voltage status for CPU, PCH, and Memory in a intuitive colour-coded fashion. The voltiminder LED allows quick voltage monitoring for overclockers.
Probelt
Get all hands-on with hardware-based overclocking
ProbeIt takes the guesswork out of locating the motherboard´s measurement points, identifying them clearly in the form of 5 sets of detection points so you´ll know exactly where to get quick yet accurate readings using a multimeter.
Extreme Engine Digi+
The implementation of Extreme Engine Digi+ was designed to enable overclockers to push the new generation of CPUs to the limit. The next-generation dynamic multi-phase power management system equipped with high performance ML Caps that ensure a stable power supply during overvoltage by lowering ESR (Equivalent Series Resistance), which successfully delivers the advantage of both analog and digital VRM all in one go, keeping mission-critical components such as the processor, system memory and the Northbridge reliable while maintaining high power efficiency.
– 8-phase CPU power
– 3-phase QPI/DRAM p0wer
– 3-phase NB power
– 3-phase Memory power
– ML caps on CPU, memory and QPI respectively
EZPlug
More power for the power hungry monsters
The Rampage III Extreme comes with two sets of E-ATX 12V, and two sets of 4-pin Molex plugs, delivering enough power for power hungry monster rigs when conducting extreme overclocking.
LN2 Mode
Cold-boot bug is a barrier which overclockers often need to face when conducting subzero overclocking with LN2 (Liquid Nitrogen). When the cold-boot bug occurs, the CPU will no longer POST till it has been warmed up again. The LN2 Mode exclusively supported by Rampage III Extreme enables users to remedy this limitation, delivering non-stop smooth extreme overclocking capability, which makes Rampage III Extreme the perfect choice for all overclockers under LGA1366 platform.
RC Bluetooth
Overwhelm your acknowledgement with wireless overclocking experience!
System Debug and keyboard-free overclocking have evolved a long way in the past years. However, regardless of any existing design, users still cannot gain the full control the system without either opening up the chassis, or simply getting back to the good old trusty keyboard. Thank to the Forth generation Asus TweakIt technology via the iROG processor, users can now gain the full control of the keyboard-free overclocking and debug tools wirelessly via their very own Bluetooth device anytime, anywhere.
Q Reset
ROG Connect
Plug and Overclock – Tweak it the hardcore way!
MemOK!
Bios Flashback
Two BIOS ROM. Two BIOS settings. Twice the overclocking flexibility.
CPU Level Up
A Simple click for instant upgrade
Extreme Tweaker
One stop performance tuning shop
COP Ex
Maximum OC with confidence with burn proof protection to chipsets and GPU!
Loadline Calibration
Optimal power boost for extreme CPU overclocking!
Onboard Switch
No more shorting pins or moving jumpers
ASUS Q-Connector
Make connections quick and accurate
Q-Fan Plus
Optimized quietness and cooling for more devices!
The Maximus IV Extreme carries with it many of the features we have come to love on the ROG Extreme motherboards. Many of the features found on the Rampage III Extreme have been brought across onto this board making it a premium solution for overclocker and gamer!
Packaging & First Look
In typical ROG fashion the Maximus IV Extreme is presented in a red box. This box opens out to reveal more details and technical specifications for those who want to absorb the full feature-set of this motherboard. Opening the box up, there are an abundance of accessories to take advantage of within the bundle. Inside we get the following items:
– Instructions manual
– Software CD
– Multi-GPU bridges (CrossfireX SLI and 3-Way SLI
– SATA 3 certified cable
– Stickers
– Thermal probes
– Bluetooth 2.1+EDR module
– Voltage reader
– I/O shield
– USB2.0 front panel bracket
– iROG cable
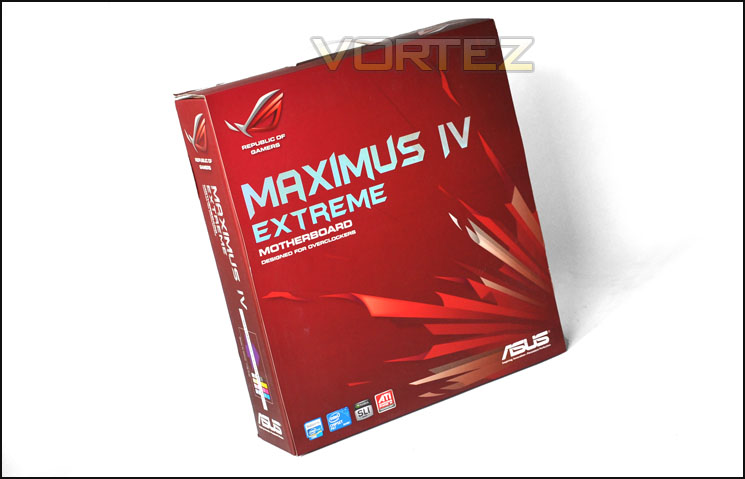
The box with typical ROG styling
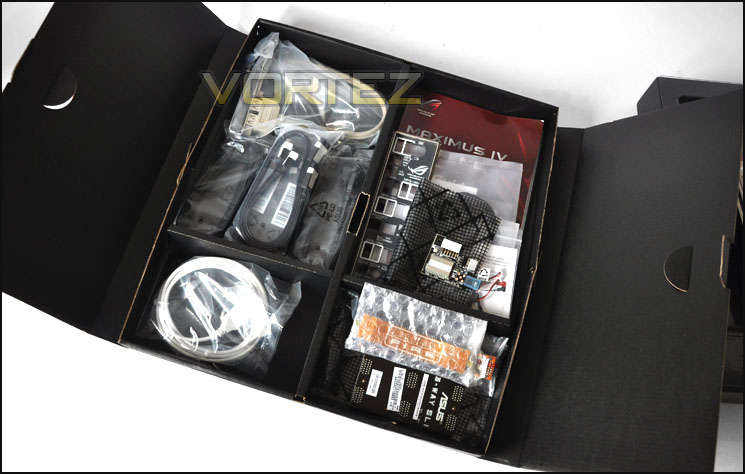
Lots of items within the bundle
Inside the box there is another box holding the motherboard. This has a clear protective plastic cover to ensure the motherboard is kept in good condition throughout transit. The Maximus IV Extreme is certainly a good looking motherboard, there is no mistaking that this board is from the ROG family. Red and back features are present throughout, the heatsinks compared to previous ROG motherboards are perhaps a little less aggressive and oversized, suggesting that the chipset doesn’t demand them.
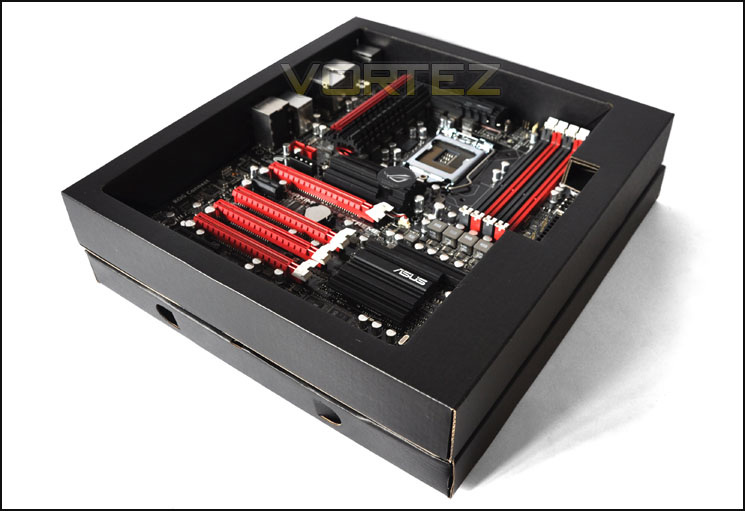
Our first look at Maximus IV Extreme
Closer Look
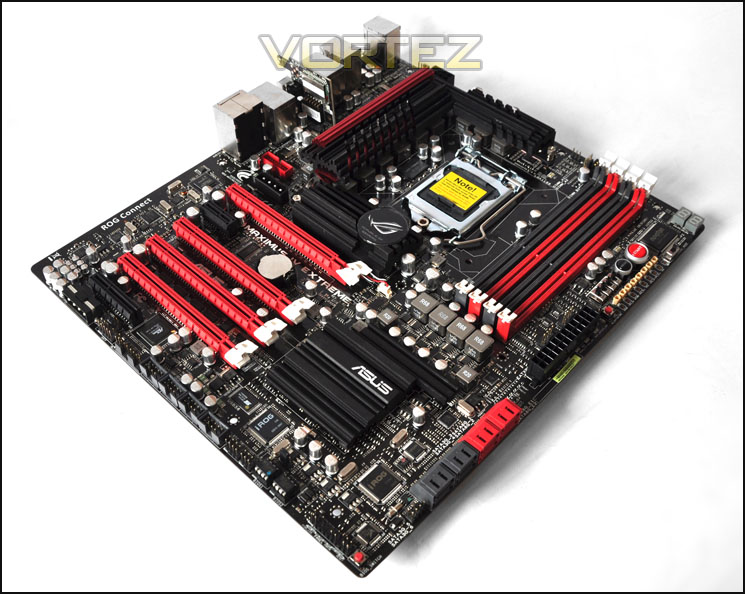
An overview of Maximus IV Extreme
Moving in for a closer look, we will take a look firstly at the CPU socket. Of course being LGA1155 our board here will pair up with Intel’s 2nd Generation Processors. Ideally the unlocked “K” chips would be an obvious choice to go with on the Maximus IV Extreme as having a board with such capabilities would be crying out to be modified. Combining this board with a non-K chip would be a strange choice.
Around the circuitry here we have a passive aluminium set of heatsinks with a copper heatpipe running through both sets. Also in this region we can see the 8 + 2 phase power design. The 8 phases for CPU and 2 for dedicated memory power. Also located near the CPU socket is the NEC Tokin chip. An NEC Tokin will replace a capacitor. Instead of using numerous solid capacitors in this region ASUS have gone for the hybrid selection, thus using a mixture of solid aluminium cored capacitors and the more innovative NEC TOKIN Proadlizers. The NEC Proadlizers feature incredible capacitance to optimise power delivery. The capacitors provide current capacity of up to 5000microFarads and extremely low ESL/ESR for super overclocking ability. We’ve seen these used on the recent MSI R6970 Lightning.
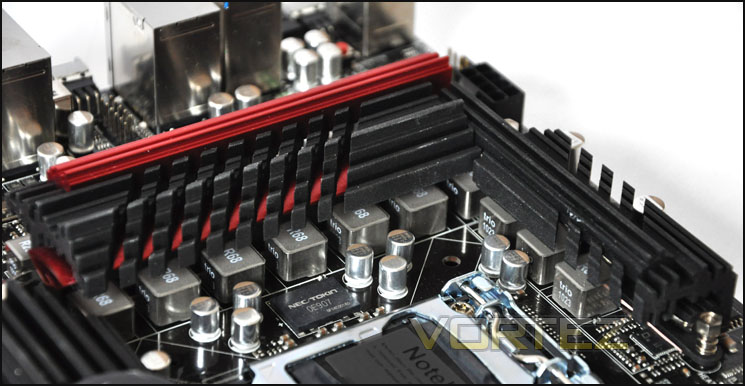
8 + 2 Phase power design and aluminium heatsinks around VRM circuitary
4 x memory DIMMs provide dual channel for up to 32GB and 1333MHz all the way up to 2200 (OC). Our Maximus IV Extreme also supports XMP memory. Around the memory we have an array of interesting features available. Firstly, in the corner of the motherboard is an LED debug indicator to help trouble shoot the system should you encounter problems during POST. Moving down the board we have an LN2 mode selector, this is obviously for use with LN2 cooling and will help to avoid the “cold bug” problem. Beside this are the onboard power and reset buttons that come in very handy for those who have this board on a test bench, underneath are a set of headers for use with a multi-meter to read voltages and above this we have a series of switches. Now these switches turn on/off the four PCI-E x16 slots – a great feature first unveiled on the Rampage III Extreme to improve power delivery to the board when you have four power hungry graphics cards installed. And finally we have the 24-pin ATX power.
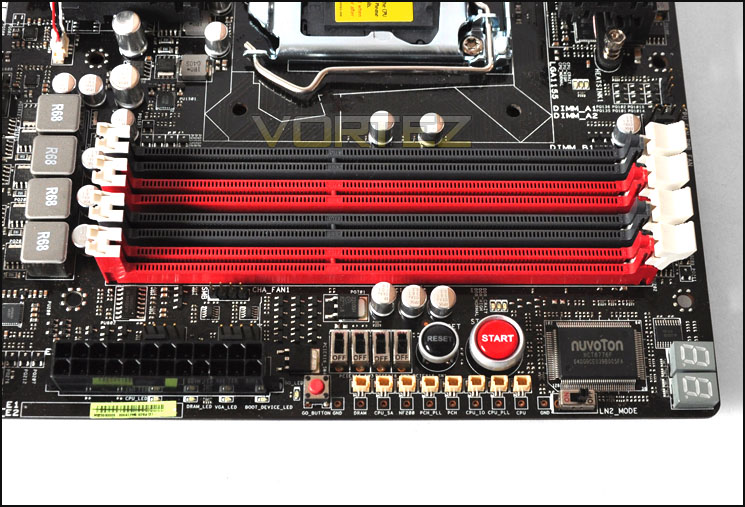
More features than a Lady GaGa MTV Music Awards costume!
Along the Maximus IV Extreme we have a generous selection of storage ports available in both 3Gbps and 6Gbps. The red indicate 6G and grey 3G. SATA 6G is fed by JMicron 9182 controller.
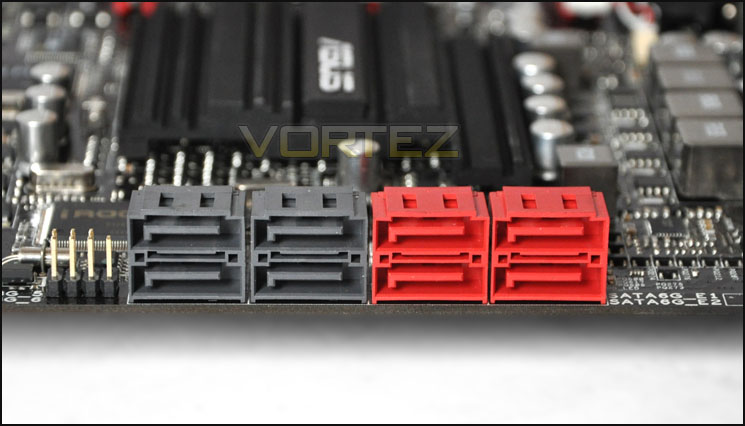
SATA provided in 3G and 6G options
Aside from using the BIOS to tweak settings and overclock there is also the option to utilise [url=http://www./articles_pages/asus_rampage_iii_extreme_motherboard_review,13.htmlRC TweakIt[/url] overclocking is then done via Bluetooth – using a phone. Rather than using a Bluetooth dongle we have the iROG microprocessor, this prevents any load being put on the CPU. The microprocessors take the strain instead. This will be especially useful for extreme overclockers, those that demand their benchmarking sessions run smoothly – a small spike can cause instability and this is something that these guys definitely want to avoid at all costs especially if they are competing.
Neighbouring our iROG chips is southbridge heatsink. This is surprisingly small compared to other rival motherboards and indeed by ROG standards.
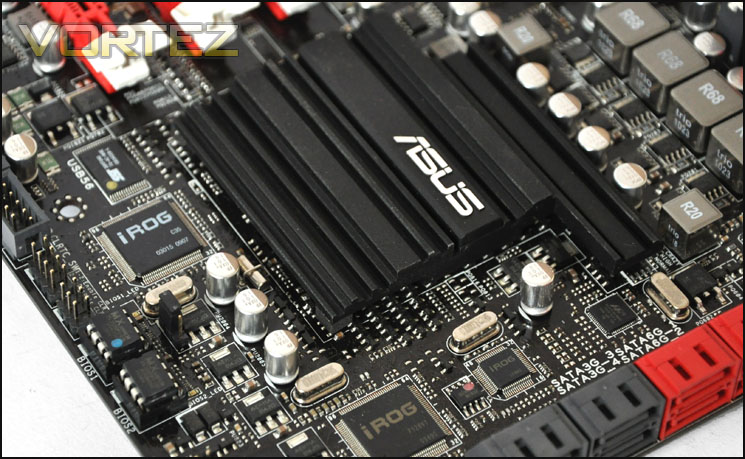
iROG chips feature for Bluetooth
Closer Look (Continued)
At the very bottom of the Maximus IV Extreme are dual BIOS chips giving failed overclocks a platform for recovery.Almost all USB2.0 functionality comes from the headers on the motherboard, there are up to 8 ports available from these 4 headers. There is another USB2.0 header located on the I/O panel – this is also used for ROG connect. We have a total of 8 fan headers on the Maximus IV Extreme which by any account is very generous.
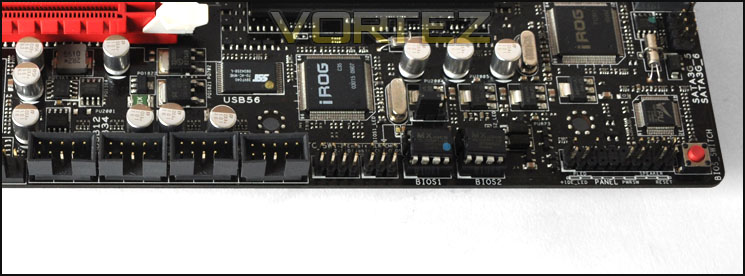
USB2.0 headers deliver almost all USB2.30 functionality
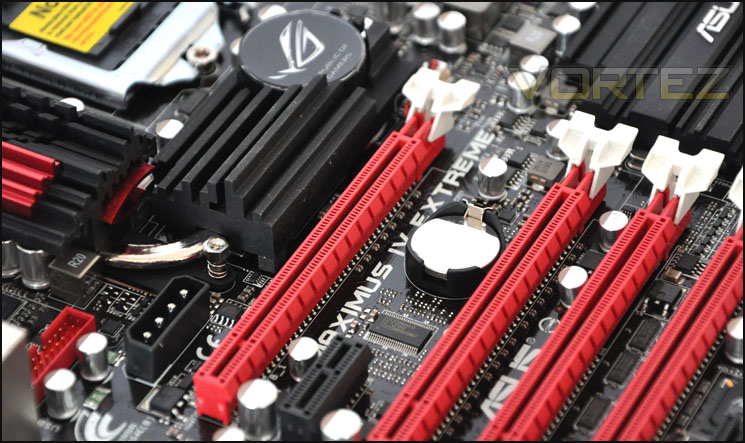
The Maximus IV Extreme’s most distinctive features are without a shadow of a doubt the 4 x PCI x16 lanes. Unlike the P8P67 that only support CrossfireX, Maximus IV Extreme can deliver SLI and CrossfireX. Not only this but Quad CrossfireX and 3-Way SLI (via NF200 PCI-E controller). Additionally we have a x1 lane and x4 too for other devices – ASUS have removed any PCI legacy support in favour of this newer standard. At the very bottom of the motherboard is the PLX bridge chip. This is designed to increase PCI-E bandwidth; with so many lanes available for multi-GPU support this is something that is needful.
Our lanes here are PCI 2.0 and will operate at x16 with a single card. Adding another card will compromise bandwidth and reduce it to x8.
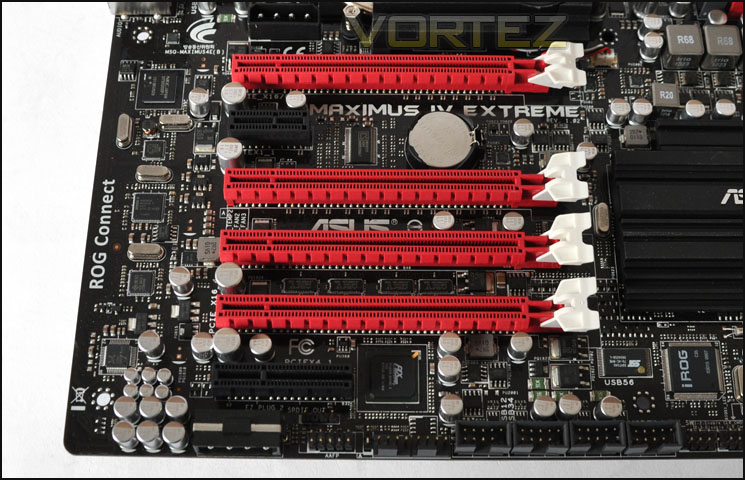
Quad CrossfireX and 3-Way SLI is readily available
Above the PCI-E lanes is an additional molex for supplementary power. Incidentally there is also another molex connection at the very bottom of the board too. In this region we also have the USB3.0 header that will provide up to 2 x USB3.0 ports for front panel support. Two NEC controllers deliver USB3.0 functionality, one supplying the capability to this header and the other providing an additional 8 on the I/O panel.
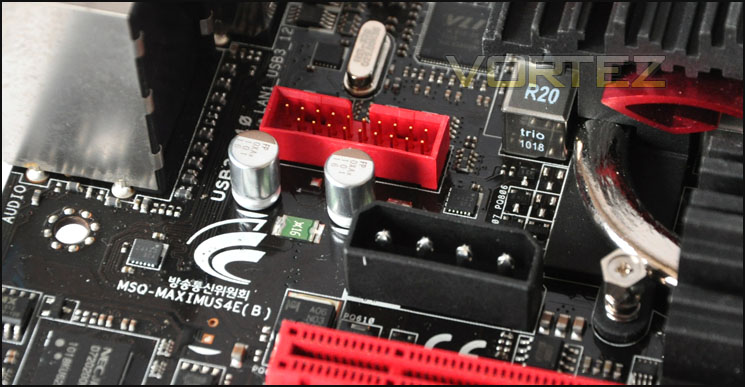
USB3.0 header and additional power for PCIe via molex
Lastly we come to the I/O panel, perhaps the most feature laden I/O we have yet seen. An astounding 8 x USB3.0 ports are available here (of course USB3.0 is backwards compatible). On the I/O panel we have the following options:
1 x PS/2 Keyboard/Mouse Combo port
2 x External SATA
2 x LAN(RJ45) ports
8 x USB 3.0/2.0
1 x USB 2.0/1.1 (also for ROG Connect)
1 x S/PDIF Out (Optical)
8 – Channel Audio I/O (Realtek ALC889)
1 x Clr CMOS switch
1 x ROG Connect On/Off switch
1 x RC Bluetooth switch
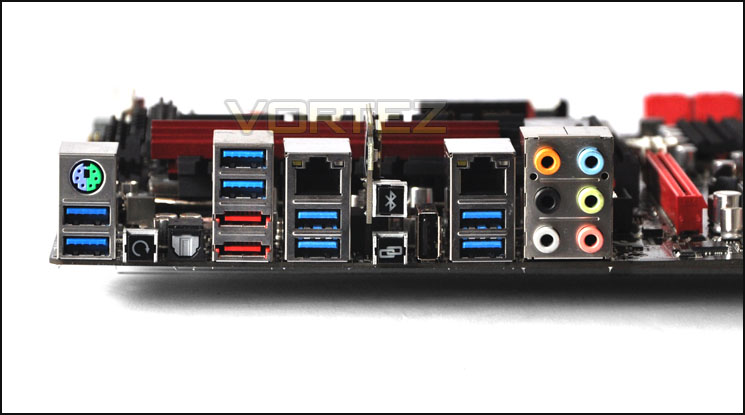
The I/O panel with countless USB3.0 ports
UEFI BIOS
ASUS have taken advantage of EFI (Extensible Firmware Interface) BIOS with the release of the new Sandy Bridge motherboards. For those who have had no experience with this BIOS interface, it is a radical step away from the conventional BIOS that we have come to use since computing really began. With EFI we can now point and click with the mouse, drag and drop, and instead of having a DOS type interface with just plain background colour and white text to scroll using the keyboard, we now have a flashy GUI that responds in a totally different manner to its aged predecessor.
Inside the ASUS EFI BIOS there are lots of features, some of which will differ to other boards that incorporate EFI. The Maximus IV Extreme has a plethora of customisable options, clearly this is a board that will satisfy novice enthusiasts all the way up to the extreme user. To take these screenshots I was even able to ‘print screen‘ by hitting F12. This saved a snapshot of the BIOS screen I was on to a USB stick – just one of the many advantages of using EFI.
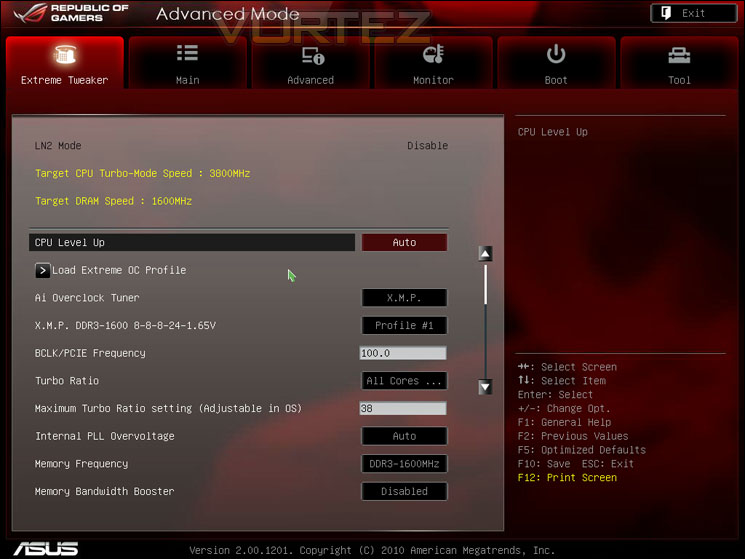
Overclocking the CPU is a simple task, BCLK is modified
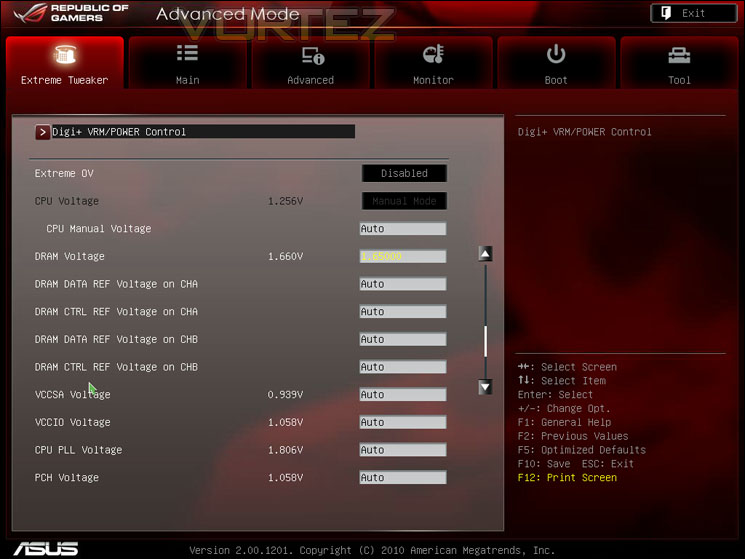
Further down are countless options for tweaking voltage and phase control
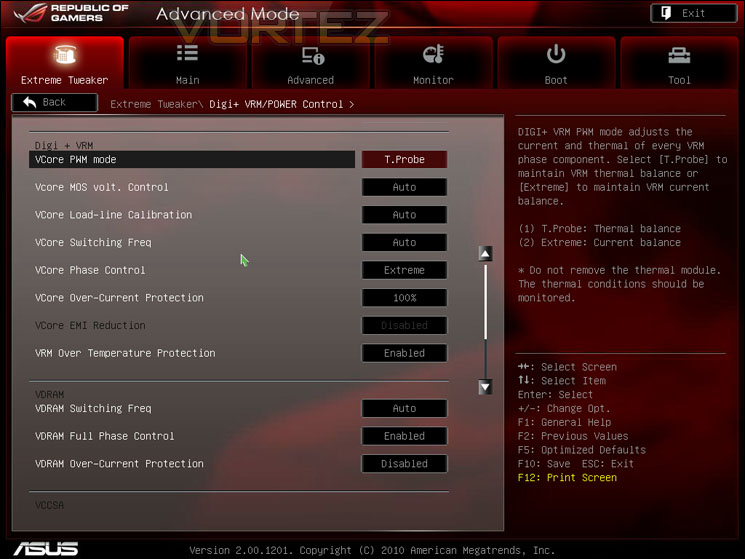
Digi + VRM provides plenty of versatility
Test Setup & Overclocking
CPU Intel Core i5 2500K (3.3GHz)
Motherboards
– ASUS Maximus IV Extreme
– GIGABYTE Z68-UD4
– Foxconn Rattler P67
– ASUS Sabertooth P67
– ASUS P8P67 (LGA1155)
– Foxconn P67A-S
– ECS P67H2-A (Black Extreme)
Memory 4GB Kingston HyperX Genesis CL9 1600MHz
CPU Cooler Noctua NH-D14
Graphics ZOTAC GTX 460
PSU OCZ Fatal1ty 750W
All P67 Sandy Bridge motherboards will be benchmarked against each other using the Intel Core i5 2500K. The maximum overclock will also be included within the proceeding benchmark tests to identify performance gains as a result of tweaking CPU clock speed via the multiplier.
Overclocking
As previously mentioned in our Intel Core i5 Sandy Bridge Roundup – overclocking is achieved by altering the multiplier rather than the BCLK. So the BCLK stays at 100MHz and the multiplier is modified. So if we have 100MHz on the BCLK and 40 for the multiplier this will obviously output 4GHz. We chose to use the Intel Core i5 2500K across each of the motherboard tests and indeed for the overclocking due to its unlocked multiplier.
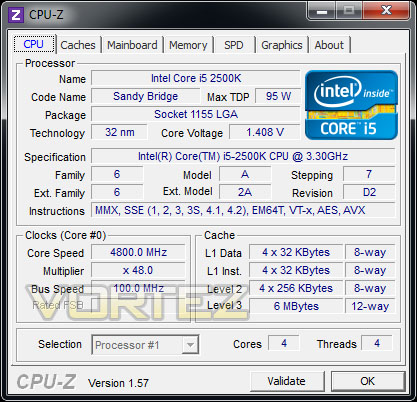
With overclocking simplified on Sandy Bridge, this means that achieving the best overclock couldn’t be easier. CPU voltage and multiplier just need to be modified accordingly. The Maximus IV Extreme is no stranger to overclocking – I disabled various safety features and began nudging the BCLK up. 4.8GHz was the most stable I could attain. 5GHz would BSOD during LinX testing even with a modification to PLL and VTT. I tried 5GHz @ 1.45v but declined to go further to keep within the recommended guidelines for overclocking voltages. Still, a 4.8GHz overclock is fantastic – 45% overclock in fact. The recently reviewed GIGABYTE Z68-UD4 only managed 4.5GHz and wouldn’t go further so its clear that the Maximus IV Extreme is in another league.
Power Consumption
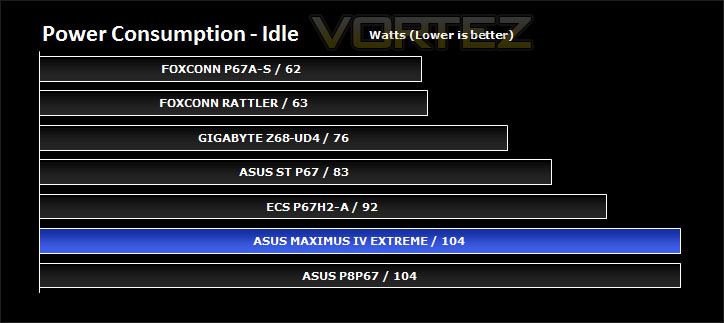
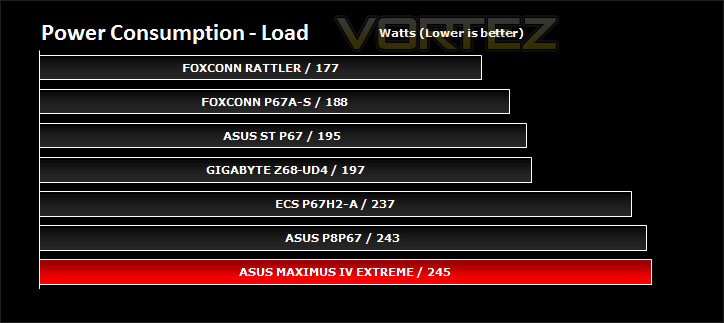
It’s interesting to note the power consumption across all motherboards. Although they are all using the P67 chipset, energy results can fluctuate between manufacturers due to the features and specifications that are integrated. First of all, for the idle tests the system is cold booted into Windows and no additional applications are executed – the watts are noted on the external energy monitor we use and then the system is loaded with 3DMark 11 – watts are again monitored for the duration of the test and the highest rated wattage result is then noted down. Below are the results of this energy test.
It’s obvious to say that the Maximus IV Extreme isn’t the most energy efficient of all the motherboards we have currently tested under the Sandy Bridge platform. Those on a mission to save the planet should look elsewhere!
Synthetic Benchmarks: AIDA64
Get your copy of AIDA64 here!CPU Queen
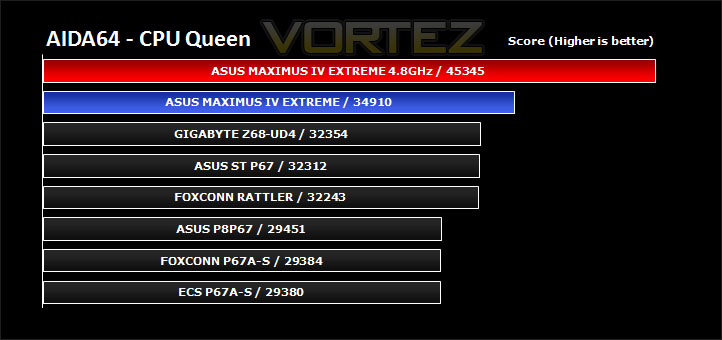
This simple integer benchmark focuses on the branch prediction capabilities and the misprediction penalties of the CPU. It finds the solutions for the classic “Queens problem” on a 10 by 10 sized chessboard. At the same clock speed theoretically the processor with the shorter pipeline and smaller misprediction penalties will attain higher benchmark scores. For example — with HyperThreading disabled — the Intel Northwood core processors get higher scores than the Intel Prescott core based ones due to the 20-step vs 31-step long pipeline. CPU Queen test uses integer MMX, SSE2 and SSSE3 optimizations.
The Maximus IV Extreme is an obvious winner in this test. It blows every other board out of the water, overclocking provides a significant improvement in the score.
CPU Photoworrx
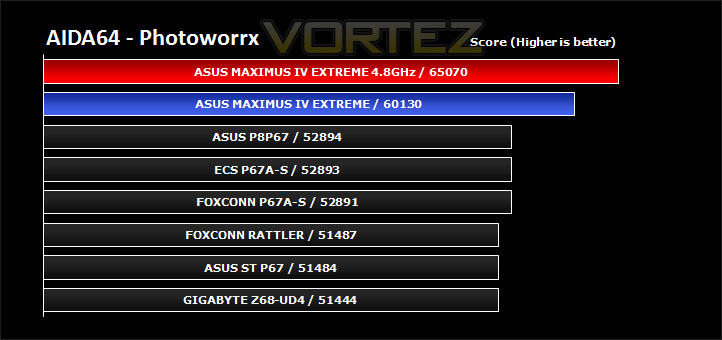
This benchmark stresses the integer arithmetic and multiplication execution units of the CPU and also the memory subsystem. Due to the fact that this test performs high memory read/write traffic, it cannot effectively scale in situations where more than 2 processing threads used. For example, on a 8-way Pentium III Xeon system the 8 processing threads will be “fighting” over the memory, creating a serious bottleneck that would lead to as low scores as a 2-way or 4-way similar processor based system could achieve. CPU PhotoWorxx test uses only the basic x86 instructions, and it is HyperThreading, multi-processor (SMP) and multi-core (CMP) aware.
Again in similar fashion, the Maximus IV Extreme doesn’t hold back. It’s a clear winner pushing ahead of the P8P67.
CPU AES
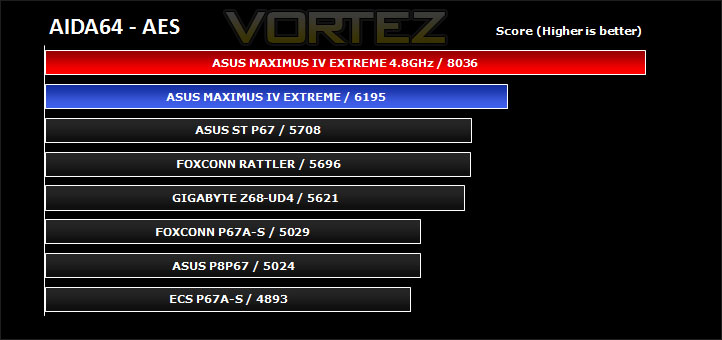
This benchmark measures CPU performance using AES (Advanced Encryption Standard) data encryption. In cryptography AES is a symmetric-key encryption standard. AES is used in several compression tools today, like 7z, RAR, WinZip, and also in disk encryption solutions like BitLocker, FileVault (Mac OS X), TrueCrypt.
CPU AES test uses only the basic x86 instructions, and it’s hardware accelerated on VIA PadLock Security Engine capable VIA C3, VIA C7 and VIA Nano processors; and on Intel AES-NI instruction set extension capable processors. The test is HyperThreading, multi-processor (SMP) and multi-core (CMP) aware.
CPU AES test uses only the basic x86 instructions, and it’s hardware accelerated on VIA PadLock Security Engine capable VIA C3, VIA C7 and VIA Nano processors; and on Intel AES-NI instruction set extension capable processors. The test is HyperThreading, multi-processor (SMP) and multi-core (CMP) aware.
This test may be relevant to those who zip or compress large files, showing no signs of holding back the Maximus IV Extreme is consistently good. Overclocking provides the most significant of boosts in score.
FPU Mandel
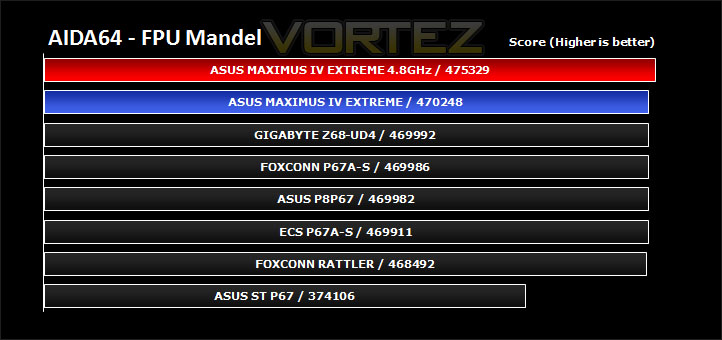
This benchmark measures the double precision (also known as 64-bit) floating-point performance through the computation of several frames of the popular “Mandelbrot” fractal. The code behind this benchmark method is written in Assembly, and it is extremely optimized for every popular AMD, Intel and VIA processor core variants by utilizing the appropriate MMX, MMX+/SSE, SSE2, SSSE3, or AVX instruction set extension. FPU Mandel test is HyperThreading, multi-processor (SMP) and multi-core (CMP) aware.
In our last Aida64 test the scores are less significant with the Maximus IV Extreme scoring similar to that of other rivals. It’s clear to see though that throughout our tests here this board is in another league in comparison.
Synthetic Benchmarks: x264 HD
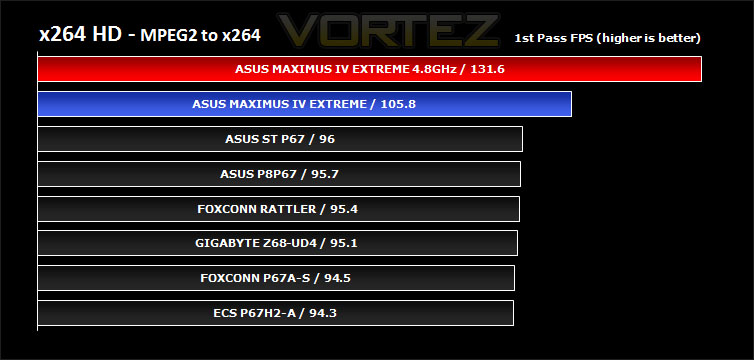
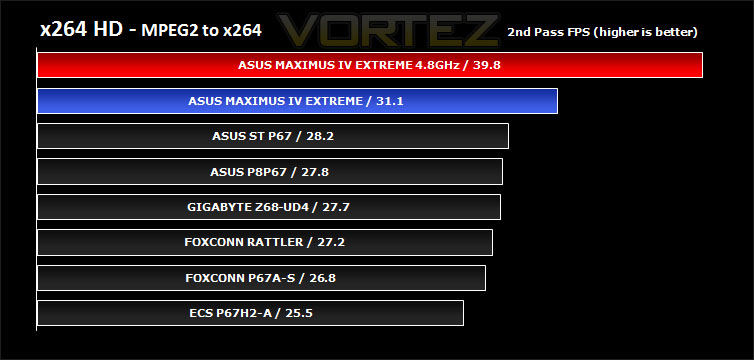
Simply put, this test measures how fast your machine can encode a short, DVD quality MPEG-2 video clip into a high-quality x264 video clip. What’s x264, you ask? It’s more or less the next-generation Xvid/DivX codec. I think it’s ideal for a benchmark because the application (x264.exe) reports fairly accurate compression results (in frames per second) for each pass of the video encoding process, and it uses multi-core processors very efficiently.
x264 HD gives results for 2 passes when compressing an MPEG-2 clip into x264. It presents 4 separate results for each pass giving a total of 8 – all results are given in FPS. For each pass I have averaged out the results.
Whilst the other motherboards we are comparing to are neck n’ neck the Maximus IV Extreme is distinctively ahead. Encoding is far superior with this board and overclocking clearly shows that this can only encourage better performance.
Synthetic Benchmarks: Cinebench 11.5
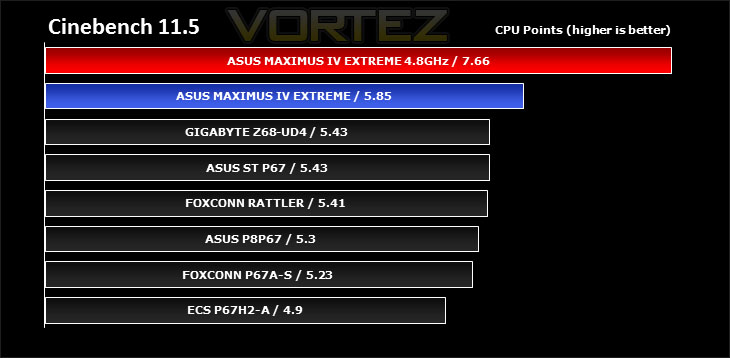
CINEBENCH can measure systems with up to 64 processor threads. ThIS test scene contains approximately 2,000 objects which in turn contain more than 300,000 polygons in total, and uses sharp and blurred reflections, area lights, shadows, procedural shaders, antialiasing, and much more. The result is displayed in points (pts). The higher the number, the faster your processor.
Cinebench produces neat and easy to understand results, giving a quite representative overall CPU performance. Here it indicates that the Maximus IV Extreme is able to achieve the best results out of all the boards under examination. Overclocking gives a very good boost in performance. With overclocking so simple on the Sandy Bridge platform it’s highly advisable to do this. The benefits are there to be had.
Synthetic Benchmarks: SiSoftware SANDRA 2011
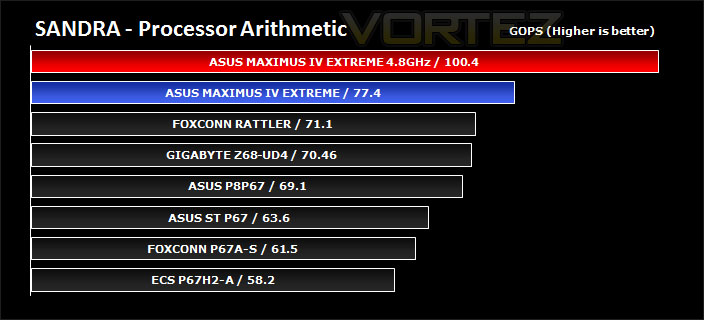
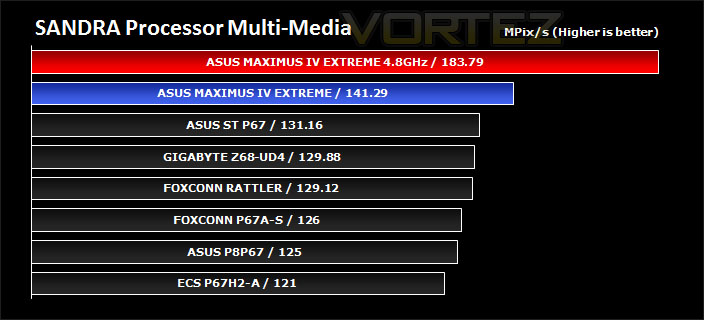
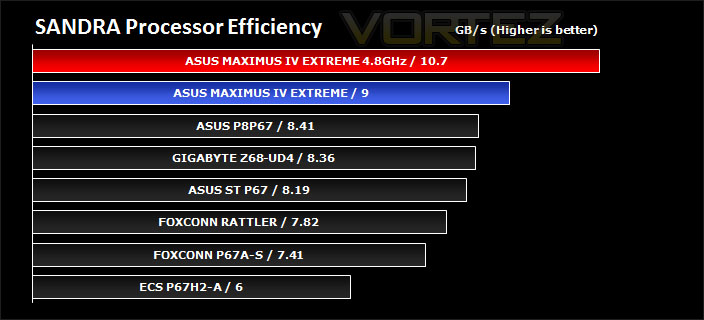
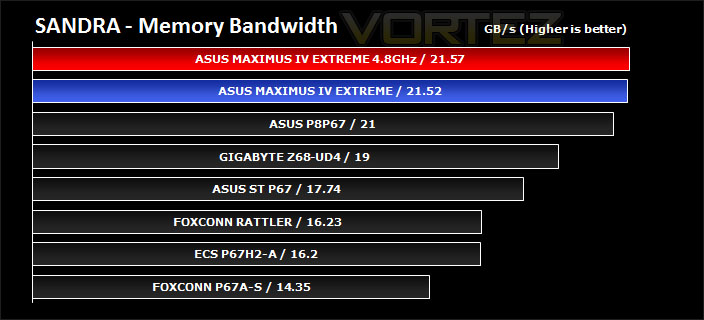
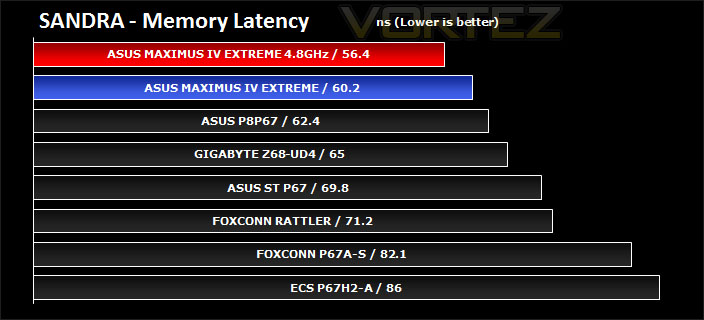
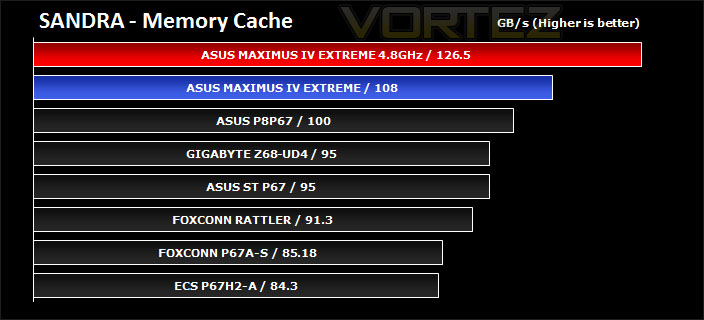
SANDRA isn’t always a benchmark that is included in hardware reviews but I believe it shouldn’t be ignored. SANDRA provides a vigorous package that tests your system in a rather large array of benchmarks. There are many aspects of benchmark that can be executed. We will be considering – CPU and memory tests.
Processor tests – In the processor tests the Maximus IV Extreme is consistently good and offers strong performance. Overclocking supplies even greater bandwidth in the tests.
Memory tests– In these tests the Maximus IV Extreme doesn’t lead by that much at stock speeds but the overclock even pushes the memory further. This board is our new leader.
Synthetic Benchmarks: 3DMark 11
Designed to measure your PC’s gaming performance 3DMark 11 makes extensive use of all the new features in DirectX 11 including tessellation, compute shaders and multi-threading. Trusted by gamers worldwide to give accurate and unbiased results, 3DMark 11 is the best way to consistently and reliably test DirectX 11 under game-like loads.
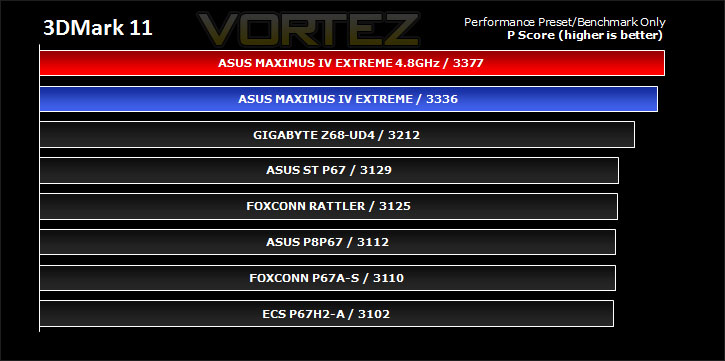
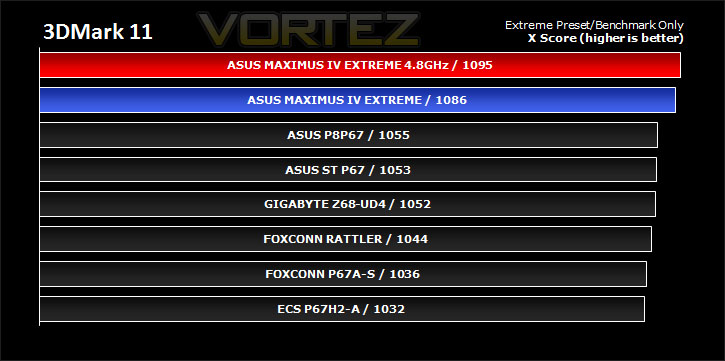
3DMark 11 was released at the end of last year and needs little introduction. For the test settings both Performance and Extreme presets are run with ‘benchmark only’ being selected. This provides good analysis. Many will only test the performance preset, using the extreme mode we can examine the board under much more severe stressing.
There isn’t much to separate the motherboards in both our performance and extreme 3DMark 11 benchmarks. However the Maximus IV Extreme does provide more points within both presets. 3D performance is another of this boards qualities.
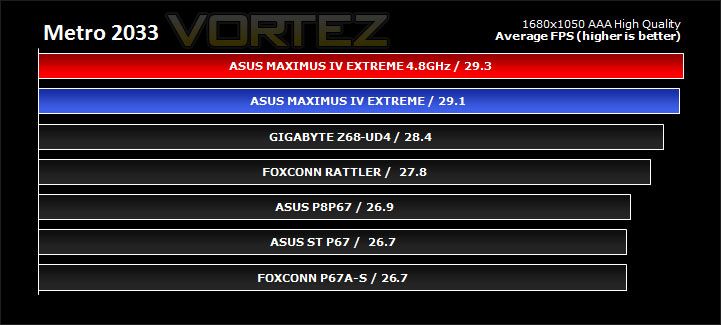
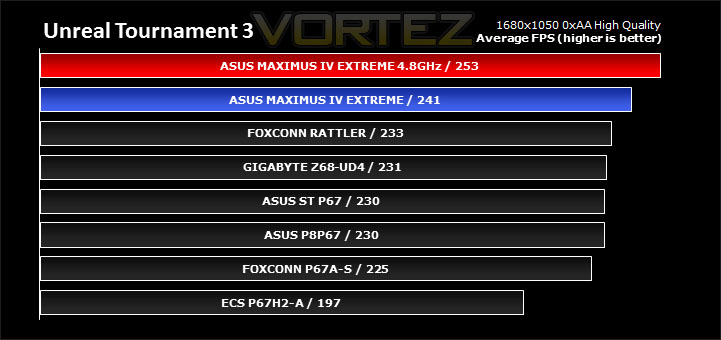
Gaming Benchmarks: DIRT 2, Call of Duty Black Ops, Metro 2033. UT3
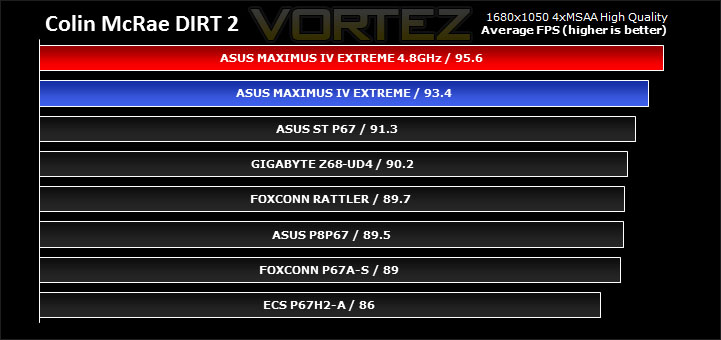
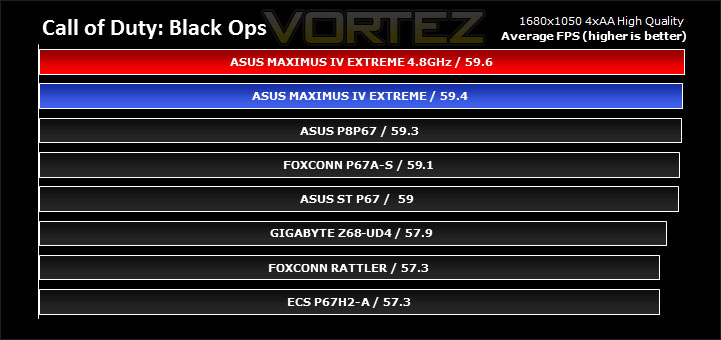
It’s important for us to perform a number of game benchmarks as well as the synthetic tests because many of our motherboards on the test bench have features which market them directly at gamers. So here we have a selection of popular gaming titles, critically acclaimed and action-packed.
Gaming performance across each of the motherboards is marginal. Whilst FPS difference isn’t significant and noticeable to the human eye we do see on paper concrete proof that the Maximus IV Extreme is a clear winner. In our synthetic tests it remained a top performer and again during 3D performance it retains the lead, showing excellent consistency throughout.
Conclusion
Casual overclockers will adore the Maximus IV Extreme. As we have shown briefly the BIOS is a dream to work with. Not only is it user-friendly thanks to UEFI, but it has so many customisable options inside that it will satisfy all levels of user – from the novice right through to the extreme user.
In every benchmark we ran on the Maximus IV Extreme it managed to take top spot every time. Some of the performance gains were quite small in comparison to rival motherboards but in a considerable amount of the benchmarks Maximus IV Extreme took a significant lead showing superior quality and great consistency.
Just browsing over the feature-set will entice even the amateur enthusiast. Being within the Republic of Gamers (ROG) family the Maximus IV Extreme carries with it countless features that are absent from other motherboards on the market. To name just a few: voltage headers for use with multi-meter, LED debug, LN2 mode for avoiding the cold-bug, PCIe x16 switches to channel more power to graphics cards, Quad CrossfireX/3-Way SLI support, 8 x USB3.0 ports on the I/O panel and up to 9 x fan headers dotted around the board. That isn’t including a number of other features either, as you can appreciate this board is laden with features and will present overclockers and gamers with a fun-packed playground of activities to indulge in.
Priced at approximately £280 inc .VAT the Maximus IV Extreme is undoubtedly one of the most expensive Sandy Bridge motherboards on the market. The numerous features and performance results we have revealed truly show this as “the cream of the crop”. You will be hard pushed to find a motherboard of its calibre out there but the question on everyone’s mind is – is it really worth nigh on almost £300? Well for those who are demanding the best – nothing else touches the Maximus IV Extreme in the P67 range. It may be quite a premium, but you get what you pay for!
Having a ROG board is always going to cost you but it’s about being part of an exclusive club. Features that are executed with absolute precision and classy implementations make it a top pick.
Bottom line is: The Maximus IV Extreme offers features and performance unlike any other motherboard using the Intel P67 chipset. It will satisfy the needs of both the gamer and overclocker, novice and extreme user. If you want the best, here it is!
Pros
+ Aggressive styling
+ Great overclocks
+ Numerous innovative features
+ Best performing P67 motherboard
+ Quad CrossfireX and 3-Way SLI
+ 8 USB3.0 ports on I/O panel
+ UEFI BIOS
Cons
– Expensive
– Not very energy efficient
+ Aggressive styling
+ Great overclocks
+ Numerous innovative features
+ Best performing P67 motherboard
+ Quad CrossfireX and 3-Way SLI
+ 8 USB3.0 ports on I/O panel
+ UEFI BIOS
Cons
– Expensive
– Not very energy efficient


