







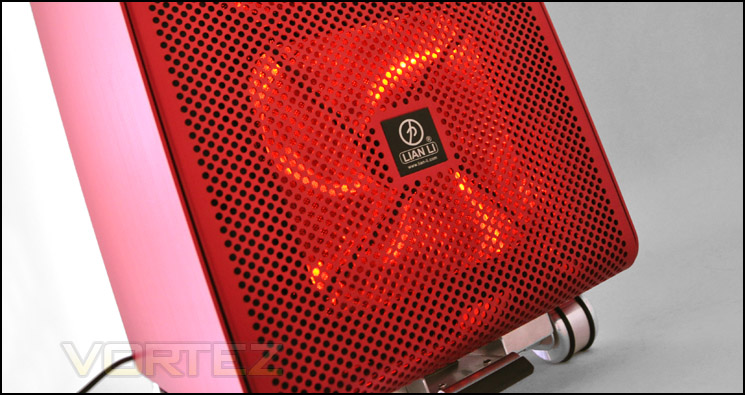
An elegant aluminium mid-tower from Lian Li with patented features throughout – including a removable motherboard tray and casters!
Product on Review: PC-V1020
Manufacturer and Sponsor: Lian Li
Street Price: (At time of review)
249 EUR inc. VAT (RED)
209 EUR inc. VAT (Black/Silver)

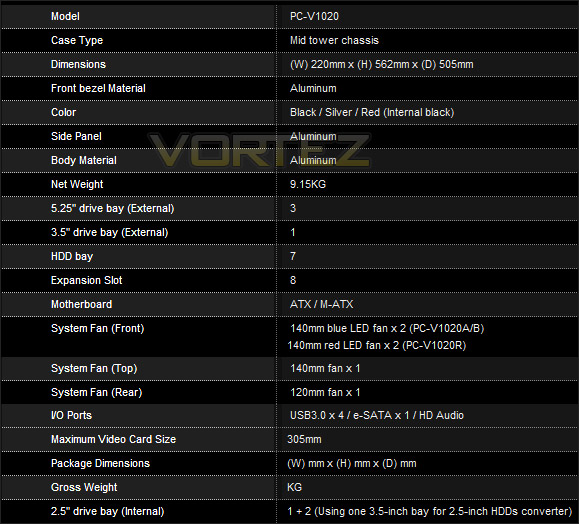
Equipped with 8 expansion slots, the PC-V1020 will support SLI and Crossfire allowing 305mm (12″) graphics cards, the PC-V1020 also has a removable motherboard tray, support for lots of storage options and 3 preinstalled cooling fans – 120mm and 140mm. And this is just scratching the surface, there are many more features to talk about and look at closely so lets waste no more time and begin our analysis of Lian Li’s PC-V1020.
Some background information about Lian Li
Lian Li Industrial Co., LTD was founded in 1983. We are the one of the largest and most reputable manufacturer of aluminum PC case in Taiwan . With over twenty years of experience in the computer products field, our dedicated team of engineers, production specialists and adminstrative staff provide the finest quality accessories available on the market.
In 1993, Lian-Li Introduced the new lines of computer hardware, including bracket( for case & interfaces), Mobile rack(for H.D.D.), mounting kit(for FDD & HDD), aluminum PC cases, IPC, external cases, server cases and more. We also provide OEM & ODM services, you are assured of designs that will meet your exact specifications, innovative ideas in manufacturing that will give your products an essential market edge.
In 1993, Lian-Li Introduced the new lines of computer hardware, including bracket( for case & interfaces), Mobile rack(for H.D.D.), mounting kit(for FDD & HDD), aluminum PC cases, IPC, external cases, server cases and more. We also provide OEM & ODM services, you are assured of designs that will meet your exact specifications, innovative ideas in manufacturing that will give your products an essential market edge.
Technical Specifications
Packaging & First Look
As with all Lian Li products the PC-V1020 adopts similar packaging, with a large case box featuring significant characteristics and features on the front and further technical details on the sides and back for the astute. Inside the PC-V1020 is covered in a clear plastic bag and supported with polystyrene pillars for transit.
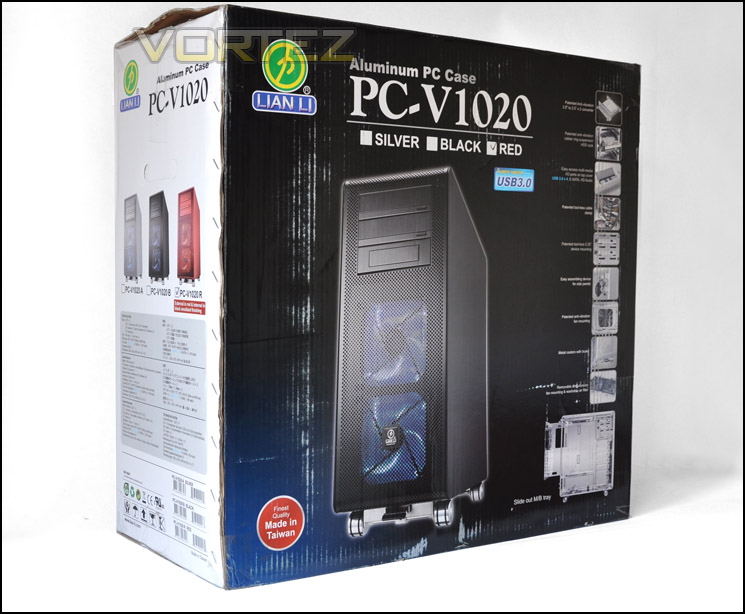
Lian Li PC-V1020 packaging
The PC-V1020 is available in 3 assorted colours. Black, silver and red. The red is the most expensive of the 3 but as you can see from our first glimpse it certainly captures the eye. Lian Li only have specific cases available in red but it has always been a more sought after colour and we can see why.
The overall design of this aluminium structure is of the discreet, elegant type. Styling is very clean, so for those with a distaste for windowed gamer cases this is surely going to be on the wish-list. Both sides of the PC-V1020 are the same, having no ventilation on the side panels, or mesh cut-outs for attaching case fans.
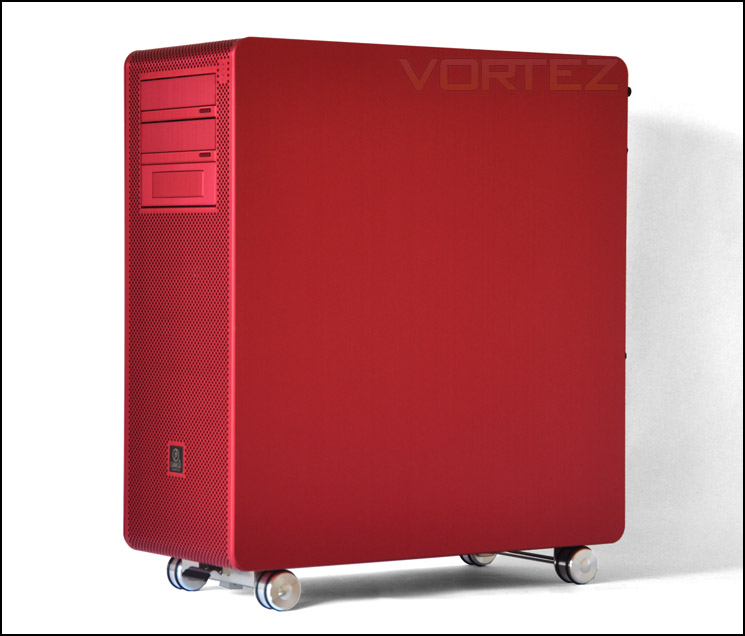
Sleek design, simple but very striking
Exterior
Now that we have seen the PC-V1020 lets go in for a closer look. Firstly, the front. Here, we have very subtle styling. The entire front features a perforated aluminium sheet partly due to having 2 x 140mm fans mounted at the front – these fans are intake and therefore need to pull air into the case. The Lian Li badge can clearly be seen right in the middle this again is metallic. Further up we have 3 x 5.25″ drive bay covers, the first has a 3.5″ adapter for attaching a card reader or such like device. Above this we have another 2 drive bay covers that have the button and fascia – you can fit the optical drive behind this cover and the button on the cover lines up to the optical drive button. This just keeps things looking consistent, optical drives either come in silver or black and therefore would look very odd without a red cover. Although a small point to remark, its good to see that Lian Li have thought of this, it keeps the styling fluid.
Turning our attention to the rear, at the bottom we have an opening for the PSU and a black plate that is fixed in place via thumbscrews. The PSU has to be installed from this orientation, a little later during installation process we will go into why. Further up the rear panel we have a large black panel. This, you will notice has thumbscrews at various points to keep it fixed. Removing these screws allows the motherboard tray and indeed this entire back panel to move out – again we will cover this later. On this panel we have 8 expansion slot covers with ventilation cut-outs for better airflow control. A fan grill covers the 120mm rear exhaust fan at the back of the PC-V1020 and 2 rubber grommets can be seen above this fan placement to provide a route for USB cables to reach the I/O panel on the motherboard or even route tubing/cabling through.
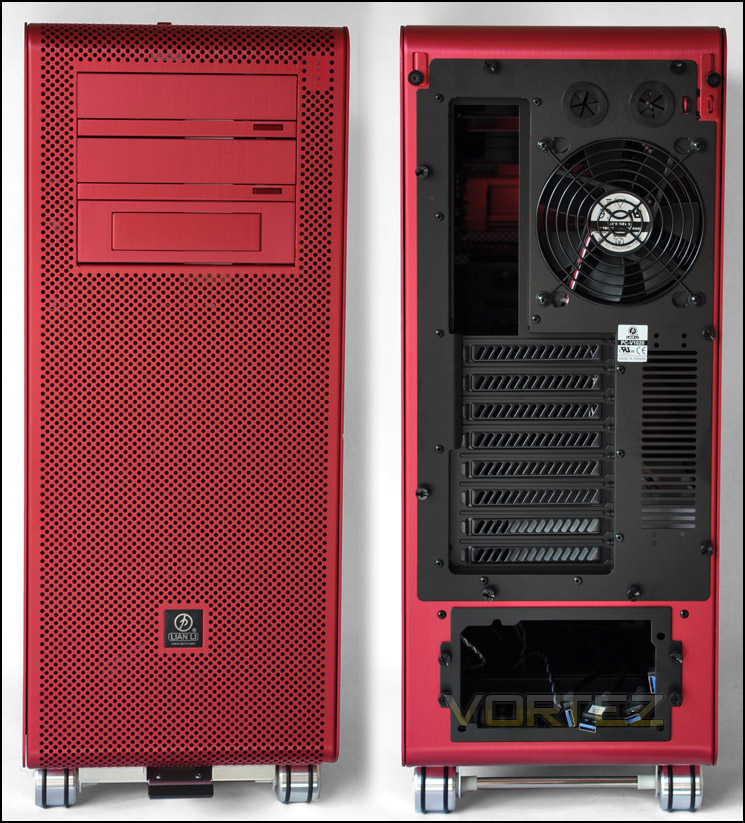
The front and back of the PC-V1020
The eagle eyed amongst you will have already realised there are casters on the PC-V1020. At the front of the case there is a brake system to immobilise the PC-V1020. Construction here is extremely good. The design process here hasn’t been rushed, handling these casters and moving the case around using them reveals just how robust they really are. On the underside you can notice a fan filter for the PSU. This can be removed and cleaned easily.
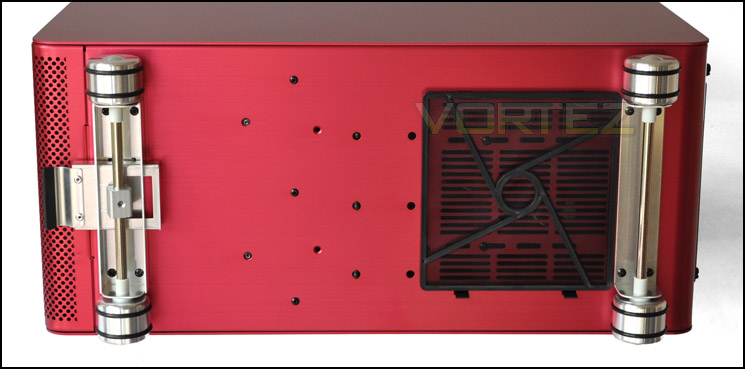
The underside with casters and fan filter
Moving to the top of the case, the front panel controls are concealed behind a small aluminium door. Lian Li adopt this type of front panel control on quite a number of their cases actually. The PC-A77F that we reviewed last year had the same type of front panel control and even the features here were the same.
Here we have ESATA, 4 x USB3.0 ports, and headphone and microphone jack. Outside of this panel there is a large power button and smaller reset button. Sadly though the USB3.0 ports need to attach to the I/O panel on the motherboard. So you will need to have 4 USB3.0 ports on the back of your motherboard, and they will be taken up exclusively for these front panel ports.
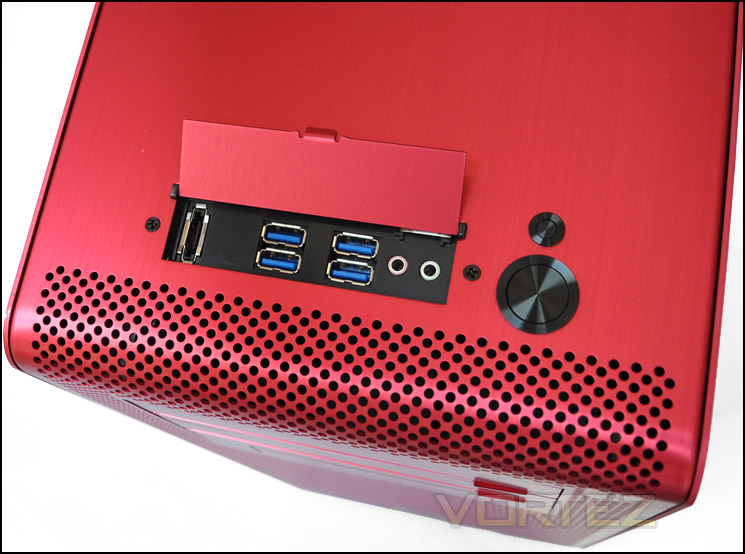
The front panel controls with USB3.0
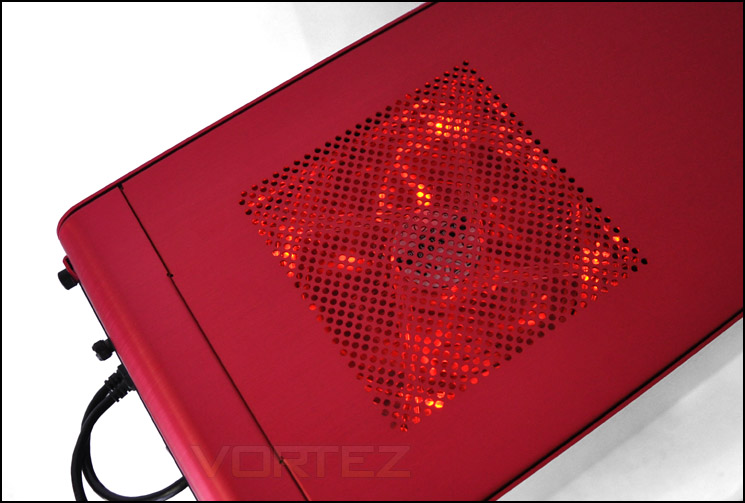
Further along the top, towards the back, we have a perforated mesh area for the 140mm top mounted fan. This fan is an LED fan and will emit a nice warm glow to complement the colour of the case.
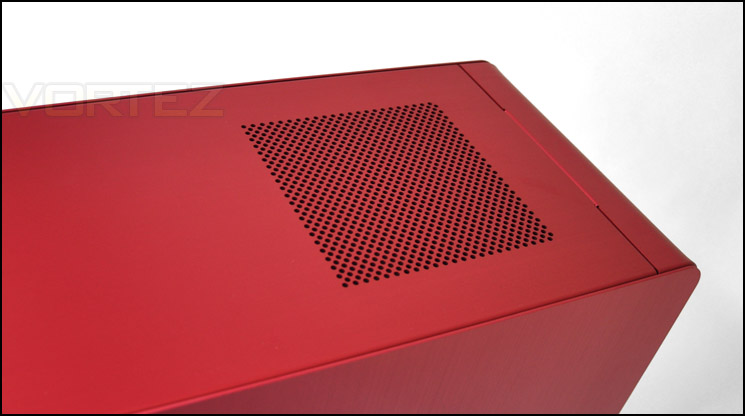
Top mounted 140mm LED fan
The way in which side panels are fixed to the PC-V1020 is totally different to the traditional double thumbscrew. Instead we have a mechanism that requires a single screw on each side panel to be undone, and then a plate to be slid back. This system actually works rather well and means that you will never lose the screws since they are always attach to the case. Once the screw and plate have been moved back the side panel simply lifts out. You will also notice that there are two loop holes on either side of the plate. When the screw is fitted and plate moved into the lock position a padlock can be fitted through these loop holes, providing a secure method of keeping intruders out of the case if you are at a LAN party.
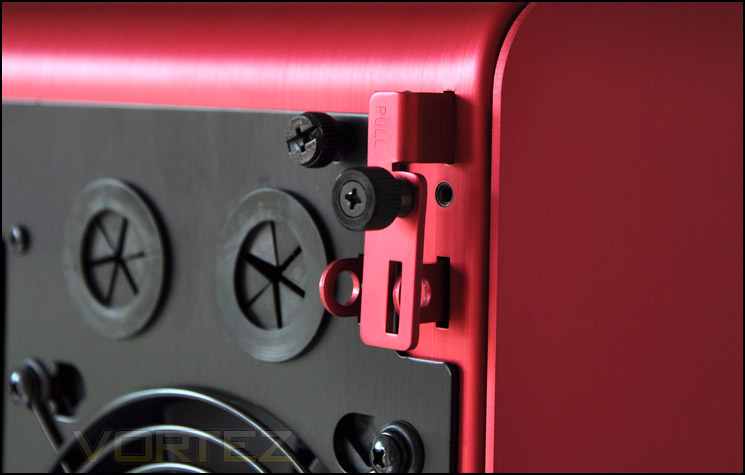
The side panel locking mechanism
Interior
With the side panels off and exterior tour complete, lets move inside for a close look. First of all, I just love the colour-scheme Lian Li have gone with here. Typically the motherboard tray and prominent regions have a polished aluminium appearance but with the red version we have a lovely black coating and it works really well with the red. As you can see from the images, the interior is very roomy and has tool-less mechanisms throughout. The PSU area has a shelf to separate the unit from system components.
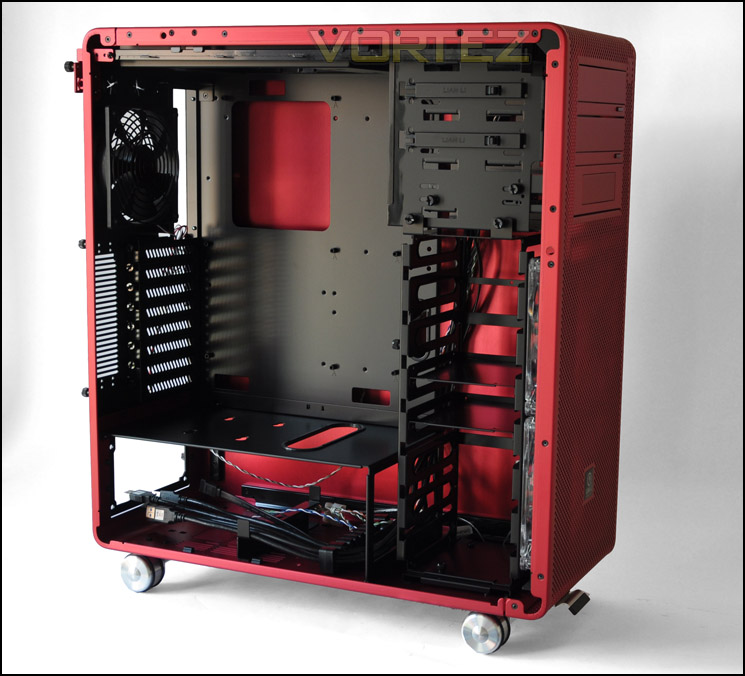
Prominent side panel off showing a fantastic black/red colour-scheme
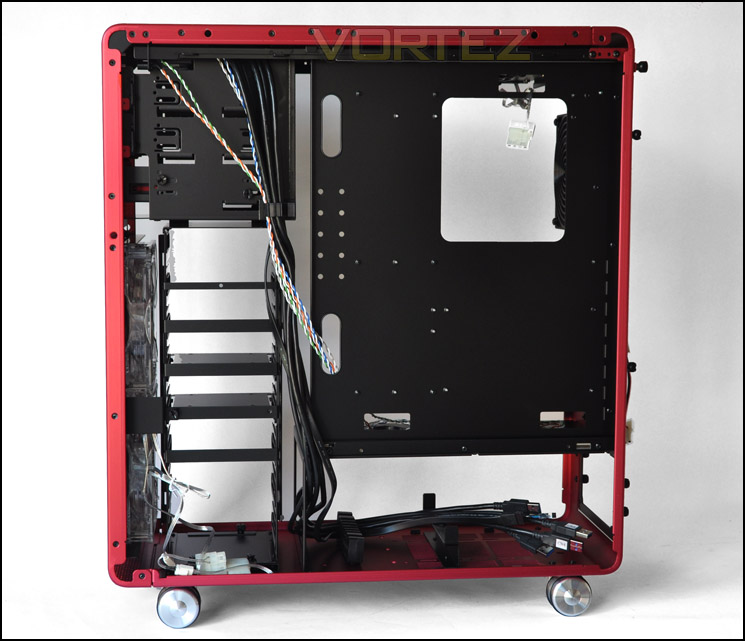
Behind the motherboard tray lots of open space to route cables
The PSU seating area is set out rather differently than the usual case. The PC-V1020 requires the PSU to slide in from the rear panel side. It will then sit within the bracket. Further towards the front there is what Lian Li call a “cable clamp” this allows us to order the cabling in a tidy manner. The front panel cables can be seen within the cable clamp in the picture below, but typically you would arrange redundant PSU cables here for example. The PSU region is actually separated from the motherboard components with a shelf, I do like this idea as it keeps things tidy. There are mounting holes on this shelf to allow a 2.5″ device to be installed such as an SSD.
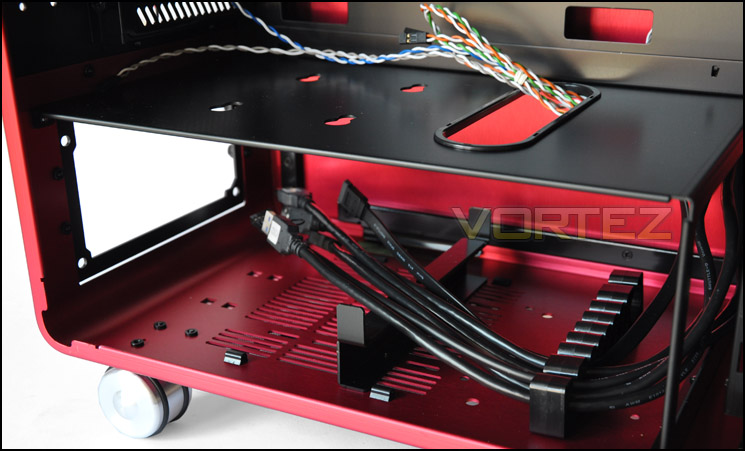
PSU region with cable clamp
Moving up, we have 8 expansion slot covers. Each cover has ventilation for better airflow. The expansion slots are fixed in place via thumbscrews for quick and easy installation.
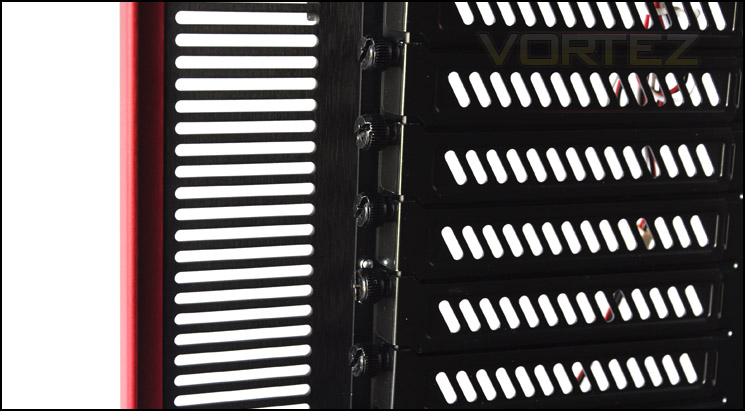
8 expansion slots with ventilation and thumbscrews
Interior (Continued)
In regards to cooling, at the rear and top we have a 120mm rear exhaust fan – this has a 3-pin motherboard header connection. At the top we have a larger, 140mm fan that is LED ready. When powered this will emit a warm red glow. We can either choose to power this via molex (12v) or 3-pin motherboard header (7v). This top fan can actually be removed without any tools. It slides out.
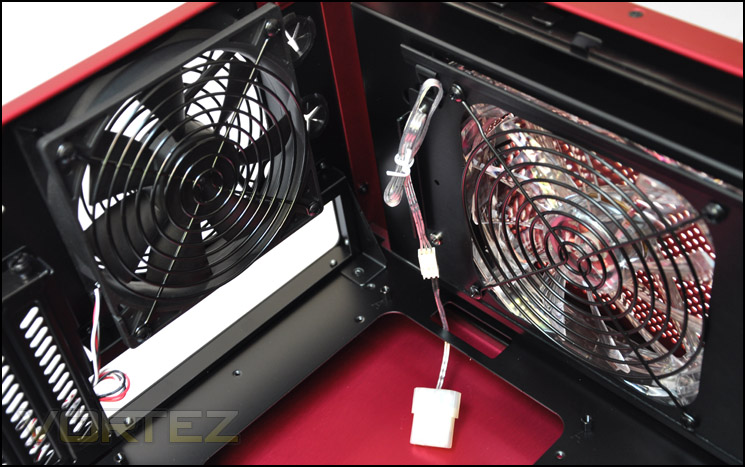
120mm rear exhaust and top mounted 140mm fans
Over the other side, we have the optical drive bays. Installing a 5.25″ drive is very easy, a level has pins attached to it, these pins fit into the optical drive screw holes. We have seen this before on other cases.
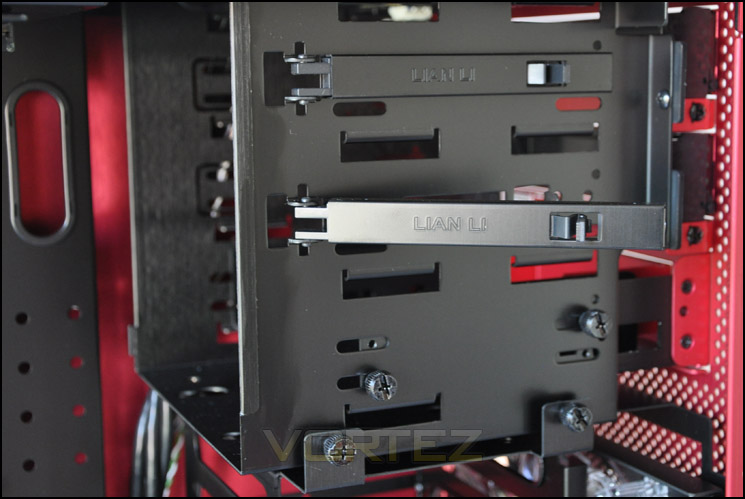
Optical drive bay with level
In terms of HDD storage, 7 x 3.5″ drives can be installed within a large cage. This cage can also take 2 x 2.5″ drives and is even removable. This is very useful if you have a long graphics cards but strangely, the cage doesn’t separate into segments. So if you do need to remove this part for better graphics card compatibility, you will in essence lose all of the HDD storage within the cage.
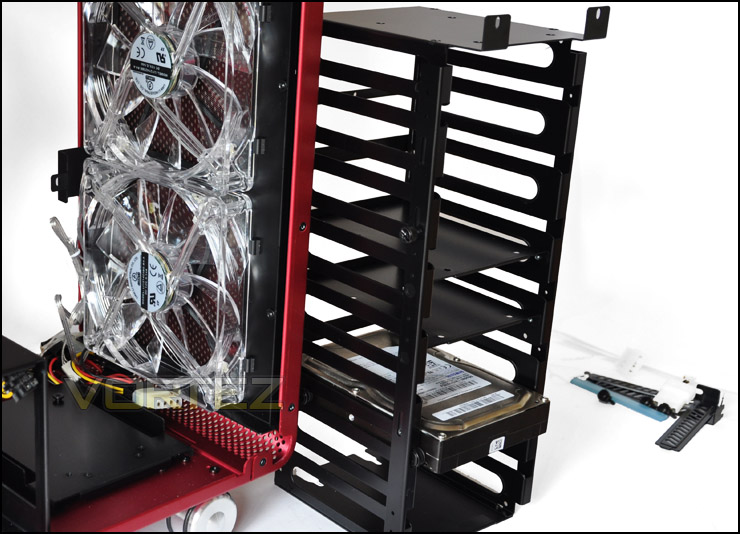
HDD cage that can store 3.5″ and 2.5″ drives is removable
Installation
How did the install go within the Lian Li PC-V1020? Well, very straight forward I must say. Thanks to the cable clamp and space, cables can be arranged very easily and keeping the interior free from disrupting airflow is clear-cut.
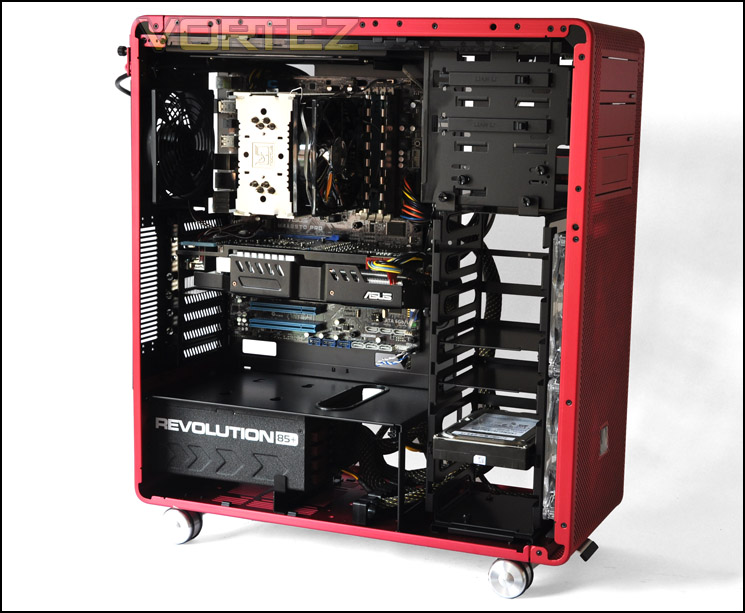
A very tidy interior
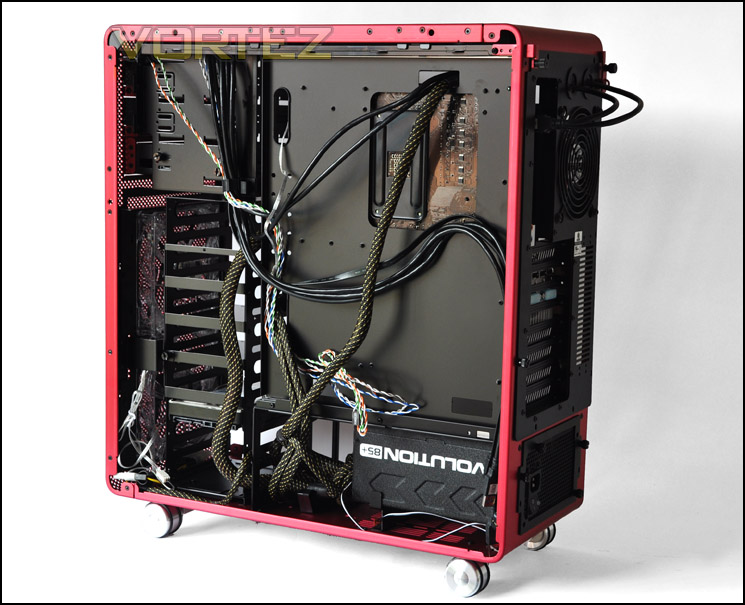
Lots of space to store cables behind motherboard tray
Bundled with the PC-V1020 is an accessories kit that includes a 3.5″ to 2.5″ adapter, an assortment of screws and screw box holder, a speaker and instructions manual. The manual is written in a selection of common languages and is very helpful with each stage of the installation process.
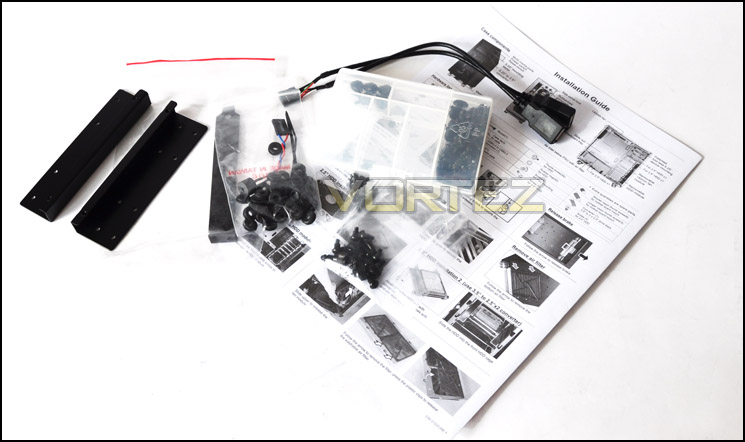
The accessories kit for the PC-V1020
As I briefly mentioned earlier, because the PSU area is very tight and there is a bracket preventing the PSU being installed from the side panel position the PSU has to be installed from the rear panel position. To do this the plate has to be removed and the PSU slides in. This makes for a tight fit but means that arranging cables is very easy.
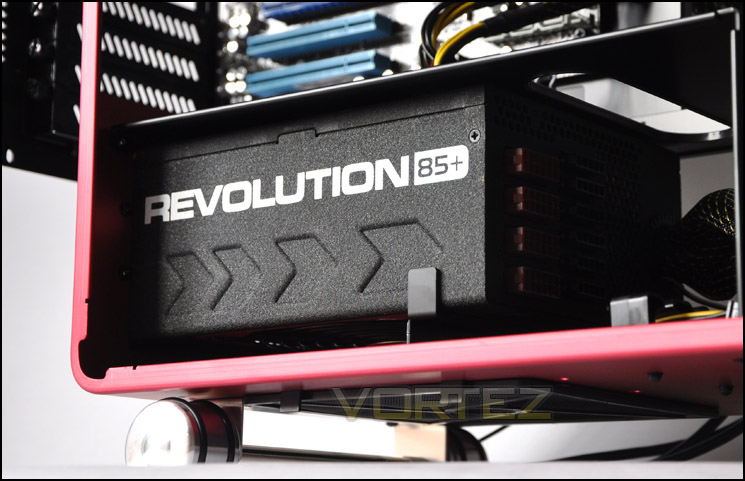
PSU installation is slightly different
The PC-V1020 has a removable motherboard tray. Not only does the motherboard tray separate from the case but part of the rear panel comes with it too, including rear exhaust fan and expansion slot covers. This means the system can be built outside of the case, this type of feature although much sought after is absent from around 90% of cases on the market so its a rare thing to see but is welcomed.
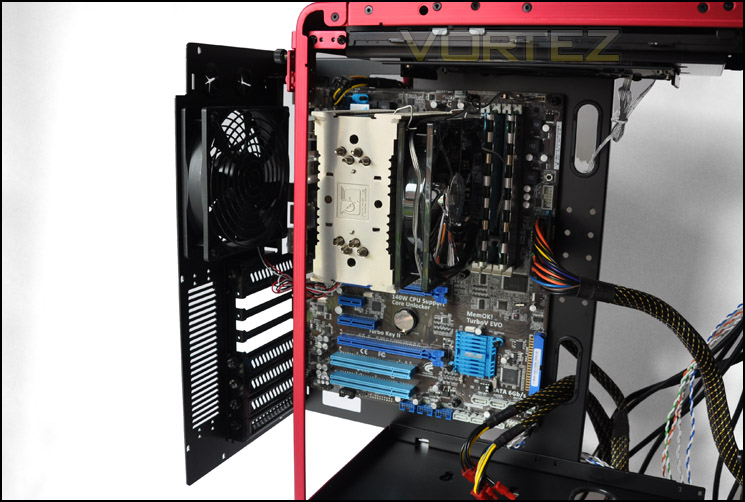
A removable motherboard tray
Installation (Continued)
Installing a HDD into the HDD cage is once again very easy, special screws need to be used in each of the screw holes as well as rubber loops. This allows the drive to slide into an available slot. Thanks to the rubber, this means no metal on metal and a reduction in vibration.
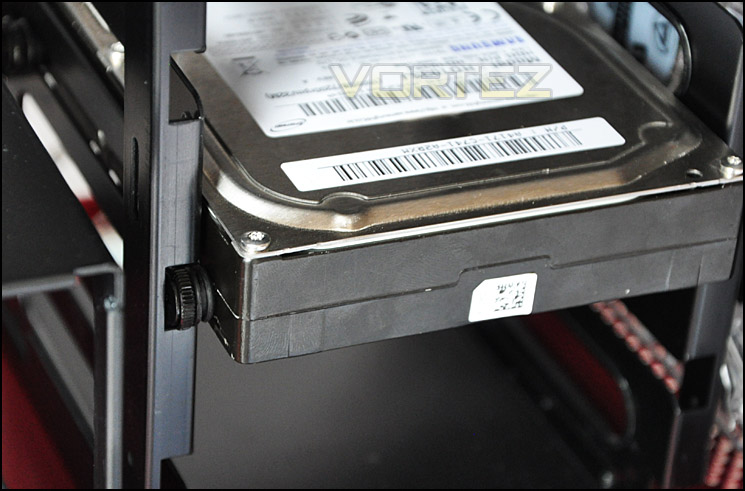
Installing a HDD is very easy
In terms of CPU cooler clearance there isn’t massive amounts of space but it should cater for a vast majority of CPU coolers out there. The Noctua NH-U12P that I have used in this install is 158mm in height and there is around 2cm in clearance between the top of the cooler and the side panel. The following coolers except Archon should fit inside the PC-V1020:
• Thermalright Archon: Height 170mm
• Thermalright Silver Arrow: Height 160mm
• Thermalright Venomous X: Height 160mm
• Noctua NH-D14: Height 160mm
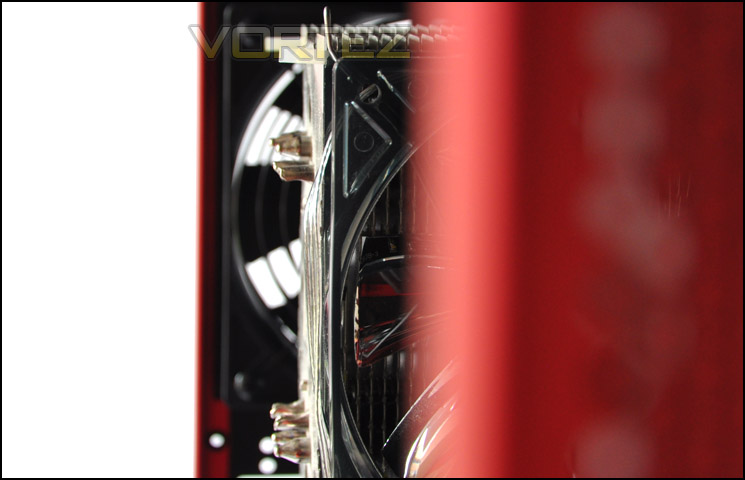
CPU Cooler clearance should allow for most of today’s high-end coolers
Those with a card of 12″ such as an AMD HD6990 should just be able to fit this card within the case without the removal of the HDD cage. Certainly, with the ASUS HD 6950 Direct CU II pictured below, which is 11.5″ fitted without any problems. I was even able to support massive, triple slot cooler on this card with a cable tie. Sometimes a ghetto mod is what it takes!
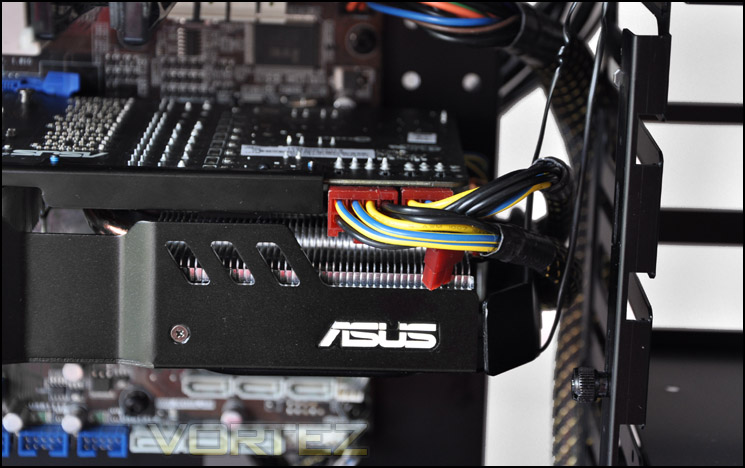
No problems with graphics card clearance
Finally, the clearance between the motherboard tray and back side panel is just over 1cm (0.5″). Which isn’t too bad at all, remember that behind the motherboard tray there are lots of areas for the cables to slip onto the other side – especially around the CPU region so storing cables around the back is of no problem at whatsoever.
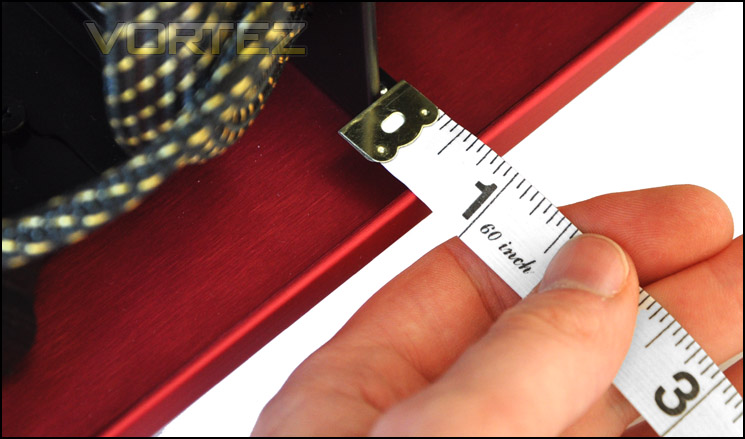
Behind the motherboard tray over 1cm in clearance
Powered UP (Lighting)
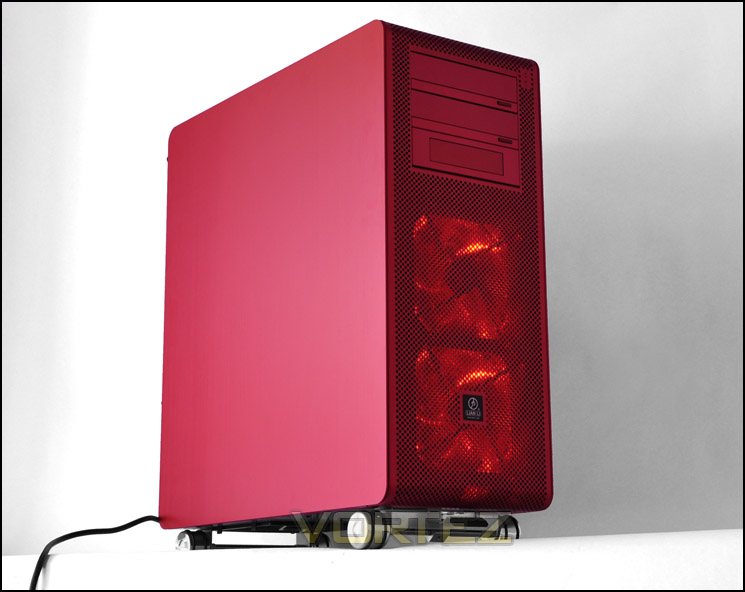
With everything finished within the case its now time to see how those 140mm red LED fans look. For the Silver and Black variants of this case the fans will be blue rather than red, the red being specifically chosen to correspond with the luscious anodised red exterior. A very nice feel and effect.
Thermal Performance Testing
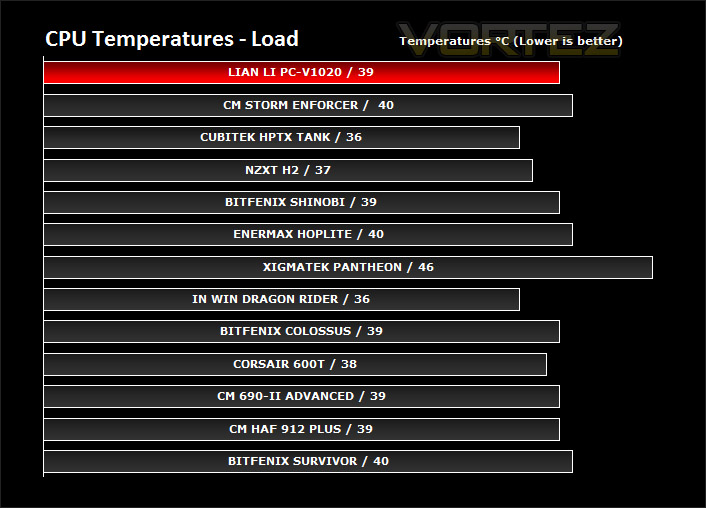
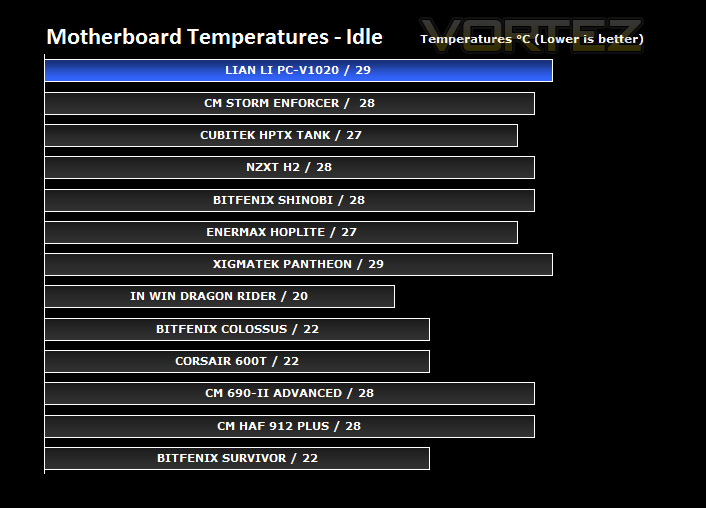
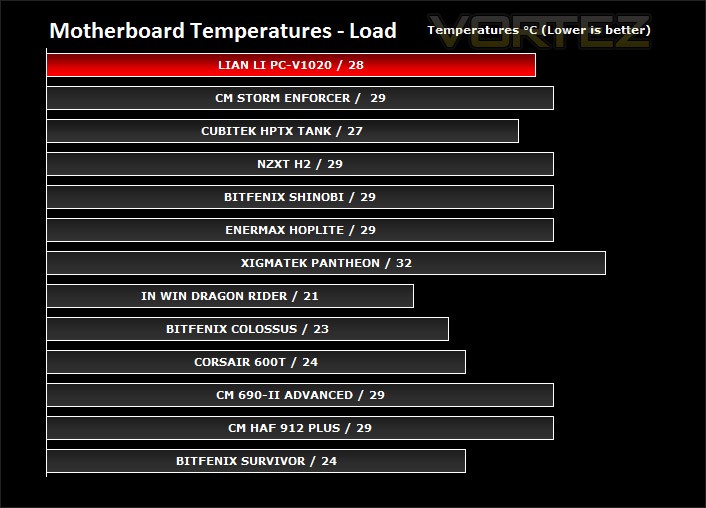
The Lian Li PC-V1020 has a traditional cooling layout. With some extra help up front via 2 x 140mm fans the rear exhaust also has a helping hand with a 140mm top mounted fan too. The front two fans will be running at 12v throughout the tests whilst the top and rear exhaust at 7v.
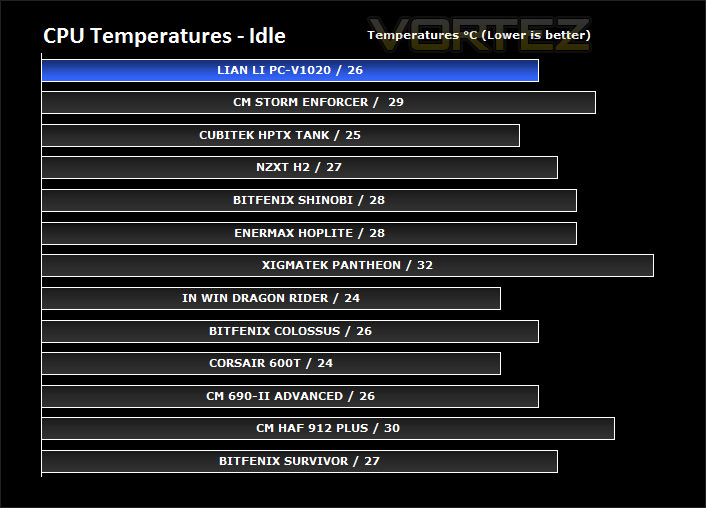
To discover the thermal performance of the Lian Li PC-V1020 I will record idle temperatures after 20 minutes from a cold boot. I will then stress the system and temperatures will again be monitored after 30 minutes have elapsed.
System Components
CPU AMD Phenom II X6 1055T 2.8GHz
Motherboard ASUS M4A89TD PRO
Graphics ZOTAC NVIDIA GTX 480
Memory 4GB Mushkin EM3-10666 DDR3
HDD Samsung Spinpoint 500GB SATA-II
PSU Enermax Revolution 85+ 850W
Lian Li’s PC-V1020 does admirably in the thermal tests but I cant help but think that a larger fan at the top of dual 140mm fans would have further enhanced the cooling ability. A traditional cooling layout always does well, the Lian Li fans within the PC-V1020 are quiet at 12v and 7v.
Conclusion
It’s always nice to get a Lian Li product in for review at Vortez. As we recently mentioned in the Cubitek HPTX Tank Review, there are very few if at all any manufacturers to rival Lian Li in the aluminium arena, their products are almost always very high quality. The PC-V1020 we have looked at today carries with it this high regard and for the most part our journey with this case has been very positive.
The PC-V1020 is without doubt a chassis with premium build quality. All of the features excuted within are done so with precision and a degree of accuracy that others only seek to achieve. As with a great deal of Lian Li’s cases the PC-V1020 has discreet, elegant styling that will suit those with a taste for an enclosure that has subtle appearances. The red variant we have taken a look at today has an exterior of red whilst inside having a black coating on all key elements. The red and back work extremely well together and personally, I favour this styling over the typical polished aluminium found on the black, silver variants and majority of cases within Lian Li’s portfolio.
Feature-wise, the PC-V1020 is ‘all-out’. It endorses some great features that give it that edge over its rivals. The casters (wheels) at the bottom of the case are a nice touch, not only does it give you the ability to move the case around much easier, but it keeps the case off the ground, away from collecting dirt and dust. We even get a brake mechanism fitted to the front caster to immobilise things when you have found your chosen spot. It’s rare to find a case with a removable motherboard tray but the PC-V1020 has this feature and its a very handy one, it means you can build the system out side of the case, which for some is easier to do.
I found the cable management within the PC-V1020 very well thought out, the cable clamp beside the PSU is a valuable asset – it allows you to keep unwanted cables hidden, stored neatly tucked away for a clean interior. Oddly on the motherboard tray there is a cut-out missing parallel to the 24-pin ATX power on the motherboard. This means that this large cable has to either route through the lower or upper vertical cut-out. It would make much more sense and be useful to have a cu-out right beside the 24-pin ATX power. Behind the motherboard tray there is plenty of space to store cables, getting the side panel on is without its problems thanks to the 0.5″ / over 1cm of clearance.
Now we come to the price. The black and silver versions can be picked up for around the £200 mark but the red variant finds itself moving closer and closer to £300. £264 for a mid-tower case is far beyond what many would pay. Really for this price-tag I would have expected more value for money, the PC-V1020 doesn’t even have fan control.
So where does this leave us? Well the PC-V1020 is of course a very good mid-tower there is no denying that. It has a plethora of features and good cooling performance but it is let down by the big price-tag. The black and silver version may well represent better value for money over the red but many will still be put off by the burdensome cost.
Pros
+ Premium aluminium build quality and appearance
+ Casters for each movement and clearance from floor
+ Removable motherboard tray
+ Good cable management options
+ Decent thermal performance
Cons
– Long graphics cards require entire HDD cage removal
– Big price-tag for mid-tower (especially red variant)
– No fan control
+ Premium aluminium build quality and appearance
+ Casters for each movement and clearance from floor
+ Removable motherboard tray
+ Good cable management options
+ Decent thermal performance
Cons
– Long graphics cards require entire HDD cage removal
– Big price-tag for mid-tower (especially red variant)
– No fan control


