Looking for a classy looking case with fan control, noise reduction, USB3.0 and good cable management? The new NZXT H2 Silent Midtower.
Product on Review: NZXT H2 Classic Silent Midtower
Manufacturer & Sponsor: NZXT
MSRP: £84.99 Inc. VAT (At time of review)

It’s been a while since NZXT launched anything new to the market. Their Phantom received overwhelming success last year and ever since we have had a keen eye on NZXT.
It was at CES 2011 at the start of the year that the product we are looking at today was first unveiled. The H2 is a case that slots into NZXT’s “Classic” series and is regarded as the “Silent Midtower” due to the fact that there are thick side panels which feature foam underlay. It differentiates itself from the gaudy gamer styled cases currently swarming the market, by offering elegance and a minimalistic approach to styling. Fans within H2 can be controlled through 3 stages giving the user complete control over audio levels emitted from the chassis. With much more to talk about, lets begin our analysis of the new NZXT H2 that launches today.
NZXT H2 is available in 2 colours. Black or White. We will be taking a look at the Black version today.
NZXT’s Take on H2:
NOISE – chaotic wavelengths that distract, distort, impede, confuse, and endanger the gamer during a life and death situation. If you are a professional gamer, avoid it at all cost. Intelligently constructed to give you peace of mind, NZXT’s H2 Classic Series Silent Midtower Chassis minimizes extraneous hums, clicks, whirls of your system to enhance your concentration, accuracy, and deadliness
Technical Specifications
CASE TYPE
– Mid Tower Steel
FRONT PANEL MATERIAL
– Plastic/Steel
DIMENSIONS
– (W x H x D) 215 x 466 X 520 mm
VGA Clearance Maximum
– 310 w/o HDD, 270mm with HDD
CPU Heatsink Support
– 170mm
COOLING SYSTEM
FRONT 2 X 120mm @ 1200rpm ( included )
REAR 1 X 120mm @ 1200rpm (included)
TOP 1 X 140mm
BOTTOM 1 x 120mm
DRIVE BAYS
– 3 EXTERNAL 5.25″ DRIVE BAYS
– 8 INTERNAL 3.5″/2.5″ Slots
Screwless Rail Design
MATERIAL(S)
– Steel with painted interior
EXPANSION SLOTS
– 7
WEIGHT
– 8.9 kg
MOTHERBOARD SUPPORT
– ATX, MICRO-ATX, BABY AT
Packaging & First Look
The H2 is presented to us in an eco-friendly box with very little graphical work compared to other cases we have seen such as the Phantom. Most people when they have unpackaged their new case will probably destroy the box and put it in the bin for disposal anyway so a recyclable box is a good idea, especially as the push these days is to go green. The sides and back feature specifications that give you an idea for the H2’s feature-set and dimensions. Inside, the H2 is supported by 2 polystyrene pillars and covered in a plastic bag for transit.
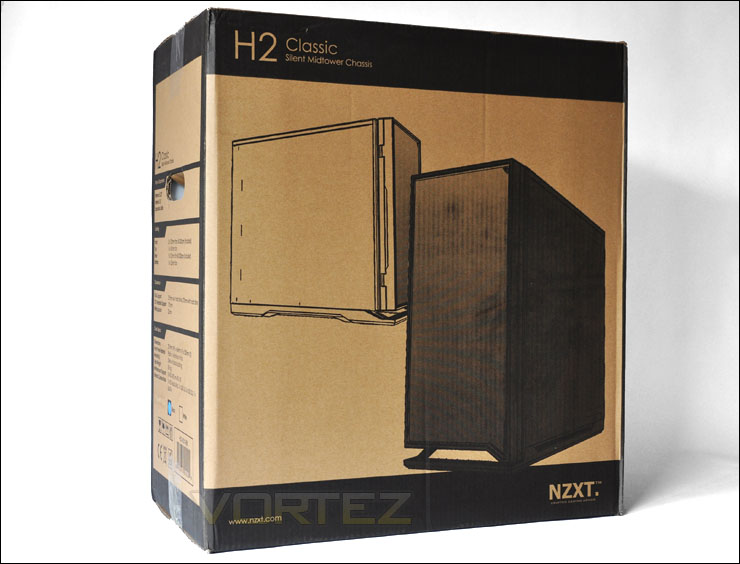
Eco friendly packaging
Removing the H2 from its packaging we are met with a very sleek, elegant looking enclosure. Those with a preference towards minimalist styling are going to be pleased with how NZXT have designed H2. The front of the case features a door which swings out to reveal optical drive bays and fans (see over the page).
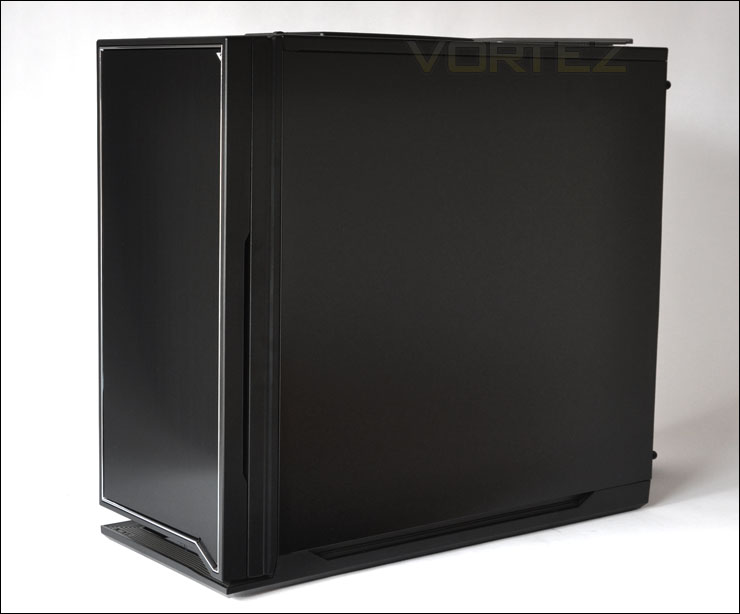
Elegant, sleek styling
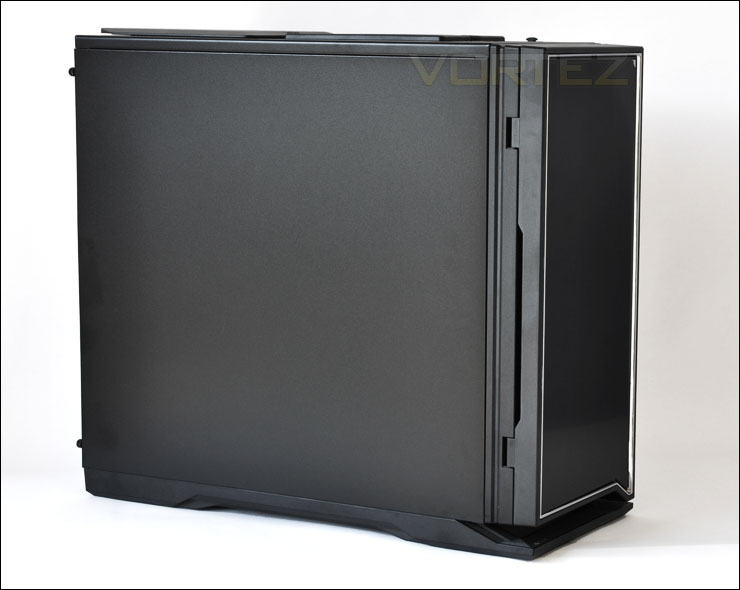
The opposing side is identical
Exterior
H2 has very reserved styling, those who despise the flamboyant gamer style cases that seem to engulf the market at the moment are going to get a ‘breath of fresh air’ with this case. The front as always mentioned is very clean and features a swinging door, whilst the rear features the following: PSU mounting at the bottom, 7 expansion slot covers with perforated mesh panel to the side and 2 rubber grommets for tubing or cable management and above this an opening for a 120mm rear exhaust fan that comes pre-installed. To the top left of the rear of H2 there is another rubber grommet that NZXT have fed the USB3.0 cable through from the front of the case. This will of course connect to USB3.0 I/O on the motherboard panel.
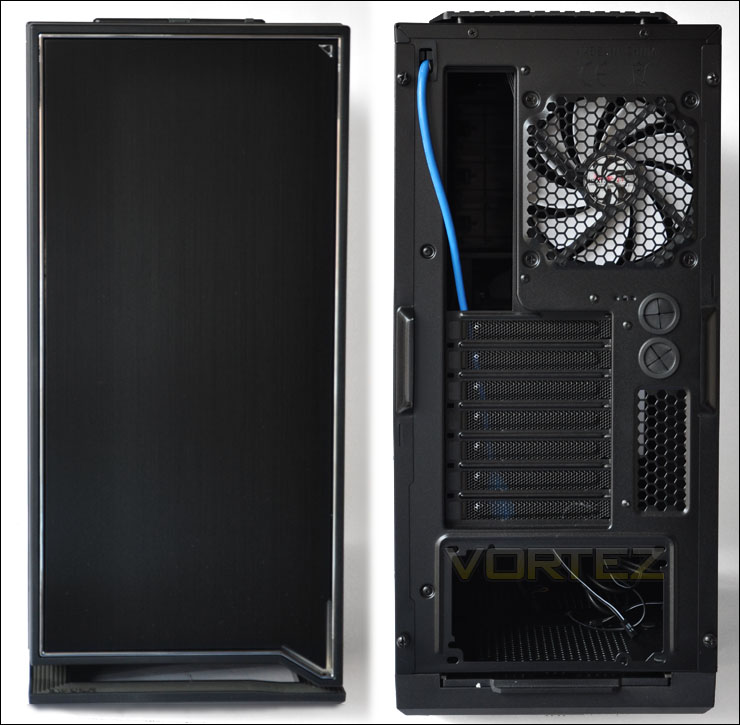
The front and back of H2
Opening the front door which is closed shut via 2 magnets we can see 3 x 5.25″ drive bay covers which are removable by simply sliding back a small button. Beneath this we have 2 x 120mm fans that are preinstalled and are removable. These intake fans don’t actually use 3/4-pin cabling so taking them out is really easy. (more on this in the interior section of the review) The inside of the door has foam noise dampening to reduce noise from these dual 120mm fans.
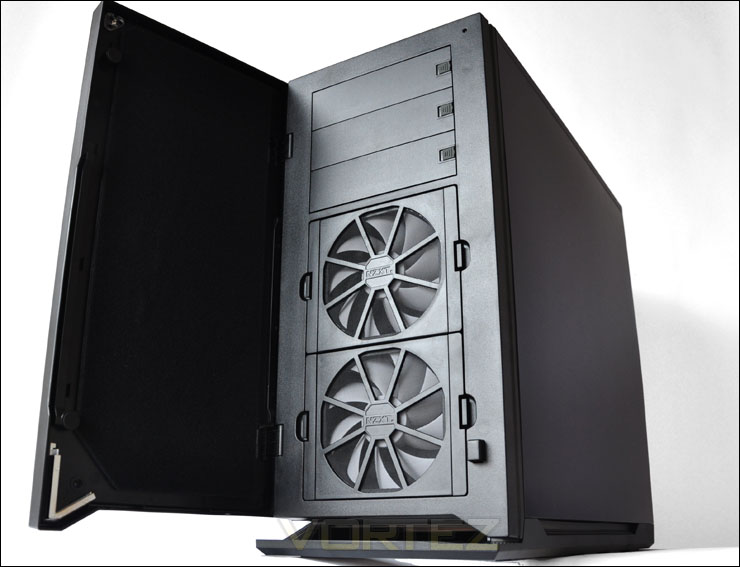
H2 has an swinging door to reveal 2 x 120mm intake fans
Moving up to the top of the case we have a front panel section that consists of (left to right): rubber power button, headphone jack, microphone jack, 1 x USB3.0 port, 3 x USB2.0 port, fan control switch (3 modes – low, med- high) and a rubber reset button. So plenty of functionality here and its good to see the USB ports in this orientation, it means you can fit devices next to one another without obstruction being an issue.
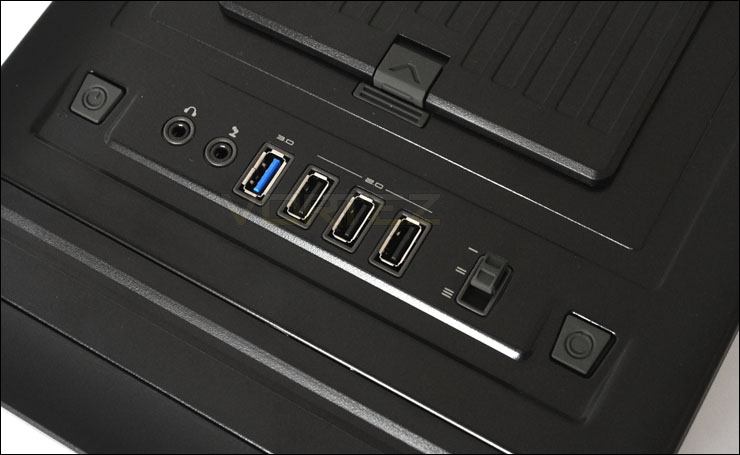
The front panel with fan USB3.0 and fan control
Further along the top of the H2 are two compartment covers. The compartment to the left can accommodate 3.5″/2.5″ drives and is a hot swappable dock. The compartment to the right (nearest back) is simply a cover to dampen out noise from a top mounted fan should you wish to install one – there isn’t one pre-installed.
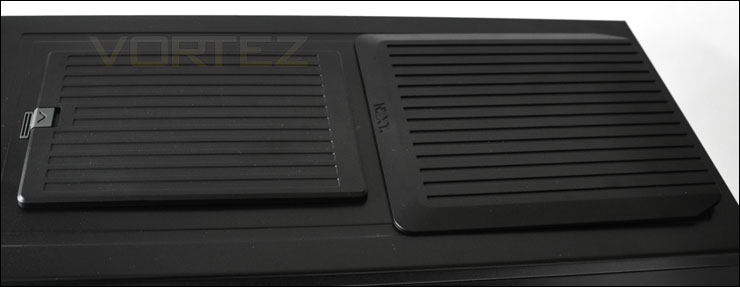
Top compartments for hot swappable HDD docking and top mounted fan
Exterior (Continued)
Taking a closer look into the compartments we can see the first as already mentioned is a HDD docking slot. This does require a AHCI capable motherboard though. There are rubber
mounts so that the drive can sit without scratching/sliding.
The other compartment has magnetic feet that allow the cover to sit over the mesh panelling. The idea with this cover is to dampen out any noise from a top mounted fan, It also acts as a dust shield for the system – This cover only really works if you don’t have a fan installed though as typically you would have a top mounted fan dissipating heat from the case (exhaust), not blowing air in (intake). An intake fan in this position could well hinder airflow.
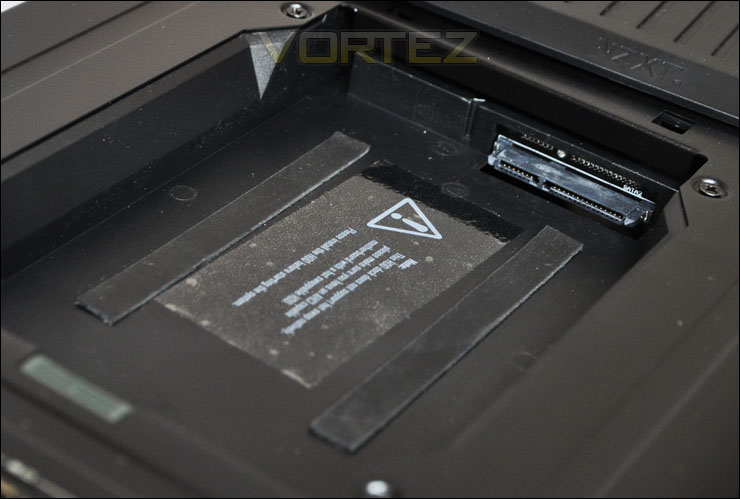
Top compartments for hot swappable HDD docking and top mounted fan
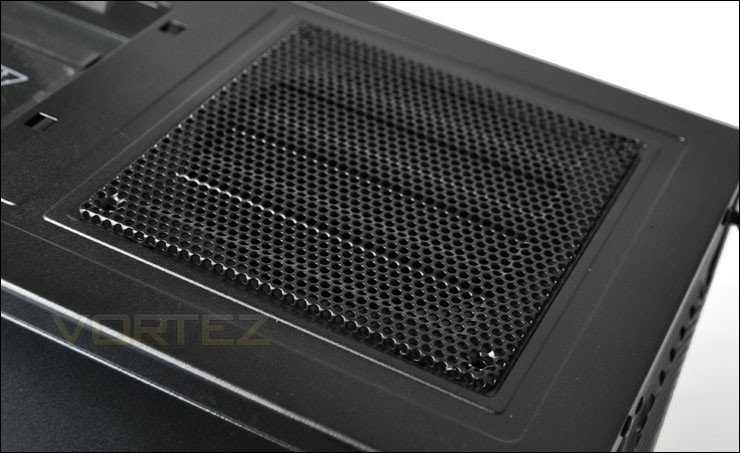
Underneath magnetic cover is a mesh panel for top mounted fan
Usually I wouldn’t show the underside of a case within a case review but since the H2 has something quite different underneath I wanted to show this. We have a series of rubber mounts to prevent sliding and in the middle a large section of filter material for the PSU and if you choose to mount a fan at the bottom of H2 (on the inside).
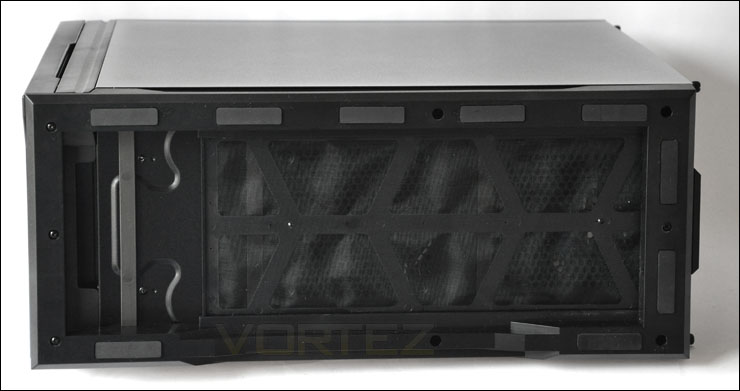
The underside of H2 with large fan filter area
Interior
Removing the side panels reveals noise dampening foam in the inside of each panel. The initial idea of this appears to be good, reducing noise from the system is always a positive thing, and this is only the 2nd case I have come across that has this noise dampening foam. A little later I will be reporting back on how well this foam reduces noise levels.
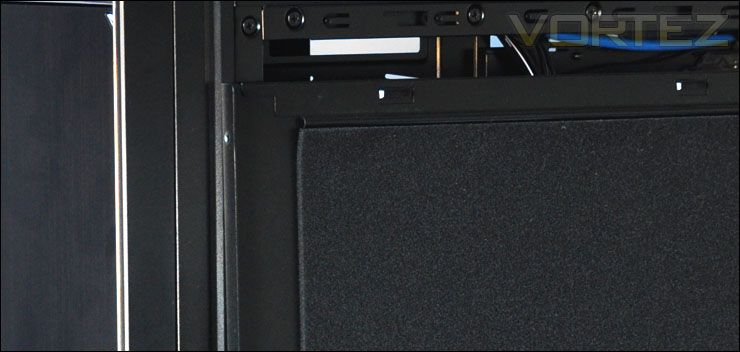
Foam on the inside of each door for noise reduction
With the side panels off we can now take a look at the inside of H2. Initial impressions are good, the inside is spacious, has a large CPU backplate cut-out and has plenty of cut-outs on the motherboard tray for cable management including 3 that have rubber surrounds. There are also up to 8 x 3.5″ drive bays for massive storage capacity. The quality of the construction is very good, nothing is flimsy. Everything is solid and feels great.
Around the other side (behind the motherboard tray) there are lots of options for cable management. Notice the USB3.0 has been pre-routed across the top of the case and out through the rubber grommet at the bottom. Most case manufacturers expect you to route this over the motherboard. NZXT are one step ahead. The distance between the motherboard tray and side panel here is what is most significant. Later on I will measure this clearance.
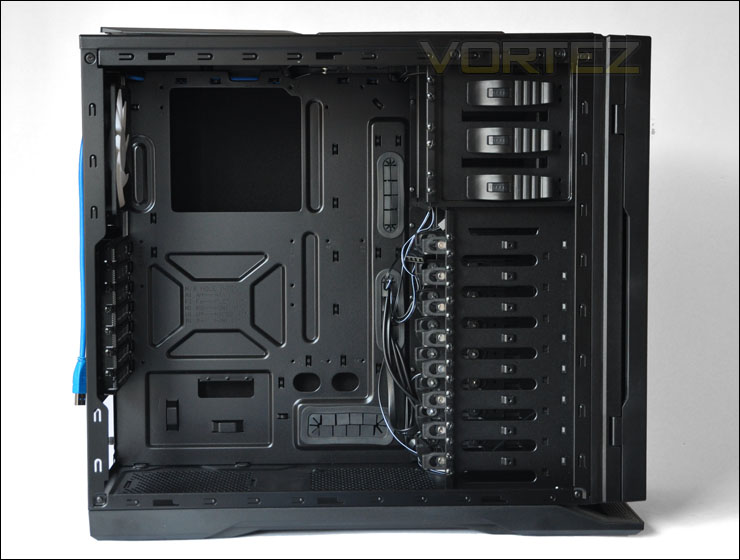
Side panel off, very roomy – tool-less throughout
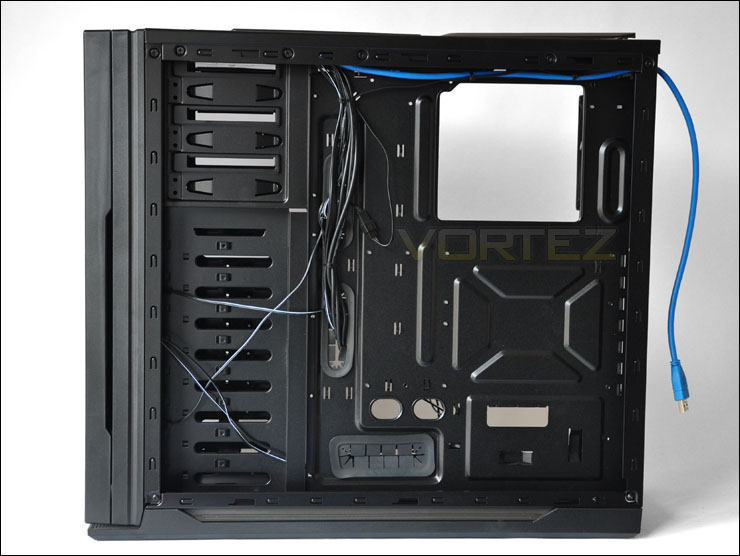
Cable management behind the motherboard tray should be easy
Installing HDD devices is really easy in the H2, the 2 x 120mm fans at the front simply unclip. These 2 fans have filters and are controlled by the switch on the front panel. They can be set to 40% 70% and 100% speeds. You will notice there are no cables running from the fans themselves, this is because they are hot-swappable. I really like the concept of this – that you can remove the fans so quickly and easily.
Behind these fans is the HDD rack containing frames to fit the HDD inside. These frames allow 3.5″ and 2.5″ drives to be attached.
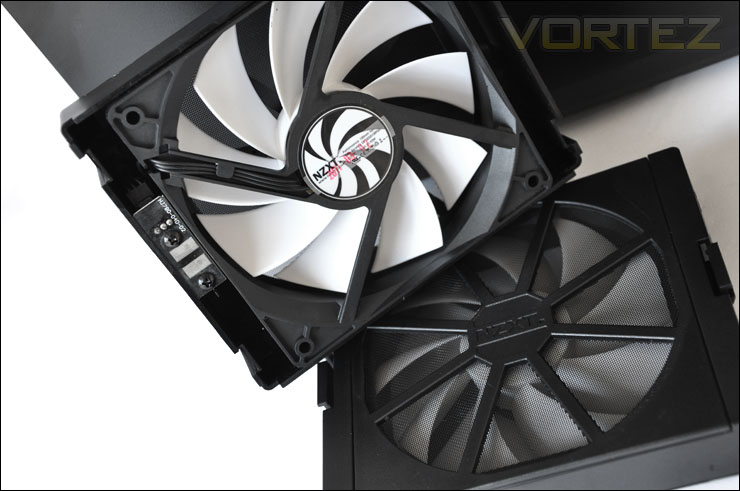
120mm front fans unclip very easily
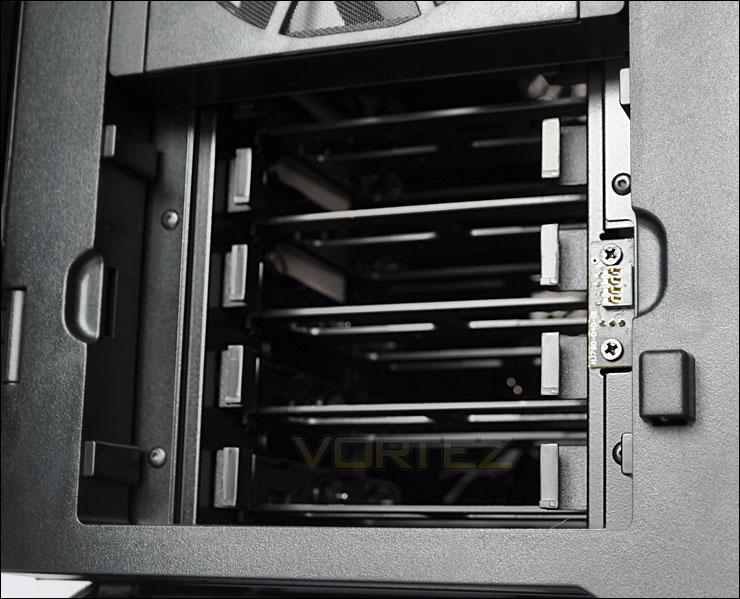
Removing fans reveals HDD storage rack/frames
Interior (Continued)
Moving in for a closer look we will start at the bottom of the case. There is space at the bottom of the H2 for mounting a PSU. 4 x rubber mounts prevent surface scratching and encourage anti-vibration whilst next to this there is a 120mm space for mounting a fan.
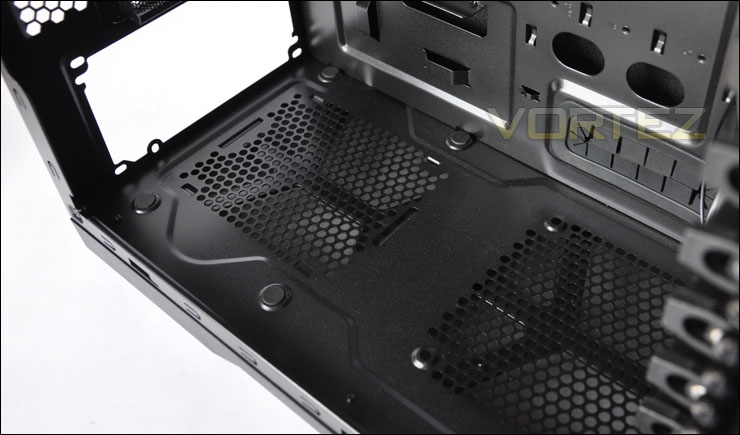
Space for bottom mounted PSU and 120mm fan
Although the H2 is a mid-tower we have 7 x expansion slot covers that have perforated mesh for better airflow. Each expansion slot cover has a thumbscrew to secure the cover/card in place.
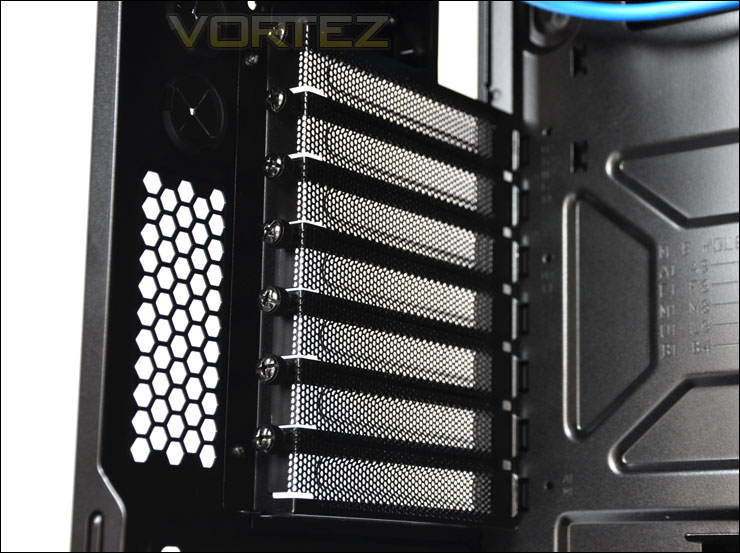
7 x Expansion slot covers with thumbscrews
At the rear we have a 120mm exhaust fan. This is also configured for fan control at the front panel so we can set this at 40%, 70% or 100% fan speed. On the underside of the top there is a space and mounting holes for a 120mm fan.
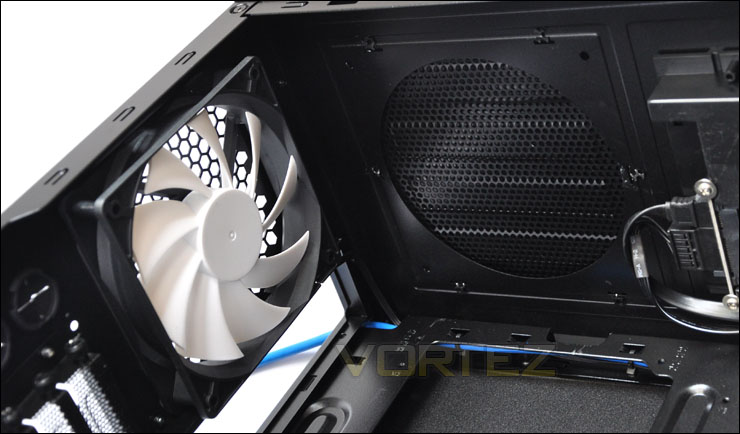
120mm rear exhaust fan
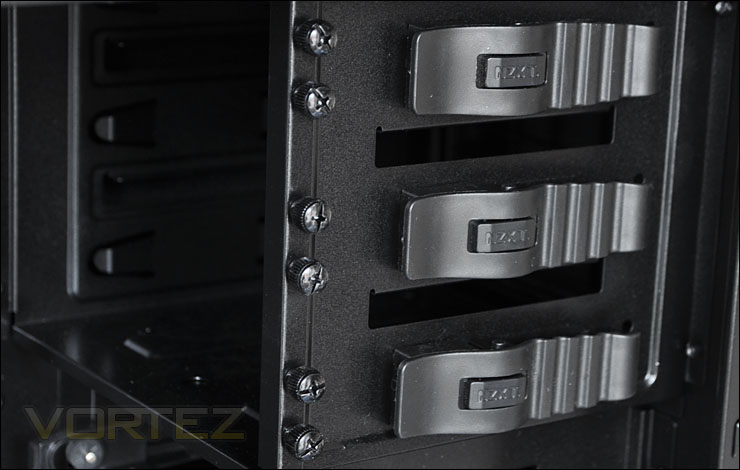
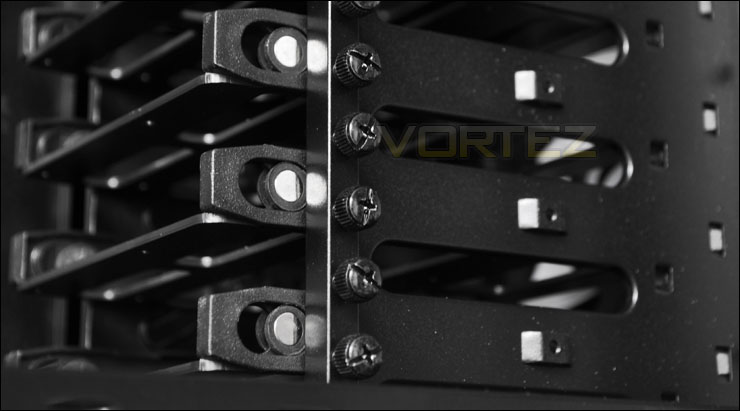
Moving over to the optical bay there are 3 x 5.25″ optical drive bays each with tool-less mechanisms attached. The level simply unclips and clips in to secure the drive.
Beneath the optical drive bays we have 8 x HDD bays each with an attached frame for mounting 3.5″ or 2.5″ drives. You will notice thumbscrews on both the HDD and optical drive rack. These are for spares and are not required to secure the drives in place. It’s always handy to have spare thumbscrews, and they are in such a position that make it very convenient to be able to use.
Space for bottom mounted PSU and 120mm fan
Space for bottom mounted PSU and 120mm fan
Installation
Getting components into the NZXT H2 is very easy. Thanks to the tool-less mechanisms and space above and behind the motherboard tray, cables can be arranged neatly – thus allowing you to get the most out of airflow within the case.
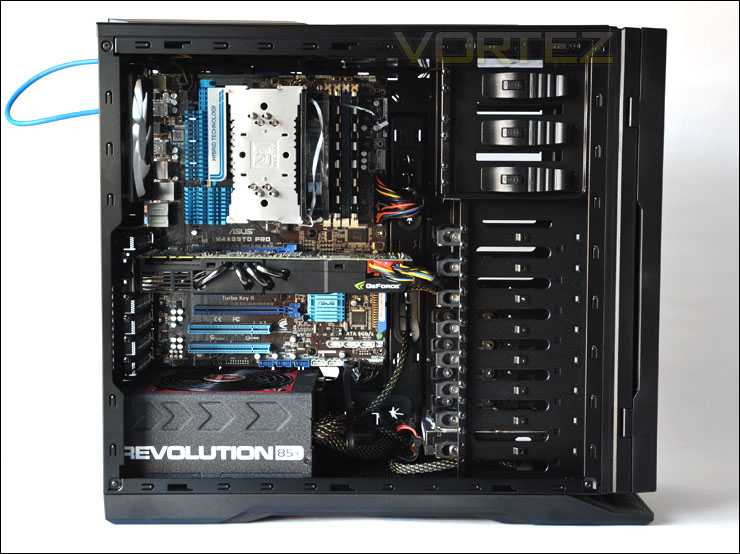
All components fitted within H2
Included with NZXT H2 is an interesting accessories kit. We have an instructions manual, quick start guide and each of the screws/fitments have been carefully separated in different bags so that you can get up and running in no time at all. Attention to smaller details like this is what we like.
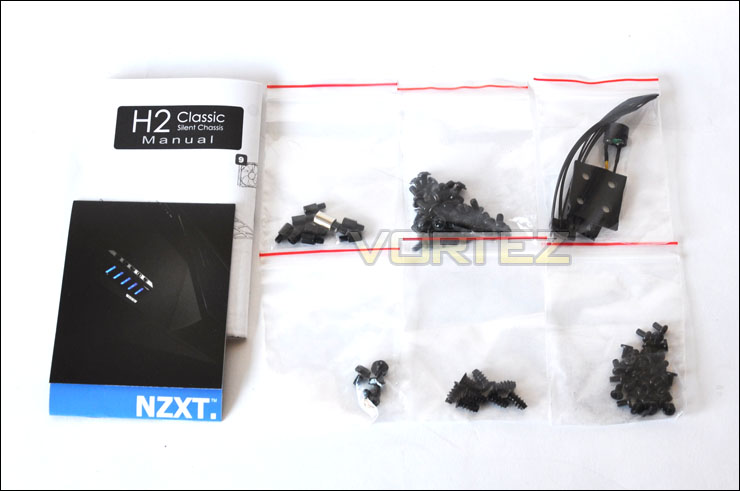
The accessories bundle
Graphics card clearance isn’t fantastic compared to some of the other cases we have tested at Vortez. The NVIDIA GTX 480 pictured below is 10.5″ in length and is almost touching the HDD rack. I tried to install an AMD HD6990 inside the H2 but sadly, being 12″ in length it wasn’t possible.
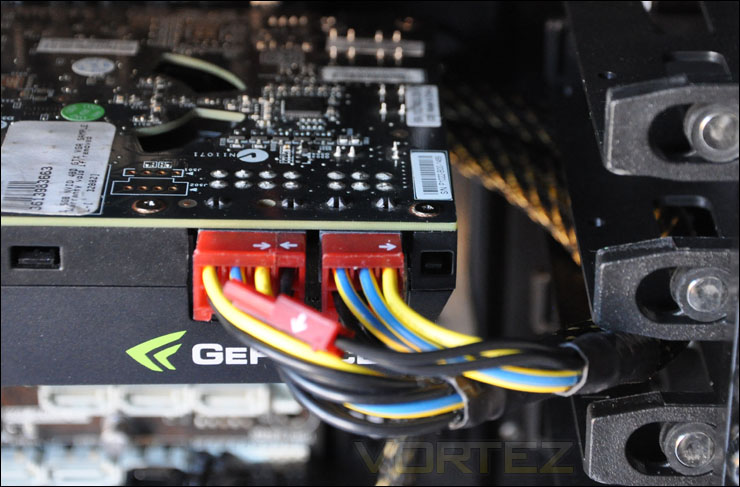
Graphics card clearance is tight for anything around 10.5″ in length
It’s the same story over on the CPU cooler clearance side of things too. The Noctua NH-U12P pictured is 158mm in height and is almost outside of the case. There is just a few mm there in clearance. NZXT state that there is 170mm for CPU cooler clearance.
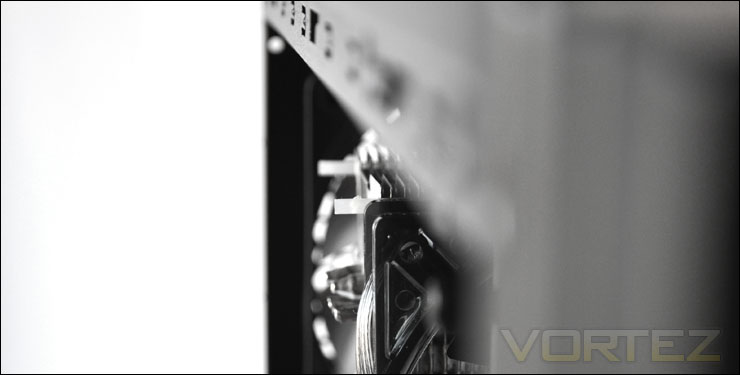
CPU cooler clearance is also tight – absolute maximum 170mm
Looking behind the motherboard tray we have lots of space. What I love about H2 is that it has so many options for cabling and it also has the space. The EATX P4 can easily run behind the motherboard tray and appear up at the top rather than having to run across the front of the motherboard. The CPU cooler backplate is very accommodating as you can see below and in general, thick cables like the 24-pin ATX can fit behind the motherboard tray so easily due to there being 2cm of clearance behind the motherboard tray. In this region, this is one of the most spacious cases I have yet come across. You can see from the images that there are masses of cable running behind and yet the H2 is very forgiving.
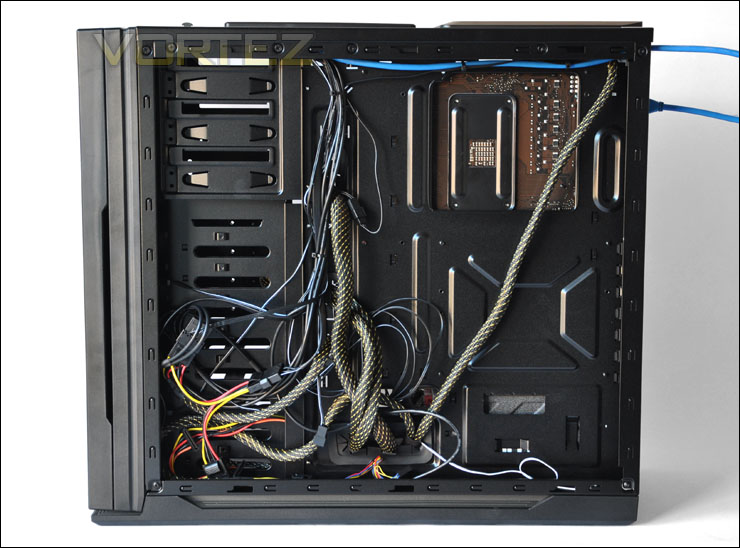
Behind the motherboard tray lots of space for cramming cables
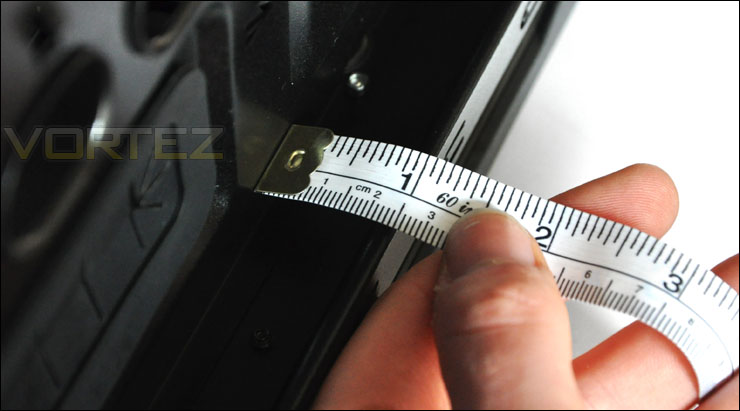
2cm of clearance behind the motherboard tray
Thermal Performance
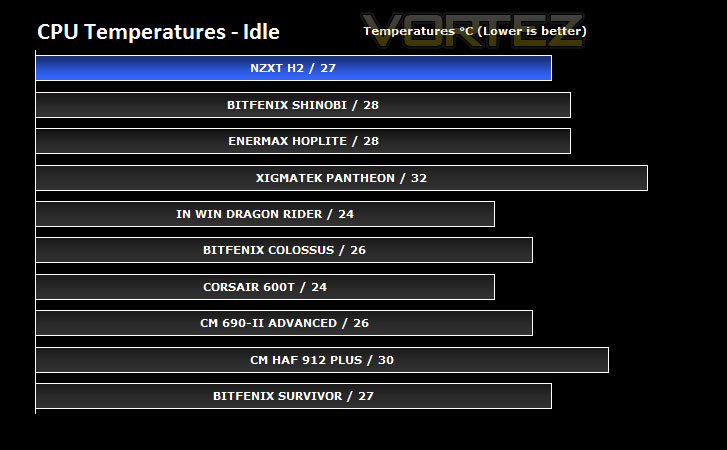
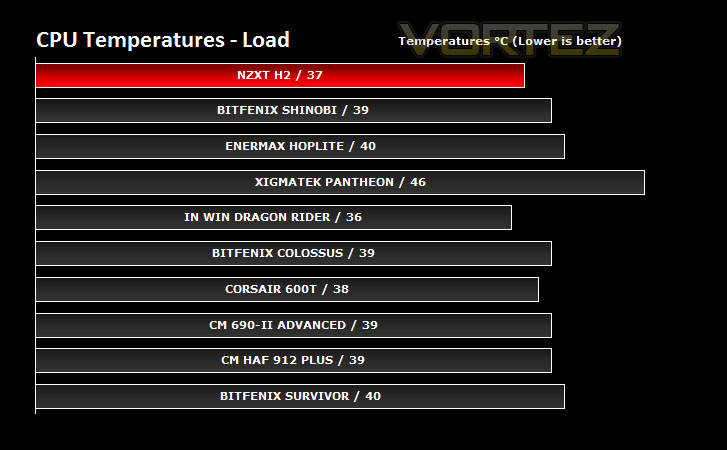
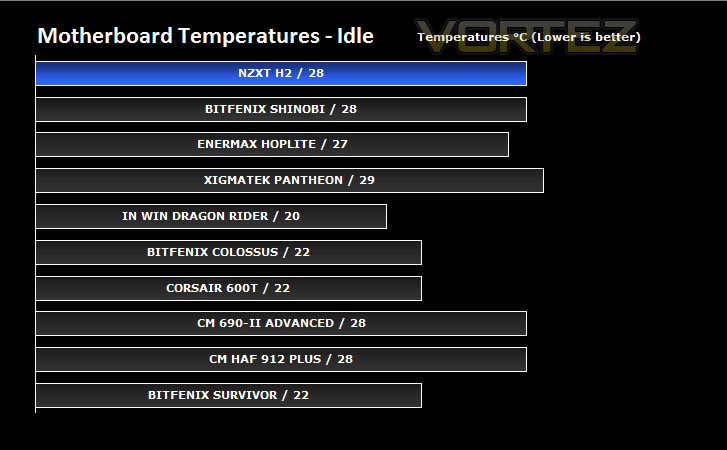
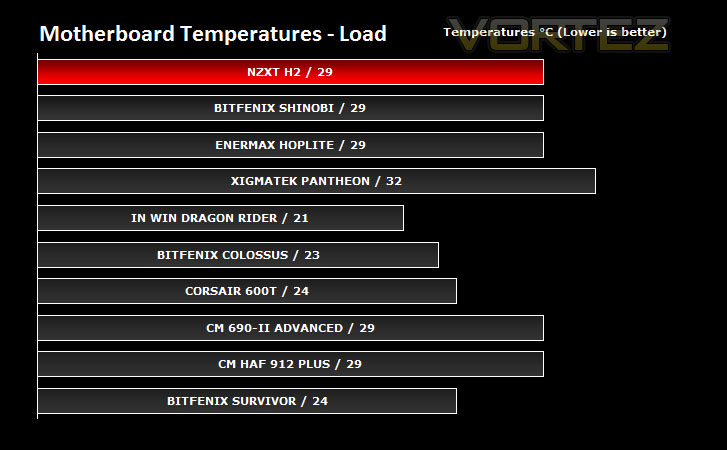
The NZXT H2 has 3 pre-installed 120mm fans. These fans can be controlled via the front panel switch to either operate at 40%, 70% or 100%. Combining this with the foam noise dampening on the side and front panels and we have an interesting enclosure in terms of thermal performance and noise interference. It will be interesting to see H2 against the range of other cases we have tested at Vortez.
To discover the thermal performance of the H2 I will record idle temperatures after 20 minutes from a cold boot. I will then stress the system and temperatures will again be monitored after 30 minutes have elapsed. All fans will be set on mid range (70%).
System Components
CPU AMD Phenom II X6 1055T 2.8GHz
Motherboard ASUS M4A89TD PRO
Graphics ZOTAC NVIDIA GTX 480
Memory 4GB Mushkin EM3-10666 DDR3
HDD Samsung Spinpoint 500GB SATA-II
PSU Enermax Revolution 85+ 850W
The NZXT performs well in the thermal tests against competition. It appears as one of the strongest in its category. In terms of noise level, the mid-range point on the fan controller causes 70% fan speed which is noticeable but thanks to noise dampening on the front and side panels this noise is reduced somewhat. 40% is whisper quiet and almost unnoticeable whilst 100% is noticeable but not dramatically interfering.
Conclusion
What can you expect from NZXT’s H2? Well, the H2 is from the ‘Classic’ series and is named the ‘Silent Midtower” because of its approach to noise dampening and the ability to switch between 3 different fan speeds on-the-fly via the front panel. In these times when the market is very much geared towards gamers, the enthusiast that favours elegance over flamboyance is often left out but the H2 caters for the enthusiast.
The H2 is tool-less throughout, so getting your kit into the case is very easy, and thanks to the massive space behind the motherboard tray, cable management is one of its highlights – the interior can be kept clean and tidy.
Build quality is great, everything is solid and fits well within the H2. Thermal performance is also pleasing and of course the noise insulation foam did a great job at reducing sound levels. Fan speeds on 100% were noticeable but without the thick panels and foam it would have been much more disturbing.
With an MSRP of £84.99 inc. VAT the consumer should see the H2 appear in stores a little cheaper making it appear in the higher priced bracket for a mid-tower case. The H2 differs from other mid-towers such as the popular HAF 912 Plus and 690-II from Cooler Master by providing completely different styling, noise dampening and fan control. Personally I think its well worth the money.
The only slight niggle I could find with the H2 was with the HDD frames inside the HDD cage. When attaching a drive into the frame, the pins sometimes have trouble fitting inside the HDD mounting holes and need tapping in slightly otherwise they will not slide into the HDD rack. Personally I don’t mind this because its a super tight fit, nothing is loose – but I know for some, having to do this would be deemed as perhaps negative.
The bottom line is: NZXT H2 breaks away from current trends by offering something much sleeker in an excellent foam underlayed chassis with fan control and USB3.0 functionality. Not forgetting that the H2 is tool-less throughout and has bags of space behind the motherboard tray making it one of the easiest cases to get your components into.
Pros
+ Professional looks
+ Available in black or white
+ Noise reduction via foam dampening
+ 3 speed fan control
+ Lots of space behind the motherboard tray
+ Great thermal performance
Cons
– HDD frame pins sometimes need tapping in
– Cannot support graphics cards 11″+
+ Professional looks
+ Available in black or white
+ Noise reduction via foam dampening
+ 3 speed fan control
+ Lots of space behind the motherboard tray
+ Great thermal performance
Cons
– HDD frame pins sometimes need tapping in
– Cannot support graphics cards 11″+